


SimpleAdapter是一个简单的适配器,主要作用就是用户自定义一个MXL文件来存储数据,然后将这些数据放在List中的Map集合里,AarryList里可以存在多个map,而每个map自成一行。
在android中有一个组件为AdapterView,其作用是显示一些“列表项”而要显示这些“列表项”就要用到Adapter来提供组件,Adapter是一个接口,它派生了两个子接口分别为ListAdapter和SpinerAdapter,其中ListAdapter为ListView提供“列表项”,而在Adapter接口有三个常用的实现类,AarryAdapter、SimpleAdapter和SimpleCursorAdapter,其中的SimpleAdapter就是今天要说的实现继承于AdapterView的一个类ListView的实现类。
simpleAdpter得一个常用的构造方法是:
 public SimpleAdpter(Context context, List<? extends Map<String, ?>> data, int resource, String[] from, int[] to) {
 }
*这里的参数解释一下**
cantext:关联simpleAdpter运行着的视图的上下文。如果在一个ViewList中用到SimpleAdpter适配器,那么这里的Content对象就可以设置为this,this代表适配器中的数据与其所在的类联系起来。
data:指一个Map列表,一个map对应其中一行,然后形成一个list,其包含在from中的所有元素。
resource:一个用户自定义的布局文件资源标识,其应包含to中的所有定义的id。
from:用于存储与要显示在列表上的值相对应的键名称的String数组。
to;存放显示在列表上面的内容的int数组。
============================================================================
下面通过一个实例来看SimpleAdpter的使用方法
创建一个Activivty,在这个界面上显示一个列表,列表上显示一些信息,所以这里要用到ListView控件。 (对于ListView控件作一简单介绍,LIistView是一个可以将项目组成一个带或不带标头的列,并显示伴随的图标或文本的控件。)
(1)首先设置一个布局,打开res
<LinearLayout xmlns:android="http://schemas.android.com/apk/res/android"
    android:layout_width="fill_parent"
    android:layout_height="fill_parent"
    android:orientation="vertical">
    <LinearLayout
        android:id="@+id/ListLinearLayout"
        android:layout_width="fill_parent"
        android:layout_height="wrap_content"
        android:orientation="vertical"
        >
        <!-- 添加一个ListView -->
        <ListView
            android:id="@id/android:list"
            android:layout_width="match_parent"
            android:layout_height="wrap_content"
            android:drawSelectorOnTop="false"
            android:scrollbars="vertical"  />
    </LinearLayout>
</LinearLayout>
对于布局管理器中的一些元素的属性就不再一一介绍了,其中ListView中的android:scrollbars=”vertical”属性指的是若列表内容过多,自动形成一个垂直方向的滚动条。
(2)然后自定义一个mxl文件提供在列表中显示的资源属性,代码中自建的文件名为User.mxl,在这里用两个TextView控件来显示这些信息。
<?xml version="1.0" encoding="utf-8"?>
<LinearLayout xmlns:android="http://schemas.android.com/apk/res/android"
    android:layout_width="fill_parent"
    android:layout_height="fill_parent"
    android:orientation="horizontal"
    android:paddingLeft="10dip"
    android:paddingRight="10dip"
    android:paddingTop="1dip"
    android:paddingBottom="1dip">
    <TextView
        android:id="@+id/user_name"
        android:layout_width="180dip"
        android:layout_height="30dip"
        android:textSize="10pt"
        android:singleLine="true"/>
    <TextView
        android:id="@+id/user_id"
        android:layout_width="fill_parent"
        android:layout_height="fill_parent"
        android:gravity="right"
        android:textSize="10pt"/>
</LinearLayout>
这些布局布局管理设置好后,接下来就是用java代码来实现,在此创建一个LIstTestActivity类继承LIstActivity,然后将该类的XML布局添加进去,通过AaryyList中的Map来存储键值对,最后通过SimpleAdpter适配器将定义的布局与该类联系在一起,把信息显示在main.mxl中的ListView上。
package com.example.listtestactivity;

import java.util.ArrayList;
import java.util.HashMap;
import android.app.ListActivity;
import android.os.Bundle;
import android.view.View;
import android.widget.ListView;
import android.widget.SimpleAdapter;

public class ListTestActivity extends ListActivity {

    protected void onCreate(Bundle savedInstanceState) {
        super.onCreate(savedInstanceState);
        setContentView(R.layout.main);

        //创建一个Arraylist对象,用HashMap来存储键值对
        ArrayList<HashMap<String,String>> list=new ArrayList<HashMap<String,String>>();
        //创建三个HashMap对象
        HashMap<String,String> map1=new HashMap<String,String>();
        HashMap<String,String> map2=new HashMap<String,String>();
        HashMap<String,String> map3=new HashMap<String,String>();
        //给三个map赋予键值对
        map1.put("user_name","zhangsan");
        map1.put("user_id","123");
        map2.put("user_name","李四");
        map2.put("user_id","456");
        map3.put("user_name","王五");
        map3.put("user_id","789");
        list.add(map1);
        list.add(map3);
        list.add(map2);
        //设置适配器
        SimpleAdapter listAdapter=new SimpleAdapter(this,list,R.layout.user,new String[]{"user_name","user_id"},new int[]{R.id.user_name,R.id.user_id});
        setListAdapter(listAdapter);

    }
        protected void onListItemClick(ListView l,View v,int position,int id){
            super.onListItemClick(l,v,position,id);
            System.out.println("id="+id);
            System.out.println("name="+position);
        }

}
当然在使用SimpleAdapter还可以添加ImageView组件,在自定义mxl文件中添加ImageView属性,
 <ImageView
        android:id="@+id/tupian"
        android:layout_width="wrap_content"
        android:layout_height="wrap_content"
        android:paddingLeft="10dp"
        />`
并且还要在代码中给出放在drawable文件夹中的图片资源。
当然还可以为各列表组件设置监听器来实现其他功能,使用AdapterView中的setOnItemClickListener()方法和setOnItemSelectedListener()方法来绑定监听事件,例如使用前者:
new AdapterView.OnItemClickListener().setOnItemClickListener(new OnItemClickListener()
{
@override
public void onItemClickListener(AdapterView<?> parent, View view, int position, long id)
{
System.out.println("*******");
}
});解释一下这四个参数:
1、parent相当于ListView适配器中的一个指针,可以用它来获取存在于ListView中的信息
2、view指点击某一个item后获得其内控件的id,然后对该控件进行操作。
3、position指点击的item在适配器中的位置。
4、id指在ListView中的第几行(在没有HeadView、用户添加View和FootView的情况下,position和id是相同的)
结果如下:
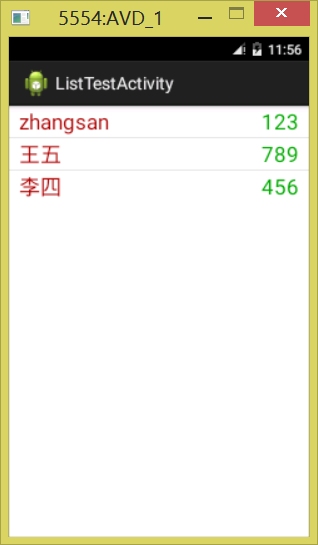


 789
789

 被折叠的 条评论
为什么被折叠?
被折叠的 条评论
为什么被折叠?
 到【灌水乐园】发言


