


我们直接接着上一部分直接讲Dispatvher方法的的init方法(Servlet的init方法)
@Override
public final void init() throws ServletException {
     ...........
   // Set bean properties from init parameters.
   PropertyValues pvs = new ServletConfigPropertyValues(getServletConfig(), this.requiredProperties);
   if (!pvs.isEmpty()) {
      try {
         BeanWrapper bw = PropertyAccessorFactory.forBeanPropertyAccess(this);
         ResourceLoader resourceLoader = new ServletContextResourceLoader(getServletContext());
         bw.registerCustomEditor(Resource.class, new ResourceEditor(resourceLoader, getEnvironment()));
         initBeanWrapper(bw);
         bw.setPropertyValues(pvs, true);
      }
      catch (BeansException ex) {
        ...........
   }

   // Let subclasses do whatever initialization they like.
   initServletBean();
      .........
}
首先是ServletConfigPropertyValues(getServletConfig(), this.requiredProperties),ServletConfigPropertyValues的初始化,其入参有两个。
private static class ServletConfigPropertyValues extends MutablePropertyValues {
    public ServletConfigPropertyValues(ServletConfig config, Set<String> requiredProperties) throws ServletException {
        Set<String> missingProps = requiredProperties != null && !requiredProperties.isEmpty() ? new HashSet(requiredProperties) : null;
        Enumeration en = config.getInitParameterNames();

        while(en.hasMoreElements()) {
            String property = (String)en.nextElement();
            Object value = config.getInitParameter(property);
            this.addPropertyValue(new PropertyValue(property, value));
            if (missingProps != null) {
                missingProps.remove(property);
            }
        }
         ............
    }
}
一个是实现ServletConfig接口,其实现类是StandardWrapperFacade:
public interface ServletConfig {

    public String getServletName();

    public ServletContext getServletContext();

    public String getInitParameter(String name);

    public Enumeration<String> getInitParameterNames();
}
public final class StandardWrapperFacade
    implements ServletConfig {
    public StandardWrapperFacade(StandardWrapper config) {
        super();
        this.config = config;
    }
    /**
     * Wrapped config.
     */
    private final ServletConfig config;
    /**
     * Wrapped context (facade).
     */
    private ServletContext context = null;
    @Override
    public String getServletName() {
        return config.getServletName();
    }
    @Override
    public ServletContext getServletContext() {
        if (context == null) {
            context = config.getServletContext();
            if (context instanceof ApplicationContext) {
                context = ((ApplicationContext) context).getFacade();
            }
        }
        return (context);
    }
    @Override
    public String getInitParameter(String name) {
        return config.getInitParameter(name);
    }
    @Override
    public Enumeration<String> getInitParameterNames() {
        return config.getInitParameterNames();
    }
}
StandardWrapperFacade类中的config就是一个StandardWrapper(描叙servlet的内容)然后这里又会有另一个类ServletContext,这里的ServletContext、StandardWrapperFacade、ServletConfig都是与tomcat相关的类,ServletContext就是描叙一个Servlet项目,简单来说就是一个Web.xml配置文件所对应的项目(可以知道web.xml配置的内容)。而ServletConfig,通过前面的getServletConfig方法,其是Servlet的成员变量,其有在web.xml中配置的对应的Serlvet的内容。我们通过web.xml的内容来看下这两个接口:
................
<context-param>
    <param-name>paramServlet</param-name>
    <param-value>servlet_config_test</param-value>
</context-param>

<servlet>
    <servlet-name>dispatcherServlet</servlet-name>
    <servlet-class>org.springframework.web.servlet.DispatcherServlet</servlet-class>
    <init-param>
        <param-name>contextConfigLocation</param-name>
        <param-value>classpath*:application_springMVC.xml</param-value>
    </init-param>
</servlet>
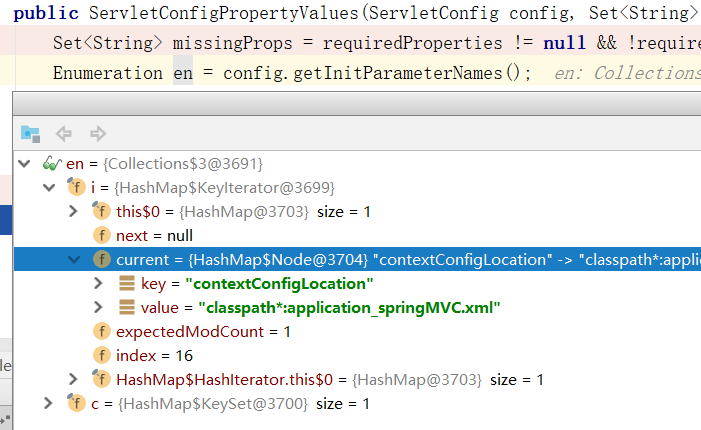
这里主要关注<context-param>与<init-param>。然后我们debug:


所以这里我们可以通过一个Servlet获取到ServletConfig(StandardWrapperFacade),由此可以获取我们配置在web.xml中init写的内容,并且会根据<param-name>的可以找到其在对应Serlvet中的属性,然后将<param-value>的value设置到实现Servlet接口的类中。并且我们可以再通过这个StandardWrapperFacade的getContext方法能够获取到对应的ServletContext,然后根据ServletContext可以获取web.xml 中<context-param>的值。
例如前面配置<param-name>contextConfigLocation</param-name>,这个contextConfigLocation在DispatcherServet的父类FrameworkServlet中就有这个属性。
public abstract class FrameworkServlet extends HttpServletBean implements ApplicationContextAware {
        ..............
   @Nullable
   private String contextConfigLocation;
       ....................
}
然后我们再回到前面的ServletConfigPropertyValues类的初始化:
private static class ServletConfigPropertyValues extends MutablePropertyValues {
    public ServletConfigPropertyValues(ServletConfig config, Set<String> requiredProperties) throws ServletException {
        Set<String> missingProps = requiredProperties != null && !requiredProperties.isEmpty() ? new HashSet(requiredProperties) : null;
        Enumeration en = config.getInitParameterNames();

        while(en.hasMoreElements()) {
            String property = (String)en.nextElement();
            Object value = config.getInitParameter(property);
            this.addPropertyValue(new PropertyValue(property, value));
            if (missingProps != null) {
                missingProps.remove(property);
            }
        }
          if (missingProps != null && missingProps.size() > 0) {
    throw new ServletException("Initialization from ServletConfig for servlet .........);
        }
    }
}
这里就是将initParam初始听取到ServletConfigPropertyValues中,然后这里还有一个入参requiredProperties,其就是用来指明不要初参数的,如果有些没有到下面的missingProps.size() > 0,就会报异常了。
现在提取构成ServletConfigPropertyValues后我们再回到前面的init方法:
PropertyValues pvs = new HttpServletBean.ServletConfigPropertyValues(this.getServletConfig(), this.requiredProperties);
BeanWrapper bw = PropertyAccessorFactory.forBeanPropertyAccess(this);
ResourceLoader resourceLoader = new ServletContextResourceLoader(this.getServletContext());
bw.registerCustomEditor(Resource.class, new ResourceEditor(resourceLoader, this.getEnvironment()));
this.initBeanWrapper(bw);
bw.setPropertyValues(pvs, true);
现在看PropertyAccessorFactory.forBeanPropertyAccess(this),注意这里在产生BeanWrapper的时候是传的this(当前的DispatcherServlet,在前面有提到其子类FrameworkServlet,其有属性contextConfigLocation),然后这里有注册一个PropertyEditor(ResourceEditor),这个前面在类型转换的时候也有讲过,同时这里的this.initBeanWrapper(bw);是一个空方法,没有具体实现(所以其实你是可以自己去自定义自己的DispatcherServlet,可以直接通过继承SpringMVC的DispatcherServlet类,同时你也可以将前面讲到requiredProperties去设置,进行参数必要性校验)。然后就是调用的setPropertyValues(这个前面讲Spring源码的时候也有讲过)方法,简单来讲就是将pvs中的属性描叙及其对应的值去设置BeanWrapper中instance所代表的具体对象对象。通过一张图片应该就能明白:
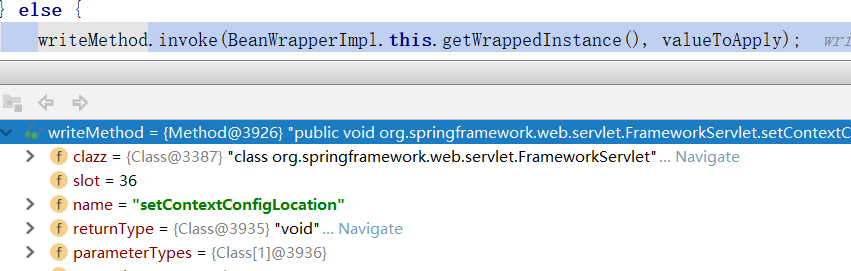
就是调用FrameworkServlet(DispatcherServlet)的setContextConfigLocation方法设置对象的值,前面PropertyAccessorFactory.forBeanPropertyAccess(this),初始化BeanWrapper 时,这里传的this,就赋值给了wrappedObject
public final Object getWrappedInstance() {
    return this.wrappedObject;
}
这里讲完了,我们再回到init方法最后调用到的一个方法this.initServletBean():
protected final void initServletBean() throws ServletException {
     ..............
    try {
        this.webApplicationContext = this.initWebApplicationContext();
        this.initFrameworkServlet();
    } catch (ServletException var5) {
         ...........
    }
        ..........
}
这里我们就可以看到现在就是去进行WebApplicationContext容器的初始化了,先是this.initWebApplicationContext()方法
protected WebApplicationContext initWebApplicationContext() {
    WebApplicationContext rootContext =     WebApplicationContextUtils.getWebApplicationContext(this.getServletContext());
    WebApplicationContext wac = null;
    if (this.webApplicationContext != null) {
        wac = this.webApplicationContext;
        if (wac instanceof ConfigurableWebApplicationContext) {
            ConfigurableWebApplicationContext cwac = (ConfigurableWebApplicationContext)wac;
            if (!cwac.isActive()) {
                if (cwac.getParent() == null) {
                    cwac.setParent(rootContext);
                }
                this.configureAndRefreshWebApplicationContext(cwac);
            }
        }
    }
    if (wac == null) {
        wac = this.findWebApplicationContext();
    }
    if (wac == null) {
        wac = this.createWebApplicationContext(rootContext);
    }
    if (!this.refreshEventReceived) {
        this.onRefresh(wac);
    }
    if (this.publishContext) {
        String attrName = this.getServletContextAttributeName();
        this.getServletContext().setAttribute(attrName, wac);
         .............
    }
    return wac;
}
这里可以看到先是调用WebApplicationContextUtils.getWebApplicationContext(this.getServletContext())方法,从ServletContext(Context级别的容器,描叙一个web项目)中获取:


记住这个attrName,这里既然会获取,后面可能就会有set方法。
然后就是this.webApplicationContext判断,这个webApplicationContext是当前的FrameworkServlet的成员变量,所以也是没有的,然后是findWebApplicationContext方法:
protected WebApplicationContext findWebApplicationContext() {
    String attrName = this.getContextAttribute();
    if (attrName == null) {
        return null;
    } else {
        WebApplicationContext wac = WebApplicationContextUtils.getWebApplicationContext(this.getServletContext(), attrName);
        if (wac == null) {
            throw new IllegalStateException("No WebApplicationContext found: initializer not registered?");
        } else {
            return wac;
        }
    }
}
这里也是从FrameworkServlet成员变量private String contextAttribute,获取也是没有,所以这里我觉得应该是给自定义DispatcherServlet来设置的,这里也没有,返回。调用this.createWebApplicationContext(rootContext)方法
protected WebApplicationContext createWebApplicationContext(ApplicationContext parent) {
    Class<?> contextClass = this.getContextClass();
      ...........
        ConfigurableWebApplicationContext wac = (ConfigurableWebApplicationContext)BeanUtils.instantiateClass(contextClass);
        wac.setEnvironment(this.getEnvironment());
        wac.setParent(parent);
        wac.setConfigLocation(this.getContextConfigLocation());
        this.configureAndRefreshWebApplicationContext(wac);
        return wac;
    ......
}
这里的contextClass是在初始化的时候用到默认值:

instantiate后设置Environment:
public ConfigurableEnvironment getEnvironment() {
    if (this.environment == null) {
        this.environment = this.createEnvironment();
    }
    return this.environment;
}
protected ConfigurableEnvironment createEnvironment() {
    return new StandardServletEnvironment();
}
public AbstractEnvironment() {
   customizePropertySources(this.propertySources);
}
public class StandardServletEnvironment extends StandardEnvironment implements ConfigurableWebEnvironment {          public static final String SERVLET_CONTEXT_PROPERTY_SOURCE_NAME = "servletContextInitParams";
   public static final String SERVLET_CONFIG_PROPERTY_SOURCE_NAME = "servletConfigInitParams";
   @Override
   protected void customizePropertySources(MutablePropertySources propertySources) {
      propertySources.addLast(new StubPropertySource(SERVLET_CONFIG_PROPERTY_SOURCE_NAME));
       propertySources.addLast(new StubPropertySource(SERVLET_CONTEXT_PROPERTY_SOURCE_NAME));
       if (JndiLocatorDelegate.isDefaultJndiEnvironmentAvailable()) {
          propertySources.addLast(new JndiPropertySource(JNDI_PROPERTY_SOURCE_NAME));
      }
      super.customizePropertySources(propertySources);
   }
     ............
}
public StubPropertySource(String name) {
   super(name, new Object());
}
注意这里测试化的servletContextInitParams、servletConfigInitParams,后面还有对应的操作。再设置父容器wac.setParent(parent),当前为空,将前面的contextConfigLocation设置,然后调用this.configureAndRefreshWebApplicationContext(wac)方法。
protected void configureAndRefreshWebApplicationContext(ConfigurableWebApplicationContext wac) {
         ..............
            wac.setId(ConfigurableWebApplicationContext.APPLICATION_CONTEXT_ID_PREFIX + ObjectUtils.getDisplayString(this.getServletContext().getContextPath()) + "/" + this.getServletName());
    }
    wac.setServletContext(this.getServletContext());
    wac.setServletConfig(this.getServletConfig());
    wac.setNamespace(this.getNamespace());
    wac.addApplicationListener(new SourceFilteringListener(wac, new FrameworkServlet.ContextRefreshListener(null)));
    ConfigurableEnvironment env = wac.getEnvironment();
    if (env instanceof ConfigurableWebEnvironment) {
        ((ConfigurableWebEnvironment)env).initPropertySources(this.getServletContext(), this.getServletConfig());
    }
    this.postProcessWebApplicationContext(wac);
    this.applyInitializers(wac);
    wac.refresh();
}
先是设置容器的id,将ServletContext,ServletConfig设置到容器中,再设置nameSpace

然后添加一个ListenerSourceFilteringListener:
private class ContextRefreshListener implements ApplicationListener<ContextRefreshedEvent> {
    private ContextRefreshListener() {
    }

    public void onApplicationEvent(ContextRefreshedEvent event) {
        FrameworkServlet.this.onApplicationEvent(event);
    }
}
其关注的事件是ContextRefreshedEvent,同时我们看下FrameworkServlet.this.onApplicationEvent方法:
public void onApplicationEvent(ContextRefreshedEvent event) {
    this.refreshEventReceived = true;
    this.onRefresh(event.getApplicationContext());
}
protected void onRefresh(ApplicationContext context) {
    this.initStrategies(context);
}

protected void initStrategies(ApplicationContext context) {
    this.initMultipartResolver(context);
    this.initLocaleResolver(context);
    this.initThemeResolver(context);
    this.initHandlerMappings(context);
    this.initHandlerAdapters(context);
    this.initHandlerExceptionResolvers(context);
    this.initRequestToViewNameTranslator(context);
    this.initViewResolvers(context);
    this.initFlashMapManager(context);
}
可以看到其是进行ApplicationContext主键的init,这个具体到时候进行事件发布的时候在具体分析。
再回到前面的configureAndRefreshWebApplicationContext方法,现在调用initPropertySources方法:
public static void initServletPropertySources(MutablePropertySources propertySources, ServletContext servletContext, ServletConfig servletConfig) {
    Assert.notNull(propertySources, "propertySources must not be null");
    if (servletContext != null && propertySources.contains("servletContextInitParams") && propertySources.get("servletContextInitParams") instanceof StubPropertySource) {
        propertySources.replace("servletContextInitParams", new ServletContextPropertySource("servletContextInitParams", servletContext));
    }
    if (servletConfig != null && propertySources.contains("servletConfigInitParams") && propertySources.get("servletConfigInitParams") instanceof StubPropertySource) {
        propertySources.replace("servletConfigInitParams", new ServletConfigPropertySource("servletConfigInitParams", servletConfig));
    }
}
这两个servletContextInitParams、servletConfigInitParams在前面通过,前面是初始的为new Object(),现在就是通过replace方法换为ServletConfigPropertySource。
再回到前面的configureAndRefreshWebApplicationContext方法,调用this.postProcessWebApplicationContext(wac),这个为空方法,应该是给自定义拓展FrameworkServlet使用的,DispatcherServlet没有重写这个空方法。
再调用applyInitializers(wac)方法
public static final String GLOBAL_INITIALIZER_CLASSES_PARAM = "globalInitializerClasses";
private static final String INIT_PARAM_DELIMITERS = ",; \t\n";

protected void applyInitializers(ConfigurableApplicationContext wac) {
   String globalClassNames = getServletContext().getInitParameter(ContextLoader.GLOBAL_INITIALIZER_CLASSES_PARAM);
   if (globalClassNames != null) {
      for (String className : StringUtils.tokenizeToStringArray(globalClassNames, INIT_PARAM_DELIMITERS)) {
         this.contextInitializers.add(loadInitializer(className, wac));
      }
   }
   if (this.contextInitializerClasses != null) {
      for (String className : StringUtils.tokenizeToStringArray(this.contextInitializerClasses, INIT_PARAM_DELIMITERS)) {
         this.contextInitializers.add(loadInitializer(className, wac));
      }
   }
   AnnotationAwareOrderComparator.sort(this.contextInitializers);
   for (ApplicationContextInitializer<ConfigurableApplicationContext> initializer : this.contextInitializers) {
      initializer.initialize(wac);
   }
}
private ApplicationContextInitializer<ConfigurableApplicationContext> loadInitializer(
      String className, ConfigurableApplicationContext wac) {
   try {
      Class<?> initializerClass = ClassUtils.forName(className, wac.getClassLoader());
        ................
      return BeanUtils.instantiateClass(initializerClass, ApplicationContextInitializer.class);
     ..................
}
这里我们看到有一个接口ApplicationContextInitializer,然后会从ServletContext中获取InitParameter参数globalInitializerClasses(你可以通过INIT_PARAM_DELIMITERS 的这些分割符去分割多个),然后通过loadInitializer方法去创建对象添加到contextInitializers中,之后再调用你自定义的熟悉了这个接口类的initialize方法,其实这里就是通过给你一个拓展接口,让你能自定义去操作这个ConfigurableApplicationContext容器。我们通过一个demo来简单说明这里的用法。
1、创建两个自定义的类:
public class CustomizeOneInit implements ApplicationContextInitializer {
    public void initialize(ConfigurableApplicationContext configurableApplicationContext) {
        System.out.println("CustomizeOneInit");
    }
}
public class CustomizeTwoInit implements ApplicationContextInitializer {
    public void initialize(ConfigurableApplicationContext configurableApplicationContext) {
        System.out.println("CustomizeTwoInit");
    }
}
再在web.xml中配置globalInitializerClasses:
<context-param>
    <param-name>globalInitializerClasses</param-name>
    <param-value>config.CustomizeOneInit;config.CustomizeTwoInit</param-value>
</context-param>

所以之后就会去创建这两个类的对象,然后通过initializer.initialize(wac)调用这两个类关于initialize方法的实现。
现在我们再回到前面的configureAndRefreshWebApplicationContext方法,这里现在就会调用wac.refresh()方法,这个方法我们再放到下一步部分再进行详细说明。


 631
631


 被折叠的 条评论
为什么被折叠?
被折叠的 条评论
为什么被折叠?
 到【灌水乐园】发言


