


 本文介绍如何在APP中实现界面截图功能,并在此基础上添加文字或图片水印,最终保存带水印的截图。
我们经常会看到很多APP会有一个截图的功能,虽然现在很多手机本身已经有截图的功能了,但是截图后不能加水印,这也是不小的麻烦,今天我们聊聊怎么截图APP当前界面自己想要的内容,并且加上水印后保存。
先看看我们的总体界面的效果。
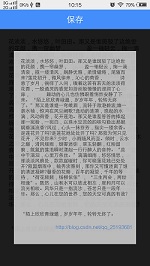
这个就是在我点击保存按钮后保存图片的效果截图。下方是加了一个文字水印,当然我们还可以实现图片水印。
这一次我们就采用循序渐进的方式来一步步探索这一个功能。先看怎么截图和保存。
我先谈谈思路,既然是一张截图,那首先就是一张图,任何一张图都有宽和高,这是基本属性,那么这个宽跟高是什么呢?就是我们所要的内容的高和宽,我们直接计算整个父级容器的高宽即可,然后这里要介绍一个系统的方法:
Bitmap.createBitmap(width, height, config)看名字就很清楚了,原来这个是创建一个Bitmap,那就好办了,这里需要传入高、宽、还有一个bitmap的配置,这里我们直接传入Bitmap.Config.ARGB_8888。
然后调用父级容器的draw方法绘制就行了。完整的代码是:
    /**
     * 把布局转换成bitmap
     * @param scrollView
     * @return bitmap
     */
    public  Bitmap getBitmapByView(ScrollView scrollView) {
        Bitmap bitmap = null;
        // 创建对应大小的bitmap
        bitmap = Bitmap.createBitmap(scrollView.getWidth(), scrollView.getHeight(),
                Bitmap.Config.ARGB_8888);
        final Canvas canvas = new Canvas(bitmap);
        scrollView.draw(canvas);
        // 测试输出
        FileOutputStream out = null;
        try {

            out = new FileOutputStream("/sdcard/screen_test.png");
        } catch (FileNotFoundException e) {
            e.printStackTrace();
        }
        try {
            if (null != out) {
                bitmap.compress(Bitmap.CompressFormat.PNG, 100, out);
                out.flush();
                out.close();
            }
        } catch (IOException e) {
            e.printStackTrace();
        }
        return bitmap;
    }
我们这里的父级容器是ScrollView ,所以使用的是ScrollView 的宽、高。另外我这里模拟了一下保存,看不懂也没关系,实际并没用上。
下面看看我们是怎么执行保存操作的。
    /**
     * 保存图片至/sdcard/myFolder文件夹下
     * @param bmp
     */
    public  void saveCroppedImage(Bitmap bmp) {
        File file = new File("/sdcard/myFolder");
        if (!file.exists())
            file.mkdir();
        long time= System.currentTimeMillis();

        file = new File("/sdcard/"+time+".jpg".trim());
        String fileName = file.getName();
        String mName = fileName.substring(0, fileName.lastIndexOf("."));
        String sName = fileName.substring(fileName.lastIndexOf("."));

        newFilePath = "/sdcard/myFolder" + "/" + mName + sName;
        file = new File(newFilePath);
        try {
            file.createNewFile();
            FileOutputStream fos = new FileOutputStream(file);
            bmp.compress(CompressFormat.JPEG, 50, fos);
            fos.flush();
            fos.close();
        } catch (IOException e) {
            e.printStackTrace();
        }
    }
这里是一个保存的操作了,把刚刚生成的bitmap传入这个方法就可以了,不是很难,我们学文件操作的时候都接触过,我这里是把文件保存在了/sdcard/myFolder目录下,这个目录可以自定义,另外我这里的文件名是采用当前的系统时间加上后缀名。
文件截图跟文件保存都有了,下面可以看看怎么生成水印了,先看看生成生成照片的水印。看看代码:
    /**
     * 有水印的保存
     * @param photo 当前截图的bitmap
     * @param mark 水印的图片
     * @param image 控件
     * @return
     */
    public Bitmap addTagUtil(Bitmap photo){
        Bitmap photoMark = Bitmap.createBitmap(photo.getWidth(), photo.getHeight(), Config.ARGB_8888);
        Bitmap mark= BitmapFactory.decodeResource(mContext.getResources(), R.drawable.ic_launcher);
        Canvas canvas = new Canvas(photoMark);
        canvas.drawBitmap(photo, 0, 0, null);
        Bitmap bitmapMark =mark.copy(Bitmap.Config.ARGB_8888, true);
        canvas.drawBitmap(bitmapMark, photo.getWidth() - bitmapMark.getWidth()-10, photo.getHeight() - bitmapMark.getHeight(), null);
        canvas.save(Canvas.ALL_SAVE_FLAG);
        canvas.restore();
        return photoMark;
    }
这里实际上也是在创建一个bitmap,只是我们用canvas去绘制的时候有重叠的部分。一般的,水印都是在图片的右下角,所以我们也是按照套路来。这个方法返回的bitmap就是一个已经有图片水印的bitmap了,同样可以调用saveCroppedImage(bitmap)来保存。
接下来再看看绘制有文字水印的截图:
    /**
     * 添加文字到图片,类似水印文字。
     * @param gContext
     * @param gResId
     * @param gText
     * @return
     */
    public  Bitmap drawTextToBitmap(Bitmap bitmap, String gText) {
        Resources resources = mContext.getResources();
        float scale = resources.getDisplayMetrics().density;

        android.graphics.Bitmap.Config bitmapConfig = bitmap.getConfig();
        if (bitmapConfig == null) {
            bitmapConfig = android.graphics.Bitmap.Config.ARGB_8888;
        }
        bitmap = bitmap.copy(bitmapConfig, true);

        Canvas canvas = new Canvas(bitmap);
        Paint paint = new Paint(Paint.ANTI_ALIAS_FLAG);
        paint.setColor(Color.parseColor("#458EFD"));
        paint.setTextSize((int) (3 * scale*5));
        paint.setShadowLayer(1f, 0f, 1f, Color.WHITE);
        Rect bounds = new Rect();
        paint.getTextBounds(gText, 0, gText.length(), bounds);
        int x = (bitmap.getWidth() - bounds.width())/10*9 ;
        int y = (bitmap.getHeight() + bounds.height())/10*9;
        canvas.drawText(gText, x , y, paint);

        return bitmap;
    }
可以看到这实际上也是一个套路,我们把文字传进去,在前面我们讲自定义View的时候接触过很多绘制文字的操作,所以我觉得也不需要再去解释怎么绘制文字了。同样的这里返回一个bitmap,那么这个bitmap就是带有文字的水印了。
当然,为了让截图效果更逼真,我们还可以加上一个属性动画:
/**
 * 定义动画
 * @param mBg 父级容器
 * @param mImage 将要显示的图片控件
 * @param bitmap 图片
 */
    public  void startAnim(final LinearLayout mBg,final ImageView mImage,final Bitmap bitmap){
        //设置为半透明
        mBg.setBackgroundColor(Color.parseColor("#e0000000"));

        PropertyValuesHolder values1=PropertyValuesHolder.ofFloat("alpha", 0f,1f,0.5f);
        PropertyValuesHolder values2=PropertyValuesHolder.ofFloat("scaleX", 1,3/4f);
        PropertyValuesHolder values3=PropertyValuesHolder.ofFloat("scaleY", 1,3/4f);
        ObjectAnimator animator=ObjectAnimator.ofPropertyValuesHolder(mImage, values1,values2,values3);
        animator.setDuration(1000);
        animator.setInterpolator(new DecelerateInterpolator());
        animator.start();

        animator.addListener(new AnimatorListener() {

            @Override
            public void onAnimationStart(Animator arg0) {

            }

            @Override
            public void onAnimationRepeat(Animator arg0) {
                // TODO Auto-generated method stub

            }

            @Override
            public void onAnimationEnd(Animator arg0) {
                mImage.setVisibility(View.INVISIBLE);
                //重置背景
                mBg.setBackgroundColor(Color.parseColor("#00000000"));

            }

            @Override
            public void onAnimationCancel(Animator arg0) {
                // TODO Auto-generated method stub

            }
        });
    }
这样就可以实现截图的功能了。下面我贴上全部代码:
布局文件:
<LinearLayout xmlns:android="http://schemas.android.com/apk/res/android"
    xmlns:tools="http://schemas.android.com/tools"
    android:layout_width="match_parent"
    android:layout_height="match_parent"
    android:orientation="vertical"
    tools:context="com.example.ssssss.MainActivity" >

    <TextView
        android:id="@+id/save"
        android:layout_width="match_parent"
        android:layout_height="wrap_content"
        android:layout_alignParentBottom="true"
        android:background="#458EFD"
        android:gravity="center"
        android:padding="10dip"
        android:text="保存"
        android:textColor="#ffffff"
        android:textSize="20sp" />

    <ScrollView
        android:id="@+id/mScrollview"
        android:layout_width="match_parent"
        android:layout_height="match_parent"
        android:background="#eeeeee" >

        <RelativeLayout
            android:layout_width="match_parent"
            android:layout_height="match_parent" >

            <LinearLayout
                android:layout_width="match_parent"
                android:layout_height="match_parent"
                android:orientation="vertical" >

                <TextView
                    android:layout_width="match_parent"
                    android:layout_height="wrap_content"
                    android:padding="20dip"
                    android:text="花淡淡,水悠悠,叶田田。那又是谁斑驳了这绝世的花颜,携一帘幽梦,
            盈一袖轻云,掬一滴清泉,揽一缕清风,娴静优雅,柔情缱绻,尾随而来?莲花初开,微风徐来,沁心的荷香,
            诗意了岁月,徜徉了人间,嗅着这若有若无的淡淡荷花香,一股通灵的感觉如游丝般慢慢的浸润了心扉,
            躁动的心儿也仿佛跟着悄然安静了下来。
“陌上欣欣青绿邈,岁岁年年,轮转无终了。”那又是谁蹙一弯峨眉,流转于潋滟碧波;嬉一袭水袖,惊鸿在风尘阙歌?逸动的涟漪,惑起的水滴,风动荷香,花开莲池。那又是谁羞答答的捧起那一宛粉,一宛白,以珠水空灵的韵味勾勒出那娓娓垂涎流香?风过,心头一抹芬芳,指尖一缕余香。是莲花开了吗?是莲花她处处开了吗? 那我为何只见花开,不见你来?
少时,小雨随风而至。倾时,云水之巅,清风细雨,烟雾迷弥,翠玉轻翻,红粉留痕,氤氲的莲池瞬时漾起一行行醉人的音符。“蕊中千滴泪,心里万条丝。”滴滴细雨,悠悠情思,那淡淡风痕处,款款崖暖时,你可晓莲花她已处处开?氤氲烟雨中,毓秀淡雅刻,那你又可懂迷离了谁的清波凝眸?馨香的花瓣,百年的凝望,千年的等待,“荷花频频,杨柳依依”,
“三生两会,两世相逢”。既然,山和水可以彼此相忘,星和月可以流光相皎。风华只是一指流沙,苍老只是一段年华。那么,心儿在您的世界,您的天空可真的有我?" />

                 <TextView
                     android:layout_width="match_parent"
                     android:layout_height="wrap_content"
                     android:padding="20dip"
                     android:text="“陌上欣欣青绿邈,岁岁年年,轮转无终了。" />

            </LinearLayout>

            <LinearLayout
                android:id="@+id/image_bg"
                android:layout_width="match_parent"
                android:layout_height="match_parent" >

                <ImageView
                    android:id="@+id/jietu_image"
                    android:layout_width="match_parent"
                    android:layout_height="match_parent"
                    android:layout_centerInParent="true" />
            </LinearLayout>
        </RelativeLayout>
    </ScrollView>

</LinearLayout>
主界面:
public class MainActivity extends Activity {

    private TextView button;

    private ScrollView mScrollView;

    private ImageView mImage;

    private LinearLayout mBg;

    private Utils utils;


    @Override
    protected void onCreate(Bundle savedInstanceState) {
        super.onCreate(savedInstanceState);
        requestWindowFeature(Window.FEATURE_NO_TITLE);
        setContentView(R.layout.activity_main);
        utils=new Utils(MainActivity.this);
        initView();
        button.setOnClickListener(new OnClickListener() {

            @Override
            public void onClick(View arg0) {


                Bitmap bitmap = utils.getBitmapByView(mScrollView);//这里返回的是没有水印的图片
                mImage.setVisibility(View.VISIBLE);

                utils.startAnim(mBg,mImage,bitmap);

//              bitmap= utils.addTagUtil(bitmap);//返回有图片水印

                bitmap=utils.drawTextToBitmap(bitmap, "http://blog.csdn.net/qq_25193681");//返回有文字的水印

                utils.saveCroppedImage(bitmap);

                mImage.setImageBitmap(bitmap);

                mImage.setVisibility(View.VISIBLE);

            }
        });

    }


    private void initView() {
        mScrollView=(ScrollView) findViewById(R.id.mScrollview);
        button=(TextView) findViewById(R.id.save);
        mBg=(LinearLayout) findViewById(R.id.image_bg);
        mImage=(ImageView) findViewById(R.id.jietu_image);
    }

}
工具类;
public class Utils {
    private Context mContext;

    public Utils(Context mContext) {
        this.mContext = mContext;
    }
    private static String newFilePath = "";


/**
 * 定义动画
 * @param mBg 父级容器
 * @param mImage 将要显示的图片控件
 * @param bitmap 图片
 */
    public  void startAnim(final LinearLayout mBg,final ImageView mImage,final Bitmap bitmap){
        //设置为半透明
        mBg.setBackgroundColor(Color.parseColor("#e0000000"));

        PropertyValuesHolder values1=PropertyValuesHolder.ofFloat("alpha", 0f,1f,0.5f);
        PropertyValuesHolder values2=PropertyValuesHolder.ofFloat("scaleX", 1,3/4f);
        PropertyValuesHolder values3=PropertyValuesHolder.ofFloat("scaleY", 1,3/4f);
        ObjectAnimator animator=ObjectAnimator.ofPropertyValuesHolder(mImage, values1,values2,values3);
        animator.setDuration(1000);
        animator.setInterpolator(new DecelerateInterpolator());
        animator.start();

        animator.addListener(new AnimatorListener() {

            @Override
            public void onAnimationStart(Animator arg0) {

            }

            @Override
            public void onAnimationRepeat(Animator arg0) {
                // TODO Auto-generated method stub

            }

            @Override
            public void onAnimationEnd(Animator arg0) {
                mImage.setVisibility(View.INVISIBLE);
                //重置背景
                mBg.setBackgroundColor(Color.parseColor("#00000000"));

            }

            @Override
            public void onAnimationCancel(Animator arg0) {
                // TODO Auto-generated method stub

            }
        });
    }

    /**
     * 把布局转换成bitmap
     * @param scrollView
     * @return bitmap
     */
    public  Bitmap getBitmapByView(ScrollView scrollView) {
        Bitmap bitmap = null;

        // 创建对应大小的bitmap
        bitmap = Bitmap.createBitmap(scrollView.getWidth(), scrollView.getHeight(),
                Bitmap.Config.ARGB_8888);
        final Canvas canvas = new Canvas(bitmap);
        scrollView.draw(canvas);
        // 测试输出
        FileOutputStream out = null;
        try {

            out = new FileOutputStream("/sdcard/screen_test.png");
        } catch (FileNotFoundException e) {
            e.printStackTrace();
        }
        try {
            if (null != out) {
                bitmap.compress(Bitmap.CompressFormat.PNG, 100, out);
                out.flush();
                out.close();
            }
        } catch (IOException e) {
            e.printStackTrace();
        }
        return bitmap;
    }
    /**
     * 保存图片至/sdcard/myFolder文件夹下
     * @param bmp
     */
    public  void saveCroppedImage(Bitmap bmp) {
        File file = new File("/sdcard/myFolder");
        if (!file.exists())
            file.mkdir();
        long time= System.currentTimeMillis();

        file = new File("/sdcard/"+time+".jpg".trim());
        String fileName = file.getName();
        String mName = fileName.substring(0, fileName.lastIndexOf("."));
        String sName = fileName.substring(fileName.lastIndexOf("."));

        newFilePath = "/sdcard/myFolder" + "/" + mName + sName;
        file = new File(newFilePath);
        try {
            file.createNewFile();
            FileOutputStream fos = new FileOutputStream(file);
            bmp.compress(CompressFormat.JPEG, 50, fos);
            fos.flush();
            fos.close();
        } catch (IOException e) {
            e.printStackTrace();
        }
    }
    /**
     * 有水印的保存
     * @param photo 当前截图的bitmap
     * @param mark 水印的图片
     * @param image 控件
     * @return
     */
    public Bitmap addTagUtil(Bitmap photo){
        Bitmap photoMark = Bitmap.createBitmap(photo.getWidth(), photo.getHeight(), Config.ARGB_8888);
        Bitmap mark= BitmapFactory.decodeResource(mContext.getResources(), R.drawable.ic_launcher);
        Canvas canvas = new Canvas(photoMark);
        canvas.drawBitmap(photo, 0, 0, null);
        Bitmap bitmapMark =mark.copy(Bitmap.Config.ARGB_8888, true);
        canvas.drawBitmap(bitmapMark, photo.getWidth() - bitmapMark.getWidth()-10, photo.getHeight() - bitmapMark.getHeight(), null);
        canvas.save(Canvas.ALL_SAVE_FLAG);
        canvas.restore();
        return photoMark;
    }
    /**
     * 添加文字到图片,类似水印文字。
     * @param gContext
     * @param gResId
     * @param gText
     * @return
     */
    public  Bitmap drawTextToBitmap(Bitmap bitmap, String gText) {
        Resources resources = mContext.getResources();
        float scale = resources.getDisplayMetrics().density;

        android.graphics.Bitmap.Config bitmapConfig = bitmap.getConfig();
        if (bitmapConfig == null) {
            bitmapConfig = android.graphics.Bitmap.Config.ARGB_8888;
        }
        bitmap = bitmap.copy(bitmapConfig, true);

        Canvas canvas = new Canvas(bitmap);
        Paint paint = new Paint(Paint.ANTI_ALIAS_FLAG);
        paint.setColor(Color.parseColor("#458EFD"));
        paint.setTextSize((int) (3 * scale*5));
        paint.setShadowLayer(1f, 0f, 1f, Color.WHITE);
        Rect bounds = new Rect();
        paint.getTextBounds(gText, 0, gText.length(), bounds);
        int x = (bitmap.getWidth() - bounds.width())/10*9 ;
        int y = (bitmap.getHeight() + bounds.height())/10*9;
        canvas.drawText(gText, x , y, paint);

        return bitmap;
    }

}当然,我觉得小伙伴光粘贴复制,那肯定不过瘾,下面我再把源码贴上:源码


 被折叠的 条评论
为什么被折叠?
被折叠的 条评论
为什么被折叠?
 到【灌水乐园】发言


