初始化
这里的UITableViewStyle有两种格式 一种是UITableViewStylePlain
还有一种是分组格式
UITableViewStyleGrouped
UITableView *tableView = [[UITableView alloc]initWithFrame:[UIScreen mainScreen].bounds style:(UITableViewStylePlain)];设置代理 和 数据源
在设置代理之前 我们要先签两个协议
tableView.delegate = self;
tableView.dataSource = self;
设置整个tableView的表头和表尾
只有高度Height可以改变
UIView *headerView = [[UIView alloc]initWithFrame:CGRectMake(0, 0, 0, 50)];
    headerView.backgroundColor = [UIColor cyanColor];
    tableView.tableHeaderView = headerView;
    [headerView release];
x轴与高度height都可以改变表尾在整个视图中的位置
UIView *footerView = [[UIView alloc]initWithFrame:CGRectMake(100, 40, 40, 90)];
    footerView.backgroundColor = [UIColor orangeColor];
    tableView.tableFooterView = footerView;
    [footerView release];
dataSource 必须要实现的两个方法
返回分区数
- (NSInteger)numberOfSectionsInTableView:(UITableView *)tableView
{
    return 3;
}
返回每个分区有多少行
- (NSInteger)tableView:(UITableView *)tableView numberOfRowsInSection:(NSInteger)section
{
    return 5;
}
在表视图中 还有一个必要的方法 就是返回单元格方法
即
在给单元格cell赋值时 要考虑到给你的是什么数据类型,你再慢慢抽丝剥茧 就像剥洋葱一样 最后赋值到cell上
- (UITableViewCell *)tableView:(UITableView *)tableView cellForRowAtIndexPath:(NSIndexPath *)indexPath
{
    static NSString *identifier = @"MyCell";
    UITableViewCell *cell = [tableView dequeueReusableCellWithIdentifier:identifier];
    if (cell == nil) {
        cell = [[[UITableViewCell alloc]initWithStyle:(UITableViewCellStyleSubtitle) reuseIdentifier:identifier] autorelease];

    }
    //赋值的位置
    NSArray *keys = self.dataDic.allKeys;
    NSString *key = keys[indexPath.section];
    NSArray *values = self.dataDic[key];
    //用model来接收数组中的model
    CellModel *model = values[indexPath.row];


    //赋值cell
    cell.textLabel.text = model.title;
    cell.imageView.image = [UIImage imageNamed:model.imageName];

    return cell;

}
 //设置单元格cell的标题
    cell.textLabel.text = @"哈哈";
    cell.detailTextLabel.text = @"呵呵";
    //设置cell上的图片
    cell.imageView.image = [UIImage imageNamed:@"00.jpg"];
    //设置辅助按钮
    cell.accessoryType = UITableViewCellAccessoryCheckmark;
设置每个分区的表头 和 表尾
- (UIView *)tableView:(UITableView *)tableView viewForHeaderInSection:(NSInteger)section
{
    UIView * headerView = [[UIView alloc]initWithFrame:CGRectMake(0, 0, 100, 50)];
    headerView.backgroundColor = [UIColor redColor];


    return [headerView autorelease];
}

- (UIView *)tableView:(UITableView *)tableView viewForFooterInSection:(NSInteger)section
{
    UIView *footerView = [[UIView alloc]initWithFrame:CGRectMake(0, 0, 100, 150)];
    footerView.backgroundColor = [UIColor greenColor];

    return [footerView autorelease];
}
设置分区表头 和 表尾 的高度
在这里 一般设置分区表头 和 表尾 的高度 都要和 设置每个分区的表头 和 表尾 一起书写
- (CGFloat)tableView:(UITableView *)tableView heightForHeaderInSection:(NSInteger)section
{
    return 50;
}

- (CGFloat)tableView:(UITableView *)tableView heightForFooterInSection:(NSInteger)section
{
    return 50;
}
返回的是每一分区的每一行 的高度
- (CGFloat)tableView:(UITableView *)tableView heightForRowAtIndexPath:(NSIndexPath *)indexPath
{
    return 80;
}
设置分区表头 的 标题
- (NSString *)tableView:(UITableView *)tableView titleForHeaderInSection:(NSInteger)section
{
    //NSLog(@"%ld",section);
    //return @"w";
    if (section == 0) {
        return @"a";
    }else if(section == 1)
    {
        return @"b";
    }else
    {
        return @"c";
    }
}
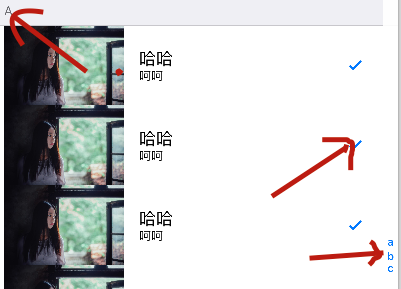
左边是分区表头 的 标题 右边是标题小按钮
对号是设置辅助按钮
cell.accessoryType = UITableViewCellAccessoryCheckmark;
设置tabelView右边 标题小按钮
- (NSArray *)sectionIndexTitlesForTableView:(UITableView *)tableView
{
    return @[@"a",@"b",@"c"];
}
这里加一个完整的代码
这是一个RootViewController.m的代码
这里面少了一张图片
//
//  RootViewController.m
//  09-UITableView-02
//
//  Created by lanou on 15/11/20.
//  Copyright (c) 2015年 yht. All rights reserved.
//

#import "RootViewController.h"

@interface RootViewController ()<UITableViewDataSource,UITableViewDelegate>
//保存数据的数组
@property (nonatomic ,retain)NSArray *dataArray;

//保存数据的字典
@property (nonatomic ,retain)NSDictionary *dataDic;
//保存完成排序的所有key
@property (nonatomic ,retain)NSArray *sortKeysArray;
@end

@implementation RootViewController

-(void)dealloc
{
    [_dataArray release];
    [super dealloc];
}

- (void)viewDidLoad {
    [super viewDidLoad];
    // Do any additional setup after loading the view.
    [self addTableView];
    [self setUpData];

}

 加载数据的方法
//- (void)setUpDate
//{
//
//    self.dataArray = @[@"我欲封天",@"大主宰",@"灵域",@"武炼巅峰",@"詹姆斯",@"科比",@"哈登",@"韦德",@"保罗"];
//}
//  处理数据
- (void)setUpData
{
    NSArray *groupD = [NSArray arrayWithObjects:
                       @"徐阳",
                       @"赵姐", nil];
    NSArray *groupC = [NSArray arrayWithObjects:
                       @"张文",
                       @"装装用", nil];
    NSArray *groupM = [NSArray arrayWithObjects:
                       @"张杰",
                       @"尼鹏",
                       @"汪峰", nil];
    NSArray *groupN = [NSArray arrayWithObjects:
                       @"张丰田",
                       @"羽凡",
                       @"马泽共",
                       @"吴玉成",
                       @"宋玉峰", nil];
    NSArray *groupE = [NSArray arrayWithObjects:
                       @"消费",
                       @"相遇",
                       @"明洋",
                       @"刚哥",
                       @"大君",
                       @"子龙",nil];
    NSArray *groupK= [NSArray arrayWithObjects:
                      @"听听",
                      @"荣飞",nil];
    NSArray *groupA = [NSArray arrayWithObjects:
                       @"精超",nil];
    NSArray *groupZ = [NSArray arrayWithObjects:
                       @"弃用",
                       @"之言",
                       @"兵器",
                       @"鹏举",
                       @"江龙",
                       @"游街", nil];

    self.dataDic = @{@"A":groupA, @"Z":groupZ, @"C":groupC, @"D":groupD, @"K":groupK, @"E":groupE, @"M":groupM, @"N":groupN};

    //  取出所有Key
    NSArray *keys = [self.dataDic allKeys];
    //  对key进行排序
    self.sortKeysArray = [keys sortedArrayUsingSelector:@selector(compare:)];
}


//初始化UITableView
- (void)addTableView
{
    UITableView *tableView = [[UITableView alloc]initWithFrame:[UIScreen mainScreen].bounds style:(UITableViewStylePlain)];

    tableView.delegate = self;
    tableView.dataSource = self;
    [self.view addSubview:tableView];
    [tableView release];

}

//返回每个分区多少行
- (NSInteger)tableView:(UITableView *)tableView numberOfRowsInSection:(NSInteger)section
{
    //数组的元素的个数
    //return self.dataArray.count;
    //return self.dataDic[self.sortKeysArray[section]].count;

    //通过这个字典  先找到分区对应的key
    //用这个key取出对应的数组
    //返回 这个数组的count
    NSString *key = self.sortKeysArray[section];
    NSArray *values = self.dataDic[key];
    return values.count;


}

//返回分区数
- (NSInteger)numberOfSectionsInTableView:(UITableView *)tableView
{
    //有多少键值对  就要多少分区
    return self.sortKeysArray.count;
}


- (UITableViewCell *)tableView:(UITableView *)tableView cellForRowAtIndexPath:(NSIndexPath *)indexPath
{
    /*
     UITableViewCell重用
     需要一个重用的集合  作用:把滑出屏幕的cell(完全消失在屏幕上时)  放入这个重用集合(备用)
     当屏幕下方需要新的cell进行展示的时候 开始重用
     方式是  首先 系统会先去重用集合中找   看有没有cell可以重新使用  如果有 就直接使用  如果没有
     就创建一个出来进行使用
     */

    static NSString *identifier = @"MyCell";
    //去重用集合中 按标识符  寻找对应的cell
    UITableViewCell *cell = [tableView dequeueReusableCellWithIdentifier:identifier];
    if (cell == nil) {
        //去创建新的cell
        //释放cell的时候  只有创建出来才需要去释放  从集合中取出来  不要释放了
        cell = [[[UITableViewCell alloc]initWithStyle:(UITableViewCellStyleSubtitle) reuseIdentifier:identifier] autorelease];
        static int num = 0;
        num++;
         NSLog(@"%d",num);
    }
    //赋值cell上的控件(从集合中取出来的   也需要赋值)

    //就一个分区 分区indexPath.section  始终是0
    //row 是每一个分区的第几行
    //cell.textLabel.text = self.dataArray[indexPath.row];

    //字典的展示数据
    //用分区 找出对应的key
    //用key 找出对应的 数组value
    //用行 找出 每一行要显示的字
    NSString *key = self.sortKeysArray[indexPath.section];
    NSArray *values = self.dataDic[key];
    NSString *name = values[indexPath.row];
    cell.textLabel.text = name;


    return cell ;


//    NSString *identifier = @"MyCell";
//    UITableViewCell *tableViewCell = [[UITableViewCell alloc]initWithStyle:(UITableViewCellStyleSubtitle) reuseIdentifier:identifier];
//    //tableViewCell.imageView.image = [UIImage imageNamed:@"01.jpg"];
//    tableViewCell.textLabel.text = @"一个字";
//    tableViewCell.detailTextLabel.text = @"haha";
//
//    return [tableViewCell autorelease];

}

//设置cell的高度
- (CGFloat)tableView:(UITableView *)tableView heightForRowAtIndexPath:(NSIndexPath *)indexPath
{
    return 80;
}
//设置分区的标题
-(NSString *)tableView:(UITableView *)tableView titleForHeaderInSection:(NSInteger)section
{
    return self.sortKeysArray[section];
}
//设置小按钮
- (NSArray *)sectionIndexTitlesForTableView:(UITableView *)tableView
{
    return self.sortKeysArray;
}


- (void)didReceiveMemoryWarning {
    [super didReceiveMemoryWarning];
    // Dispose of any resources that can be recreated.
}

/*
#pragma mark - Navigation

// In a storyboard-based application, you will often want to do a little preparation before navigation
- (void)prepareForSegue:(UIStoryboardSegue *)segue sender:(id)sender {
    // Get the new view controller using [segue destinationViewController].
    // Pass the selected object to the new view controller.
}
*/

@end


 52
52


 被折叠的 条评论
为什么被折叠?


