


Swagger 是一个用于生成、描述、调用和可视化 RESTful 风格的 Web 服务。Swagger 让部署管理和使用功能强大的API从未如此简单。
下面会从基本原理、如何使用(基于spring-mvc)、常用注解 、源码分析四个部分进行分析.
基本原理
web开发过程中,api定义是前后端交互最基本也是最重要的信息,而在实践过程中,往往是更新了代码,而没有来得及更新aip,导致api与代码不对应,进而延误进度。而swagger正好用来描述项目api,在后端定义,在前端可视化api,其前后端交互的契约为json格式的api信息. 详细的前后端api描述信息可参考Swagger RESTful API Documentation Specification
描述信息分两类,一类是resource listing,另一类是 api declaration. 前者是概要,描述一共有多少类的api信息,后者描述具体的每一个api定义.可参考Swagger RESTful API Documentation Specification
如何使用
本文基于spring-mvc,前提是api可被正常访问,在些基础上,我们增加swagger的api描述
首先加入引用
<dependency>·
   <groupId>com.mangofactory</groupId>
   <artifactId>swagger-springmvc</artifactId>
   <version>1.0.2</version>
</dependency>
<!--前面分析,还需要支持json序列化,如果项目中没有引入相关jackson或者fastjson的话,也同样需要引入.此处不给具体的依赖-->
- 1
- 2
- 3
- 4
- 5
- 6

- 1
- 2
- 3
- 4
- 5
- 6
前端处理
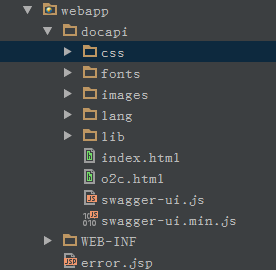
从https://github.com/swagger-api/swagger-ui 从该处下载zip包。解压后,将dist文件夹下的所有内容copy到Java Web project的webapp下。可以新建一个目录,笔者建的目标为docapi,如图所示
修改index中的 url 地址,修改后的地址即为最后访问api信息的地址,要注意docapi里面的文件都可以正常被servlet访问
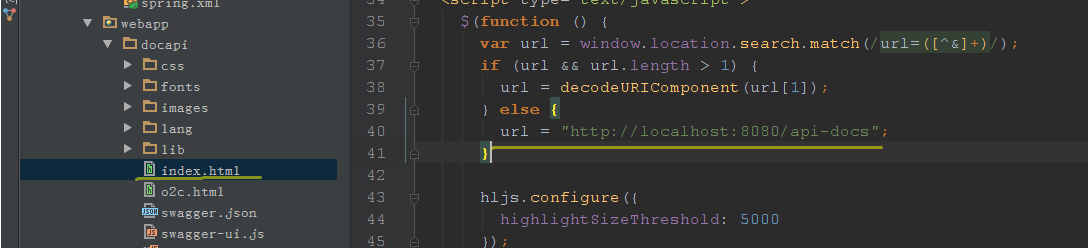
而url后面的 /api-docs ,是可以获取api协议的请求地址, 对于引用的com.mangofactory: swagger-springmvc:1.0.2 包来讲, 地址为 /api-docs,可参考后文的源码分析
此时前端已处理完成.
后端处理
在相应的controller中增加swagger 注解
demo 代码很简单,采用map进行存储用户,实现用户的增删改查操作
@Controller
@Api(value="/person",description="针对用户的插入,删除,查看等操作")
@RequestMapping("/person")
public class TestController {
    private ConcurrentMap<Integer,Person> store = Maps.newConcurrentMap();
    private AtomicInteger atomicInteger = new AtomicInteger(0);

    @RequestMapping(value = "/show/{id}",method= RequestMethod.GET)
    @ResponseBody
    @ApiOperation(value="查看",notes="查看用户", response = Person.class)
    public Person getPerson(@PathVariable("id")int id){
        Person person = store.get(id);
        return person == null ? null : person;
    }

    @RequestMapping(value = "/add/{name}/{age}",method= RequestMethod.POST)
    @ResponseBody
    @ApiOperation(value="增加",notes="增加用户",produces = "text/plain;charset=UTF8")
    public String addPerson(@PathVariable("name")String name,@PathVariable("age")int age){
        int id = atomicInteger.incrementAndGet();
        Person person = new Person().setAge(age).setId(id).setName(name);
        return "原来的人? " + store.put(id, person);
    }

    @RequestMapping(value = "/delete/{id}",method= RequestMethod.DELETE)
    @ResponseBody
    @ApiOperation(value="删除",notes="删除用户",produces = "text/plain;charset=UTF8")
    public String deletePerson(@PathVariable("id")int id){
        return "删除个人:? " + store.remove(id);
    }

    @RequestMapping(value = "/all",method= RequestMethod.GET)
    @ResponseBody
    @ApiOperation(value="查看所有用户",produces = "text/plain;charset=UTF8")
    public String showAllPerson(){
        return store.toString();
    }
- 1
- 2
- 3
- 4
- 5
- 6
- 7
- 8
- 9
- 10
- 11
- 12
- 13
- 14
- 15
- 16
- 17
- 18
- 19
- 20
- 21
- 22
- 23
- 24
- 25
- 26
- 27
- 28
- 29
- 30
- 31
- 32
- 33
- 34
- 35
- 36
- 37
- 1
- 2
- 3
- 4
- 5
- 6
- 7
- 8
- 9
- 10
- 11
- 12
- 13
- 14
- 15
- 16
- 17
- 18
- 19
- 20
- 21
- 22
- 23
- 24
- 25
- 26
- 27
- 28
- 29
- 30
- 31
- 32
- 33
- 34
- 35
- 36
- 37
@ApiModel(value = "a person",description = "a class description a person")
public class Person  implements Serializable{

    @ApiModelProperty(value = "id",notes = "the unique id")
    private int id;
    @ApiModelProperty(value = "name",notes = "the name of the person")
    private String name;
    private int age;
- 1
- 2
- 3
- 4
- 5
- 6
- 7
- 8
- 1
- 2
- 3
- 4
- 5
- 6
- 7
- 8
后端的配置方案有两种,一种是使用默认配置,即在servlet的spring配置文件中增加以下bean的定义
<bean class="com.mangofactory.swagger.configuration.SpringSwaggerConfig" />
- 1
- 1
如果不想用默认配置,可以进行自定义一些信息,比如api的说明,联系人信息等.
增加配置类,同时确保该类可被定义为spring bean
@Configuration
@EnableSwagger   //用于支持swagger,必须和@confuguratin共用,我没有找到这个注解是如何起作用的.
@EnableWebMvc  //和 <mvc:annotation-driven />共用,有可能会导致异常[异常][2]
public class SwaggerConfig {
    private SpringSwaggerConfig config;

    //注入默认配置方案中定义的bean
    @Autowired
    public void setSpringSwaggerConfig(SpringSwaggerConfig springSwaggerConfig){
        this.config = springSwaggerConfig;
    }
    @Bean
    public SwaggerSpringMvcPlugin getPlugin(){    //最主要的目的就是获得该bean.
        return new SwaggerSpringMvcPlugin(config).apiInfo(getApiInfo());  //config对象很重要. 是swaggerSpringMvcPlugin中最重要的一个对象
    }

    private ApiInfo getApiInfo(){  //提供api的说明,开发者联系方式等
        return new ApiInfo("person",
                "CURD for person",
                "",
                "myemail@163.com",
                "",
                "");
    }
- 1
- 2
- 3
- 4
- 5
- 6
- 7
- 8
- 9
- 10
- 11
- 12
- 13
- 14
- 15
- 16
- 17
- 18
- 19
- 20
- 21
- 22
- 23
- 24
- 1
- 2
- 3
- 4
- 5
- 6
- 7
- 8
- 9
- 10
- 11
- 12
- 13
- 14
- 15
- 16
- 17
- 18
- 19
- 20
- 21
- 22
- 23
- 24
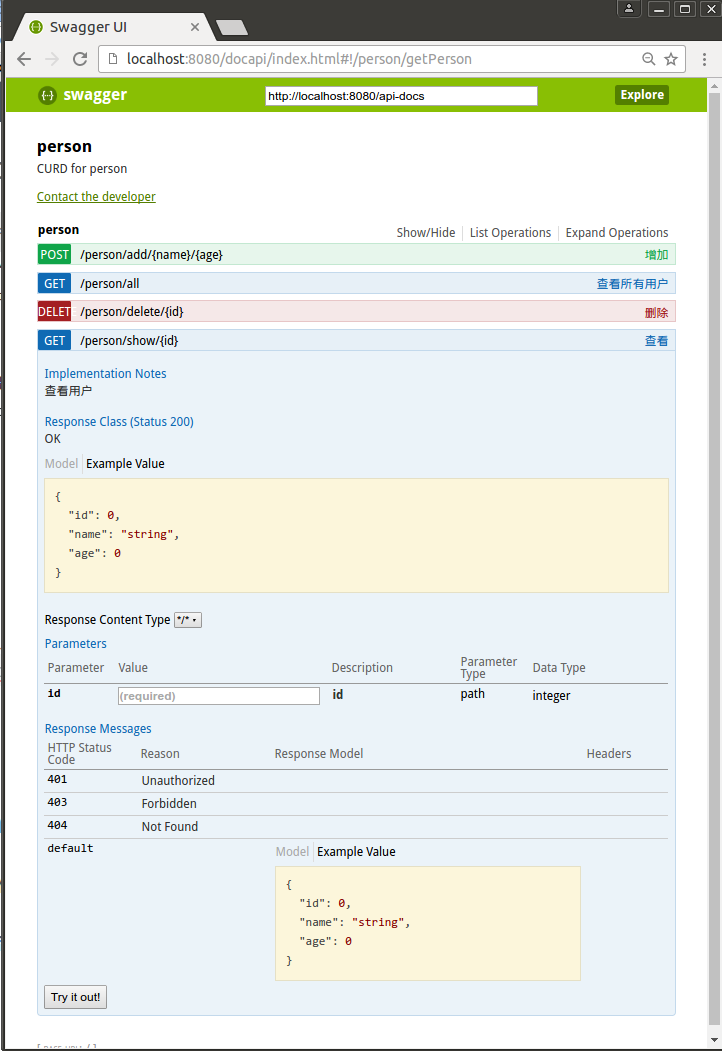
至此,已配置完成,通过tomcat或者jetty启动服务,访问 /docapi/index.html,可看到如下的结果,可看到正常的api信息,并且还可以进行直接发送请求。
常用注解
在上面的代码中,我们使用了 @Api.@ApiOperation,下面介绍一下常用的注解
下面对常用的注解做一下介绍
| 注解 | 描述 | 解释 |
|---|---|---|
| @Api | Marks a class as a Swagger resource. | 用于类对象,只有在类对象上标注该注解后,相应的api信息才能展示出来. |
| @ApiOperation | Describes an operation or typically a HTTP method against a specific path. | 描述具体的方法 |
| @ApiImplicitParam | Represents a single parameter in an API Operation. | 描述具体的请求参数,比如具体的响应方法的参数为 HttpServletRequest时,我会从该参数中取一些请求参数,则可以通过该方法单独定义参数.见下面的具体说明,该参数不能单独使用,必须和@ApiImplicitParams一起使用,可参考后面的例子 |
| @ApiImplicitParams | A wrapper to allow a list of multiple ApiImplicitParam objects. | 组合一组@ApiImplicitParam |
| @ApiParam | Adds additional meta-data for operation parameters. | 定义具体的请求参数,类似@RequestParam 参数,直接在方法参数上使用. |
| @ApiResponse | Describes a possible response of an operation. | 返回值,该类主要有code值与message两个属性,code值必须是http 返回code值,默认会有200,404等,不能单独使用,必须和@ApiResponses一起使用 |
| @ApiResponses | A wrapper to allow a list of multiple ApiResponse objects. | 组合@ApiResponse |
| @ApiModel | Provides additional information about Swagger models. | 提供对请求参数与返回结果中的model的定义 |
ApiImplicitParam 使用说明
    @ApiImplicitParams({@ApiImplicitParam(name = "id",paramType = "query",dataType = "java.lang.String")})
     @RequestMapping(value = "doNothing",method = RequestMethod.GET)
    @ResponseBody
    public String log(HttpServletRequest request){
        String id = request.getParameter("id");
        System.out.println(id);
        return "OK";
    }
- 1
- 2
- 3
- 4
- 5
- 6
- 7
- 8
- 1
- 2
- 3
- 4
- 5
- 6
- 7
- 8
至此,对于使用而言,已经足够了,如果还想了解更多的注解,可以查看源码。
源码分析
先看下类结构
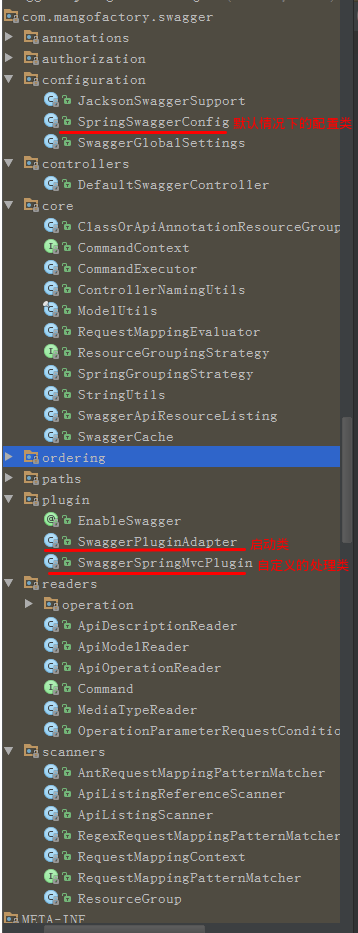
图中,最主要的几个类我已标红,除此之外,controllers 包下是前端api接口的controller,readers 包是对所有注解的解析,scanners 包下是定义如何进行扫描的。core下是一些公用的方法及支撑类。
下面详细解析源码。
SpringSwaggerConfig 类,上面提到过,默认情况下,将该类配置为一个bean即可. 该类是一个@Configuration类,里面的方法主要是用来提供spring bean的,相当于一个xml配置文档,并且在其中引入了controllers 包下的所有类。代码比较简单,不再展开。
SwaggerPluginAdapter是一个入口类, 该类实现了ApplicationListener,因此在spring加载完成时,会执行该类的onApplicationEvent方法 ,直接看该方法
  public void onApplicationEvent(ContextRefreshedEvent contextRefreshedEvent) {
    if (initialized.compareAndSet(false, true)) {
      ApplicationContext applicationContext = contextRefreshedEvent.getApplicationContext();

//获取所有的SwaggerSpringMvcPlugin 类
      Map<String, SwaggerSpringMvcPlugin> plugins = BeanFactoryUtils.beansOfTypeIncludingAncestors(
              applicationContext,
              SwaggerSpringMvcPlugin.class);

      if (plugins.isEmpty()) {
      // 如是没有自定义,则采用默认的配置
        new SwaggerSpringMvcPlugin(springSwaggerConfig) //此用也用 springSwaggerConfig初始化了 SwaggerSpringMvcPlugin
                .build()
                .initialize();
      } else {
      // 否则,采用自定义的配置
        for (Map.Entry<String, SwaggerSpringMvcPlugin> entry : plugins.entrySet()) {
          if (entry.getValue().isEnabled()) {
            entry.getValue()
                    .build()
                    .initialize();
          }
        }
      }
    }
  }
- 1
- 2
- 3
- 4
- 5
- 6
- 7
- 8
- 9
- 10
- 11
- 12
- 13
- 14
- 15
- 16
- 17
- 18
- 19
- 20
- 21
- 22
- 23
- 24
- 25
- 26
- 1
- 2
- 3
- 4
- 5
- 6
- 7
- 8
- 9
- 10
- 11
- 12
- 13
- 14
- 15
- 16
- 17
- 18
- 19
- 20
- 21
- 22
- 23
- 24
- 25
- 26
onApplicationEvent()方法中,首先获取所有的SwaggerSpringMvcPlugin bean,如果获得的结果为空,即采用默认的SwaggerSpringMvcPlugin类,当不为空时,采用自定义的SwaggerSpringMvcPlugin类。
SwaggerSpringMvcPlugin是核心配置类.有好多可配置的属性,并且提供了相应的get与set方法. 在该类中,初始化了SwaggerApiResourceListing 类(用于扫描RequestMappingHandler方法)的属性. 当调用initialize()方法的时候,调用的则是SwaggerApiResourceListing类的initialize()方法.
SwaggerApiResourceListing的 initialize方法
 public void initialize() {
    List<ApiListingReference> apiListingReferences = new ArrayList<ApiListingReference>();
    if (null != apiListingReferenceScanner) {
      // 该方法用于获取ResourceListing json 内容
      apiListingReferenceScanner.scan();
      apiListingReferences = apiListingReferenceScanner.getApiListingReferences();

      Map<ResourceGroup, List<RequestMappingContext>> resourceGroupRequestMappings =
              apiListingReferenceScanner.getResourceGroupRequestMappings();
      // 初始化apiListingScanner 类
      ApiListingScanner apiListingScanner = new ApiListingScanner(resourceGroupRequestMappings, swaggerPathProvider,
              modelProvider, authorizationContext, customAnnotationReaders, requestMappingEvaluator, this.apiVersion);

      apiListingScanner.setApiDescriptionOrdering(apiDescriptionOrdering);
      apiListingScanner.setSwaggerGlobalSettings(swaggerGlobalSettings);
      apiListingScanner.setResourceGroupingStrategy(apiListingReferenceScanner.getResourceGroupingStrategy());

      //该方法通过刚才初始化的apiListingScanner,扫描具体的api信息,详细的过程不进行详述,主要原理是采用命令模式,从requestMapping中拿到每个方法,解析其中的swagger注解.并将解析完成的结果放在一个map结果中
      Map<String, ApiListing> apiListings = apiListingScanner.scan();
      // 将结果放在swaggerCache中,SwaggerCahe是spring管理的一个类.里面保存了解析好的api信息
      swaggerCache.addApiListings(swaggerGroup, apiListings);
    }

    Collections.sort(apiListingReferences, apiListingReferenceOrdering);

    ResourceListing resourceListing = new ResourceListingBuilder()
            .apiVersion(this.apiVersion)
            .swaggerVersion("1.2")
            .apis(apiListingReferences)
            .authorizations(authorizationTypes == null ? new ArrayList<AuthorizationType>() : authorizationTypes)
            .info(apiInfo)
            .build();

    swaggerCache.addSwaggerResourceListing(swaggerGroup, resourceListing);
  }
- 1
- 2
- 3
- 4
- 5
- 6
- 7
- 8
- 9
- 10
- 11
- 12
- 13
- 14
- 15
- 16
- 17
- 18
- 19
- 20
- 21
- 22
- 23
- 24
- 25
- 26
- 27
- 28
- 29
- 30
- 31
- 32
- 33
- 34
- 35
- 1
- 2
- 3
- 4
- 5
- 6
- 7
- 8
- 9
- 10
- 11
- 12
- 13
- 14
- 15
- 16
- 17
- 18
- 19
- 20
- 21
- 22
- 23
- 24
- 25
- 26
- 27
- 28
- 29
- 30
- 31
- 32
- 33
- 34
- 35
解析过程基本上如上所述,对具体的注解解析不再展开,将解析的结果放到SwaggerCache中,解析过程就完成了。
而SwaggerCache是spring定义的一个bean,回到最初的SpringSwaggerConfig的定义
@Configuration
@ComponentScan(basePackages = {"com.mangofactory.swagger.controllers"})
@Import(SwaggerModelsConfiguration.class)
public class SpringSwaggerConfig {
}
- 1
- 2
- 3
- 4
- 5
- 1
- 2
- 3
- 4
- 5
看到有 @ComponentScan(basePackages = {“com.mangofactory.swagger.controllers”}) .我们打开该包,发现有类DefaultSwaggerController.
@Controller
public class DefaultSwaggerController {

  public static final String DOCUMENTATION_BASE_PATH = "/api-docs";

//引入了swaggerCache bean
  @Autowired
  private SwaggerCache swaggerCache;

  @ApiIgnore
  @RequestMapping(value = {DOCUMENTATION_BASE_PATH}, method = RequestMethod.GET)
  public
  @ResponseBody
  ResponseEntity<ResourceListing> getResourceListing(
      @RequestParam(value = "group",  required = false) String swaggerGroup) {

    return getSwaggerResourceListing(swaggerGroup);
  }

  @ApiIgnore
  @RequestMapping(value = {DOCUMENTATION_BASE_PATH + "/{swaggerGroup}/{apiDeclaration}"}, method = RequestMethod.GET)
  public
  @ResponseBody
  ResponseEntity<ApiListing> getApiListing(@PathVariable String swaggerGroup, @PathVariable String apiDeclaration) {
    return getSwaggerApiListing(swaggerGroup, apiDeclaration);
  }
  }
- 1
- 2
- 3
- 4
- 5
- 6
- 7
- 8
- 9
- 10
- 11
- 12
- 13
- 14
- 15
- 16
- 17
- 18
- 19
- 20
- 21
- 22
- 23
- 24
- 25
- 26
- 27
- 1
- 2
- 3
- 4
- 5
- 6
- 7
- 8
- 9
- 10
- 11
- 12
- 13
- 14
- 15
- 16
- 17
- 18
- 19
- 20
- 21
- 22
- 23
- 24
- 25
- 26
- 27
该类是一个controller.并且引用了 SwaggerCache类,在请求的时候,发现是从SwaggerCache中取相应的信息.
至此, 相关的api信息就可以获取到.相应的流程就走通了.
另附参考文献
https://github.com/swagger-api/swagger-core/wiki/Annotation 官方文档
https://github.com/OAI/OpenAPI-Specification/blob/master/versions/1.2.md
http://www.2cto.com/kf/201502/376959.html


 1万+
1万+

 被折叠的 条评论
为什么被折叠?
被折叠的 条评论
为什么被折叠?
 到【灌水乐园】发言


