


Android 自绘控件,听起来是高大上的对吧,然鹅,真正开发起来是一件非常苦逼的事情。对于初学者来说,总是有这样或者那样的坑等着去踩,为了以后少踩些坑,特奉上自绘控件的一些心得,有不对的地方欢迎大神批评指正0.0
首先,你需要知道屏幕坐标系是个什么鬼,不知道坐标系很容易被各种坐标值搞晕:
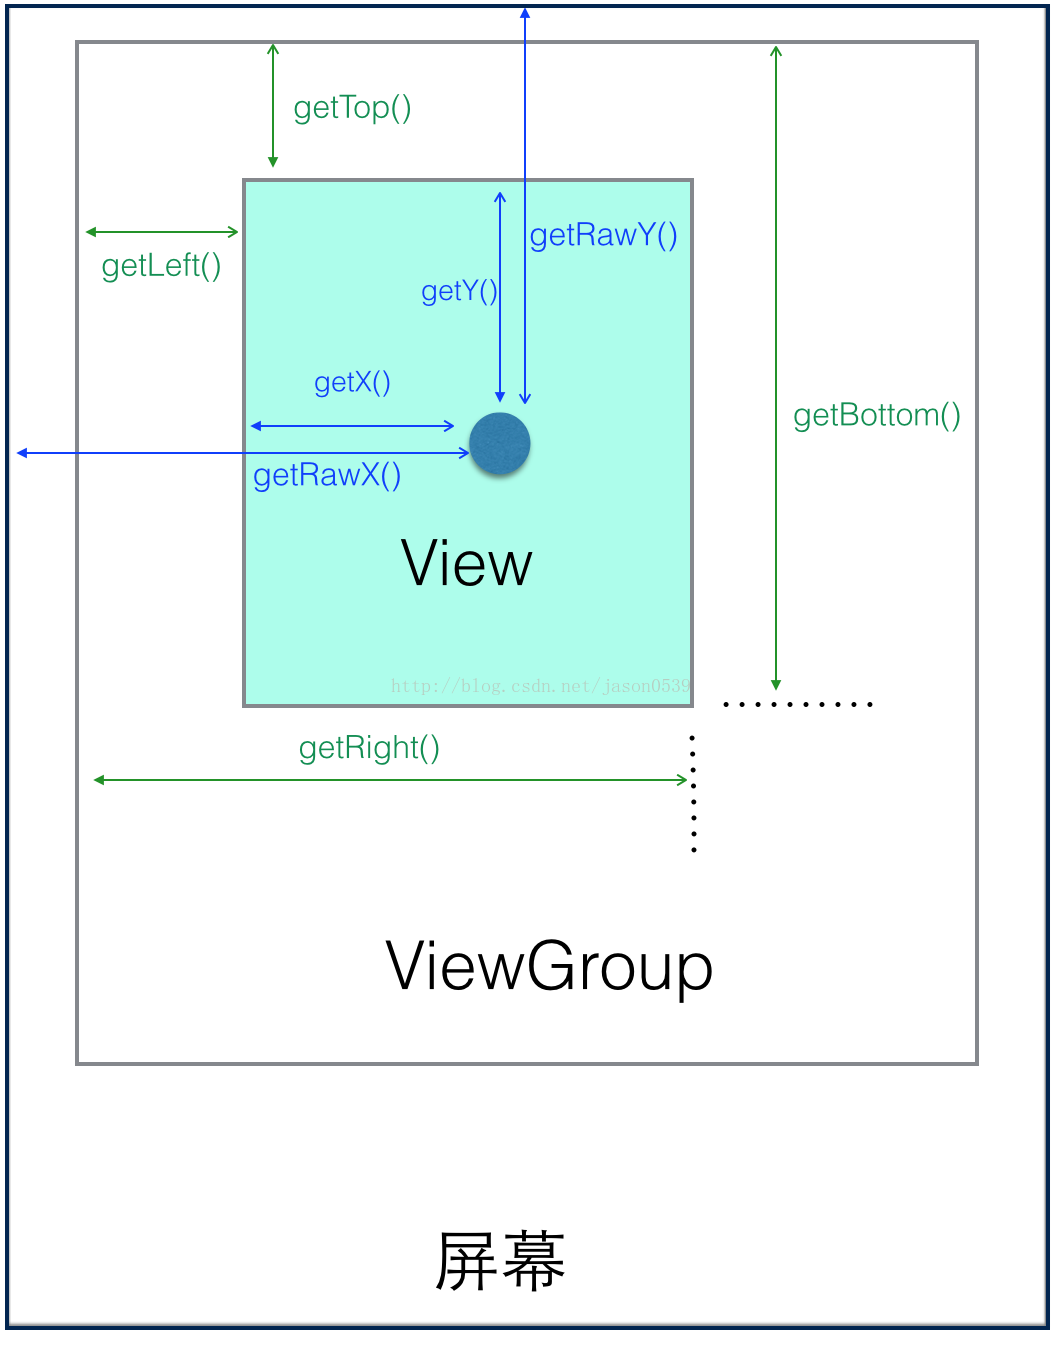
坐标系统以左上角为原点,右方向为x正向,下方向为y正向。获取左上右下的坐标,是显示区域左上右下边界的坐标。相对坐标是相对于父控件的坐标,绝对坐标是相对于屏幕坐标系的坐标。
控件,说白了就是一块有特定功能的显示区域。那么问题来了,从你的代码开始,它是如何显示在屏幕上的呢?
拢共分三步:1测量,2布局,3绘制。
1:measure 测量大小,你首先需要知道这个控件要多大的显示区域。对于不包含子view的自绘控件(也就是原始view)来说,measure过程是测量自身大小;对于ViewGroup,除测量自身,还需调用子view的measure方法。so,measure是一个递归的过程,只有所有子View的大小知道了,父控件的大小才能确定。
、
measure 方法是一个final类型的方法,其内部会调用onMeasure方法, onMeasure中会设置view宽高的测量值。xml中对控件大小有三种设定,精确值,wrap_Content,match_Parent, 对于wrapContent和match_Parent,安卓采用AT_MOST即最大值模式;对于精确值采用EXACTLY即精确值模式。当自定义控件使用wrap_Content,其测量模式为ATMOST,在这种测量模式下,它的宽高为parentSize。所以当自绘控件使用wrap_Content时,等同于使用了match_Parent。
那么如何解决呢?我的view就不能用wrap_Content了吗 ,当然可以,附上方案:
重写onMeasure方法,判断测量模式是啥,如果是ATMOST,说明用户采用了wrapContent,这个时候设置你的宽高就行。
/**
 * 使view能支持wrapcontent
 *
 * @param widthMeasureSpec
 * @param heightMeasureSpec
 */
@Override
protected void onMeasure(int widthMeasureSpec, int heightMeasureSpec) {
    super.onMeasure(widthMeasureSpec, heightMeasureSpec);
    int widthSpecMode = MeasureSpec.getMode(widthMeasureSpec);
    int heightSpecMode = MeasureSpec.getMode(heightMeasureSpec);
    if (widthSpecMode == MeasureSpec.AT_MOST && heightSpecMode == MeasureSpec.AT_MOST) {
        setMeasuredDimension(mWidth, mHeight);
    } else if (widthSpecMode == MeasureSpec.AT_MOST)
        setMeasuredDimension(mWidth, heightMeasureSpec);
    else if (heightSpecMode == MeasureSpec.AT_MOST)
        setMeasuredDimension(widthMeasureSpec, mHeight);


}
上面的mHeight和mWidth就是wrap_Content时的测量大小。
刚才我一直再说测量大小而非最终大小,因为最终大小是在layout阶段确定的,但几乎所有情况下测量大小就是最终大小。有好事儿的问了,什么情况下不等于嘞?。。。这个我先
挖个坑,等谈layout的时候再讲。
测量完毕之后,就可以获得测量后的宽高值。
2:layout过程将确定在屏幕上显示的位置。layout方法会确定自身四个顶点的位置,确定了四个顶点,就确定了自身的位置。接着会调用onlayout方法确定子view的位置。so,与
测量过程相反,布局过程是从上而下的。
![]()
回答上面好事的人的问题,啥时候测量大小不等于最终大小,就是我们强行找事的时候:
布局结束后,就可以获得最终显示的宽高值。
3: 绘制过程,绘制过程将把view绘制到屏幕上。
步骤: 绘制背景(background.draw)----> 绘制自身(onDraw)----->绘制子视图(dispatchDraw)----->绘制装饰(onDrawScrollBars)
绘制过程告诉我们,view会通过dispatchDraw方法将绘制任务一层一层的下发。
在这里有个坑,view的ondraw方法中啥也没写,这意味着如果你xml中定义了padding,就得自己让他们有效。具体做法是在ondraw方法中获取padding,获取测量宽高或最终宽高相减,得到显示区域的宽高。
 @Override
    protected void onDraw(Canvas canvas) {
        super.onDraw(canvas);
        //使view支持padding
        final int paddingLeft = getPaddingLeft();
        final int paddingRight = getPaddingRight();
        final int paddingTop = getPaddingTop();
        final int paddingButtom = getPaddingBottom();

        this.__Left = paddingLeft;
        this.__Top = paddingTop;
        this.__Right = getWidth() - paddingRight;
        this.__Bottom = getHeight() - paddingButtom;

        this.mHeight = __Bottom - __Top;
        this.mWidth = __Right - __Left;
    }
这样,view就支持了padding._left _right _top _buttom是padding之后的绘制区域边界,如果你的view还需要留白,自己去设置。
还有view常用到的自定义属性:
1:在attrs.xml中新建,name与自定义view相同
<declare-styleable name="MyView_ArcScale">
        <attr name="inCircleColor" format="reference" />
        <attr name="outArcColor" format="reference" />
        <attr name="testColor" format="reference" />
        <attr name="outArcWidth" format="dimension" />
        <attr name="testSize" format="dimension" />
        <attr name="degreeStart" format="integer" />

</declare-styleable><com.example.administrator.view.mywidgit.myview.MyView_ArcScale
android:layout_width="wrap_content"
android:layout_height="wrap_content"
MyView_ArcScale:inCircleColor="@android:color/holo_purple"
MyView_ArcScale:outArcColor="@android:color/holo_blue_light" final TypedArray typedArray = context.obtainStyledAttributes(attrs,
R.styleable.MyView_ArcScale);
this.inCricleColor = typedArray.getColor(R.styleable.MyView_ArcScale_inCircleColor, inCricleColor);
this.outArcColor = typedArray.getColor(R.styleable.MyView_ArcScale_outArcColor, outArcColor);
this.textColor = typedArray.getColor(R.styleable.MyView_ArcScale_testColor, textColor);
this.outArcWidth = typedArray.getDimension(R.styleable.MyView_ArcScale_outArcWidth, outArcWidth);
this.startDegree = typedArray.getInt(R.styleable.MyView_ArcScale_degreeStart, startDegree);
this.testSize = typedArray.getDimension(R.styleable.MyView_ArcScale_testSize, testSize);
typedArray.recycle();//回收资源
附上MyStandardView:
public abstract class MyStandardView extends View {


    private int mHeight = 100;
    private int mWidth = 100;

    private int __Top;
    private int __Left;
    private int __Right;
    private int __Bottom;


    public MyStandardView(Context context) {

        this(context, null, 0);
    }

    public MyStandardView(Context context, AttributeSet attrs) {
        this(context, attrs, 0);
    }


    public MyStandardView(Context context, AttributeSet attrs, int defStyleAttr) {
        super(context, attrs, defStyleAttr);
        mHeight = getDefaultHeight();
        mWidth = getDefaultWidth();


    }


    /**
     * 绘制区域的上边界
     * @return
     */
    protected final int get__Top() {
        return __Top;
    }
    /**
     * 绘制区域的左边界
     * @return
     */
    protected final int get__Left() {
        return __Left;
    }
    /**
     * 绘制区域的右边界
     * @return
     */
    protected final int get__Right() {
        return __Right;
    }
    /**
     * 绘制区域的下边界
     * @return
     */
    protected final int get__Bottom() {
        return __Bottom;

    }

    /**
     * 获取wrapContent时的高度
     *
     * @return
     */
    protected abstract int getDefaultHeight();

    /**
     * 获取wrapContent时的宽度
     *
     * @return
     */
    protected abstract int getDefaultWidth();

    @Override
    protected void onDraw(Canvas canvas) {
        super.onDraw(canvas);
        //使view支持padding
        final int paddingLeft = getPaddingLeft();
        final int paddingRight = getPaddingRight();
        final int paddingTop = getPaddingTop();
        final int paddingButtom = getPaddingBottom();

        this.__Left = paddingLeft;
        this.__Top = paddingTop;
        this.__Right = getWidth() - paddingRight;
        this.__Bottom = getHeight() - paddingButtom;

        this.mHeight = __Bottom - __Top;
        this.mWidth = __Right - __Left;
    }


    /**
     * 获取layout过程之后控件的高度,即最终高度
     * 仅在layout之后调用有效
     *
     * @return
     */
    protected final int getFinalHeight() {
        return this.mHeight;
    }

    /**
     * 获取layout过程之后控件的宽度,即最终宽度
     * 仅在layout之后调用有效
     *
     * @return
     */
    protected final int getFinalWidth() {
        return this.mWidth;
    }

    /**
     * 使view能支持wrapcontent
     *
     * @param widthMeasureSpec
     * @param heightMeasureSpec
     */
    @Override
    protected void onMeasure(int widthMeasureSpec, int heightMeasureSpec) {
        super.onMeasure(widthMeasureSpec, heightMeasureSpec);
        int widthSpecMode = MeasureSpec.getMode(widthMeasureSpec);
        int heightSpecMode = MeasureSpec.getMode(heightMeasureSpec);
        if (widthSpecMode == MeasureSpec.AT_MOST && heightSpecMode == MeasureSpec.AT_MOST) {
            setMeasuredDimension(mWidth, mHeight);
        } else if (widthSpecMode == MeasureSpec.AT_MOST)
            setMeasuredDimension(mWidth, heightMeasureSpec);
        else if (heightSpecMode == MeasureSpec.AT_MOST)
            setMeasuredDimension(widthMeasureSpec, mHeight);


    }


}


 761
761


 被折叠的 条评论
为什么被折叠?
被折叠的 条评论
为什么被折叠?
 到【灌水乐园】发言


