


Redis分布式锁相关基础可查阅——redis实现分布式锁(手写redis分布式锁)
Redisson的基本使用查阅我的另一篇博文——Redisson——分布式锁的基本应用
其实之前我在写Redis锁的使用过程中,已经是查阅了很多相关的资料,算是对redis分布式锁有了一个新的认识;在使用Riddson的过程中,Riddson已经帮开发者做了很好的封装,几乎是无侵入的帮助开发者勿略掉了分布式锁的实现问题,简单有效。由于最近比较忙,现在重新捡起来Riddson,来简单的聊一聊Riddson是怎么实现分布式锁的。
以之前写的代码为入口(reddisonClient代码就是redisson初始化实例的配置bean,参考我之前的文章)
这里以异步的加锁操作为例子
    public boolean orderByProductId4(String productId) {

        //redisson加锁
        RLock lock = redissonClient.getLock(PRODUCT_LOCK_TITLE + productId);
        Future<Boolean> res = lock.tryLockAsync(30, 10, TimeUnit.SECONDS);

        //此时获取锁的行为并不会阻塞代码,可以执行其他业务逻辑
        //do something......

        boolean result = false;
        try {
            //=======================执行业务逻辑=========================
            //判断是否存在该商品
            if (checkExist(productId) && res.get()) {
                try {
                    //模拟数据库操作
                    Thread.sleep(1000*2);
                    //产生订单,扣减库存
                    order.put(UUID.randomUUID().toString(), productId);
                    productStockQuantity.put(productId, productStockQuantity.get(productId) - 1);
                    result = true;
                } catch (InterruptedException e) {
                    e.printStackTrace();
                }
            }
            //=======================业务逻辑结束=========================
        } catch (Exception e) {
            e.printStackTrace();
        } finally {
            //解锁
            lock.unlock();
        }
        return result;
    }
这段代码最上方的 lock.tryLockAsync 以及 lock.unlock() 共同完成了对业务代码的分布式锁处理,在这行代码中的业务是“分布式中请求线程安全”的,这是我自己编的一个词,没有任何的理论支持,纯个人理解。分布式锁嘛,肯定解决是分布式系统中的资源竞争问题,那请求线程安全是指怎么,我这么说是因为,实际场景中,往往是一次次的请求来抢夺资源的,如:电商活动抢购商品,在这个场景中每个参与请求的用户,再具体点就是客户端,发出了一次次的请求,到后端服务器,每一次的请求,不知道会被网关或者是负载均衡转发到哪个业务系统的实例,所以我理解是请求线程安全。废话不多说,直接开始看源码。redisson的源码注释很少,希望大家多支持一下,点个赞也行啊
锁的初始化
Redisson public RLock getLock(String name)
    @Override
    public RLock getLock(String name) {
        return new RedissonLock(connectionManager.getCommandExecutor(), name);
    }
RedissonLock(non-fair,非公平锁,本次原理解析不讨论)创建过程中,构造方法需要通过connectionManager.getCommandExecutor()传入一个命令执行器,这是一个关键,ConnectionManager实际就是管理了一些连接redis的操作。它是在配置Redisson参数之后,创建Redisson客户端的时候初始化的:
@Configuration
public class RedissonConfig {

    @Bean
    public RedissonClient config() {
        Config config = new Config();
        config.setTransportMode(TransportMode.NIO);
        config.useSingleServer().setAddress("redis://127.0.0.1:6379").setPassword("liyalong"); //可以用"rediss://"来启用SSL连接
        config.setLockWatchdogTimeout(10*1000);
        RedissonClient redisson = Redisson.create(config);
        return redisson;
    }

}
Redisson.create()
    /**
     * Create sync/async Redisson instance with provided config
     *
     * @param config for Redisson
     * @return Redisson instance
     */
    public static RedissonClient create(Config config) {
        Redisson redisson = new Redisson(config);
        if (config.isReferenceEnabled()) {
            redisson.enableRedissonReferenceSupport();
        }
        return redisson;
    }
创建Redisson对象的时候要注意了,这里构造方法是关键:
package org.redisson;

//省略导包

/**
 * Main infrastructure class allows to get access
 * to all Redisson objects on top of Redis server.
 *
 * @author Nikita Koksharov
 *
 */
public class Redisson implements RedissonClient {

    static {
        RedissonReference.warmUp();
    }

    protected final QueueTransferService queueTransferService = new QueueTransferService();
    protected final EvictionScheduler evictionScheduler;
    protected final WriteBehindService writeBehindService;
    protected final ConnectionManager connectionManager;

    protected final ConcurrentMap<Class<?>, Class<?>> liveObjectClassCache = new ConcurrentHashMap<>();
    protected final Config config;

    protected final ConcurrentMap<String, ResponseEntry> responses = new ConcurrentHashMap<>();

    protected Redisson(Config config) {
        this.config = config;
        Config configCopy = new Config(config);

        //注意这一行
        connectionManager = ConfigSupport.createConnectionManager(configCopy);
        evictionScheduler = new EvictionScheduler(connectionManager.getCommandExecutor());
        writeBehindService = new WriteBehindService(connectionManager.getCommandExecutor());
    }

    public EvictionScheduler getEvictionScheduler() {
        return evictionScheduler;
    }

    public CommandExecutor getCommandExecutor() {
        return connectionManager.getCommandExecutor();
    }

    public ConnectionManager getConnectionManager() {
        return connectionManager;
    }

    //省略其他代码
}
带着初始化Redisson的配置信息,根据配置的不同Redis模式创建了对应配置参数的ConnectionManager,Redisson支持多种Redis模式:集群、云托管、单节点、哨兵模式、主从模式。
    public static ConnectionManager createConnectionManager(Config configCopy) {
        UUID id = UUID.randomUUID();

        if (configCopy.getMasterSlaveServersConfig() != null) {
            validate(configCopy.getMasterSlaveServersConfig());
            return new MasterSlaveConnectionManager(configCopy.getMasterSlaveServersConfig(), configCopy, id);
        } else if (configCopy.getSingleServerConfig() != null) {
            validate(configCopy.getSingleServerConfig());
            return new SingleConnectionManager(configCopy.getSingleServerConfig(), configCopy, id);
        } else if (configCopy.getSentinelServersConfig() != null) {
            validate(configCopy.getSentinelServersConfig());
            return new SentinelConnectionManager(configCopy.getSentinelServersConfig(), configCopy, id);
        } else if (configCopy.getClusterServersConfig() != null) {
            validate(configCopy.getClusterServersConfig());
            return new ClusterConnectionManager(configCopy.getClusterServersConfig(), configCopy, id);
        } else if (configCopy.getReplicatedServersConfig() != null) {
            validate(configCopy.getReplicatedServersConfig());
            return new ReplicatedConnectionManager(configCopy.getReplicatedServersConfig(), configCopy, id);
        } else if (configCopy.getConnectionManager() != null) {
            return configCopy.getConnectionManager();
        }else {
            throw new IllegalArgumentException("server(s) address(es) not defined!");
        }
}由于我们在配置Redisson的时候,Config调用的是userSingleServer(),创建的是单节点Redisson客户端,这里我们获得的ConnectionManager就是SingleConnectionManager。
在创建SingleConnectionManager过程中,调用类其父类MasterSlaveConnectionManager的构造方法:
    protected MasterSlaveConnectionManager(Config cfg, UUID id) {
        this.id = id.toString();
        Version.logVersion();

        if (cfg.getTransportMode() == TransportMode.EPOLL) {
            if (cfg.getEventLoopGroup() == null) {
                this.group = new EpollEventLoopGroup(cfg.getNettyThreads(), new DefaultThreadFactory("redisson-netty"));
            } else {
                this.group = cfg.getEventLoopGroup();
            }

            this.socketChannelClass = EpollSocketChannel.class;
            if (PlatformDependent.isAndroid()) {
                this.resolverGroup = DefaultAddressResolverGroup.INSTANCE;
            } else {
                this.resolverGroup = cfg.getAddressResolverGroupFactory().create(EpollDatagramChannel.class, DnsServerAddressStreamProviders.platformDefault());
            }
        } else if (cfg.getTransportMode() == TransportMode.KQUEUE) {
            if (cfg.getEventLoopGroup() == null) {
                this.group = new KQueueEventLoopGroup(cfg.getNettyThreads(), new DefaultThreadFactory("redisson-netty"));
            } else {
                this.group = cfg.getEventLoopGroup();
            }

            this.socketChannelClass = KQueueSocketChannel.class;
            if (PlatformDependent.isAndroid()) {
                this.resolverGroup = DefaultAddressResolverGroup.INSTANCE;
            } else {
                this.resolverGroup = cfg.getAddressResolverGroupFactory().create(KQueueDatagramChannel.class, DnsServerAddressStreamProviders.platformDefault());
            }
        } else {
            if (cfg.getEventLoopGroup() == null) {
                this.group = new NioEventLoopGroup(cfg.getNettyThreads(), new DefaultThreadFactory("redisson-netty"));
            } else {
                this.group = cfg.getEventLoopGroup();
            }

            this.socketChannelClass = NioSocketChannel.class;
            if (PlatformDependent.isAndroid()) {
                this.resolverGroup = DefaultAddressResolverGroup.INSTANCE;
            } else {
                this.resolverGroup = cfg.getAddressResolverGroupFactory().create(NioDatagramChannel.class, DnsServerAddressStreamProviders.platformDefault());
            }
        }

        if (cfg.getExecutor() == null) {
            int threads = Runtime.getRuntime().availableProcessors() * 2;
            if (cfg.getThreads() != 0) {
                threads = cfg.getThreads();
            }
            executor = Executors.newFixedThreadPool(threads, new DefaultThreadFactory("redisson"));
        } else {
            executor = cfg.getExecutor();
        }

        this.cfg = cfg;
        this.codec = cfg.getCodec();
        //这就是创建之后getLock使用的CommadExecutor
        this.commandExecutor = new CommandSyncService(this);
}方法很长,我们只看最后一行,这里创建了之后getLock使用的CommadExecutor,这个CommadExecutor并持有了当前connectionManager,这很重要。
至此,我们已经创建好了Redis lock,注意!注意!注意!这时候还没有加锁,知识初始化了锁对象而已。初始化锁的过程暂不深入研究,大致了解一下。

获取锁
顺着代码lock.tryLockAsync一路走,找到RedissonLock的tryLockAsync方法:
    @Override
    public RFuture<Boolean> tryLockAsync(long waitTime, long leaseTime, TimeUnit unit,
            long currentThreadId) {
        //Redisson首先创建了Rpromise,Rpromise继承了java Future接口
        RPromise<Boolean> result = new RedissonPromise<Boolean>();

        //把加锁的等待时间使用AtomicLong代替,AtomicLong是对lang的原子操作类,具体信息自行了解
        AtomicLong time = new AtomicLong(unit.toMillis(waitTime));
        long currentTime = System.currentTimeMillis();
        RFuture<Long> ttlFuture = tryAcquireAsync(waitTime, leaseTime, unit, currentThreadId);

        //以下是对future结果的回调,暂不做详解
        ttlFuture.onComplete((ttl, e) -> {
            if (e != null) {
                result.tryFailure(e);
                return;
            }

            // lock acquired
            if (ttl == null) {
                if (!result.trySuccess(true)) {
                    unlockAsync(currentThreadId);
                }
                return;
            }

            long el = System.currentTimeMillis() - currentTime;
            time.addAndGet(-el);

            if (time.get() <= 0) {
                trySuccessFalse(currentThreadId, result);
                return;
            }

            long current = System.currentTimeMillis();
            AtomicReference<Timeout> futureRef = new AtomicReference<Timeout>();
            RFuture<RedissonLockEntry> subscribeFuture = subscribe(currentThreadId);
            subscribeFuture.onComplete((r, ex) -> {
                if (ex != null) {
                    result.tryFailure(ex);
                    return;
                }

                if (futureRef.get() != null) {
                    futureRef.get().cancel();
                }

                long elapsed = System.currentTimeMillis() - current;
                time.addAndGet(-elapsed);

                tryLockAsync(time, waitTime, leaseTime, unit, subscribeFuture, result, currentThreadId);
            });
            if (!subscribeFuture.isDone()) {
                Timeout scheduledFuture = commandExecutor.getConnectionManager().newTimeout(new TimerTask() {
                    @Override
                    public void run(Timeout timeout) throws Exception {
                        if (!subscribeFuture.isDone()) {
                            subscribeFuture.cancel(false);
                            trySuccessFalse(currentThreadId, result);
                        }
                    }
                }, time.get(), TimeUnit.MILLISECONDS);
                futureRef.set(scheduledFuture);
            }
        });


        return result;
    }
首先关注这行代码:
RFuture<Long> ttlFuture = tryAcquireAsync(waitTime, leaseTime, unit, currentThreadId);再debug一层
    private <T> RFuture<Long> tryAcquireAsync(long waitTime, long leaseTime, TimeUnit unit, long threadId) {
        //如果设置了自动解锁时间走这里
        if (leaseTime != -1) {
            return tryLockInnerAsync(waitTime, leaseTime, unit, threadId, RedisCommands.EVAL_LONG);
        }
        //如果没有设置自动解锁时间走这里
        RFuture<Long> ttlRemainingFuture = tryLockInnerAsync(waitTime,
                                                commandExecutor.getConnectionManager().getCfg().getLockWatchdogTimeout(),
                                                TimeUnit.MILLISECONDS, threadId, RedisCommands.EVAL_LONG);
        ttlRemainingFuture.onComplete((ttlRemaining, e) -> {
            if (e != null) {
                return;
            }

            // lock acquired
            if (ttlRemaining == null) {
                scheduleExpirationRenewal(threadId);
            }
        });
        return ttlRemainingFuture;
}在这里会判断开发者有没有设置锁的超时时间,如果没有设置会通过Redisson初始化过程中的命令执行器获取默认配置30秒:private long lockWatchdogTimeout = 30 * 1000;
感觉30秒好长啊,大家使用的时候还是根据业务实际情况设置一下吧,感觉大多数场景都用不到30秒
Warning!!!核心代码要来了
    <T> RFuture<T> tryLockInnerAsync(long waitTime, long leaseTime, TimeUnit unit, long threadId, RedisStrictCommand<T> command) {
        internalLockLeaseTime = unit.toMillis(leaseTime);

        return evalWriteAsync(getName(), LongCodec.INSTANCE, command,
                "if (redis.call('exists', KEYS[1]) == 0) then " +
                        "redis.call('hincrby', KEYS[1], ARGV[2], 1); " +
                        "redis.call('pexpire', KEYS[1], ARGV[1]); " +
                        "return nil; " +
                        "end; " +
                        "if (redis.call('hexists', KEYS[1], ARGV[2]) == 1) then " +
                        "redis.call('hincrby', KEYS[1], ARGV[2], 1); " +
                        "redis.call('pexpire', KEYS[1], ARGV[1]); " +
                        "return nil; " +
                        "end; " +
                        "return redis.call('pttl', KEYS[1]);",
                Collections.singletonList(getName()), internalLockLeaseTime, getLockName(threadId));
    }
在这里第一行首先会设置一下开发者设定的锁超时间,下面就直接return了一堆东西,这个字符串是啥鸭???
开始我也愣了一下,后来我Ctrl+Q了一下evalWriteAsync方法看了一下参数列表:
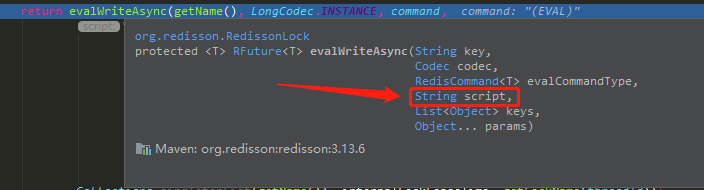
这参数名,就是脚本呗,我就顺手google了一下 redis 脚本,原来这就是操作redis的 Lua jio本......
顺手我就又学了一下Lua脚本,暂时先不谈Lua脚本本身,先说一下Lua脚本对于redis操作的意义,那就是原子性啊,将一系列的操作,在一个Lua脚本内编写,一并 提交给redis执行,由于redis本就是单线程的原因,保证了这段脚本执行的原子性,要么这一些列操作全部成功,要么一起失败。
redis不是有自己的事务嘛,为什么用Lua???
Lua方便比那个东西方便多了。
这段脚本如下
if
    (redis.call('exists', KEYS[1]) == 0)
then
    redis.call('hincrby', KEYS[1], ARGV[2], 1);
    redis.call('pexpire', KEYS[1], ARGV[1]);
return nil;
end;

if
    (redis.call('hexists', KEYS[1], ARGV[2]) == 1)
then
    redis.call('hincrby', KEYS[1], ARGV[2], 1);
redis.call('pexpire', KEYS[1], ARGV[1]);
return nil;
end;
return redis.call('pttl', KEYS[1]);
这个KEYS[1]就是我们设置的分布式锁的key
大致逻辑如下:
- 首先判断redis中是否存在这个key
- 如果不存在就使用hset设置这个key对应的value——ARGV[2]为1,然后设置这个key的超时时间——ARGV[1](顺带提一下hset适合存储对象,所以可得知redisson分布式锁存的是一个对象在redis中)
- 如果存在,就是重入锁的操作了
- 最后返回这个key的剩余存活时间(pttl以毫秒为单位返回 key 的剩余生存时间)
详细说明一下这个重入锁操作干了什么:
hincrby:增加 key 指定的哈希集中指定字段的数值。如果 key 不存在,会创建一个新的哈希集并与 key 关联。如果字段不存在,则字段的值在该操作执行前被设置为 0,HINCRBY 支持的值的范围限定在 64位 有符号整数
返回值:增值操作执行后的该字段的值
使用举栗:
redis> HSET myhash field 5
(integer) 1
redis> HINCRBY myhash field 1
(integer) 6
redis> HINCRBY myhash field -1
(integer) 5
redis> HINCRBY myhash field -10
(integer) -5
redis> 也就是说如果这个key存在,则将ARGV[2] 增加 1(实现可重入锁,同一个线程多次tryLock,每次加1,每次releaseLock就-1,当被减为0的时候,就代表该线程完全释放掉锁)
然后重置这个key的超时时间为ARGV[1]
继续往下:
    protected <T> RFuture<T> evalWriteAsync(String key, Codec codec, RedisCommand<T> evalCommandType, String script, List<Object> keys, Object... params) {
        //根据当前的CommandSyncService替换成CommandBatchService
        CommandBatchService executorService = createCommandBatchService();
        RFuture<T> result = executorService.evalWriteAsync(key, codec, evalCommandType, script, keys, params);
        if (!(commandExecutor instanceof CommandBatchService)) {
            executorService.executeAsync();
        }
        return result;
    }
如下方法实现了CommandSyncService替换成CommandBatchService
    private CommandBatchService createCommandBatchService() {
        //如果当前命令执行器是CommandBatchService就直接强转返回了
        if (commandExecutor instanceof CommandBatchService) {
            return (CommandBatchService) commandExecutor;
        }

        //如果不是CommandBatchService,将自己的配置信息提供出来,用于创建CommandBatchService
        MasterSlaveEntry entry = commandExecutor.getConnectionManager().getEntry(getName());
        BatchOptions options = BatchOptions.defaults()
                                .syncSlaves(entry.getAvailableSlaves(), 1, TimeUnit.SECONDS);

        return new CommandBatchService(commandExecutor.getConnectionManager(), options);
    }
创建的CommandBatchService如下

很明显,配置信息确实移交了,同时我发现了NioEventLoopGroup!!!看来redisson的底层是用了Netty啊,了解过网络编程的读者应该是知道Netty是干什么的,它在网络编程中多么重要我也不阐述了,这个东西暂时不谈,谈也谈不完,Netty的相关资料可以参考的我专栏
继续跟代码:
    @Override
    public <T, R> RFuture<R> evalWriteAsync(String key, Codec codec, RedisCommand<T> evalCommandType, String script, List<Object> keys, Object... params) {
        NodeSource source = getNodeSource(key);
        return evalAsync(source, false, codec, evalCommandType, script, keys, params);
    }
继续跟......执行脚本的关键代码来了
    private <T, R> RFuture<R> evalAsync(NodeSource nodeSource, boolean readOnlyMode, Codec codec, RedisCommand<T> evalCommandType, String script, List<Object> keys, Object... params) {
        //这里的isEvalCacheActive始终是false,所以只有当evalCommandType.getName().equals("EVAL")不成立的时候才会进入下面的代码,暂时先不解释直接跳过
        if (isEvalCacheActive() && evalCommandType.getName().equals("EVAL")) {
            RPromise<R> mainPromise = new RedissonPromise<R>();

            Object[] pps = copy(params);

            RPromise<R> promise = new RedissonPromise<R>();
            String sha1 = calcSHA(script);
            RedisCommand cmd = new RedisCommand(evalCommandType, "EVALSHA");
            List<Object> args = new ArrayList<Object>(2 + keys.size() + params.length);
            args.add(sha1);
            args.add(keys.size());
            args.addAll(keys);
            args.addAll(Arrays.asList(params));

            RedisExecutor<T, R> executor = new RedisExecutor<>(readOnlyMode, nodeSource, codec, cmd,
                                                        args.toArray(), promise, false, connectionManager, objectBuilder);
            executor.execute();

            promise.onComplete((res, e) -> {
                if (e != null) {
                    if (e.getMessage().startsWith("NOSCRIPT")) {
                        RFuture<String> loadFuture = loadScript(executor.getRedisClient(), script);
                        loadFuture.onComplete((r, ex) -> {
                            if (ex != null) {
                                free(pps);
                                mainPromise.tryFailure(ex);
                                return;
                            }

                            RedisCommand command = new RedisCommand(evalCommandType, "EVALSHA");
                            List<Object> newargs = new ArrayList<Object>(2 + keys.size() + params.length);
                            newargs.add(sha1);
                            newargs.add(keys.size());
                            newargs.addAll(keys);
                            newargs.addAll(Arrays.asList(pps));

                            NodeSource ns = nodeSource;
                            if (ns.getRedisClient() == null) {
                                ns = new NodeSource(nodeSource, executor.getRedisClient());
                            }

                            async(readOnlyMode, ns, codec, command, newargs.toArray(), mainPromise, false);
                        });
                    } else {
                        free(pps);
                        mainPromise.tryFailure(e);
                    }
                    return;
                }
                free(pps);
                mainPromise.trySuccess(res);
            });
            return mainPromise;
        }

        RPromise<R> mainPromise = createPromise();
        List<Object> args = new ArrayList<Object>(2 + keys.size() + params.length);
        args.add(script);
        args.add(keys.size());
        args.addAll(keys);
        args.addAll(Arrays.asList(params));
        async(readOnlyMode, nodeSource, codec, evalCommandType, args.toArray(), mainPromise, false);
        return mainPromise;
    }
所以暂时的焦点在如下代码:
        RPromise<R> mainPromise = createPromise();
        List<Object> args = new ArrayList<Object>(2 + keys.size() + params.length);
        args.add(script);
        args.add(keys.size());
        args.addAll(keys);
        args.addAll(Arrays.asList(params));
        async(readOnlyMode, nodeSource, codec, evalCommandType, args.toArray(), mainPromise, false);
return mainPromise;这里将脚本、key数量、key数组以及参数放入了一个list,其中这个参数中至少包括了锁的超时时间 和 当前connectionManager的id+当前线程的id的字符串。
继续跟进......调用到了CommandBatchService的async方法
    @Override
    public <V, R> void async(boolean readOnlyMode, NodeSource nodeSource,
            Codec codec, RedisCommand<V> command, Object[] params, RPromise<R> mainPromise, boolean ignoreRedirect) {
        //判断当前的操作类型是否是REDIS_READ_ATOMIC或者是REDIS_WRITE_ATOMIC
        if (isRedisBasedQueue()) {
            //下面判断当前是否是只读操作
            boolean isReadOnly = options.getExecutionMode() == ExecutionMode.REDIS_READ_ATOMIC;
            RedisExecutor<V, R> executor = new RedisQueuedBatchExecutor<>(isReadOnly, nodeSource, codec, command, params, mainPromise,
                    false, connectionManager, objectBuilder, commands, connections, options, index, executed, semaphore);
            executor.execute();
        } else {
            //很显然我们获取分布式锁是读写操作,走这一步
            RedisExecutor<V, R> executor = new RedisBatchExecutor<>(readOnlyMode, nodeSource, codec, command, params, mainPromise,
                    false, connectionManager, objectBuilder, commands, options, index, executed);
            executor.execute();
        }

    }
现在看一下这个RedisBatchExecutor是什么来头
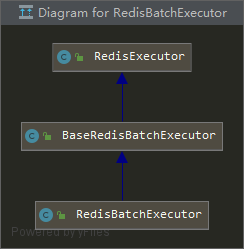
有点尴尬,我本以为和java.util.concurrent.ExecutorService有关系,我大意了QaQ,看来只能读一读了,本来还想偷个懒~~~
烦的eb,除了最上面的软件法律声明,真就没有注释呗!全靠类名想象呗~~~
实际上这里只是再一次的组织了相关参数
public class RedisBatchExecutor<V, R> extends BaseRedisBatchExecutor<V, R> {

    @SuppressWarnings("ParameterNumber")
    public RedisBatchExecutor(boolean readOnlyMode, NodeSource source, Codec codec, RedisCommand<V> command,
            Object[] params, RPromise<R> mainPromise, boolean ignoreRedirect, ConnectionManager connectionManager,
            RedissonObjectBuilder objectBuilder, ConcurrentMap<MasterSlaveEntry, Entry> commands,
            BatchOptions options, AtomicInteger index,
            AtomicBoolean executed) {
        super(readOnlyMode, source, codec, command, params, mainPromise, ignoreRedirect, connectionManager, objectBuilder,
                commands, options, index, executed);
    }

    @Override
    public void execute() {
        //父类的方法
        addBatchCommandData(params);
    }

}

    protected final void addBatchCommandData(Object[] batchParams) {
        MasterSlaveEntry msEntry = getEntry(source);
        Entry entry = commands.get(msEntry);
        if (entry == null) {
            entry = new Entry();
            Entry oldEntry = commands.putIfAbsent(msEntry, entry);
            if (oldEntry != null) {
                entry = oldEntry;
            }
        }

        if (!readOnlyMode) {
            entry.setReadOnlyMode(false);
        }

        Codec codecToUse = getCodec(codec);
        BatchCommandData<V, R> commandData = new BatchCommandData<V, R>(mainPromise, codecToUse, command, batchParams, index.incrementAndGet());
        entry.getCommands().add(commandData);
    }
执行结束之后,我们往回看!!!回到RedissonLock的evalWriteAsync方法,我再复制到下面一次
    protected <T> RFuture<T> evalWriteAsync(String key, Codec codec, RedisCommand<T> evalCommandType, String script, List<Object> keys, Object... params) {
        CommandBatchService executorService = createCommandBatchService();
        RFuture<T> result = executorService.evalWriteAsync(key, codec, evalCommandType, script, keys, params);
        //要开始执行redis操作了
        if (!(commandExecutor instanceof CommandBatchService)) {
            executorService.executeAsync();
        }
        return result;
    }
刚才分析过,这里的executorService才是真正做执行redis操作的对象
此时的commands对象如下:

以下代码我修剪过,删了不重要的部分
    public RFuture<BatchResult<?>> executeAsync() {

        //判断是否执行过,难道还有什么可能在其他地方执行过的嘛?暂时不纠结
        if (executed.get()) {
            throw new IllegalStateException("Batch already executed!");
        }

        //判断是否是IN_MEMORY模式,默认情况下是IN_MEMORY,所以不走这个分支
        if (this.options.getExecutionMode() != ExecutionMode.IN_MEMORY) {
            for (Entry entry : commands.values()) {
                BatchCommandData<?, ?> multiCommand = new BatchCommandData(RedisCommands.MULTI, new Object[] {}, index.incrementAndGet());
                entry.getCommands().addFirst(multiCommand);
                BatchCommandData<?, ?> execCommand = new BatchCommandData(RedisCommands.EXEC, new Object[] {}, index.incrementAndGet());
                entry.getCommands().add(execCommand);
            }
        }

        RPromise<BatchResult<?>> promise = new RedissonPromise<>();
        RPromise<Void> voidPromise = new RedissonPromise<Void>();

        //以下是设置Future回调相关的操作
        if (this.options.isSkipResult()
                && this.options.getSyncSlaves() == 0) {
            voidPromise.onComplete((res, ex) -> {
                executed.set(true);

                if (ex != null) {
                    for (Entry e : commands.values()) {
                        e.getCommands().forEach(t -> t.tryFailure(ex));
                    }

                    promise.tryFailure(ex);

                    commands.clear();
                    nestedServices.clear();
                    return;
                }

                commands.clear();
                nestedServices.clear();
                promise.trySuccess(new BatchResult<>(Collections.emptyList(), 0));
            });
        } else {
            voidPromise.onComplete((res, ex) -> {
                executed.set(true);
                if (ex != null) {
                    for (Entry e : commands.values()) {
                        e.getCommands().forEach(t -> t.tryFailure(ex));
                    }

                    promise.tryFailure(ex);

                    commands.clear();
                    nestedServices.clear();
                    return;
                }

                List<BatchCommandData> entries = new ArrayList<BatchCommandData>();
                for (Entry e : commands.values()) {
                    entries.addAll(e.getCommands());
                }
                Collections.sort(entries);
                List<Object> responses = new ArrayList<Object>(entries.size());
                int syncedSlaves = 0;
                for (BatchCommandData<?, ?> commandEntry : entries) {
                    if (isWaitCommand(commandEntry)) {
                        syncedSlaves = (Integer) commandEntry.getPromise().getNow();
                    } else if (!commandEntry.getCommand().getName().equals(RedisCommands.MULTI.getName())
                            && !commandEntry.getCommand().getName().equals(RedisCommands.EXEC.getName())
                            && !this.options.isSkipResult()) {

                        if (commandEntry.getPromise().isCancelled()) {
                            continue;
                        }

                        Object entryResult = commandEntry.getPromise().getNow();
                        try {
                            entryResult = RedisExecutor.tryHandleReference(objectBuilder, entryResult);
                        } catch (ReflectiveOperationException exc) {
                            log.error("Unable to handle reference from " + entryResult, exc);
                        }
                        responses.add(entryResult);
                    }
                }

                BatchResult<Object> result = new BatchResult<Object>(responses, syncedSlaves);
                promise.trySuccess(result);

                commands.clear();
                nestedServices.clear();
            });
        }

        AtomicInteger slots = new AtomicInteger(commands.size());

        for (Map.Entry<RFuture<?>, List<CommandBatchService>> entry : nestedServices.entrySet()) {
            slots.incrementAndGet();
            for (CommandBatchService service : entry.getValue()) {
                service.executeAsync();
            }

            entry.getKey().onComplete((res, e) -> {
                handle(voidPromise, slots, entry.getKey());
            });
        }

        for (Map.Entry<MasterSlaveEntry, Entry> e : commands.entrySet()) {
            RedisCommonBatchExecutor executor = new RedisCommonBatchExecutor(new NodeSource(e.getKey()), voidPromise,
                                                    connectionManager, this.options, e.getValue(), slots);
            executor.execute();
        }
        return promise;
    }
带着脚本和参数的commands终于要执行了

循环遍历每一个待执行的命令对象,开始使用RedisCommonBatchExecutor执行。创建并通过构造方法设置好RedisCommonBatchExecutor之后
public void execute() {
        if (mainPromise.isCancelled()) {
            free();
            return;
        }

        if (!connectionManager.getShutdownLatch().acquire()) {
            free();
            mainPromise.tryFailure(new RedissonShutdownException("Redisson is shutdown"));
            return;
        }

        codec = getCodec(codec);

        //获取redis连接
        RFuture<RedisConnection> connectionFuture = getConnection();

        RPromise<R> attemptPromise = new RedissonPromise<R>();
        mainPromiseListener = (r, e) -> {
            if (mainPromise.isCancelled() && connectionFuture.cancel(false)) {
                log.debug("Connection obtaining canceled for {}", command);
                timeout.cancel();
                if (attemptPromise.cancel(false)) {
                    free();
                }
            }
        };

        if (attempt == 0) {
            mainPromise.onComplete((r, e) -> {
                if (this.mainPromiseListener != null) {
                    this.mainPromiseListener.accept(r, e);
                }
            });
        }

        //按照某个时间间隔刷新超时时间的定时任务,这就是redisson的看门狗,这个很重要
        scheduleRetryTimeout(connectionFuture, attemptPromise);

        connectionFuture.onComplete((connection, e) -> {
            if (connectionFuture.isCancelled()) {
                connectionManager.getShutdownLatch().release();
                return;
            }

            if (!connectionFuture.isSuccess()) {
                connectionManager.getShutdownLatch().release();
                exception = convertException(connectionFuture);
                return;
            }

            //发送命令到redis
            sendCommand(attemptPromise, connection);

            //发送数据之后添加监听器
            writeFuture.addListener(new ChannelFutureListener() {
                @Override
                public void operationComplete(ChannelFuture future) throws Exception {
                    checkWriteFuture(writeFuture, attemptPromise, connection);
                }
            });

            releaseConnection(attemptPromise, connectionFuture);
        });

        attemptPromise.onComplete((r, e) -> {
            checkAttemptPromise(attemptPromise, connectionFuture);
        });
    }
发送命令到redis的代码
    @Override
    protected void sendCommand(RPromise<Void> attemptPromise, RedisConnection connection) {
        boolean isAtomic = options.getExecutionMode() != ExecutionMode.IN_MEMORY;
        boolean isQueued = options.getExecutionMode() == ExecutionMode.REDIS_READ_ATOMIC
                                || options.getExecutionMode() == ExecutionMode.REDIS_WRITE_ATOMIC;

        List<CommandData<?, ?>> list = new ArrayList<>(entry.getCommands().size());
        if (source.getRedirect() == Redirect.ASK) {
            RPromise<Void> promise = new RedissonPromise<Void>();
            list.add(new CommandData<Void, Void>(promise, StringCodec.INSTANCE, RedisCommands.ASKING, new Object[] {}));
        }

        //遍历所有的执行命令并添加到list集合
        for (CommandData<?, ?> c : entry.getCommands()) {
            if ((c.getPromise().isCancelled() || c.getPromise().isSuccess())
                    && !isWaitCommand(c)
                        && !isAtomic) {
                // skip command
                continue;
            }
            list.add(c);
        }

        if (list.isEmpty()) {
            writeFuture = connection.getChannel().newPromise();
            attemptPromise.trySuccess(null);
            timeout.cancel();
            return;
        }

        //调用连接对象的发送方法
        writeFuture = connection.send(new CommandsData(attemptPromise, list, options.isSkipResult(), isAtomic, isQueued, options.getSyncSlaves() > 0));
    }
使用Netty发送命令到redis
RedisConnection:
    public ChannelFuture send(CommandsData data) {
        return channel.writeAndFlush(data);
    }
看到这里,很明显嘛,channel的writeAndFlush就是Netty的操作

之后的执行结果都是异步返回
再继续执行,回到RedisCommonBatchExecutor的execute方法,向这个ChannelFuture添加监听器
writeFuture.addListener(new ChannelFutureListener() {
    @Override
    public void operationComplete(ChannelFuture future) throws Exception {
        checkWriteFuture(writeFuture, attemptPromise, connection);
    }
});
最后释放连接
releaseConnection(attemptPromise, connectionFuture);到此不再分析,看到Netty就知道这个异步加锁操作的的结果,是通过监听器来实现的
释放锁
RedissonLock
    @Override
    public RFuture<Void> unlockAsync(long threadId) {
        RPromise<Void> result = new RedissonPromise<Void>();

        //通过lua脚本去redis删除key,或者说是直接让key过期,基本和加锁的执行流程相同
        RFuture<Boolean> future = unlockInnerAsync(threadId);

        future.onComplete((opStatus, e) -> {
            //移除给redis中锁续期的定时任务
            cancelExpirationRenewal(threadId);

            if (e != null) {
                result.tryFailure(e);
                return;
            }

            if (opStatus == null) {
                IllegalMonitorStateException cause = new IllegalMonitorStateException("attempt to unlock lock, not locked by current thread by node id: "
                        + id + " thread-id: " + threadId);
                result.tryFailure(cause);
                return;
            }

            result.trySuccess(null);
        });

        return result;
    }
实际释放锁代码
    protected RFuture<Boolean> unlockInnerAsync(long threadId) {
        return evalWriteAsync(getName(), LongCodec.INSTANCE, RedisCommands.EVAL_BOOLEAN,
                "if (redis.call('hexists', KEYS[1], ARGV[3]) == 0) then " +
                        "return nil;" +
                        "end; " +
                        "local counter = redis.call('hincrby', KEYS[1], ARGV[3], -1); " +
                        "if (counter > 0) then " +
                        "redis.call('pexpire', KEYS[1], ARGV[2]); " +
                        "return 0; " +
                        "else " +
                        "redis.call('del', KEYS[1]); " +
                        "redis.call('publish', KEYS[2], ARGV[1]); " +
                        "return 1; " +
                        "end; " +
                        "return nil;",
                Arrays.asList(getName(), getChannelName()), LockPubSub.UNLOCK_MESSAGE, internalLockLeaseTime, getLockName(threadId));
    }
总结
其实我这里可以不用异步的加锁来研究源码,但是我了解到Redisson底层是使用了Netty,还是向看看Redisson是怎么玩的
通常情况下使用redisson分布式锁只需记住如下几点:
- redisson使用lua脚本执行操作redis保证了原子性
- redisson会在加锁成功之后添加一个定时任务,在业务代码没有之前完成释放锁之前,为该分布式锁续期,这就是Redisson所说的看门狗


 285
285


 被折叠的 条评论
为什么被折叠?
被折叠的 条评论
为什么被折叠?
 到【灌水乐园】发言


