


MyBatis是什么?
开源的持久层框架,底层仍然是jdbc。
(了解)
Jdbc:易掌握、性能好、代码繁琐
Hibernate:难掌握、性能不好(复杂的查询经常需要优化sql),代码简介,可以不写sql。
Mybatis:比较容易掌握,性能一般,代码简洁,需要些sql。
编程步骤()
Step1:导包(mybatis,ojdbc,junit)
Step2:添加MyBatis配置文件
SqlMapConfig.xml的配置:
<configuration>
    <environments default="environment">
        <environment id="environment">
            <transactionManager type="JDBC" />
            <dataSource type="POOLED">
                <property name="driver" value="oracle.jdbc.driver.OracleDriver" />
                <property name="url"
                    value="jdbc:oracle:thin:@localhost:1521:xe" />
                <property name="username" value="SYSTEM" />
                <property name="password" value="tarena" />
            </dataSource>
        </environment>
    </environments>
    <mappers>
        <!-- 指定映射文件的位4子,注意用/隔开-->
        <mapper resource="entity/DeptMapper.xml" />
    </mappers>
</configuration>
SqlMap.xml的配置:
<mapper namespace="test">
    <!-- id:每一条sql语句应该有唯一的id(称之为sqlID)
        parameterType:参数类型,要写类的完整的名字 -->
    <insert id="save" parameterType="entity.Employee">
        insert into t_emp values(t_emp_seq.nextval,#{ename},#{salary},#{age})
    </insert>

    <!-- resultType:返回类型(要写类的完整的名字) -->
    <select id="findAll" resultType="entity.Employee">
        select * from t_emp
    </select>

    <select id="findById" parameterType="int" resultType="entity.Employee">
        select * from t_emp where id = #{id1}
    </select>

    <update id="update" parameterType="entity.Employee">
        update t_emp set ename=#{ename},salary=#{salary},age=#{age} where id=#{id}
    </update>

    <delete id="delete" parameterType="int">
        delete from t_emp where id=#{id1}
    </delete>
Step3:添加实体类。注:实体类的属性名要和表的字段名要一样(大小写可以忽略)
package entity;

public class Employee {
    private int id;
    private String ename;
    private double salary;
    private int age;
    public int getId() {
        return id;
    }
    public void setId(int id) {
        this.id = id;
    }
Step4:添加映射文件。注:存放sql语句(不要忘记修改MyBatis配置文件,指定映射文件的位置)
    <mappers>
        <!-- 指定映射文件的位4子 -->
        <mapper resource="entity/EmpMapper.xml" />
    </mappers>
Step5:调用Mybatis的api访问数据库
public class TestCase {
    private SqlSession session;
    @Before
    public void init(){
        String config="SqlMapConfig.xml";
        SqlSessionFactoryBuilder ssfb = new SqlSessionFactoryBuilder();
        SqlSessionFactory ssf = ssfb.build(TestCase.class.getClassLoader().getResourceAsStream(config));
        //获得SQLSession对象
        session = ssf.openSession();
    }
    @Test
    public void test1(){

        //调用SQLSession对象提供的方法访问数据库
        //第一参数是sql语句的id;第二个参数是对象
        Employee e = new Employee();
        e.setEname("大道");
        e.setAge(22);
        e.setId(1);
        e.setSalary(213);
        session.insert("test.save",e);
        //提交事务(添加、修改、删除)
        session.commit();
        //关闭资源
        session.close();
    }
原理 (了解)
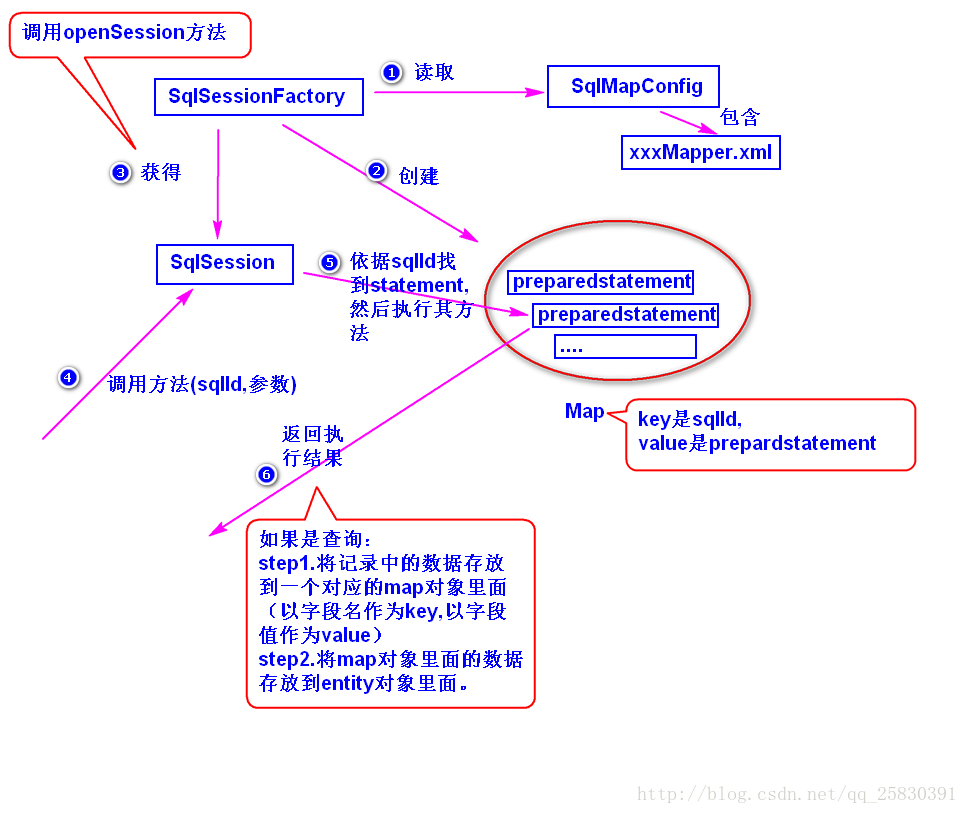
返回Map类型的结果
EmpMapper.xml配置:
<!-- 返回Map类型的结果 -->
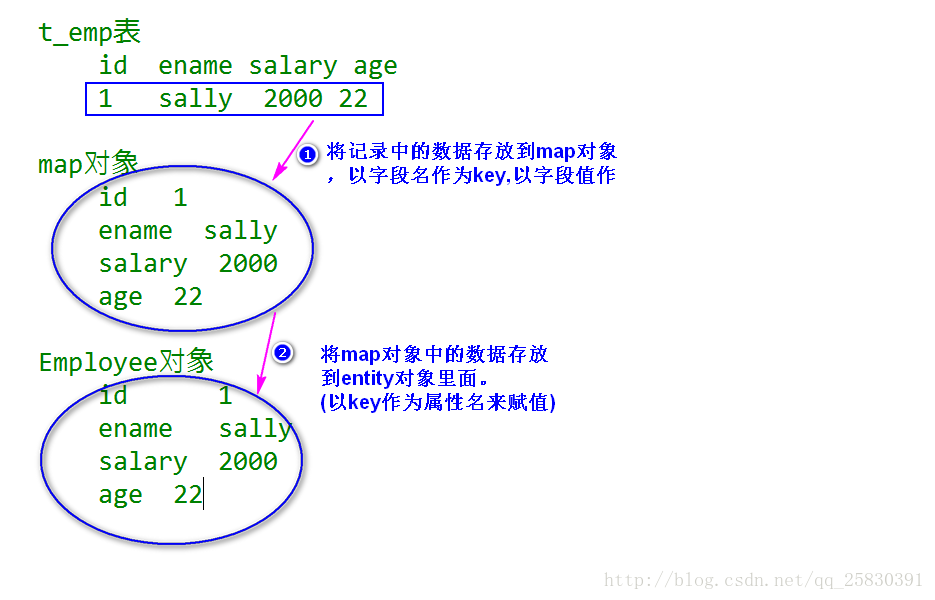
<!-- 即拿到MyBatis查询的中间结果。
注:MyBatis会先将记录存放到一个对应的map对象里面,
然后再将map中的数据存放到对应的实体对象里
map:是java.util.Map的简写形式 -->
<select id="findById2" parameterType="int" resultType="map" >
select * from t_emp where id = #{id1}
</select>测试代码:
@Test
public void test6(){
Map map = session.selectOne("test.findById2",162);
System.out.println(map);
/*注意,oracle数据库表的字段名都是大写*/
System.out.println(map.get("ENAME"));
session.close();
}解决实体类的属性与表的字段名不一致的情况
方式一:使用别名:select id empNo,ename name…
方式二:使用resultMap元素
EmpMapper.xml配置:
    <!-- resultMap用来告诉MyBatis,字段名与实体类的属性名的对应关系。 -->
    <resultMap type="entity.Emp2" id="emp2ResultMap">
        <result property="empNo" column="id"/>
        <result property="name" column="ename"/>
    </resultMap>

    <select id="findById3" parameterType="int" resultMap="emp2ResultMap">
        select * from t_emp where id = #{id1}
    </select>
测试代码
    @Test
    public void test7(){
        Emp2 emp = session.selectOne("test.findById3", 162);
        System.out.println(emp);
        session.close();


 3419
3419

 被折叠的 条评论
为什么被折叠?
被折叠的 条评论
为什么被折叠?
 到【灌水乐园】发言


