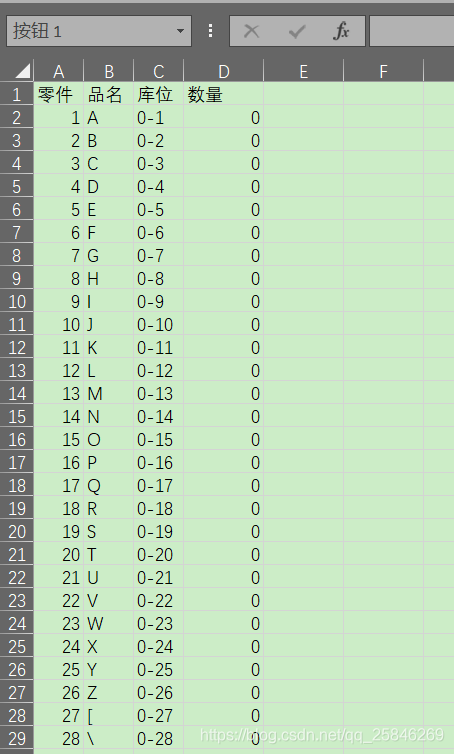
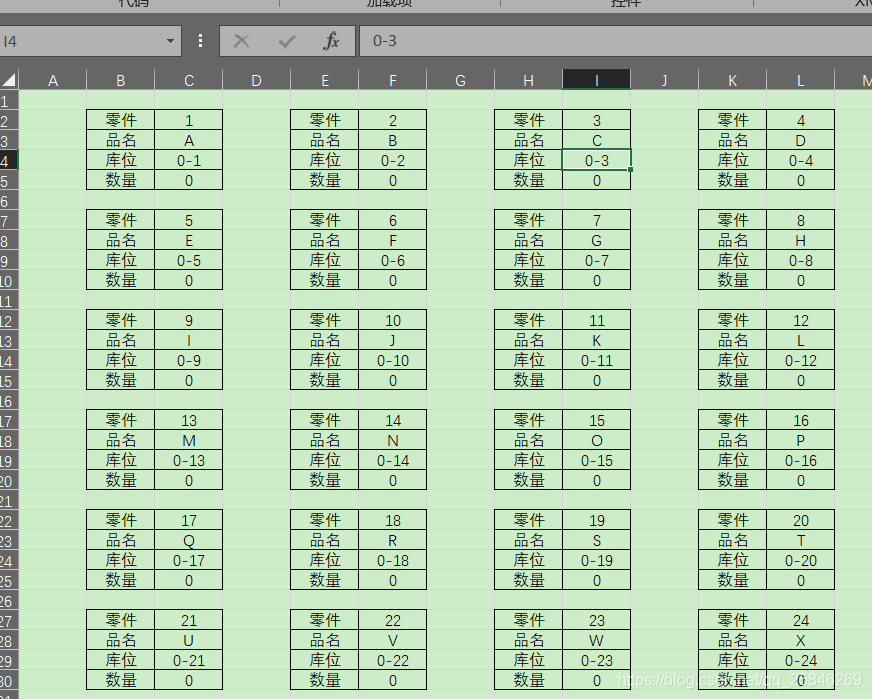
此方法能将一列生成任意列的列表:


Option Explicit

'Callback for rxCol2Cols onAction
Sub column2Columns(control As IRibbonControl)
    Application.ScreenUpdating = False
    Dim iRow As Long, nCol, nRow As Long, i As Long, j As Long
    Dim TempRng As Range '临时单元格区域
    Dim iRowStr As String '要插入新行的数据集
    Sht2.Cells.Delete
    nCol = InputBox("请输入要生成的行数:", "提示", 3)
    If nCol = "" Then Exit Sub Else nCol = CLng(nCol)
    iRow = Sht1.Rows(1).SpecialCells(xlCellTypeConstants, 23).Count                 '标题的列数,决定每个结果集的行数
    nRow = Sht1.Range("A65536").End(xlUp).Row                                       '取原始数据的有效行数,如果是2007及以上的版本可以为:A1048576
    For i = 2 To nRow                                                               '从Sht1的第二行开始遍历非空单元格区域,并将需要的值写入Sht2对应的单元格
        Set TempRng = Sht1.Range(Replace("a{0}:c{0}", "{0}", i))
        For j = 1 To iRow
            Sht2.Cells(Int((i - 2) / nCol) * iRow + j, (i - 2) Mod nCol + 1).Value = TempRng(1, j).Value  '写值
        Next j
    Next i
    Sht2.Cells.SpecialCells(xlCellTypeBlanks).Delete Shift:=xlUp                '删除空白单元格,向上移动

    For i = nCol To 1 Step -1 '从右到左插入列
        For j = 1 To 2
            Sht2.Columns(i).Insert Shift:=xlToRight, CopyOrigin:=xlFormatFromLeftOrAbove      '插入2列
        Next j
        For Each TempRng In Sht2.Columns(i + 2).SpecialCells(xlCellTypeConstants, 23)         '遍历非空列
            With TempRng
                .Offset(0, -1).Value = Sht1.Cells(1, (.Row - 1) Mod iRow + 1)                 '位移赋值
            End With
        Next TempRng
    Next i
    Set TempRng = Nothing
    For i = Int(nRow / nCol) * iRow + 1 To 1 Step -iRow          '生成要插入的行集
        iRowStr = Replace("{0}:{0}", "{0}", i)
        Debug.Print iRowStr
        Sht2.Range(iRowStr).Insert Shift:=xlDown, CopyOrigin:=xlFormatFromLeftOrAbove              '插入行集
    Next i

     '要插入新行的列集


    Call iGetLines '为有数据的单元格加边框
    Sht2.Activate
    Cells(1, 1).Select
    Application.ScreenUpdating = True
x: Exit Sub
End Sub

Sub iGetLines() '为有数据的单元格加边框
    With Sht2.Cells.SpecialCells(xlCellTypeConstants, 23)
        .Borders(xlDiagonalDown).LineStyle = xlNone
        .Borders(xlDiagonalUp).LineStyle = xlNone
        With .Borders(xlEdgeLeft)
            .LineStyle = xlContinuous
            .ColorIndex = 0
            .TintAndShade = 0
            .Weight = xlThin
        End With
        With .Borders(xlEdgeTop)
            .LineStyle = xlContinuous
            .ColorIndex = 0
            .TintAndShade = 0
            .Weight = xlThin
        End With
        With .Borders(xlEdgeBottom)
            .LineStyle = xlContinuous
            .ColorIndex = 0
            .TintAndShade = 0
            .Weight = xlThin
        End With
        With .Borders(xlEdgeRight)
            .LineStyle = xlContinuous
            .ColorIndex = 0
            .TintAndShade = 0
            .Weight = xlThin
        End With
        With .Borders(xlInsideVertical)
            .LineStyle = xlContinuous
            .ColorIndex = 0
            .TintAndShade = 0
            .Weight = xlThin
        End With
        With .Borders(xlInsideHorizontal)
            .LineStyle = xlContinuous
            .ColorIndex = 0
            .TintAndShade = 0
            .Weight = xlThin
        End With
    End With
End Sub
对应的IRibbon:
<customUI
    xmlns="http://schemas.microsoft.com/office/2006/01/customui"
    xmlns:nsHost="My Shared Ribbon">
    <ribbon startFromScratch="false">
        <tabs>
            <tab idMso="TabHome">

              <group idQ="nsHost:rxGrpCol2Cols"
                    label="转换工具"
                    insertAfterMso="GroupFont">
                    <button id="rxCol2Cols"
                            label="生成"
                            image="c2cs"
                            size="large"
                            screentip="列表转换小工具"
                            supertip="此工具可以将一列生成任意指定的指定数量的列"
                            onAction="column2Columns"/>
                </group>
            </tab>
        </tabs>
    </ribbon>
</customUI>
其中的
image="c2cs"
要插入一个名为c2cs的图片文件到资源中去的格式可以是PNG,JPG,GIF,TIF,ICO,BMP
大小建议是40px*40px


 本文介绍了一种使用VBA在Excel中将一列数据转换为多列的实用方法,通过输入指定的列数,该工具能够高效地进行数据重组,适用于数据整理和报告制作等场景。


 被折叠的 条评论
为什么被折叠?


