


1、前言
如果一个项目由一个父模块和若干个子模块构成,每个模块都对应着一个pom.xml。它们之间通过继承相互关联,都是maven管理的,那么这种就是多模块项目。
多模块适用于一些比较大的项目,通过合理的模块拆分,实现代码的复用,便于维护和管理。
比如有一些是common、utils等子模块提供公共服务。
2、创建多模块
2.1、创建父模块
左上角选择File->New->Project后,选择Spring Initializr,默认使用的Java版本是1.8

进入下一步,可以设置项目的一些基本信息,过程省略,该填写的就填写

点击Next,进入下一个选择dependency的界面,作用是在pom中自动添加一些依赖,在项目初始化时就下载。这里我们不需要任何依赖。
创建完成后,删除src、target等目录,父模块只做依赖管理,不需要编写代码。
2.2、创建子模块
右键项目名,New->module

创建过程同上,依次创建file-common、file-fastdfs-client、file-obs-client、file-ap(入口)
删除父子模块中所有的mvnw、mvnw.cmd文件及.mvn文件夹

到此为止,简单的父模块和子模块创建完成。
3、多模块配置
3.1、父pom
父pom是抽取统一的配置信息和依赖版本控制,方便子pom直接引用,简化子pom的配置;
父pom的依赖,子模块都可以引用。
<?xml version="1.0" encoding="UTF-8"?>
<project xmlns="http://maven.apache.org/POM/4.0.0" xmlns:xsi="http://www.w3.org/2001/XMLSchema-instance"
xsi:schemaLocation="http://maven.apache.org/POM/4.0.0 https://maven.apache.org/xsd/maven-4.0.0.xsd">
<modelVersion>4.0.0</modelVersion>
<!-- parent指明继承关系,给出被继承的父项目的具体信息-->
<parent>
<groupId>org.springframework.boot</groupId>
<artifactId>spring-boot-starter-parent</artifactId>
<version>2.3.1.RELEASE</version>
<relativePath/> <!-- lookup parent from repository -->
</parent>
<groupId>com.alex</groupId>
<artifactId>file</artifactId>
<version>1.0.0</version>
<name>file-center</name>
<description>file-service-java</description>
<!--父模块打包类型必须为pom-->
<packaging>pom</packaging>
<properties>
<java.version>1.8</java.version>
</properties>
<dependencies>
<dependency>
<groupId>org.springframework.boot</groupId>
<artifactId>spring-boot-starter</artifactId>
</dependency>
<dependency>
<groupId>org.springframework.boot</groupId>
<artifactId>spring-boot-starter-test</artifactId>
<scope>test</scope>
</dependency>
<!-- log -->
<dependency>
<groupId>org.slf4j</groupId>
<artifactId>slf4j-api</artifactId>
<version>1.7.25</version>
</dependency>
<dependency>
<groupId>org.slf4j</groupId>
<artifactId>slf4j-log4j12</artifactId>
<version>1.7.25</version>
</dependency>
<dependency>
<groupId>org.springframework</groupId>
<artifactId>spring-web</artifactId>
</dependency>
<dependency>
<groupId>org.projectlombok</groupId>
<artifactId>lombok</artifactId>
</dependency>
</dependencies>
<!--声明有几个子模块-->
<modules>
<module>file-fastdfs-client</module>
<module>file-obs-client</module>
<module>file-api</module>
<module>file-common</module>
</modules>
<!--build作用是打包,必须要写在需要打包的项目里。这里的父模块不需要打包运行,所以删掉。-->
<!-- <build>-->
<!-- <plugins>-->
<!-- <plugin>-->
<!-- <groupId>org.apache.maven.plugins</groupId>-->
<!-- <artifactId>maven-compiler-plugin</artifactId>-->
<!-- <version>3.1</version>-->
<!-- <configuration>-->
<!-- <source>${java.version}</source>-->
<!-- <target>${java.version}</target>-->
<!-- </configuration>-->
<!-- </plugin>-->
<!-- <plugin>-->
<!-- <groupId>org.apache.maven.plugins</groupId>-->
<!-- <artifactId>maven-surefire-plugin</artifactId>-->
<!-- <version>2.19.1</version>-->
<!-- <configuration>-->
<!-- <skipTests>true</skipTests> <!–默认关掉单元测试 –>-->
<!-- </configuration>-->
<!-- </plugin>-->
<!-- </plugins>-->
<!-- </build>-->
</project>
有多少个子模块,就写多少个module。新增的子模块也必须加到父pom的modules中。
继承是maven中很强大的一种功能,继承可以使子pom获得parent中的各项配置,对子pom进行统一的配置和依赖管理。父pom中的大多数元素都能被子pom继承。
3.2、子pom
子模块的parent要声明父模块;
file-fastdfs-client
pom.xml
不需要打包
<?xml version="1.0" encoding="UTF-8"?>
<project xmlns="http://maven.apache.org/POM/4.0.0" xmlns:xsi="http://www.w3.org/2001/XMLSchema-instance"
         xsi:schemaLocation="http://maven.apache.org/POM/4.0.0 https://maven.apache.org/xsd/maven-4.0.0.xsd">
    <modelVersion>4.0.0</modelVersion>
    <artifactId>fastdfs</artifactId>
    <version>1.0.0</version>
    <name>file-fastdfs-client</name>
    <description>fastdfs</description>

    <!--声明父模块-->
    <parent>
        <groupId>com.alex</groupId>
        <artifactId>file</artifactId>
        <version>1.0.0</version>
    </parent>

    <dependencies>
        <!-- fastdfs -->
        <dependency>
            <groupId>org.csource</groupId>
            <artifactId>fastdfs-client-java</artifactId>
            <version>1.29-SNAPSHOT</version>
        </dependency>

        <!-- 子模块间相互引用 -->
        <dependency>
            <groupId>com.alex</groupId>
            <artifactId>obs</artifactId>
            <version>1.0.0</version>
        </dependency>

        <dependency>
            <groupId>org.apache.commons</groupId>
            <artifactId>commons-lang3</artifactId>
        </dependency>
    </dependencies>


    <build>
        <resources>
            <resource>
                <directory>src/main/java</directory>
                <includes>
                    <include>**/*.*</include>
                </includes>
            </resource>
            <resource>
                <directory>src/main/resources</directory>
                <includes>
                    <include>**.*</include>
                    <include>**/*.*</include>
                    <include>**/*/*.*</include>
                </includes>
            </resource>
        </resources>

    </build>

</project>
注意:子模块间相互引用方式
<!-- 子模块间相互引用 -->
<dependency>
    <groupId>com.alex</groupId>
    <artifactId>obs</artifactId>
    <version>1.0.0</version>
</dependency>
file-api
pom.xml
需要打包
<?xml version="1.0" encoding="UTF-8"?>
<project xmlns="http://maven.apache.org/POM/4.0.0" xmlns:xsi="http://www.w3.org/2001/XMLSchema-instance"
         xsi:schemaLocation="http://maven.apache.org/POM/4.0.0 https://maven.apache.org/xsd/maven-4.0.0.xsd">
    <modelVersion>4.0.0</modelVersion>

    <artifactId>file-web-api</artifactId>
    <version>1.0.0</version>
    <name>file-web-api</name>
    <description>web restful api</description>
    <packaging>jar</packaging>

    <!--声明父模块-->
    <parent>
        <groupId>com.alex</groupId>
        <artifactId>file</artifactId>
        <version>1.0.0</version>
    </parent>

    <profiles>
        <profile>
            <!-- 开发环境 -->
            <id>dev</id>
            <properties>
                <profileActive>dev</profileActive>
            </properties>
            <!-- 默认激活的环境 -->
            <activation>
                <activeByDefault>true</activeByDefault>
            </activation>
        </profile>
        <profile>
            <!-- 生产环境 -->
            <id>prod</id>
            <properties>
                <profileActive>prod</profileActive>
            </properties>
        </profile>
    </profiles>

    <dependencies>
        <dependency>
            <groupId>org.springframework.boot</groupId>
            <artifactId>spring-boot-starter-web</artifactId>
        </dependency>

        <dependency>
            <groupId>org.springframework.boot</groupId>
            <artifactId>spring-boot-devtools</artifactId>
            <scope>runtime</scope>
            <optional>true</optional>
        </dependency>

         <!-- 子模块间相互引用 -->
        <dependency>
            <groupId>com.alex</groupId>
            <artifactId>fastdfs</artifactId>
            <version>1.0.0</version>
            <scope>compile</scope>
        </dependency>
        <dependency>
            <groupId>com.alex</groupId>
            <artifactId>common</artifactId>
            <version>1.0.0</version>
            <scope>compile</scope>
        </dependency>
        <dependency>
            <groupId>com.alex</groupId>
            <artifactId>obs</artifactId>
            <version>1.0.0</version>
            <scope>compile</scope>
        </dependency>
    </dependencies>
	<!-- 打包 -->
    <build>
        <plugins>
            <plugin>
                <groupId>org.springframework.boot</groupId>
                <artifactId>spring-boot-maven-plugin</artifactId>
            </plugin>
        </plugins>
    </build>

</project>
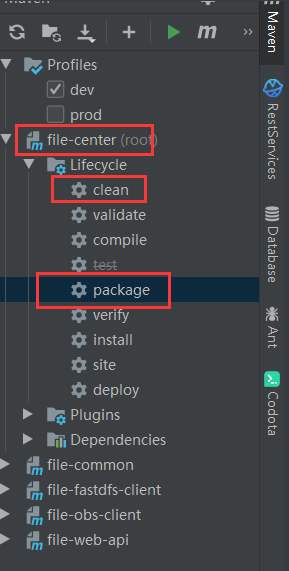
4、打包
打包一定是要在父pom下打包
5、文件目录
F:.
├─.idea
├─file-api
│  ├─.mvn
│  │  └─wrapper
│  ├─src
│  │  ├─main
│  │  │  ├─java
│  │  │  │  └─com
│  │  │  │      └─alex
│  │  │  │          └─web
│  │  │  │              ├─base
│  │  │  │              ├─common
│  │  │  │              ├─config
│  │  │  │              └─controller
│  │  │  └─resources
│  │  │      ├─static
│  │  │      └─templates
│  │  └─test
│  │      └─java
│  │          └─com
│  │              └─alex
│  │                  └─web
|  └─target
├─file-common
│  ├─.mvn
│  │  └─wrapper
│  ├─src
│  │  └─main
│  │      ├─java
│  │      │  └─com
│  │      │      └─alex
│  │      │          └─common
│  │      │              └─utils
│  │      └─resources
|  └─target
├─file-fastdfs-client
│  ├─.mvn
│  │  └─wrapper
│  ├─src
│  │  ├─main
│  │  │  ├─java
│  │  │  │  └─com
│  │  │  │      └─alex
│  │  │  │          └─fastdfs
│  │  │  │              └─fastDFS
│  │  │  └─resources
│  │  │      ├─static
│  │  │      └─templates
│  │  └─test
│  │      └─java
│  │          └─com
│  │              └─alex
│  │                  └─fastdfs
|  └─target
└─file-obs-client
    ├─.mvn
    │  └─wrapper
    ├─src
    │  ├─main
    │  │  ├─java
    │  │  │  └─com
    │  │  │      └─alex
    │  │  │          └─obs
    │  │  │              ├─client
    │  │  │              └─utils
    │  │  └─resources
    │  └─test
    │      └─java
    │          └─com
    │              └─alex
    │                  └─obs
    └─target


 1696
1696


 被折叠的 条评论
为什么被折叠?
被折叠的 条评论
为什么被折叠?
 到【灌水乐园】发言


