


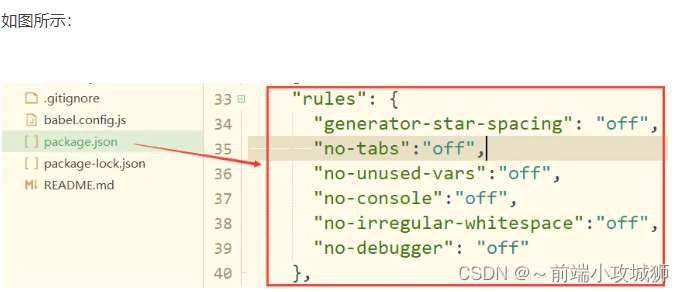
1.VUE如何关闭Eslint 的方法
在package.json文件内加入如下代码:
"rules": {
    "generator-star-spacing": "off",
    "no-tabs":"off",
    "no-unused-vars":"off",
    "no-console":"off",
    "no-irregular-whitespace":"off",
    "no-debugger": "off"
},
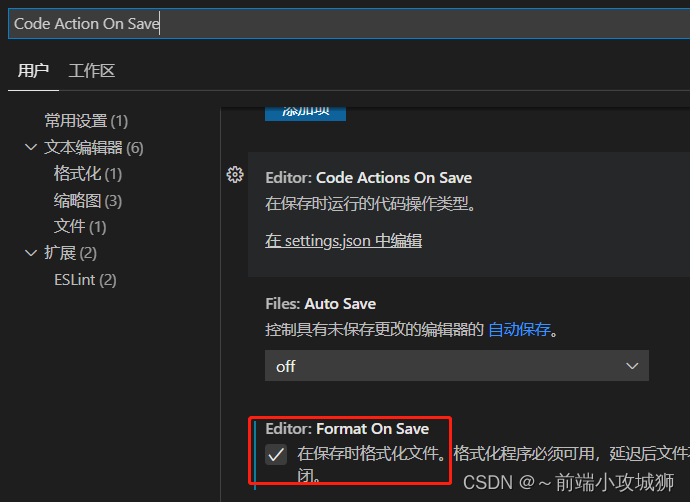
2.vscode ctrl+s后自动格式化生效
3.Uncaught DOMException: Blocked a frame with origin “null“ from accessing a cross-origin frame 4.漂亮的遮罩层
<body>
    <div id="appLoading">
        <div class='loading'></div>
    </div>
    <div id="app" style="display: none"></div>
</body>

<style media="screen" type="text/css">
        .loading{

            position: absolute;
            height: 100%;
            width: 100%;
            background-color: #000;
            bottom: 0;
            left: 0;
            right: 0;
            top: 0;
            z-index: 9999;;
            opacity: 0.8;
        }

        .loading.fixed {
           position: fixed;
        }

        .loading:before {
             content: '';
             background-color: rgba(0,0,0,0);
             border: 5px solid rgba(0,183,229,0.9);
             opacity: .9;
             border-right: 5px solid rgba(0,0,0,0);
             border-left: 5px solid rgba(0,0,0,0);
             border-radius: 50px;
             box-shadow: 0 0 35px #2187e7;
             width: 50px;
             height: 50px;
             -moz-animation: spinPulse 1s infinite ease-in-out;
             -webkit-animation: spinPulse 1s infinite linear;
             margin: -25px 0 0 -25px;
             position: absolute;
             top: 50%;
             left: 50%;
         }

        .loading:after {
             content: '';
             background-color: rgba(0,0,0,0);
             border: 5px solid rgba(0,183,229,0.9);
             opacity: .9;
             border-left: 5px solid rgba(0,0,0,0);
             border-right: 5px solid rgba(0,0,0,0);
             border-radius: 50px;
             box-shadow: 0 0 15px #2187e7;
             width: 30px;
             height: 30px;
             -moz-animation: spinoffPulse 1s infinite linear;
             -webkit-animation: spinoffPulse 1s infinite linear;

             margin: -15px 0 0 -15px;
             position: absolute;
             top: 50%;
             left: 50%;
        }
        @-moz-keyframes spinPulse {

            0% {

                -moz-transform:rotate(160deg);
                opacity: 0;
                box-shadow: 0 0 1px #2187e7;
            }
            50% {

                -moz-transform: rotate(145deg);
                opacity: 1;
            }
            100% {

                -moz-transform: rotate(-320deg);
                opacity: 0;
            }
        }
        @-moz-keyframes spinoffPulse {

            0% {

                -moz-transform: rotate(0deg);
            }
            100% {

                -moz-transform: rotate(360deg);
            }
        }
        @-webkit-keyframes spinPulse {

            0% {

                -webkit-transform: rotate(160deg);
                opacity: 0;
                box-shadow: 0 0 1px #2187e7;
            }
            50% {

                -webkit-transform: rotate(145deg);
                opacity: 1;
            }
            100% {

                -webkit-transform: rotate(-320deg);
                opacity: 0;
            }
        }
        @-webkit-keyframes spinoffPulse {

            0% {

                -webkit-transform: rotate(0deg);
            }
            100% {

                -webkit-transform: rotate(360deg);
            }
        }
</style>
在App.vue中判断项目未加载则显示loading样式,加载完成则正常显示项目
mounted(){
	document.getElementById('app').style.display = 'block';
	document.getElementById('appLoading').style.display = 'none';
}
5.html常见语义化标签
- header 表示网页头部,主要用于放置logo,导航,搜索框等
- main 表示网页主体 主要内容都放里面
- footer 表示网页底部 主要放置版权,友情链接等
- nav 导航栏
- aside 侧边栏
- section 表示一块独立区域 当无法用其他标签表示的区域时可以使用
- article 表示网页中的一块内容
<!DOCTYPE html> <html lang="en"> <head> <meta charset="UTF-8"> <meta name="viewport" content="width=device-width, initial-scale=1.0"> <title>Document</title> </head> <body> <!-- 语义化标签是块元素,独占一行 全部可以用div代替 --> <!-- header表示网页头部 主要用于放置一些logo、导航、搜索框等 --> <header> 我是网页的头部 <!-- nav表示页面的导航栏 --> <nav>导航栏</nav> </header> <!-- main标签表示网页中的主体内容 --> <main> 我是网页的主体 <!-- aside表示侧边栏 --> <aside>侧边栏</aside> <!-- section表示一块独立的区域 --> <section>独立区域</section> <!-- article表示网页中的一块内容 --> <article> <p> 锄禾日当午,<br> 汗滴禾下土,<br> 谁知盘中餐,<br> 粒粒皆辛苦.<br> </p> </article> </main> <!-- footer表示网页底部 主要用于放置一些版权信息,友情链接 --> <footer> 网页底部 </footer> <!-- 以上标签都是H5新增的语义化标签,他们并不能支持所有的浏览器, 所以基本上不用,如果使用也就nav用得最多,基本上可以使用div代替以上所有标签 --> </body> </html> - em和strong 都表示强调 一个默认斜体显示,一个加粗显示
- i和b 无语义 仅仅是斜体和加粗
- q标签表示短引用 是行内元素
- blockquote表示长引用 是块元素
- span 没有语义 主要作用就是选中文本
- sub 下标 sup上标
- 常用的标签:div和span 可以代替以上所有语义标签
<!DOCTYPE html>
<html lang="en">
<head>
    <meta charset="UTF-8">
    <meta name="viewport" content="width=device-width, initial-scale=1.0">
    <title>Document</title>
</head>
<body>
    <!--
        em标签 表示强调 默认斜体显示
        strong标签 表示强调 加粗

        em和strong为行内元素
     -->
    <p>今天<em>天气</em>真好</p>
    <p>今天<strong>天气</strong>真好</p>

    <!-- i和b无语义 就是斜体和加粗 -->
    <p>今天<i>天气</i>真好</p>
    <p>今天<b>天气</b>真好</p>

    <!--
        q标签表示短引用
        blockquote标签表示长引用 块元素
        p标签中不能放任何块元素
     -->
    <p>
        鲁迅说:<q>地上本没有路走的人多了便成了路</q>
    </p>
    <blockquote>
        床前明月光<br>
        疑是地上霜<br>
    </blockquote>

    <!-- span没有语义 主要作用就是选中文本 -->
    <span>我是span</span>

    <!--
        sub下标
        sup上标
     -->
    9<sub><small>8</small></sub>
    9<sup>8</sup>
</body>
</html>
6.keep-alive缓存的使用(vue3)
1.router-view的配置
<template>
  <!-- vue3.0配置 -->
  <router-view v-slot="{ Component }">
    <keep-alive>
      <component :is="Component"  v-if="$route.meta.keepAlive"/>
    </keep-alive>
    <component :is="Component"  v-if="!$route.meta.keepAlive"/>
  </router-view>
</template>
(router-view的vue2的配置)
<template>
	<!-- vue2.x配置 -->
   <keep-alive>
    <router-view v-if="$route.meta.keepAlive" />
  </keep-alive>
  <router-view v-if="!$route.meta.keepAlive"/>
</template>
2.添加meta属性
在对应的路由上添加meta属性来设置页面是否要使用缓存,如下:(其他要配置false)
{
  path: "/keepAliveTest",
   name: "keepAliveTest",
   meta: {
       keepAlive: true //设置页面是否需要使用缓存
   },
   component: () => import("@/views/keepAliveTest/index.vue")
 },
7.Vue获取某一个元素的样式
@click="getStyle($event)"
8.css样式,鼠标移动上去变成禁用、小手等样式。
	1、鼠标移动上去会显示禁用样式。
	cursor:no-drop
	或	cursor:not-allowed
	2、鼠标移动上去变小手样式。
    cursor:pointer;
    3、等待光标
    cursor:wait
    4、移动标
    cursor:move   或  all-scroll
    5、帮助光标
    cursor:help
9.pnpm安装
1.npm install pnpm -g
2.pnpm config get registry // 查看源
3.pnpm config set registry http://registry.npm.taobao.org // 切换淘宝源
10.element二级侧边栏渲染
<template>
<el-menu
:default-active="activeRouter"
class="el-menu-vertical"
active-text-color="#36a3f7"
background-color="#304156"
text-color="#bfcbd9"
:collapse="expandStore.expand"
>
<div v-for="item of adminRouter.children" :key="item.name">
<el-menu-item v-if="!item.children" :index="item.name" @click="changeRouter(item)">
<template #title>{{ item.meta.title }}</template>
</el-menu-item>
<el-sub-menu v-else :index="item.name">
<template #title>{{ item.meta.title }}</template>
<div v-for="child of item.children" :key="child.name">
<el-menu-item @click="changeRouter(child)" :index="child.name" :key="child.name">
<span>{{ child.name }}</span>
</el-menu-item>
</div>
</el-sub-menu>
</div>
</el-menu>
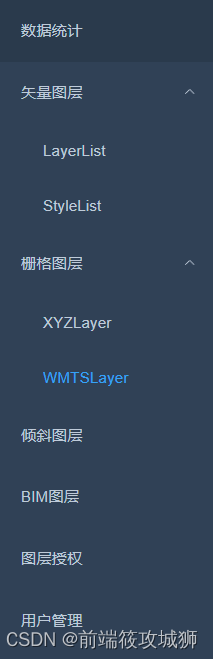
</template>路由表样式
const adminRouter = {
  path: "/Admin",
  name: "Admin",
  redirect: "/Admin/DashBoard",
  component: () => import("@/views/Admin/index.vue"),
  meta: { title: "后台管理", auth: [], icon: "", keepAlive: false },
  children: [
    {
      path: "DashBoard",
      name: "DashBoard",
      component: () => import("@/views/Admin/DashBoard/index.vue"),
      meta: { title: "数据统计", auth: [], icon: "dashboard", keepAlive: false }
    },
    {
      path: "VectorLayer",
      name: "VectorLayer",
      meta: { title: "矢量图层", auth: [], icon: "user-fill", keepAlive: false },
      children: [
        {
          path: "LayerList",
          name: "LayerList",
          component: () => import("@/views/Admin/VectorLayer/LayerList.vue"),
          meta: { title: "图层列表", auth: [], icon: "dashboard", keepAlive: false }
        },
        {
          path: "StyleList",
          name: "StyleList",
          component: () => import("@/views/Admin/VectorLayer/StyleList.vue"),
          meta: { title: "样式列表", auth: [], icon: "dashboard", keepAlive: false }
        }
      ]
    },
    {
      path: "RasterLayer",
      name: "RasterLayer",
      meta: { title: "栅格图层", auth: [], icon: "user-fill", keepAlive: false },
      children: [
        {
          path: "XYZLayer",
          name: "XYZLayer",
          component: () => import("@/views/Admin/RasterLayer/XYZLayerList.vue"),
          meta: { title: "XYZ瓦片图层", auth: [], icon: "dashboard", keepAlive: false }
        },
        {
          path: "WMTSLayer",
          name: "WMTSLayer",
          component: () => import("@/views/Admin/RasterLayer/WMTSLayerList.vue"),
          meta: { title: "WMTS服务图层", auth: [], icon: "dashboard", keepAlive: false }
        }
      ]
    },
    {
      path: "GradientLayer",
      name: "GradientLayer",
      component: () => import("@/views/Admin/GradientLayer/index.vue"),
      meta: { title: "倾斜图层", auth: [], icon: "user-fill", keepAlive: false }
    },
    {
      path: "BIMLayer",
      name: "BIMLayer",
      component: () => import("@/views/Admin/BIMLayer/index.vue"),
      meta: { title: "BIM图层", auth: [], icon: "user-fill", keepAlive: false }
    },
    {
      path: "LayerAuthorize",
      name: "LayerAuthorize",
      component: () => import("@/views/Admin/LayerAuthorize/index.vue"),
      meta: { title: "图层授权", auth: [], icon: "user-fill", keepAlive: false }
    },

    {
      path: "User",
      name: "User",
      component: () => import("@/views/Admin/User/index.vue"),
      meta: { title: "用户管理", auth: [], icon: "user-fill", keepAlive: false }
    }
  ]
}
export default adminRouter
效果图
11.截取字符,获取文件类型
item.file.name.substring(item.file.name.length - 4) //截取文件类型12.如果为空清空对象
// 如果对象的每一项为空则删除该项
    filterParams(obj){
        let _newPar = {};
        for (let key in obj) {
            //如果对象属性的值不为空,就保存该属性(,如果属性的值为0,保存该属性。如果属性的值全部是空格,属于为空。)
            if ((obj[key] === 0 || obj[key]) && obj[key].toString().replace(/(^\s*)|(\s*$)/g, '') !== '') {
                //记录属性
                _newPar[key] = obj[key];
            }
        }
        //返回对象
        return _newPar;
    }
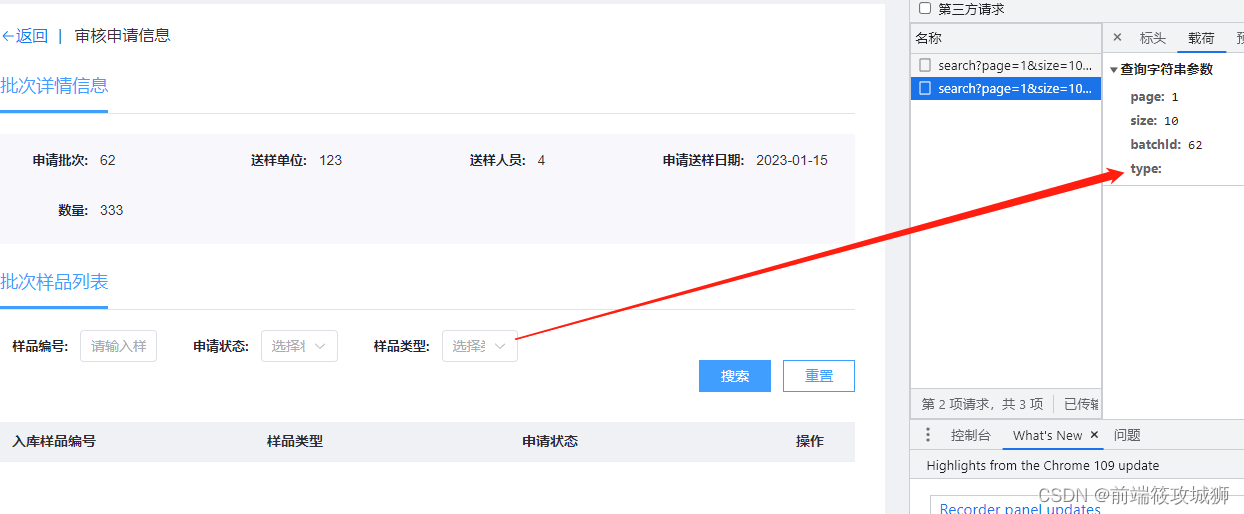
13.下载文件
const handleDownload = async (item) => {
  console.log("item :>> ", item.fileUrl)
  const href = item.fileUrl
  const a = document.createElement("a")
  a.href = href
  a.target = "_blank"
  a.click()
}![]()
14.vue3 vue项目实现鼠标拖拽功能
<div
    id="back"
    @mousedown="draggableFun($event)"
 ></div>
//e.clientX和e.clientY 相对于浏览器可视区的位置
//元素.offsetLeft\ 元素.offsetTop 获取元素、节点位置 参照已定位的祖先元素的位置,
//当所有祖先都未定位则参照 body 元素
//原理:鼠标移动前后相对于浏览器可视区的位置的差值+元素相对于已定位的祖先元素的位置
// 鼠标拖拽事件
const draggableFun = (val) => {
let div = document.getElementById("back");
let dragFlag = false;
let x, y;
div.onmousedown = function (e) {
dragFlag = true;
e = e || window.event;
// 获取鼠标在元素上的位置(鼠标按下时在元素上得位置)
x = e.clientX - div.offsetLeft;
y = e.clientY - div.offsetTop;
};
div.onmousemove = function (e) {
if (dragFlag) {
e = e || window.event;
div.style.left = e.clientX - x + "px";
div.style.top = e.clientY - y + "px";
}
};
// 鼠标抬起事件
div.onmouseup = function (e) {
dragFlag = false;
};
};


 400
400

 被折叠的 条评论
为什么被折叠?
被折叠的 条评论
为什么被折叠?
 到【灌水乐园】发言


