


在高并发Java(2):多线程基础中,我们已经初步提到了基本的线程同步操作。这次要提到的是在并发包中的同步控制工具。
1. 各种同步控制工具的使用
1.1 ReentrantLock
ReentrantLock感觉上是synchronized的增强版,synchronized的特点是使用简单,一切交给JVM去处理,但是功能上是比较薄弱的。在JDK1.5之前,ReentrantLock的性能要好于synchronized,由于对JVM进行了优化,现在的JDK版本中,两者性能是不相上下的。如果是简单的实现,不要刻意去使用ReentrantLock。
相比于synchronized,ReentrantLock在功能上更加丰富,它具有可重入、可中断、可限时、公平锁等特点。
首先我们通过一个例子来说明ReentrantLock最初步的用法:
|
1
2
3
4
5
6
7
8
9
10
11
12
13
14
15
16
17
18
19
20
21
22
23
24
25
26
27
28
29
30
31
32
33
34
35
36
37
38
39
|
package
test;
import
java.util.concurrent.locks.ReentrantLock;
public
class
Test
implements
Runnable
{
public
static
ReentrantLock lock =
new
ReentrantLock();
public
static
int
i =
0
;
@Override
public
void
run()
{
for
(
int
j =
0
; j <
10000000
; j++)
{
lock.lock();
try
{
i++;
}
finally
{
lock.unlock();
}
}
}
public
static
void
main(String[] args)
throws
InterruptedException
{
Test test =
new
Test();
Thread t1 =
new
Thread(test);
Thread t2 =
new
Thread(test);
t1.start();
t2.start();
t1.join();
t2.join();
System.out.println(i);
}
}
|
有两个线程都对i进行++操作,为了保证线程安全,使用了 ReentrantLock,从用法上可以看出,与 synchronized相比,ReentrantLock就稍微复杂一点。因为必须在finally中进行解锁操作,如果不在 finally解锁,有可能代码出现异常锁没被释放,而synchronized是由JVM来释放锁。
那么ReentrantLock到底有哪些优秀的特点呢?
1.1.1 可重入
单线程可以重复进入,但要重复退出
|
1
2
3
4
5
6
7
8
9
10
11
12
|
lock.lock();
lock.lock();
try
{
i++;
}
finally
{
lock.unlock();
lock.unlock();
}
|
由于ReentrantLock是重入锁,所以可以反复得到相同的一把锁,它有一个与锁相关的获取计数器,如果拥有锁的某个线程再次得到锁,那么获取计数器就加1,然后锁需要被释放两次才能获得真正释放(重入锁)。这模仿了 synchronized 的语义;如果线程进入由线程已经拥有的监控器保护的 synchronized 块,就允许线程继续进行,当线程退出第二个(或者后续) synchronized 块的时候,不释放锁,只有线程退出它进入的监控器保护的第一个synchronized 块时,才释放锁。
|
1
2
3
4
5
6
7
8
9
10
11
12
13
14
15
16
17
18
19
20
21
22
23
24
25
26
27
28
|
public
class
Child
extends
Father
implements
Runnable{
final
static
Child child =
new
Child();
//为了保证锁唯一
public
static
void
main(String[] args) {
for
(
int
i =
0
; i <
50
; i++) {
new
Thread(child).start();
}
}
public
synchronized
void
doSomething() {
System.out.println(
"1child.doSomething()"
);
doAnotherThing();
// 调用自己类中其他的synchronized方法
}
private
synchronized
void
doAnotherThing() {
super
.doSomething();
// 调用父类的synchronized方法
System.out.println(
"3child.doAnotherThing()"
);
}
@Override
public
void
run() {
child.doSomething();
}
}
class
Father {
public
synchronized
void
doSomething() {
System.out.println(
"2father.doSomething()"
);
}
}
|
我们可以看到一个线程进入不同的 synchronized方法,是不会释放之前得到的锁的。所以输出还是顺序输出。所以synchronized也是重入锁
输出:
|
1
2
3
4
5
6
7
8
9
10
|
1child.doSomething()
2father.doSomething()
3child.doAnotherThing()
1child.doSomething()
2father.doSomething()
3child.doAnotherThing()
1child.doSomething()
2father.doSomething()
3child.doAnotherThing()
...
|
1.1.2.可中断
与synchronized不同的是,ReentrantLock对中断是有响应的。中断相关知识查看高并发Java(2):多线程基础
普通的lock.lock()是不能响应中断的,lock.lockInterruptibly()能够响应中断。
我们模拟出一个死锁现场,然后用中断来处理死锁
|
1
2
3
4
5
6
7
8
9
10
11
12
13
14
15
16
17
18
19
20
21
22
23
24
25
26
27
28
29
30
31
32
33
34
35
36
37
38
39
40
41
42
43
44
45
46
47
48
49
50
51
52
53
54
55
56
57
58
59
60
61
62
63
64
65
66
67
68
69
70
71
72
73
74
75
76
77
78
79
80
81
82
83
84
85
86
87
88
89
90
91
92
93
94
95
96
97
98
99
100
101
102
103
104
105
106
107
108
109
110
111
112
113
114
115
116
117
118
119
120
121
122
123
124
125
126
127
128
129
130
|
package
test;
import
java.lang.management.ManagementFactory;
import
java.lang.management.ThreadInfo;
import
java.lang.management.ThreadMXBean;
import
java.util.concurrent.locks.ReentrantLock;
public
class
Test
implements
Runnable
{
public
static
ReentrantLock lock1 =
new
ReentrantLock();
public
static
ReentrantLock lock2 =
new
ReentrantLock();
int
lock;
public
Test(
int
lock)
{
this
.lock = lock;
}
@Override
public
void
run()
{
try
{
if
(lock ==
1
)
{
lock1.lockInterruptibly();
try
{
Thread.sleep(
500
);
}
catch
(Exception e)
{
// TODO: handle exception
}
lock2.lockInterruptibly();
}
else
{
lock2.lockInterruptibly();
try
{
Thread.sleep(
500
);
}
catch
(Exception e)
{
// TODO: handle exception
}
lock1.lockInterruptibly();
}
}
catch
(Exception e)
{
// TODO: handle exception
}
finally
{
if
(lock1.isHeldByCurrentThread())
{
lock1.unlock();
}
if
(lock2.isHeldByCurrentThread())
{
lock2.unlock();
}
System.out.println(Thread.currentThread().getId() +
":线程退出"
);
}
}
public
static
void
main(String[] args)
throws
InterruptedException
{
Test t1 =
new
Test(
1
);
Test t2 =
new
Test(
2
);
Thread thread1 =
new
Thread(t1);
Thread thread2 =
new
Thread(t2);
thread1.start();
thread2.start();
Thread.sleep(
1000
);
//DeadlockChecker.check();
}
static
class
DeadlockChecker
{
private
final
static
ThreadMXBean mbean = ManagementFactory
.getThreadMXBean();
final
static
Runnable deadlockChecker =
new
Runnable()
{
@Override
public
void
run()
{
// TODO Auto-generated method stub
while
(
true
)
{
long
[] deadlockedThreadIds = mbean.findDeadlockedThreads();
if
(deadlockedThreadIds !=
null
)
{
ThreadInfo[] threadInfos = mbean.getThreadInfo(deadlockedThreadIds);
for
(Thread t : Thread.getAllStackTraces().keySet())
{
for
(
int
i =
0
; i < threadInfos.length; i++)
{
if
(t.getId() == threadInfos[i].getThreadId())
{
t.interrupt();
}
}
}
}
try
{
Thread.sleep(
5000
);
}
catch
(Exception e)
{
// TODO: handle exception
}
}
}
};
public
static
void
check()
{
Thread t =
new
Thread(deadlockChecker);
t.setDaemon(
true
);
t.start();
}
}
}
|
上述代码有可能会发生死锁,线程1得到lock1,线程2得到lock2,然后彼此又想获得对方的锁。
我们用jstack查看运行上述代码后的情况
的确发现了一个死锁。
DeadlockChecker.check();方法用来检测死锁,然后把死锁的线程中断。中断后,线程正常退出。
1.1.3.可限时
超时不能获得锁,就返回false,不会永久等待构成死锁
使用lock.tryLock(long timeout, TimeUnit unit)来实现可限时锁,参数为时间和单位。
举个例子来说明下可限时:
|
1
2
3
4
5
6
7
8
9
10
11
12
13
14
15
16
17
18
19
20
21
22
23
24
25
26
27
28
29
30
31
32
33
34
35
36
37
38
39
40
41
42
43
44
45
|
package
test;
import
java.util.concurrent.TimeUnit;
import
java.util.concurrent.locks.ReentrantLock;
public
class
Test
implements
Runnable
{
public
static
ReentrantLock lock =
new
ReentrantLock();
@Override
public
void
run()
{
try
{
if
(lock.tryLock(
5
, TimeUnit.SECONDS))
{
Thread.sleep(
6000
);
}
else
{
System.out.println(
"get lock failed"
);
}
}
catch
(Exception e)
{
}
finally
{
if
(lock.isHeldByCurrentThread())
{
lock.unlock();
}
}
}
public
static
void
main(String[] args)
{
Test t =
new
Test();
Thread t1 =
new
Thread(t);
Thread t2 =
new
Thread(t);
t1.start();
t2.start();
}
}
|
使用两个线程来争夺一把锁,当某个线程获得锁后,sleep6秒,每个线程都只尝试5秒去获得锁。
所以必定有一个线程无法获得锁。无法获得后就直接退出了。
输出:
|
1
|
get lock failed
|
1.1.4.公平锁
使用方式:
|
1
2
3
|
public
ReentrantLock(
boolean
fair)
public
static
ReentrantLock fairLock =
new
ReentrantLock(
true
);
|
一般意义上的锁是不公平的,不一定先来的线程能先得到锁,后来的线程就后得到锁。不公平的锁可能会产生饥饿现象。
公平锁的意思就是,这个锁能保证线程是先来的先得到锁。虽然公平锁不会产生饥饿现象,但是公平锁的性能会比非公平锁差很多。
1.2 Condition
Condition与ReentrantLock的关系就类似于synchronized与Object.wait()/signal()
await()方法会使当前线程等待,同时释放当前锁,当其他线程中使用signal()时或者signalAll()方法时,线 程会重新获得锁并继续执行。或者当线程被中断时,也能跳出等待。这和Object.wait()方法很相似。
awaitUninterruptibly()方法与await()方法基本相同,但是它并不会再等待过程中响应中断。 singal()方法用于唤醒一个在等待中的线程。相对的singalAll()方法会唤醒所有在等待中的线程。这和Obejct.notify()方法很类似。
这里就不再详细介绍了。举个例子来说明:
|
1
2
3
4
5
6
7
8
9
10
11
12
13
14
15
16
17
18
19
20
21
22
23
24
25
26
27
28
29
30
31
32
33
34
35
36
37
38
39
40
41
42
|
package
test;
import
java.util.concurrent.locks.Condition;
import
java.util.concurrent.locks.ReentrantLock;
public
class
Test
implements
Runnable
{
public
static
ReentrantLock lock =
new
ReentrantLock();
public
static
Condition condition = lock.newCondition();
@Override
public
void
run()
{
try
{
lock.lock();
condition.await();
System.out.println(
"Thread is going on"
);
}
catch
(Exception e)
{
e.printStackTrace();
}
finally
{
lock.unlock();
}
}
public
static
void
main(String[] args)
throws
InterruptedException
{
Test t =
new
Test();
Thread thread =
new
Thread(t);
thread.start();
Thread.sleep(
2000
);
lock.lock();
condition.signal();
lock.unlock();
}
}
|
上述例子很简单,让一个线程await住,让主线程去唤醒它。condition.await()/signal只能在得到锁以后使用。
1.3.Semaphore
对于锁来说,它是互斥的排他的。意思就是,只要我获得了锁,没人能再获得了。
而对于Semaphore来说,它允许多个线程同时进入临界区。可以认为它是一个共享锁,但是共享的额度是有限制的,额度用完了,其他没有拿到额度的线程还是要阻塞在临界区外。当额度为1时,就相等于lock
下面举个例子:
|
1
2
3
4
5
6
7
8
9
10
11
12
13
14
15
16
17
18
19
20
21
22
23
24
25
26
27
28
29
30
31
32
33
34
35
36
37
|
package
test;
import
java.util.concurrent.ExecutorService;
import
java.util.concurrent.Executors;
import
java.util.concurrent.Semaphore;
public
class
Test
implements
Runnable
{
final
Semaphore semaphore =
new
Semaphore(
5
);
@Override
public
void
run()
{
try
{
semaphore.acquire();
Thread.sleep(
2000
);
System.out.println(Thread.currentThread().getId() +
" done"
);
}
catch
(Exception e)
{
e.printStackTrace();
}
finally
{
semaphore.release();
}
}
public
static
void
main(String[] args)
throws
InterruptedException
{
ExecutorService executorService = Executors.newFixedThreadPool(
20
);
final
Test t =
new
Test();
for
(
int
i =
0
; i <
20
; i++)
{
executorService.submit(t);
}
}
}
|
有一个20个线程的线程池,每个线程都去 Semaphore的许可,Semaphore的许可只有5个,运行后可以看到,5个一批,一批一批地输出。
当然一个线程也可以一次申请多个许可
|
1
|
public
void
acquire(
int
permits)
throws
InterruptedException
|
1.4 ReadWriteLock
ReadWriteLock是区分功能的锁。读和写是两种不同的功能,读-读不互斥,读-写互斥,写-写互斥。
这样的设计是并发量提高了,又保证了数据安全。
使用方式:
|
1
2
3
|
private
static
ReentrantReadWriteLock readWriteLock=
new
ReentrantReadWriteLock();
private
static
Lock readLock = readWriteLock.readLock();
private
static
Lock writeLock = readWriteLock.writeLock();
|
详细例子可以查看 Java实现生产者消费者问题与读者写者问题,这里就不展开了。
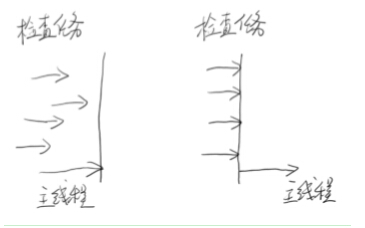
1.5 CountDownLatch
倒数计时器
一种典型的场景就是火箭发射。在火箭发射前,为了保证万无一失,往往还要进行各项设备、仪器的检查。 只有等所有检查完毕后,引擎才能点火。这种场景就非常适合使用CountDownLatch。它可以使得点火线程
,等待所有检查线程全部完工后,再执行
使用方式:
|
1
2
3
|
static
final
CountDownLatch end =
new
CountDownLatch(
10
);
end.countDown();
end.await();
|
示意图:
一个简单的例子:
|
1
2
3
4
5
6
7
8
9
10
11
12
13
14
15
16
17
18
19
20
21
22
23
24
25
26
27
28
29
30
31
32
33
34
35
36
37
38
|
package
test;
import
java.util.concurrent.CountDownLatch;
import
java.util.concurrent.ExecutorService;
import
java.util.concurrent.Executors;
public
class
Test
implements
Runnable
{
static
final
CountDownLatch countDownLatch =
new
CountDownLatch(
10
);
static
final
Test t =
new
Test();
@Override
public
void
run()
{
try
{
Thread.sleep(
2000
);
System.out.println(
"complete"
);
countDownLatch.countDown();
}
catch
(Exception e)
{
e.printStackTrace();
}
}
public
static
void
main(String[] args)
throws
InterruptedException
{
ExecutorService executorService = Executors.newFixedThreadPool(
10
);
for
(
int
i =
0
; i <
10
; i++)
{
executorService.execute(t);
}
countDownLatch.await();
System.out.println(
"end"
);
executorService.shutdown();
}
}
|
主线程必须等待10个线程全部执行完才会输出”end”。
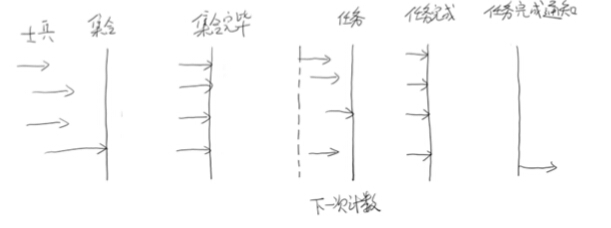
1.6 CyclicBarrier
和CountDownLatch相似,也是等待某些线程都做完以后再执行。与CountDownLatch区别在于这个计数器可以反复使用。比如,假设我们将计数器设置为10。那么凑齐第一批1 0个线程后,计数器就会归零,然后接着凑齐下一批10个线程
使用方式:
|
1
2
3
4
5
|
public
CyclicBarrier(
int
parties, Runnable barrierAction)
barrierAction就是当计数器一次计数完成后,系统会执行的动作
await()
|
示意图:
下面举个例子:
|
1
2
3
4
5
6
7
8
9
10
11
12
13
14
15
16
17
18
19
20
21
22
23
24
25
26
27
28
29
30
31
32
33
34
35
36
37
38
39
40
41
42
43
44
45
46
47
48
49
50
51
52
53
54
55
56
57
58
59
60
61
62
63
64
65
66
67
68
69
70
71
72
73
74
75
76
77
78
79
80
81
82
83
84
85
86
87
88
89
90
91
92
93
94
|
package
test;
import
java.util.concurrent.CyclicBarrier;
public
class
Test
implements
Runnable
{
private
String soldier;
private
final
CyclicBarrier cyclic;
public
Test(String soldier, CyclicBarrier cyclic)
{
this
.soldier = soldier;
this
.cyclic = cyclic;
}
@Override
public
void
run()
{
try
{
//等待所有士兵到齐
cyclic.await();
dowork();
//等待所有士兵完成工作
cyclic.await();
}
catch
(Exception e)
{
// TODO Auto-generated catch block
e.printStackTrace();
}
}
private
void
dowork()
{
// TODO Auto-generated method stub
try
{
Thread.sleep(
3000
);
}
catch
(Exception e)
{
// TODO: handle exception
}
System.out.println(soldier +
": done"
);
}
public
static
class
BarrierRun
implements
Runnable
{
boolean
flag;
int
n;
public
BarrierRun(
boolean
flag,
int
n)
{
super
();
this
.flag = flag;
this
.n = n;
}
@Override
public
void
run()
{
if
(flag)
{
System.out.println(n +
"个任务完成"
);
}
else
{
System.out.println(n +
"个集合完成"
);
flag =
true
;
}
}
}
public
static
void
main(String[] args)
{
final
int
n =
10
;
Thread[] threads =
new
Thread[n];
boolean
flag =
false
;
CyclicBarrier barrier =
new
CyclicBarrier(n,
new
BarrierRun(flag, n));
System.out.println(
"集合"
);
for
(
int
i =
0
; i < n; i++)
{
System.out.println(i +
"报道"
);
threads[i] =
new
Thread(
new
Test(
"士兵"
+ i, barrier));
threads[i].start();
}
}
}
|
打印结果:
|
1
2
3
4
5
6
7
8
9
10
11
12
13
14
15
16
17
18
19
20
21
22
23
|
集合
0
报道
1
报道
2
报道
3
报道
4
报道
5
报道
6
报道
7
报道
8
报道
9
报道
10
个集合完成
士兵
5
: done
士兵
7
: done
士兵
8
: done
士兵
3
: done
士兵
4
: done
士兵
1
: done
士兵
6
: done
士兵
2
: done
士兵
0
: done
士兵
9
: done
10
个任务完成
|
1.7 LockSupport
提供线程阻塞原语
和suspend类似
|
1
2
|
LockSupport.park();
LockSupport.unpark(t1);
|
与suspend相比 不容易引起线程冻结
LockSupport的思想呢,和 Semaphore有点相似,内部有一个许可,park的时候拿掉这个许可,unpark的时候申请这个许可。所以如果unpark在park之前,是不会发生线程冻结的。
下面的代码是高并发Java(2):多线程基础中suspend示例代码,在使用suspend时会发生死锁。
|
1
2
3
4
5
6
7
8
9
10
11
12
13
14
15
16
17
18
19
20
21
22
23
24
25
26
27
28
29
30
31
32
33
34
35
36
37
38
39
40
41
42
|
package
test;
import
java.util.concurrent.locks.LockSupport;
public
class
Test
{
static
Object u =
new
Object();
static
TestSuspendThread t1 =
new
TestSuspendThread(
"t1"
);
static
TestSuspendThread t2 =
new
TestSuspendThread(
"t2"
);
public
static
class
TestSuspendThread
extends
Thread
{
public
TestSuspendThread(String name)
{
setName(name);
}
@Override
public
void
run()
{
synchronized
(u)
{
System.out.println(
"in "
+ getName());
//Thread.currentThread().suspend();
LockSupport.park();
}
}
}
public
static
void
main(String[] args)
throws
InterruptedException
{
t1.start();
Thread.sleep(
100
);
t2.start();
// t1.resume();
// t2.resume();
LockSupport.unpark(t1);
LockSupport.unpark(t2);
t1.join();
t2.join();
}
}
|
而使用 LockSupport则不会发生死锁。
另外
park()能够响应中断,但不抛出异常。中断响应的结果是,park()函数的返回,可以从Thread.interrupted()得到中断标志。
在JDK当中有大量地方使用到了park,当然LockSupport的实现也是使用unsafe.park()来实现的。
|
1
2
3
|
public
static
void
park() {
unsafe.park(
false
, 0L);
}
|
1.8 ReentrantLock 的实现
下面来介绍下ReentrantLock的实现,ReentrantLock的实现主要由3部分组成:
- CAS状态
- 等待队列
- park()
ReentrantLock的父类中会有一个state变量来表示同步的状态
|
1
2
3
4
|
/**
* The synchronization state.
*/
private
volatile
int
state;
|
通过CAS操作来设置state来获取锁,如果设置成了1,则将锁的持有者给当前线程
|
1
2
3
4
5
6
|
final
void
lock() {
if
(compareAndSetState(
0
,
1
))
setExclusiveOwnerThread(Thread.currentThread());
else
acquire(
1
);
}
|
如果拿锁不成功,则会做一个申请
|
1
2
3
4
5
|
public
final
void
acquire(
int
arg) {
if
(!tryAcquire(arg) &&
acquireQueued(addWaiter(Node.EXCLUSIVE), arg))
selfInterrupt();
}
|
首先,再去申请下试试看tryAcquire,因为此时可能另一个线程已经释放了锁。
如果还是没有申请到锁,就addWaiter,意思是把自己加到等待队列中去
|
1
2
3
4
5
6
7
8
9
10
11
12
13
14
|
private
Node addWaiter(Node mode) {
Node node =
new
Node(Thread.currentThread(), mode);
// Try the fast path of enq; backup to full enq on failure
Node pred = tail;
if
(pred !=
null
) {
node.prev = pred;
if
(compareAndSetTail(pred, node)) {
pred.next = node;
return
node;
}
}
enq(node);
return
node;
}
|
其间还会有多次尝试去申请锁,如果还是申请不到,就会被挂起
|
1
2
3
4
|
private
final
boolean
parkAndCheckInterrupt() {
LockSupport.park(
this
);
return
Thread.interrupted();
}
|
同理,如果在unlock操作中,就是释放了锁,然后unpark,这里就不具体讲了。
2. 并发容器及典型源码分析
2.1 ConcurrentHashMap
我们知道HashMap不是一个线程安全的容器,最简单的方式使HashMap变成线程安全就是使用Collections.synchronizedMap,它是对HashMap的一个包装
|
1
|
public
static
Map m=Collections.synchronizedMap(
new
HashMap());
|
同理对于List,Set也提供了相似方法。
但是这种方式只适合于并发量比较小的情况。
我们来看下synchronizedMap的实现
|
1
2
3
4
5
6
7
8
9
10
11
12
13
14
15
16
17
18
19
20
21
22
23
24
25
26
27
28
29
30
31
32
33
34
35
36
37
38
39
40
41
42
43
|
private
final
Map<K,V> m;
// Backing Map
final
Object mutex;
// Object on which to synchronize
SynchronizedMap(Map<K,V> m) {
if
(m==
null
)
throw
new
NullPointerException();
this
.m = m;
mutex =
this
;
}
SynchronizedMap(Map<K,V> m, Object mutex) {
this
.m = m;
this
.mutex = mutex;
}
public
int
size() {
synchronized
(mutex) {
return
m.size();}
}
public
boolean
isEmpty() {
synchronized
(mutex) {
return
m.isEmpty();}
}
public
boolean
containsKey(Object key) {
synchronized
(mutex) {
return
m.containsKey(key);}
}
public
boolean
containsValue(Object value) {
synchronized
(mutex) {
return
m.containsValue(value);}
}
public
V get(Object key) {
synchronized
(mutex) {
return
m.get(key);}
}
public
V put(K key, V value) {
synchronized
(mutex) {
return
m.put(key, value);}
}
public
V remove(Object key) {
synchronized
(mutex) {
return
m.remove(key);}
}
public
void
putAll(Map<?
extends
K, ?
extends
V> map) {
synchronized
(mutex) {m.putAll(map);}
}
public
void
clear() {
synchronized
(mutex) {m.clear();}
}
|
它会将HashMap包装在里面,然后将HashMap的每个操作都加上synchronized。
由于每个方法都是获取同一把锁(mutex),这就意味着,put和remove等操作是互斥的,大大减少了并发量。
下面来看下ConcurrentHashMap是如何实现的
|
1
2
3
4
5
6
7
8
9
10
11
|
public
V put(K key, V value) {
Segment<K,V> s;
if
(value ==
null
)
throw
new
NullPointerException();
int
hash = hash(key);
int
j = (hash >>> segmentShift) & segmentMask;
if
((s = (Segment<K,V>)UNSAFE.getObject
// nonvolatile; recheck
(segments, (j << SSHIFT) + SBASE)) ==
null
)
// in ensureSegment
s = ensureSegment(j);
return
s.put(key, hash, value,
false
);
}
|
在 ConcurrentHashMap内部有一个Segment段,它将大的HashMap切分成若干个段(小的HashMap),然后让数据在每一段上Hash,这样多个线程在不同段上的Hash操作一定是线程安全的,所以只需要同步同一个段上的线程就可以了,这样实现了锁的分离,大大增加了并发量。
在使用ConcurrentHashMap.size时会比较麻烦,因为它要统计每个段的数据和,在这个时候,要把每一个段都加上锁,然后再做数据统计。这个就是把锁分离后的小小弊端,但是size方法应该是不会被高频率调用的方法。
在实现上,不使用synchronized和lock.lock而是尽量使用trylock,同时在HashMap的实现上,也做了一点优化。这里就不提了。
2.2 BlockingQueue
BlockingQueue不是一个高性能的容器。但是它是一个非常好的共享数据的容器。是典型的生产者和消费者的实现。
示意图:

具体可以查看Java实现生产者消费者问题与读者写者问题


 4482
4482


 被折叠的 条评论
为什么被折叠?
被折叠的 条评论
为什么被折叠?
 到【灌水乐园】发言


