 CentOS与Ubuntu下Tinyproxy的安装与配置详解


安装
# centos
sudo yum install tinyproxy
# ubuntu
sudo apt install tinyproxy
配置
vim /etc/tinyproxy/tinyproxy.conf
需要修改的是:
# 注释掉这一行
# Allow 127.0.0.1
# 修改端口号
Port 8787
- Allow 是允许访问的主机IP,不写就是允许所有主机访问
- Port 是代理访问端口号
启动/停止/查看状态/重启命令
systemctl start tinyproxy.service
systemctl stop tinyproxy.service
systemctl status tinyproxy.service
systemctl restart tinyproxy.service
查看日志
tailf /var/log/tinyproxy/tinyproxy.log
配置访问站点限制
黑名单设置
打开如下配置
Filter "/etc/tinyproxy/filter"

FilterURLs On
FilterExtended On
FilterCaseSensitive On
FilterDefaultDeny No
最需要注意的是这个参数
- FilterDefaultDeny :
当这个参数设置为No 或者 被注释掉,就代表filter文件内的内容为黑名单
当这个参数设置为Yes 就代表filter内的内容为白名单。
#
# FilterDefaultDeny: Change the default policy of the filtering system.
# If this directive is commented out, or is set to "No" then the default
# policy is to allow everything which is not specifically denied by the
# filter file.
#
# However, by setting this directive to "Yes" the default policy becomes
# to deny everything which is _not_ specifically allowed by the filter
# file.
#
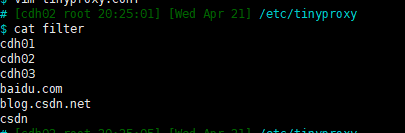
把上面几个配置放开后,如果不想让访问哪个地址,就在 /etc/tinyproxy/filter 文件里配置上对应的地址,默认是/etc/tinyproxy/filter 文件内的地址被禁止访问,例如:
我的filter文件里只写了cdh01(此时FilterDefaultDeny为No)

那么所有访问cdh01的请求都会被过滤掉,被禁止访问,效果如下:
当我访问Hue界面时报错:

白名单设置
修改 FilterDefaultDeny 为Yes
这就代表通过代理只能访问域名是这些的网站。
附录-我的配置文件
##
## tinyproxy.conf -- tinyproxy daemon configuration file
##
## This example tinyproxy.conf file contains example settings
## with explanations in comments. For decriptions of all
## parameters, see the tinproxy.conf(5) manual page.
##

#
# User/Group: This allows you to set the user and group that will be
# used for tinyproxy after the initial binding to the port has been done
# as the root user. Either the user or group name or the UID or GID
# number may be used.
#
User tinyproxy
Group tinyproxy

#
# Port: Specify the port which tinyproxy will listen on.  Please note
# that should you choose to run on a port lower than 1024 you w
最低0.47元/天 解锁文章


 2113
2113

 被折叠的 条评论
为什么被折叠?
被折叠的 条评论
为什么被折叠?
 到【灌水乐园】发言


