


一、UITableViewCell
1. 基本概念
2. 属性方法
- (instancetype)initWithStyle:(UITableViewCellStyle)style reuseIdentifier:(nullableNSString *)reuseIdentifier;
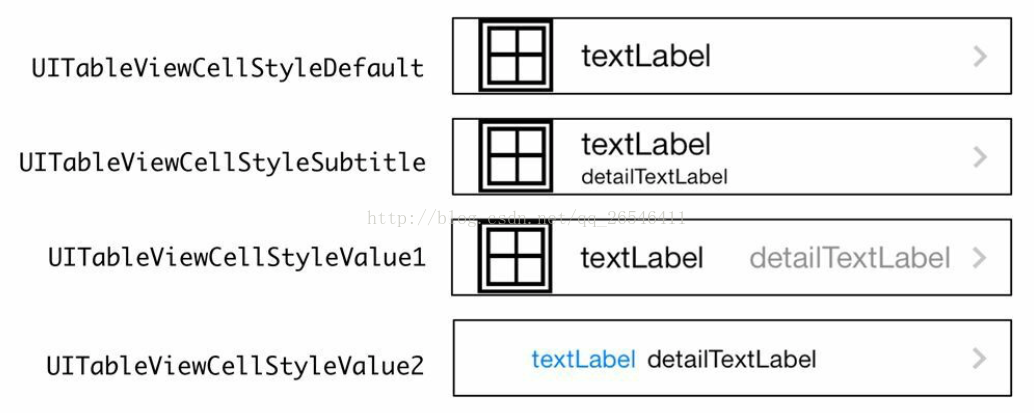
// UITableViewCellStyle
typedef NS_ENUM(NSInteger, UITableViewCellStyle) {
    UITableViewCellStyleDefault,  // 默认风格,自带标题和一个图片视图,图片在左
    UITableViewCellStyleValue1,   // 只有标题和副标题,标题在右
    UITableViewCellStyleValue2,   // 只有标题和副标题,副标题在标题下方
    UITableViewCellStyleSubtitle  // 自带图片视图和主副标题,图片在左,主副标题一个在上一个在下并在右边
};
详细风格如下
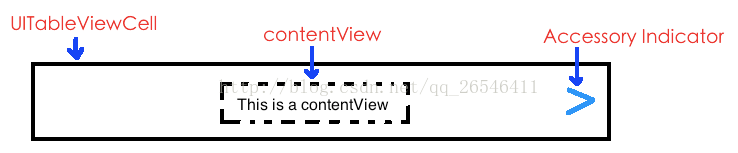
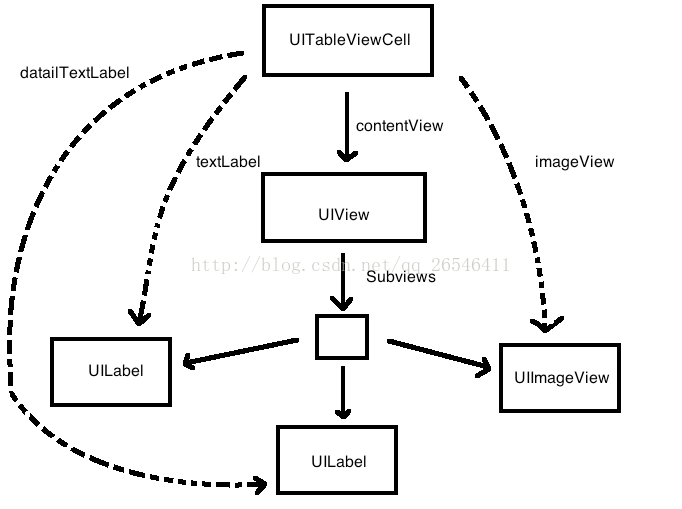
@property (nonatomic,readonly,strong)UIView *contentView;
3)contentView 属性所指的视图对象;默认是 nil
@property (nonatomic,readonly,strong,nullable)UIImageView *imageView;
4)contentView 属性所指的主标题对象;默认是 nil
@property (nonatomic,readonly,strong,nullable)UILabel *textLabel;
5)contentView 属性所指的副标题对象;默认是 nil
@property (nonatomic,readonly,strong,nullable)UILabel *detailTextLabel;
由此得出,UITableViewCell 对象的视图层次结构,如图
6)UITableViewCell 对象的背景视图
@property (nonatomic,strong,nullable)UIView *backgroundView;
7)UITableViewCell 对象选中状态时的背景视图
@property (nonatomic,strong,nullable)UIView *selectedBackgroundView;
@property (nonatomic,strong,nullable)UIView *multipleSelectionBackgroundView;
9)UITableViewCell 对象的 标识符
@property (nonatomic,readonly,copy,nullable)NSString *reuseIdentifier;
10)UITableViewCell 对象被选中时的风格;默认是 UITableViewCellSelectionStyleBlue
@property (nonatomic)UITableViewCellSelectionStyle selectionStyle;
// UITableViewCellSelectionStyle
typedef NS_ENUM(NSInteger, UITableViewCellSelectionStyle) {
    UITableViewCellSelectionStyleNone,    // 无色
    UITableViewCellSelectionStyleBlue,    // 蓝色
    UITableViewCellSelectionStyleGray,    // 灰色
    UITableViewCellSelectionStyleDefault  // 默认,为蓝色
};
11)设置 UITableViewCell 对象是否是选中状态;默认是 NO,无动画效果
@property (nonatomic,getter=isSelected)BOOL selected;
12)设置 UITableViewCell 对象是否是高亮状态;默认是 NO,无动画效果
@property (nonatomic,getter=isHighlighted)BOOL highlighted;
13)设置 UITableViewCell 对象是否是选中状态并设置有无动画效果
- (void)setSelected:(BOOL)selected animated:(BOOL)animated;
14)设置 UITableViewCell 对象是否是高亮状态并设置有无动画效果
- (void)setHighlighted:(BOOL)highlighted animated:(BOOL)animated;
15)获取 UITableViewCell 对象的编辑状态;默认是 UITableViewCellEditingStyleNone
@property (nonatomic,readonly)UITableViewCellEditingStyle editingStyle;
// UITableViewCellEditingStyle
typedef NS_ENUM(NSInteger, UITableViewCellEditingStyle) {
    UITableViewCellEditingStyleNone,   // 无编辑
    UITableViewCellEditingStyleDelete, // 删除编辑
    UITableViewCellEditingStyleInsert  // 插入编辑
};
16)设置 UITableViewCell 对象是否自带自动排序
@property (nonatomic)BOOL showsReorderControl;
注意 : 要让 cell 对象实现自动排序,除了要设置此属性为 YES 外,还要实现 UITableViewDataSource 中的两个方法
- (BOOL)tableView:(UITableView *)tableView canMoveRowAtIndexPath:(NSIndexPath*)indexPath;
- (void)tableView:(UITableView *)tableView moveRowAtIndexPath:(NSIndexPath*)sourceIndexPath toIndexPath:(NSIndexPath *)destinationIndexPath;
17)设置 UITableViewCell 对象是否显示缩进;默认为 YES
@property (nonatomic)BOOL shouldIndentWhileEditing;
18)设置 UITableViewCell 对象的辅助视图的风格;默认为 UITableViewCellAccessoryNone
@property (nonatomic)UITableViewCellAccessoryType accessoryType;
// UITableViewCellAccessoryType
typedef NS_ENUM(NSInteger, UITableViewCellAccessoryType) {
    UITableViewCellAccessoryNone,                  // 没有视图
    UITableViewCellAccessoryDisclosureIndicator,   // cell 对象显示一个灰色箭头
    UITableViewCellAccessoryDetailDisclosureButton // cell 对象显示详情符号和灰色箭头
    UITableViewCellAccessoryCheckmark,             // cell 对象显示蓝色对号
    UITableViewCellAccessoryDetailButton           // cell 对象显示详情符号
};
19)自定义 UITableViewCell 对象的辅助视图;如果自定了辅助视图,那么忽略 accessoryType 的设置
@property (nonatomic,strong,nullable)UIView * accessoryView;
20)设置 UITableViewCell 对象在编辑时的辅助视图的风格;默认为UITableViewCellAccessoryNone
@property (nonatomic)UITableViewCellAccessoryType editingAccessoryType;
21)自定义 UITableViewCell 对象在编辑时的辅助视图;如果自定了辅助视图,那么忽略 accessoryType 的设置
@property (nonatomic,strong,nullable)UIView * editingAccessoryView;
22)设置 UITableViewCell 对象的内容区域的缩进级别;默认为 0
@property (nonatomic)NSInteger indentationLevel;
23)设置 UITableViewCell 对象的每个级别的缩进宽度
@property (nonatomic)CGFloat indentationWidth;
24)设置 UITableViewCell 对象的分割线的偏移量
@property (nonatomic)UIEdgeInsets separatorInset
25)设置 UITableViewCell 对象是否是编辑状态,无动画效果
@property (nonatomic,getter=isEditing)BOOL editing;
26)设置 UITableViewCell 对象是否是编辑状态,有动画效果
- (void)setEditing:(BOOL)editing animated:(BOOL)animated;
27)返回当前的 cell 对象是否正在显示 Delete 按钮
@property(nonatomic,readonly)BOOL showingDeleteConfirmation;
28)设置 UITableViewCell 对象的聚焦风格;iOS 9 之后才可以使用
@property (nonatomic)UITableViewCellFocusStyle focusStyle
// UITableViewCellFocusStyle
typedef NS_ENUM(NSInteger, UITableViewCellFocusStyle) {
    UITableViewCellFocusStyleDefault,
    UITableViewCellFocusStyleCustom
};
29)设置 cell 对象状态将要转换时调用的方法,可被子类重写
- (void)willTransitionToState:(UITableViewCellStateMask)state;
// UITableViewCellStateMask
typedef NS_OPTIONS(NSUInteger, UITableViewCellStateMask) {
    UITableViewCellStateDefaultMask                     = 0,      // 默认状态
    UITableViewCellStateShowingEditControlMask          = 1 << 0, // 编辑状态
    UITableViewCellStateShowingDeleteConfirmationMask   = 1 << 1  // 确认删除状态
};
- (void)didTransitionToState:(UITableViewCellStateMask)state;
二、UITableViewCell 的重用
1. 对于一个 UITableView 对象来说,可能需要成百上千的 UITableViewCell 对象显示,如果每个 cell 对象都需要单独创建的话,会消耗很大的内存,为了避免这种情况,重用机制就诞生了
例如 : 假设某个 UITableView 对象要显示 100 个数据,即需要 100 个 UITableViewCell 对象,然而屏幕一次最多只能显示 10 个 cell 对象,使用重用就可以不用创建 100 个 cell 对象,只需创建 (10 + 1)个 cell 对象
示例代码
// 当某个 UItableView 向其数据源发送该消息时,其目的是要显示第 n 段,第 n 行的内容
- (UITableViewCell *)tableView:(UITableView *)tableView cellForRowAtIndexPath:(NSIndexPath *)indexPath {

    // 创建标识符
    static NSString * identifier = @"cell";

    // - (UITableViewCell *)dequeueReusableCellWithIdentifier:(NSString *)identifier;
    // 从重用队列中取出标识符为 identifier 的 cell
    UITableViewCell * cell = [tableView dequeueReusableCellWithIdentifier:identifier];

    // 由于一开始重用队列是空的,所以取出的 cell 也是空的,所以 !cell 条件成立
    if (!cell) {

        // 创建类型为 UITableViewCellStyleDefault 类型的 cell,并将其标识符 identifier(@"cell")
        cell = [[UITableViewCell alloc]initWithStyle:UITableViewCellStyleDefault reuseIdentifier:identifier];

        NSLog(@"enter success %li", indexPath.row);

    }


    cell.textLabel.text = identifier;

    return cell;
}
当我们下拉 tableView 时,就会出现第 11 个 cell,此时,重用队列里还是没有,那么继续创建第 11 个 cell,这时,当第 11 个 cell 显示时,第 1 个 cell 就消失了,它就被放进重用队列里了
再继续向下拉 tableView,出现第 12 个 cell,那么还是继续创建吗??先看重用队列里有没有标识符为 identifier 的 cell,调用 dequeueReusableCellWithIdentifier:,此时,正好有前面刚入队的 第1个 cell,!cell 条件不成立,不会执行其中的代码了
之后的 cell 都是以此方法出现的,所以,只需要创建 10 + 1 个 cell,尽管需要 100 个 cell,但事实只创建了 11 个 cell
2. identifier
在创建一个 cell 对象时伴随着一个 identifier,这个 identifier 可以理解为 cell 对象的标识符,标志着它属于哪个重用队列
UITableViewCell * cell = [tableView dequeueReusableCellWithIdentifier:identifier];
从重用队列中 根据标识符 identifier 的对立取出一个 cell(一个队列里的 indentifier 是相同的)
另外,入队的时候也会根据 cell 的 identifier 放到指定的重用队列中如果把代码改成下面这样呢
- (UITableViewCell *)tableView:(UITableView *)tableView cellForRowAtIndexPath:(NSIndexPath *)indexPath {

    NSString * identifier = [NSString stringWithFormat:@"cell%li", indexPath.row];

    UITableViewCell * cell = [tableView dequeueReusableCellWithIdentifier:identifier];

    if (!cell) {

        cell = [[UITableViewCell alloc] initWithStyle:UITableViewCellStyleDefault reuseIdentifier:identifier];

        NSLog(@"enter success %li", indexPath.row);

    }

    cell.textLabel.text = identifier;

    return cell;

}
3. 注册 cell 对象
- (void)viewDidLoad {

    [super viewDidLoad];

    [self.tableView registerClass:[UITableViewCell class] forCellReuseIdentifier:@"cell"];

}

- (UITableViewCell *)tableView:(UITableView *)tableView cellForRowAtIndexPath:(NSIndexPath *)indexPath {

    static NSString * identifier = @"cell";

    UITableViewCell * cell = [tableView dequeueReusableCellWithIdentifier:identifier];

    NSLog(@"%li", indexPath.row);

    cell.textLabel.text = identifier;


    return cell;

}
if (!cell) {
                cell = [[UITableViewCell alloc]initWithStyle:UITableViewCellStyleDefault reuseIdentifier:identifier];
            }


 5063
5063

 被折叠的 条评论
为什么被折叠?
被折叠的 条评论
为什么被折叠?
 到【灌水乐园】发言


