


之前有做过关于threejs开发的一些小功能项,最近正好在做一个仓库相关的3D场景,这里贴出核心代码和大家分享下。
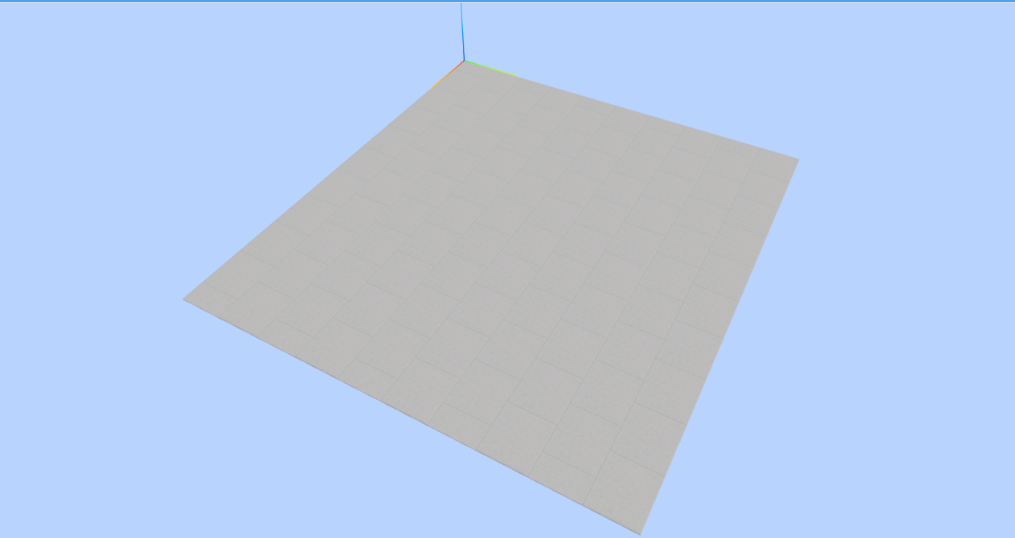
首先要做3D场景,除了基础的组件要引入生成外,要先加入地板,在地板上添加一些3D模型达到各种各样的效果,所以首先插入地板,这里用的是vue框架,所以和原始的html使用方法上有一些区别,地板我这里也是创建了一个立体,只不过长和宽很大,高度只有1,所以看起来像一个地板,其次就是给地板添加一些纹理贴图,使地板看起来更真实一些,然后设置地板位置,最终加入到场景scene中,为了方便扩展性更好,这里把地面的宽高厚度设置为变量,方便后续修改
initFloor(){
      let floorGeometry = new THREE.BoxGeometry(
      this.floor.floorLength,this.floor.floorWidth,this.floor.floorDepth);
      let texture = new THREE.TextureLoader().load( '/static/images/floor.jpg' )
      texture.wrapS = THREE.RepeatWrapping
      texture.wrapT = THREE.RepeatWrapping
      texture.repeat.set(5,5)
      let cubeMaterial = new THREE.MeshLambertMaterial( {
        map:texture
      } );
      let floor = new THREE.Mesh( floorGeometry, cubeMaterial );
      floor.name = '地板';
      floor.position.set(this.floor.floorLength/2,this.floor.floorWidth/2,0)
      scene.add(floor)
},- 1.
- 2.
- 3.
- 4.
- 5.
- 6.
- 7.
- 8.
- 9.
- 10.
- 11.
- 12.
- 13.
- 14.
- 15.
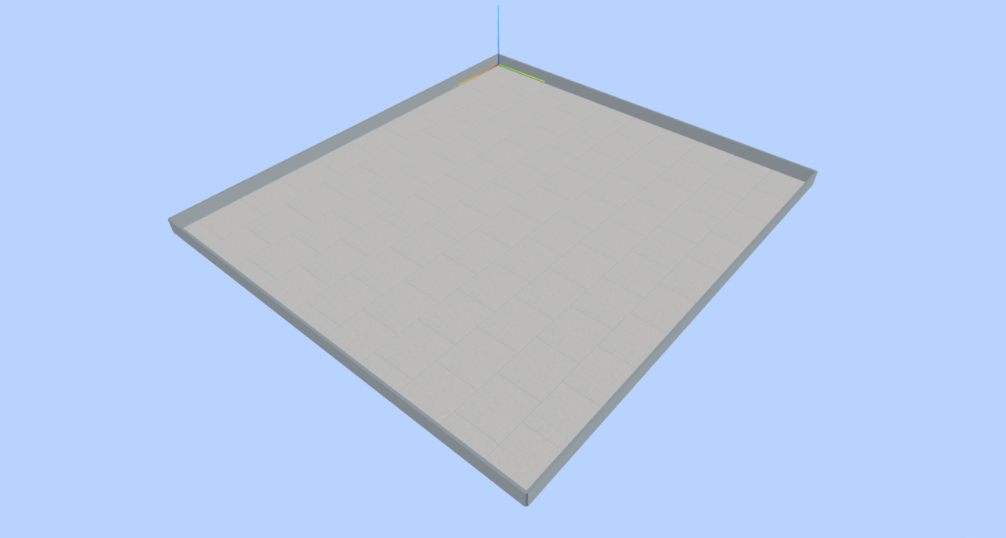
添加完地面后,开始添加墙面,没有墙面的话会显得物体比较突兀,而且场地没有边界感,如果是模拟的墙可以直接添加四面墙,不用考虑窗户和门,这里从简开发,就只添加四面墙,先设置好每面墙的高度和宽度,同样这里将墙体的相关参数设置为变量,方便后期修改。
//创建墙面
createCubeWall() {
      let materialTie = [];
      materialTie.push(new THREE.MeshPhongMaterial({color: 0xafc0ca}));  //前  0xafc0ca :灰色
      materialTie.push(new THREE.MeshPhongMaterial({color: 0x9cb2d1}));  //后  0x9cb2d1:淡紫
      materialTie.push(new THREE.MeshPhongMaterial({color: 0xd6e4ec}));  //上  0xd6e4ec: 偏白色
      materialTie.push(new THREE.MeshPhongMaterial({color: 0xd6e4ec}));  //下
      materialTie.push(new THREE.MeshPhongMaterial({color: 0xafc0ca}));  //左   0xafc0ca :灰色
      materialTie.push(new THREE.MeshPhongMaterial({color: 0xafc0ca}));  //右

      let wallList = []
      let wall1 = {width:this.floor.floorLength, height:3, depth:20, angle:0, matArrayB:materialTie, x:this.floor.floorLength/2, y:0, z:10, name:"墙面"};
      let wall2 = {width:this.floor.floorLength, height:3, depth:20, angle:1, matArrayB:materialTie, x:this.floor.floorLength/2, y:this.floor.floorWidth, z:10, name:"墙面"};
      let wall3 = {width:this.floor.floorWidth, height:3, depth:20, angle:1.5, matArrayB:materialTie, x:0, y:(this.floor.floorWidth/2), z:10, name:"墙面"};
      let wall4 = {width:this.floor.floorWidth, height:3, depth:20, angle:1.5, matArrayB:materialTie, x:this.floor.floorLength, y:(this.floor.floorWidth/2), z:10, name:"墙面"};
      wallList.push(wall1);wallList.push(wall2);wallList.push(wall3);wallList.push(wall4);
      for(let i=0;i<wallList.length;i++){
        let cubeGeometry = new THREE.BoxGeometry(wallList[i].width, wallList[i].height, wallList[i].depth);
        let cube = new THREE.Mesh(cubeGeometry, wallList[i].matArrayB);
        cube.position.x = wallList[i].x;
        cube.position.y = wallList[i].y;
        cube.position.z = wallList[i].z;
        cube.rotation.z += wallList[i].angle * Math.PI; //-逆时针旋转,+顺时针
        cube.name = wallList[i].name;
        scene.add(cube);
      }
},- 1.
- 2.
- 3.
- 4.
- 5.
- 6.
- 7.
- 8.
- 9.
- 10.
- 11.
- 12.
- 13.
- 14.
- 15.
- 16.
- 17.
- 18.
- 19.
- 20.
- 21.
- 22.
- 23.
- 24.
- 25.
- 26.
- 27.
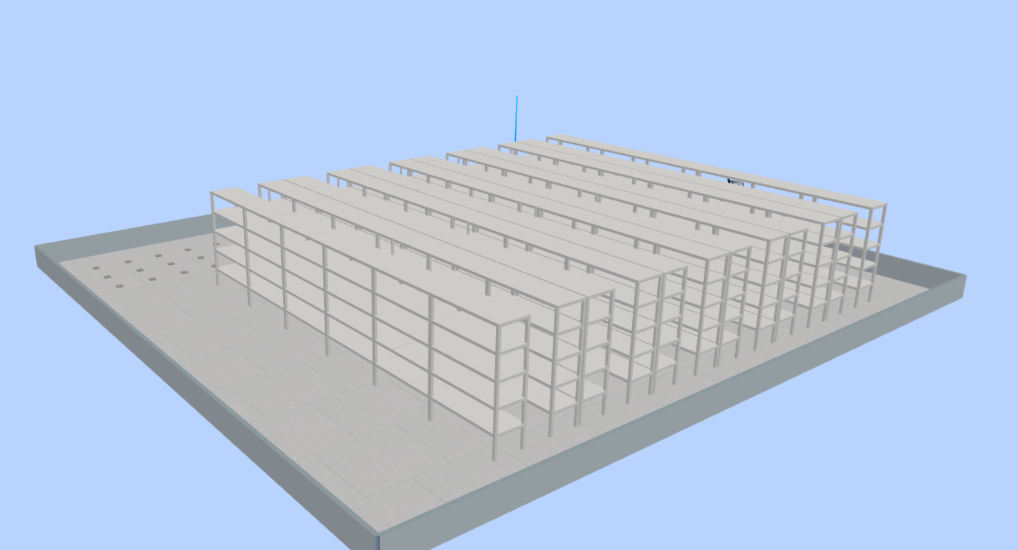
再接着就是添加一些货架,货架不推荐使用建模的方式开发,因为后续一但货架的尺寸发生了改变,那么就需要对模型重新改动再引入进来,太麻烦了,尽量使用threejs提供的建模方式进行绘制,因为需求的关系这里需要两两货架并拢,所以代码会显得有些乱,货架包括了四条腿,层板,五个模型,这里对五个模型的相关参数都设置为变量的方式,方便后面快速调整货架的模型,仓库也不会只有一个货架,这里用了循环,实现12排货架,每排两组货架,每组三个货架,
//初始化货架
initShelf(){
      for(let n=0;n<2;n++) {
        let offsetX = 60;
        for (let i = 0; i < 12; i++) {
          if(i%2 === 1){
            offsetX  = offsetX + 45;
          }else{
            offsetX = offsetX + 25;
            this.addPaTrack(offsetX, this.indistanceY+n*180, 0,true,"car_"+n+"_"+i)
          }
          for (let j = 0; j < 3; j++) {
            let shelfName = '货架' + j+"上"
            this.shelfList.push({
              shelfName: shelfName,
              planeWidth: this.plane.planeWidth,
              planeHeight: this.plane.planeHeight,
              planeLength: this.plane.planeLength,
              holderLength: this.holder.holderLength,
              holderHeight: this.holder.holderHeight,
              holderWidth: this.holder.holderWidth,
              positionX: offsetX,
              positionY: this.indistanceY + (j * 60)+n*180,
              positionZ: this.holder.holderHeight + 2,
              layerNum: this.layerNum,
              columnNum: this.columnNum
            });
          }
        }
      }
      for(let i = 0;i < this.shelfList.length; i++){
        for(let j = 0; j < this.shelfList[i].layerNum; j++){
          this.addShelf(
              this.shelfList[i].positionX,
              this.shelfList[i].positionY,
              this.shelfList[i].positionZ*(j+1),
              this.shelfList[i].planeWidth,
              this.shelfList[i].planeLength,
              this.shelfList[i].planeHeight,
              this.shelfList[i].holderLength,
              this.shelfList[i].holderWidth,
              this.shelfList[i].holderHeight,
              scene,
              this.shelfList[i].shelfName+"$"+j,
              this.shelfList[i].columnNum);
        }
      }
    },
    addShelf(x,y,z,plane_x,plane_y,plane_z,holder_x,holder_y,holder_z,scene,name,num){
      let RackMat2 = new THREE.MeshPhongMaterial({color:0xFFFFFF});
      let plane = new THREE.BoxGeometry( plane_x, plane_y/num,plane_z, );
      let gz = [];
      for(let i = 0; i < num; i++){
        gz.push( y + plane_y/num/2 + (plane_y/num)*i );
        let obj = new THREE.Mesh( plane, RackMat2 );
        obj.position.set(x, gz[i], z) ;
        scene.add(obj);
      }
      let holder = new THREE.BoxGeometry( holder_x, holder_y, holder_z );
      let obj2 = new THREE.Mesh( holder, RackMat2, 0 );
      let obj3 = new THREE.Mesh( holder, RackMat2, 0 );
      let obj4 = new THREE.Mesh( holder, RackMat2, 0 );
      let obj5 = new THREE.Mesh( holder, RackMat2, 0 );
      obj2.position.set(x-plane_x/2+holder_x/2,y+holder_y/2,z-holder_z/2-plane_z/2,);
      obj3.position.set(x+plane_x/2-holder_x/2,y+holder_y/2, z-holder_z/2-plane_z/2, );
      obj4.position.set(x-plane_x/2+holder_x/2,y+plane_y-holder_y/2,z-holder_z/2-plane_z/2 );
      obj5.position.set(x+plane_x/2-holder_x/2,y+plane_y-holder_y/2, z-holder_z/2-plane_z/2 );
      scene.add(obj2);scene.add(obj3);scene.add(obj4);scene.add(obj5);
},- 1.
- 2.
- 3.
- 4.
- 5.
- 6.
- 7.
- 8.
- 9.
- 10.
- 11.
- 12.
- 13.
- 14.
- 15.
- 16.
- 17.
- 18.
- 19.
- 20.
- 21.
- 22.
- 23.
- 24.
- 25.
- 26.
- 27.
- 28.
- 29.
- 30.
- 31.
- 32.
- 33.
- 34.
- 35.
- 36.
- 37.
- 38.
- 39.
- 40.
- 41.
- 42.
- 43.
- 44.
- 45.
- 46.
- 47.
- 48.
- 49.
- 50.
- 51.
- 52.
- 53.
- 54.
- 55.
- 56.
- 57.
- 58.
- 59.
- 60.
- 61.
- 62.
- 63.
- 64.
- 65.
- 66.
- 67.
- 68.
- 69.
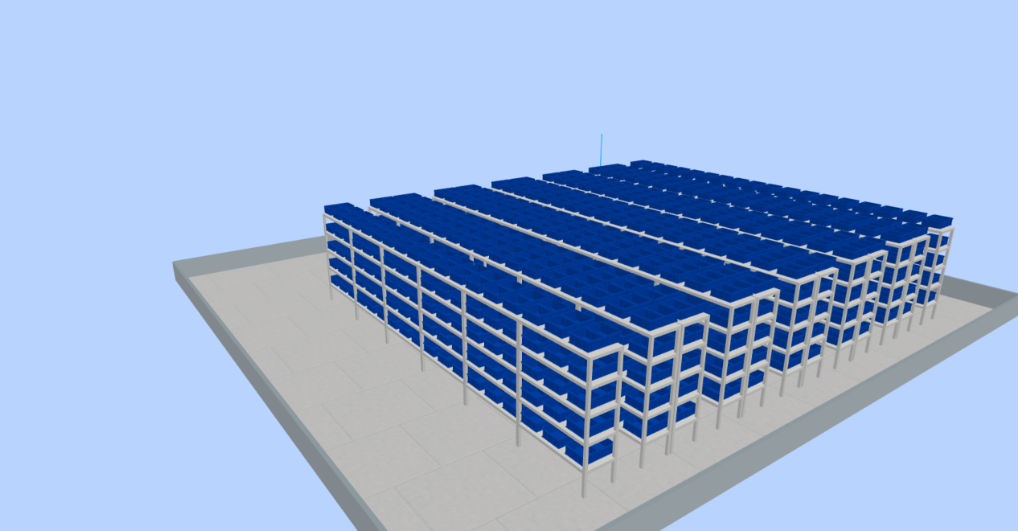
有了货架还需要在货架上防止货物,货物可以根据货架的位置动态计算货物放置的位置,先做一个专门添加货物的功能,在做一个初始化货架的方法,在初始化货架中根据需求添加货物,再循环调用生成货物的方法添加多个货物。
//初始化货架
initCube(){
      for(let q=0; q<this.shelfList.length;q++){
        for(let i=0;i<this.layerNum;i++){
          for(let j=0;j<this.columnNum;j++){
            let shorageName = this.shelfList[q].shelfName+"_"+i+"层_"+j+"列"
            let x = this.shelfList[q].positionX;
            let y = this.shelfList[q].positionY + (this.box.boxDepth) + j*(this.plane.planeLength/3)
            let z = this.shelfList[q].positionZ + (this.box.boxDepth/2) + i*(this.holder.holderHeight+this.plane.planeHeight)
            this.addCube(x-6,y,z,"货物在"+"_"+shorageName+"_1")
            this.addCube(x+5,y,z,"货物在"+"_"+shorageName+"_2")
          }
        }
      }
    },
    //新增货架
    addCube(x,y,z,name){
      const loader = new GLTFLoader()
      loader.load("/static/model/box.glb", (gltf) => {
        gltf.scene.position.set(x, y, z+1)   // 模型位置
        gltf.scene.rotation.x = Math.PI / 2    // x轴旋转
        gltf.scene.scale.set(0.6, 0.4, 0.5)   // 模型位置
        gltf.scene.name = name
        scene.add(gltf.scene)
      })
},- 1.
- 2.
- 3.
- 4.
- 5.
- 6.
- 7.
- 8.
- 9.
- 10.
- 11.
- 12.
- 13.
- 14.
- 15.
- 16.
- 17.
- 18.
- 19.
- 20.
- 21.
- 22.
- 23.
- 24.
- 25.
- 26.
好了这里一个简单的仓库模型就好了,可以根据具体需求定制化开发一些其他功能,实现更好的效果。


 1581
1581

 被折叠的 条评论
为什么被折叠?
被折叠的 条评论
为什么被折叠?
 到【灌水乐园】发言


