


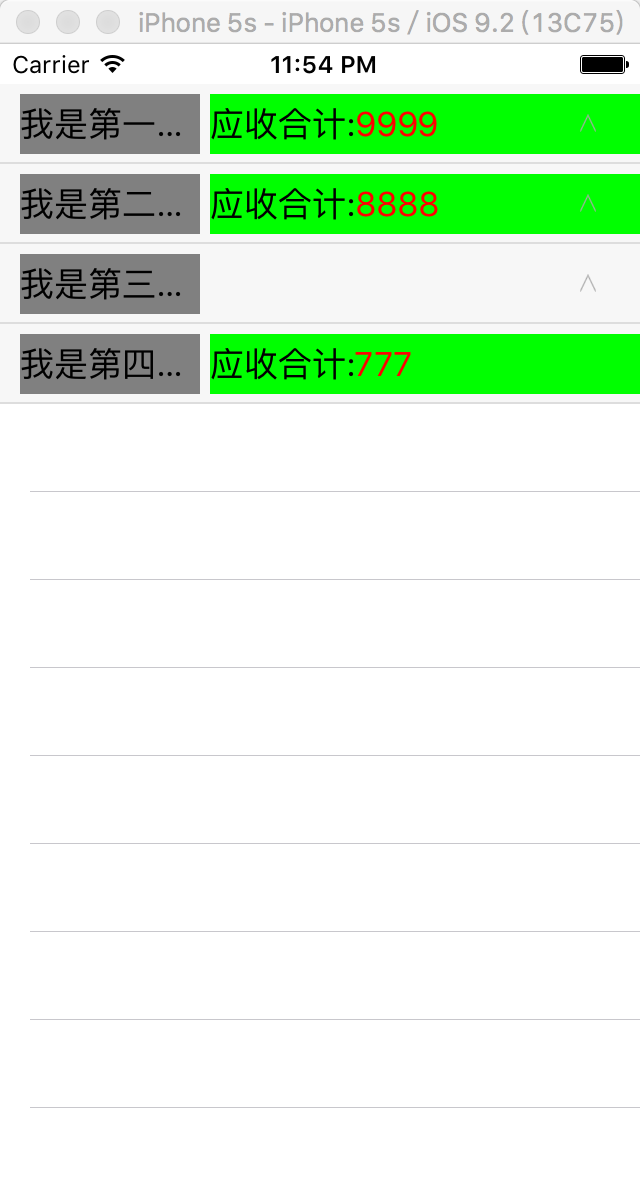
效果 如图:

在项目中遇到这个问题,总结出比较方便使用的方法
《1》
tableView的headerView和cell有些类似, 所以先创建一个类, 继承自UITableViewHeaderFooterView
.h中
首先明确headerView需要暴露在外部的接口和headerView的大体形态,我做的是在sectionHeaderView上有一个标题titleLabel 一个明细detailLabel 一个表示上下的图片, 一个点击section响应的按钮。其次在外部要能改变section的折叠状态。当section折叠状态改变时需要穿到外部进行cellNumber的改变。所以需要一个protocol。
@protocol FoldSectionHeaderViewDelegate <NSObject>

- (void)foldHeaderInSection:(NSInteger)SectionHeader;

@end
声明外部可用的属性:
@property(nonatomic, assign) BOOL fold;/**< 是否折叠 */
@property(nonatomic, assign) NSInteger section;/**< 选中的section */
@property(nonatomic, weak) id<FoldSectionHeaderViewDelegate> delegate;/**< 代理 */
创建sectionHeaderView上控件的方法
- (void)setFoldSectionHeaderViewWithTitle:(NSString *)title detail:(NSString *)detail type:(HerderStyle)type section:(NSInteger)section canFold:(BOOL)canFold;
.m 中
声明内部全局变量
@implementation LGJFoldHeaderView
{
    BOOL _created;/**< 是否创建过 */
    UILabel *_titleLabel;/**< 标题 */
    UILabel *_detailLabel;/**< 其他内容 */
    UIImageView *_imageView;/**< 图标 */
    UIButton *_btn;/**< 收起按钮 */
    BOOL _canFold;/**< 是否可展开 */

}
实现方法
- (void)setFoldSectionHeaderViewWithTitle:(NSString *)title detail:(NSString *)detail type:(HerderStyle)type section:(NSInteger)section canFold:(BOOL)canFold {
    if (!_created) {
        [self creatUI];
    }
    _titleLabel.text = title;
    if (type == HerderStyleNone) {
         _detailLabel.hidden = YES;
    } else {
        _detailLabel.hidden = NO;
        _detailLabel.attributedText = [self attributeStringWith:detail];
    }
    _section = section;
    _canFold = canFold;
    if (canFold) {
        _imageView.hidden = NO;
    } else {
        _imageView.hidden = YES;
    }
}
//改变detail上的字体颜色
- (NSMutableAttributedString *)attributeStringWith:(NSString *)money {
    NSString *str = [NSString stringWithFormat:@"应收合计:%@", money];
    NSMutableAttributedString *ats = [[NSMutableAttributedString alloc] initWithString:str];
    NSRange range = [str rangeOfString:money];
    [ats setAttributes:@{NSForegroundColorAttributeName:[UIColor redColor]} range:range];
    return ats;
}
//creatUI
- (void)creatUI {
    _created = YES;

    //标题
    _titleLabel = [[UILabel alloc] initWithFrame:CGRectMake(10, 5, 90, 30)];
    _titleLabel.backgroundColor = [UIColor grayColor];
    [self.contentView addSubview:_titleLabel];

    //其他内容
    _detailLabel = [[UILabel alloc] initWithFrame:CGRectMake(105, 5, 320-40, 30)];
    _detailLabel.backgroundColor = [UIColor greenColor];
    [self.contentView addSubview:_detailLabel];

    //按钮
    _btn = [UIButton buttonWithType:UIButtonTypeCustom];
    _btn.frame = CGRectMake(0, 0, 320, 30);
    [_btn addTarget:self action:@selector(btnClick:) forControlEvents:UIControlEventTouchUpInside];
    [self.contentView addSubview:_btn];

    //图片
    _imageView = [[UIImageView alloc] initWithFrame:CGRectMake(320 - 30, 15, 8, 9)];
    _imageView.image = [UIImage imageNamed:@"arrow_down_gray"];
    [self.contentView addSubview:_imageView];

    //线
    UIImageView *line = [[UIImageView alloc] initWithFrame:CGRectMake(0, 39, 320, 1)];
    line.image = [UIImage imageNamed:@"line"];
    [self.contentView addSubview:line];
}
//重写fold的set方法, 根据fold的状态, 改变图片形状
- (void)setFold:(BOOL)fold {
    _fold = fold;
    if (fold) {
        _imageView.image = [UIImage imageNamed:@"arrow_down_gray"];
    } else {
        _imageView.image = [UIImage imageNamed:@"arrow_up_gray"];
    }
}

//按钮的点击响应方法,将代理传出
- (void)btnClick:(UIButton *)btn {
    if (_canFold) {
        if ([self.delegate respondsToSelector:@selector(foldHeaderInSection:)]) {
            [self.delegate foldHeaderInSection:_section];
        }
    }
}
《2》在viewController中的使用时,引入头文件,遵循代理
在controller中,我们需要一个字典来记录section的折叠状态,这个字典根据当前选中的第几个section和section的状态来记录
_foldInfoDic = [NSMutableDictionary dictionaryWithDictionary:@{
                                                                   @"0":@"1",
                                                                   @"1":@"1",
                                                                   @"2":@"1",
                                                                   @"3":@"0"
                                                                   }];
这里我创建4个section,前三个的默认状态是1,说明此时section是打开的。
在numberOfRowsInSection这个方法中,根据当前section转化成字符串当做key(因为我们一开始字典创建的思路就是根据对应的section和开关状态来创建的)来查找字典中的value 并将value转化成bool类型,说明只有开关两种状态。
- (NSInteger)tableView:(UITableView *)tableView numberOfRowsInSection:(NSInteger)section {

    NSString *key = [NSString stringWithFormat:@"%d", (int)section];
    BOOL folded = [[_foldInfoDic objectForKey:key] boolValue];

    if (section == 0) {
        return folded?_arr.count:0;
    } else if (section == 1) {
        return folded?_arr.count:0;
    } else if (section == 2) {
        return folded?_arr.count:0;
    } else {
        return folded?_arr.count:0;
    }
}
在viewForHeaderInSection方法中 和cell类似,根据identifier先从池子中找headerView 如果没有就创建,创建时记得给headerView加identifier。创建好之后根据当前section 个性定制sectionHeaderView上面的内容。将headerView的delegate= self; 在headerView创建好的这时候,改变字典中的值。
 NSString *key = [NSString stringWithFormat:@"%d", (int)section];
    BOOL folded = [[_foldInfoDic valueForKey:key] boolValue];


- (UIView *)tableView:(UITableView *)tableView viewForHeaderInSection:(NSInteger)section {
    LGJFoldHeaderView *headerView = [tableView dequeueReusableHeaderFooterViewWithIdentifier:@"header"];
    if (!headerView) {
        headerView = [[LGJFoldHeaderView alloc] initWithReuseIdentifier:@"header"];
    }

    if (section == 0) {
        [headerView setFoldSectionHeaderViewWithTitle:@"我是第一个Section" detail:@"9999" type: HerderStyleTotal section:0 canFold:YES];
    } else if (section == 1) {
        [headerView setFoldSectionHeaderViewWithTitle:@"我是第二个Section" detail:@"8888" type:HerderStyleTotal section:1 canFold:YES];
    } else if (section == 2){
        [headerView setFoldSectionHeaderViewWithTitle:@"我是第三个Section" detail:nil type:HerderStyleNone section:2 canFold:YES];
    } else {
        [headerView setFoldSectionHeaderViewWithTitle:@"我是第四个Seciton" detail:@"777" type:HerderStyleTotal section:3 canFold:NO];
    }
    headerView.delegate = self;
    NSString *key = [NSString stringWithFormat:@"%d", (int)section];
    BOOL folded = [[_foldInfoDic valueForKey:key] boolValue];
    headerView.fold = folded;
    return headerView;

}
实现headerView的代理方法
- (void)foldHeaderInSection:(NSInteger)SectionHeader {
    NSString *key = [NSString stringWithFormat:@"%d",(int)SectionHeader];
    BOOL folded = [[_foldInfoDic objectForKey:key] boolValue];
    NSString *fold = folded ? @"0" : @"1";
    [_foldInfoDic setValue:fold forKey:key];
    NSMutableIndexSet *set = [[NSMutableIndexSet alloc] initWithIndex:SectionHeader];
    [_tableView reloadSections:set withRowAnimation:UITableViewRowAnimationLeft];

}
好了,一个比较容易理解,操作的一个可折叠的sectionHeaderView基本成型了。
end


 1587
1587

 被折叠的 条评论
为什么被折叠?
被折叠的 条评论
为什么被折叠?
 到【灌水乐园】发言


