


实现线程的众所周知的方法具体有2种,但是还有一种,估计不是人人都知道的,没搞过多线程编程的,估计就不知道啦:
(1)继承Thread类,重写run方法
(2)实现Runnable接口,重写run方法
(3)实现Callable接口,重写call方法
(4)线程池的使用
一直天真的以为只有两种方式来实现多线程,直到我真的来仔细琢磨学习了一下这个问题,才知道,Java后来优化了问题。新增了个高级方式。
然后我做如下具体实例来测试。
第一种实现方式:实现Runnable接口,重写run方法
package com.lxk.threadTest.wayToThread;

/**
 * Created by lxk on 2017/6/25
 * 创建线程方式1实现
 * 实现Runnable接口,重写run方法
 */
public class ThreadWay1 implements Runnable {
    @Override
    public void run() {
        for (; ; ) {
            try {
                Thread.sleep(1000);//毫秒
                System.out.println(Thread.currentThread().getName() + "...implements Runnable way");
            } catch (InterruptedException e) {
                e.printStackTrace();
            }
        }
    }
}
第二种实现方式:继承Thread类,重写run方法
package com.lxk.threadTest.wayToThread;

/**
 * Created by lxk on 2017/6/25
 * 创建线程方式2实现
 * 继承Thread类,重写run函数
 */
public class ThreadWay2 extends Thread {
    @Override
    public void run() {
        for (; ; ) {
            try {
                Thread.sleep(1000);//毫秒
                System.out.println(Thread.currentThread().getName() + "...extends way");
            } catch (InterruptedException e) {
                e.printStackTrace();
            }
        }
    }
}
第三种实现方式:实现Callable接口,重写call方法
package com.lxk.threadTest.wayToThread;

import java.util.concurrent.Callable;

/**
 * Callable和Runnable有几点不同:
 * (1)Callable规定的方法是call(),而Runnable规定的方法是run().
 * (2)Callable的任务执行后可返回值,而Runnable的任务是不能返回值的。
 * (3)call()方法可抛出异常,而run()方法是不能抛出异常的。
 * (4)运行Callable任务可拿到一个Future对象,
 * <p>
 * Created by lxk on 2017/6/27
 */
public class ThreadWay3 implements Callable<Integer> {

    @Override
    public Integer call() throws Exception {
        int sum = 0;
        for (int i = 0; i < 10; i++) {
            try {
                Thread.sleep(1000);//毫秒
                sum += 1;
                System.out.println(Thread.currentThread().getName() + "...implements Callable<T>..." + sum);
            } catch (InterruptedException e) {
                e.printStackTrace();
            }
        }
        return sum;
    }
}
只是简单的记录下,如何实现,后面有机会再总结一下这个,我真不常见的这个实现方式。
然后就是在main方法里面调用,运行一下的代码。
package com.lxk.threadTest.wayToThread;

import java.util.concurrent.FutureTask;

/**
 * 线程测试(实现多线程的几种方式)
 * <p>
 * Created by lxk on 2016/11/12
 */
public class Main {
    public static void main(String[] args) {
        newThreadWay1();//实现Runnable接口
        //newThreadWay2();//继承Thread类
        //newThreadWay3();//实现Callable接口
        //newThreadWay1_();//也就是个简单的匿名对象,直接实现Runnable接口,省去了新建个类的步骤
        //newThreadWay1__();//一样也是实现Runnable接口,省去了新建个类的步骤,不过不是匿名对象而已
    }

    /**
     * 创建线程方式1实现
     * 实现Runnable接口,重写run方法
     * 实现接口的优点:可以方便扩展
     */
    private static void newThreadWay1() {
        ThreadWay1 threadWay1 = new ThreadWay1();
        new Thread(threadWay1).start();
        //new Thread(new ThreadWay1()).start();//等于上面的2行代码
        System.out.println(Thread.currentThread().getName() + "...implements Runnable way");
    }


    /**
     * 创建线程方式2实现
     * 继承Thread类,重写run函数
     */
    private static void newThreadWay2() {
        ThreadWay2 threadWay2 = new ThreadWay2();
        threadWay2.start();
        //new ThreadWay2().start();//等于上面的2行代码
        System.out.println(Thread.currentThread().getName() + "...extends way");
    }

    /**
     * 创建线程方式3实现
     * 实现Callable接口,重写call方法
     */
    private static void newThreadWay3() {
        int resultFromThread;
        try {
            ThreadWay3 threadWay3 = new ThreadWay3();
            FutureTask<Integer> future = new FutureTask<>(threadWay3);
            new Thread(future).start();
            Thread.sleep(5000);// 可能做一些事情
            //注意:
            // 这个有个问题:主线程必须等子线程执行完,才可以继续执行,变成了同步啦,这就不太好啦。失去了多线程的意义啦。
            resultFromThread = future.get();
            System.out.println(Thread.currentThread().getName() + "...implements Callable<T>..." + resultFromThread);
        } catch (Exception e) {
            e.printStackTrace();
        }
    }

    /**
     * 创建线程方式1实现
     * 实现Runnable接口,重写run方法
     * (匿名对象:new个线程对象直接开启)
     */
    private static void newThreadWay1_() {
        new Thread(new Runnable() {
            @Override
            public void run() {
                for (; ; ) {//死循环
                    try {
                        Thread.sleep(1000);//毫秒
                        System.out.println(Thread.currentThread().getName() + "...new Runnable()匿名对象");
                    } catch (InterruptedException e) {
                        e.printStackTrace();
                    }
                }

            }
        }).start();
        System.out.println(Thread.currentThread().getName() + "......new Runnable()匿名对象");
    }

    /**
     * 创建线程方式1实现
     * 实现Runnable接口,重写run方法
     * (实例化一个线程对象,然后调用start方法开启线程)
     */
    private static void newThreadWay1__() {
        Thread thread = new Thread(new Runnable() {
            @Override
            public void run() {
                for (; ; ) {
                    try {
                        Thread.sleep(1000);//毫秒
                        System.out.println(Thread.currentThread().getName() + "...new Runnable()非匿名对象");
                    } catch (InterruptedException e) {
                        e.printStackTrace();
                    }
                }
            }
        });
        thread.start();
        System.out.println(Thread.currentThread().getName() + "...new Runnable()非匿名对象");
    }
}
然后就是各个实现方式 的代码运行结果图 ,如下:
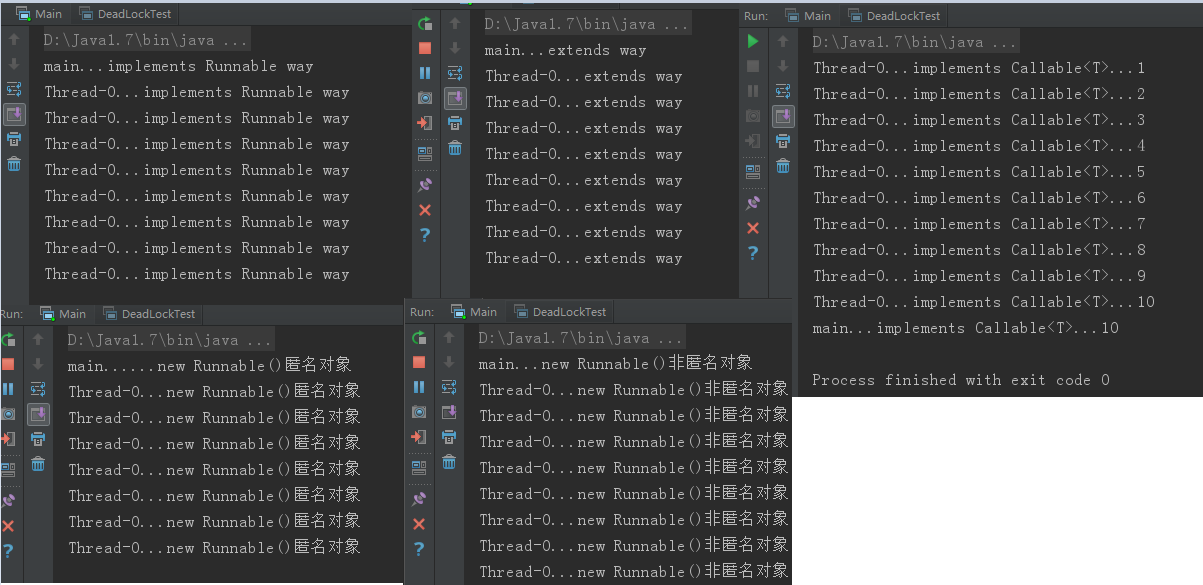
可以看到,起码是看到2个线程在跑,而且,callable接口的main线程是在后面的,是有点特殊的。
一下摘译Java 1.7 jdk的Thread类里面的一段注释
 public class Thread implements Runnable {......}

 * There are two ways to create a new thread of execution. One is to
 * declare a class to be a subclass of <code>Thread</code>. This
 * subclass should override the <code>run</code> method of class
 * <code>Thread</code>. An instance of the subclass can then be
 * allocated and started.

 //。。。。。。省略他自带的例子,就是继承Thread类,重写run();

 * The other way to create a thread is to declare a class that
 * implements the <code>Runnable</code> interface. That class then
 * implements the <code>run</code> method. An instance of the class can
 * then be allocated, passed as an argument when creating
 * <code>Thread</code>, and started.
 //。。。。。。省略他自带的例子,就是实现Runnable接口,还是重写run();
第四种:线程池。
实例代码:
package com.lxk.threadTest.wayToThread;

import java.util.ArrayList;
import java.util.Date;
import java.util.List;
import java.util.concurrent.*;

/**
 * 线程池
 *
 * @author lxk on 2018/8/13
 */
public class ThreadPoolWay {

    public static void main(String[] args) throws ExecutionException, InterruptedException {
        System.out.println("----程序开始运行----");
        Date date1 = new Date();

        int taskSize = 5;
        // 创建一个线程池
        ExecutorService pool = Executors.newFixedThreadPool(taskSize);
        // 创建多个有返回值的任务
        List<Future> list = new ArrayList<>();
        for (int i = 0; i < taskSize; i++) {
            Callable<String> c = new MyCallable(i + " ");
            // 执行任务并获取Future对象
            Future f = pool.submit(c);
            // System.out.println(">>>" + f.get().toString());
            list.add(f);
        }
        // 关闭线程池
        pool.shutdown();

        // 获取所有并发任务的运行结果
        for (Future f : list) {
            // 从Future对象上获取任务的返回值,并输出到控制台
            System.out.println(">>>" + f.get().toString());
        }

        Date date2 = new Date();
        System.out.println("----程序结束运行----,程序运行时间【" + (date2.getTime() - date1.getTime()) + "毫秒】");
    }
}

class MyCallable implements Callable<String> {
    private String taskNum;

    MyCallable(String taskNum) {
        this.taskNum = taskNum;
    }

    @Override
    public String call() throws Exception {
        System.out.println(">>>" + taskNum + "任务启动");
        Date dateTmp1 = new Date();
        Thread.sleep(1000);
        Date dateTmp2 = new Date();
        long time = dateTmp2.getTime() - dateTmp1.getTime();
        System.out.println(">>>" + taskNum + "任务终止");
        return taskNum + "任务返回运行结果,当前任务时间【" + time + "毫秒】";
    }

}
代码是直接可运行的。
总结:
看了这个文章,以后谁要是再问,多线程的实现是几种,
那一定得回答:“四种”,这样才显得,嗯,这小伙子,高级。一般的都回答的是2种,太low啦。
一定得记住。


 被折叠的 条评论
为什么被折叠?
被折叠的 条评论
为什么被折叠?
 到【灌水乐园】发言


