


闲言少叙,开始整合 Struts2+Spring2.5+Hibernate3.6
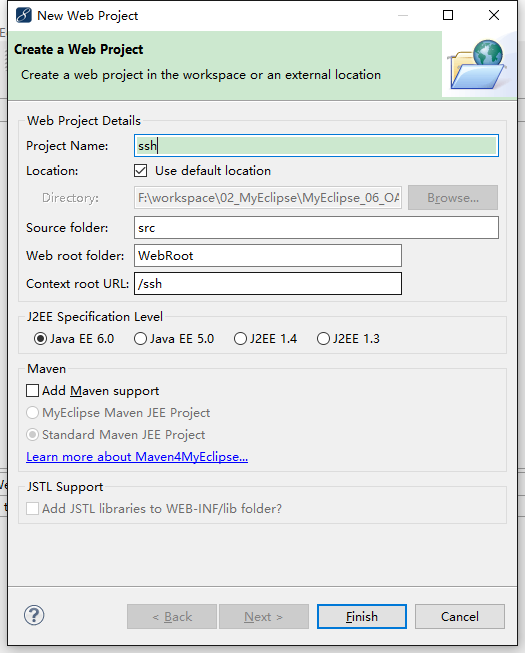
新建工程
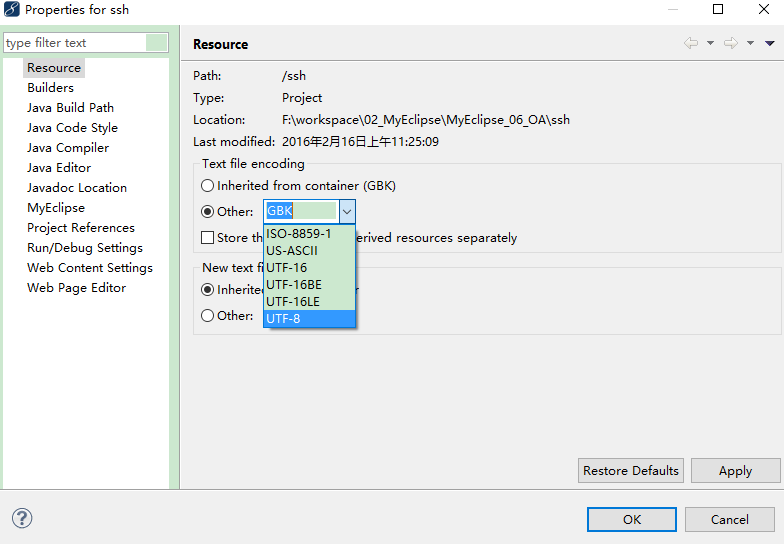
修改编码:UTF-8
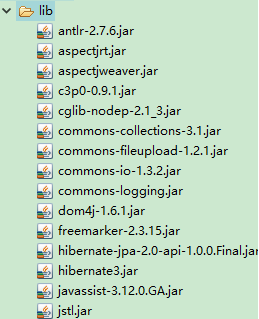
导入jar包

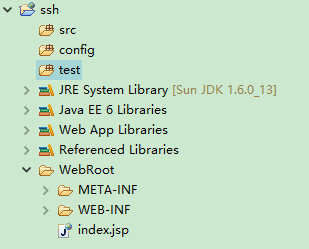
在classpath路径下新建config、test资源包
在config资源包下导入配置文件
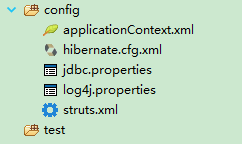
applicationContext.xml
<?xml version="1.0" encoding="UTF-8"?>
<beans xmlns="http://www.springframework.org/schema/beans" xmlns:xsi="http://www.w3.org/2001/XMLSchema-instance" xmlns:context="http://www.springframework.org/schema/context"
    xmlns:tx="http://www.springframework.org/schema/tx"
    xsi:schemaLocation="http://www.springframework.org/schema/beans
    http://www.springframework.org/schema/beans/spring-beans-2.5.xsd
    http://www.springframework.org/schema/context
    http://www.springframework.org/schema/context/spring-context-2.5.xsd
    http://www.springframework.org/schema/tx
    http://www.springframework.org/schema/tx/spring-tx-2.5.xsd">


    <!-- 自动扫描与装配bean -->
    <context:component-scan base-package="com.dust"></context:component-scan>


    <!-- 加载外部的properties配置文件 -->
    <context:property-placeholder location="classpath:jdbc.properties"/>


    <!-- 配置数据库连接池(c3p0) -->
    <bean id="dataSource" class="com.mchange.v2.c3p0.ComboPooledDataSource">
        <!-- 基本信息 -->
        <property name="jdbcUrl" value="${jdbcUrl}"></property>
        <property name="driverClass" value="${driverClass}"></property>
        <property name="user" value="${username}"></property>
        <property name="password" value="${password}"></property>
        <!-- 其他配置 -->
        <!--初始化时获取三个连接,取值应在minPoolSize与maxPoolSize之间。Default: 3 -->
        <property name="initialPoolSize" value="3"></property>
        <!--连接池中保留的最小连接数。Default: 3 -->
        <property name="minPoolSize" value="3"></property>
        <!--连接池中保留的最大连接数。Default: 15 -->
        <property name="maxPoolSize" value="5"></property>
        <!--当连接池中的连接耗尽的时候c3p0一次同时获取的连接数。Default: 3 -->
        <property name="acquireIncrement" value="3"></property>
        <!-- 控制数据源内加载的PreparedStatements数量。如果maxStatements与maxStatementsPerConnection均为0,则缓存被关闭。Default: 0 -->
        <property name="maxStatements" value="8"></property>
        <!-- maxStatementsPerConnection定义了连接池内单个连接所拥有的最大缓存statements数。Default: 0 -->
        <property name="maxStatementsPerConnection" value="5"></property>
        <!--最大空闲时间,1800秒内未使用则连接被丢弃。若为0则永不丢弃。Default: 0 -->
        <property name="maxIdleTime" value="1800"></property>
    </bean>


    <!-- 配置SessionFactory -->
    <bean id="sessionFactory" class="org.springframework.orm.hibernate3.LocalSessionFactoryBean">
        <property name="dataSource" ref="dataSource"></property>
        <property name="configLocation" value="classpath:hibernate.cfg.xml"></property>
    </bean>


    <!-- 配置声明式的事务管理(采用基于注解的方式) -->
    <bean id="transactionManager" class="org.springframework.orm.hibernate3.HibernateTransactionManager">
        <property name="sessionFactory" ref="sessionFactory"></property>
    </bean>
    <tx:annotation-driven transaction-manager="transactionManager"/>

</beans>
hibernate.cfg.xml
<!DOCTYPE hibernate-configuration PUBLIC
    "-//Hibernate/Hibernate Configuration DTD 3.0//EN"
    "http://www.hibernate.org/dtd/hibernate-configuration-3.0.dtd">

<hibernate-configuration>
<session-factory>

    <!-- 数据库信息(连接信息写到spring的配置文件中) -->
    <property name="dialect">
        org.hibernate.dialect.DerbyDialect
    </property>
    <!--
        <property name="connection.url">jdbc:mysql:///itcastoa_20120216</property>
        <property name="connection.driver_class">com.mysql.jdbc.Driver</property>
        <property name="connection.username">root</property>
        <property name="connection.password">root</property>
    -->

    <!-- 其他配置 -->
    <property name="show_sql">true</property>
    <property name="hbm2ddl.auto">update</property>


    <!-- 导入映射配置

    -->

</session-factory>
</hibernate-configuration>
jdbc.properties
jdbcUrl     = jdbc:mysql:///dust
driverClass = com.mysql.jdbc.Driver
username    = root
password    = ********
dust : 数据库名
log4j.properties
### direct log messages to stdout ###
log4j.appender.stdout=org.apache.log4j.ConsoleAppender
log4j.appender.stdout.Target=System.out
log4j.appender.stdout.layout=org.apache.log4j.PatternLayout
log4j.appender.stdout.layout.ConversionPattern=%d{ABSOLUTE} %5p %c{1}:%L - %m%n

### direct messages to file hibernate.log ###
#log4j.appender.file=org.apache.log4j.FileAppender
#log4j.appender.file.File=hibernate.log
#log4j.appender.file.layout=org.apache.log4j.PatternLayout
#log4j.appender.file.layout.ConversionPattern=%d{ABSOLUTE} %5p %c{1}:%L - %m%n

### set log levels - for more verbose logging change 'info' to 'debug' ###

# 默认的日志显示级别,表示指定级别和更高的级别都显示
log4j.rootLogger=warn, stdout

# 指定com.dust包中的日志的显示级别是debug
log4j.logger.com.dust=debug

### log HQL query parser activity
#log4j.logger.org.hibernate.hql.ast.AST=debug

### log just the SQL
#log4j.logger.org.hibernate.SQL=debug
struts.xml
<?xml version="1.0" encoding="UTF-8" ?>
<!DOCTYPE struts PUBLIC
    "-//Apache Software Foundation//DTD Struts Configuration 2.0//EN"
    "http://struts.apache.org/dtds/struts-2.0.dtd">

<struts>
    <!-- 配置为开发模式 -->
    <constant name="struts.devMode" value="true" />
    <!-- 配置扩展名为action -->
    <constant name="struts.action.extension" value="action" />


    <package name="default" namespace="/" extends="struts-default">


    </package>

</struts>
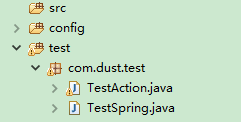
测试
测试Spring整合Hibernate
package com.dust.test;

import org.hibernate.SessionFactory;
import org.junit.Test;
import org.springframework.context.ApplicationContext;
import org.springframework.context.support.ClassPathXmlApplicationContext;

public class TestSpring {

    @Test
    public void testSpring() {

        //加载配置Spring文件
        ApplicationContext context = new ClassPathXmlApplicationContext(
                "applicationContext.xml");
        //从Spring配置文件中获取bean
        SessionFactory sessionFactory = (SessionFactory) context
                .getBean("sessionFactory");
        System.out.println(sessionFactory);
    }

}
问题一
如果你跟着步骤做,相信在这里控制台会报错
Unable to get the default Bean Validation factory这是神马原因呢?这是因为在整合Spring和Hibernate时,版本出现了问题,这也是常常会发生的问题。
如何解决此问题?
在hibernate的配置文件中加:
<property name="javax.persistence.validation.mode">none</property>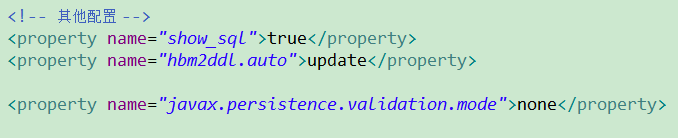
这次测试就不会报异常了。
测试Spring整合Struts
完善web.xml文件
<?xml version="1.0" encoding="UTF-8"?>
<web-app xmlns:xsi="http://www.w3.org/2001/XMLSchema-instance" xmlns="http://java.sun.com/xml/ns/javaee" xmlns:web="http://java.sun.com/xml/ns/javaee/web-app_2_5.xsd" xsi:schemaLocation="http://java.sun.com/xml/ns/javaee http://java.sun.com/xml/ns/javaee/web-app_2_5.xsd" version="2.5">
  <listener>
    <listener-class>org.springframework.web.context.ContextLoaderListener</listener-class>
  </listener>
  <context-param>
    <param-name>contextConfigLocation</param-name>
    <param-value>classpath:applicationContext*.xml</param-value>
  </context-param>
  <filter>
    <filter-name>struts2</filter-name>
    <filter-class>org.apache.struts2.dispatcher.ng.filter.StrutsPrepareAndExecuteFilter</filter-class>
  </filter>
  <filter-mapping>
    <filter-name>struts2</filter-name>
    <url-pattern>/*</url-pattern>
  </filter-mapping>
  <welcome-file-list>
    <welcome-file>index.jsp</welcome-file>
  </welcome-file-list>
</web-app>
编写测试类
package com.dust.test;

import org.springframework.context.annotation.Scope;
import org.springframework.stereotype.Controller;

import com.opensymphony.xwork2.ActionSupport;

@Controller
@Scope("prototype")
public class TestAction extends ActionSupport {

    @Override
    public String execute() throws Exception {
        System.out.println("run...");
        return SUCCESS;
    }

}
测试类:
在struts.xml文件中配置action
<!-- 测试用的action,当与Spring整合后,class属性写的就是Spring中bean的名称 -->
        <action name="test" class="testAction">
            <result name="success">/test.jsp</result>
        </action>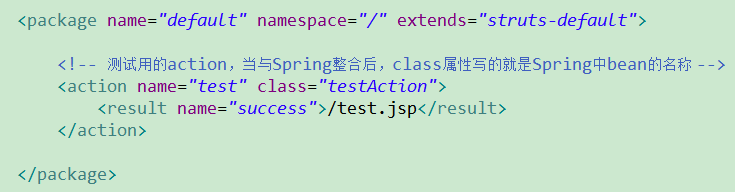
在WebRoot下新建test.jsp页面
启动服务器访问:localhost:8080/ssh/test.action
访问成功。
事务
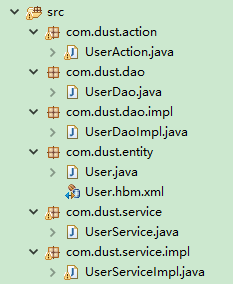
编写实体类和映射文件
实体类:
package com.dust.entity;

public class User {

    private String id;
    private String name ;
    public String getId() {
        return id;
    }
    public void setId(String id) {
        this.id = id;
    }
    public String getName() {
        return name;
    }
    public void setName(String name) {
        this.name = name;
    }

}
映射文件:User.hbm.xml
<?xml version="1.0"?>
<!DOCTYPE hibernate-mapping PUBLIC
        "-//Hibernate/Hibernate Mapping DTD 3.0//EN"
        "http://hibernate.sourceforge.net/hibernate-mapping-3.0.dtd">

<hibernate-mapping package="com.dust.entity">

    <class name="User" table="User">
        <id name="id">
            <generator class="uuid"/>
        </id>
        <property name="name"/>

    </class>

</hibernate-mapping>
编写Dao接口和实现类
接口:
package com.dust.dao;

import com.dust.entity.User;

public interface UserDao {

    public void save(User user);
}
接口实现类:
package com.dust.dao.impl;

import org.hibernate.SessionFactory;
import org.springframework.beans.factory.annotation.Autowired;
import org.springframework.stereotype.Repository;

import com.dust.dao.UserDao;
import com.dust.entity.User;

@Repository
public class UserDaoImpl implements UserDao {

    @Autowired
    private SessionFactory sessionFactory;

    @Override
    public void save(User user) {

        sessionFactory.getCurrentSession().save(user);
    }

}
编写service层及其实现类
service类:
package com.dust.service;

import com.dust.entity.User;

public interface UserService {
    public void save(User user);
}
service实现类:
package com.dust.service.impl;

import org.springframework.beans.factory.annotation.Autowired;
import org.springframework.stereotype.Service;
import org.springframework.transaction.annotation.Transactional;

import com.dust.dao.UserDao;
import com.dust.entity.User;
import com.dust.service.UserService;

@Service
@Transactional
public class UserServiceImpl implements UserService {

    @Autowired
    private UserDao userDao;

    @Override
    public void save(User user) {
        userDao.save(user);
    }

}
编写控制层
action:
package com.dust.action;

import org.springframework.beans.factory.annotation.Autowired;
import org.springframework.context.annotation.Scope;
import org.springframework.stereotype.Controller;

import com.dust.entity.User;
import com.dust.service.UserService;
import com.opensymphony.xwork2.ActionSupport;

@Controller
@Scope("prototype")
public class UserAction extends ActionSupport {

    @Autowired
    private UserService userService;

    public String saveUser() {

        User user = new User();
        user.setName("dust");
        userService.save(user);
        return SUCCESS;
    }

}
在struts.xml中添加action
 <action name="user_*" class="userAction" method="{1}">
            <result name="success">/user.jsp</result>
</action>访问:http://localhost:8080/ssh/user_saveUser.action
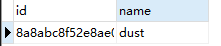
插入数据成功
User表:
测试数据异常是否回滚
serviceImpl:
package com.dust.service.impl;

import org.springframework.beans.factory.annotation.Autowired;
import org.springframework.stereotype.Service;
import org.springframework.transaction.annotation.Transactional;

import com.dust.dao.UserDao;
import com.dust.entity.User;
import com.dust.service.UserService;

@Service
@Transactional
public class UserServiceImpl implements UserService {

    @Autowired
    private UserDao userDao;

    @Override
    public void save(User user) {
        userDao.save(user);
        // 异常数据
        int i = 1 / 0;
    }

}
action:
package com.dust.action;

import org.springframework.beans.factory.annotation.Autowired;
import org.springframework.context.annotation.Scope;
import org.springframework.stereotype.Controller;

import com.dust.entity.User;
import com.dust.service.UserService;
import com.opensymphony.xwork2.ActionSupport;

@Controller
@Scope("prototype")
public class UserAction extends ActionSupport {

    @Autowired
    private UserService userService;

    public String saveUser() {

        User user = new User();
        // 这里是准备要插入的数据
        user.setName("么么哒");
        userService.save(user);
        return SUCCESS;
    }

}
重启服务器,访问:http://localhost:8080/ssh/user_saveUser.action
页面报错,查看数据库并没有新数据插入,因为异常是发生在插入程序之后的,数据库又没有新数据插入,所以实现了回滚


 1万+
1万+


 被折叠的 条评论
为什么被折叠?
被折叠的 条评论
为什么被折叠?
 到【灌水乐园】发言


