


https://blog.csdn.net/y_qc_lookup/article/details/80178545
springboot中配置mybatis连接postgresql

置顶 Dylan's 2018-05-03 15:49:46  41415
41415  收藏 8
收藏 8
分类专栏: java 文章标签: springboot mybatis postgresql xml
版权
最近在使用springboot用于搭建程序后台的框架,与之前ssm,ssh等框架相比,搭建简单,只需下载eclipse或其他插件进行安装即可。
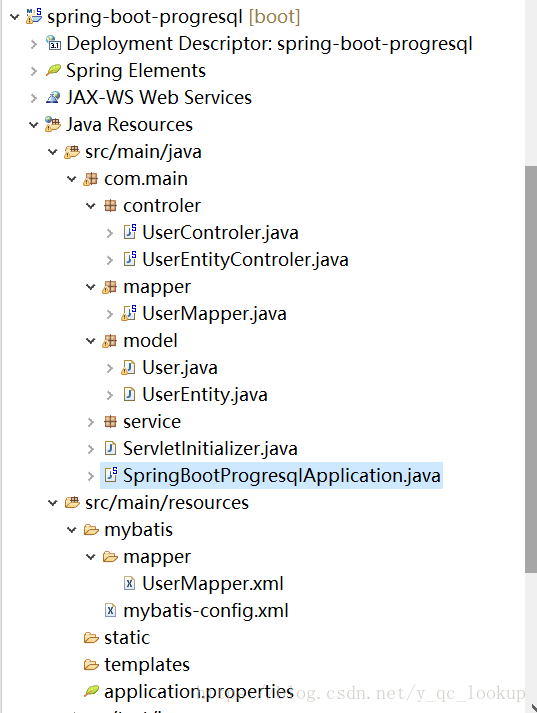
整体结构
1.在pom.xml中加入配置
-
<!-- 加载postgresql驱动 --> -
<dependency> -
<groupId>org.postgresql</groupId> -
<artifactId>postgresql</artifactId> -
<scope>runtime</scope> -
</dependency> -
<!-- 加载jdbc连接数据库 --> -
<dependency> -
<groupId>org.springframework.boot</groupId> -
<artifactId>spring-boot-starter-jdbc</artifactId> -
</dependency> -
<!-- 加载mybatis jar包 --> -
<dependency> -
<groupId>org.mybatis.spring.boot</groupId> -
<artifactId>mybatis-spring-boot-starter</artifactId> -
<version>1.3.2</version> -
</dependency>
2.resources/application.properties中加入数据库配置链接
-
### postgresql config ### -
spring.datasource.url=jdbc:postgresql://192.168.1.1:5432/postgre -
spring.datasource.username=postgre -
spring.datasource.password=123456 -
spring.datasource.driver-class-name=org.postgresql.Driver
3.编写model模型
-
package com.main.model; -
import java.io.Serializable; -
public class UserEntity implements Serializable { -
private static final long serialVersionUID = 1L; -
private Long id; -
private String userName; -
private String passWord; -
private String userSex; -
private String nickName; -
public UserEntity() { -
super(); -
} -
public UserEntity(String userName, String passWord, String userSex,String nickName) { -
super(); -
this.passWord = passWord; -
this.userName = userName; -
this.userSex = userSex; -
this.nickName = nickName; -
} -
public Long getId() { -
return id; -
} -
public void setId(Long id) { -
this.id = id; -
} -
public String getUserName() { -
return userName; -
} -
public void setUserName(String userName) { -
this.userName = userName; -
} -
public String getPassWord() { -
return passWord; -
} -
public void setPassWord(String passWord) { -
this.passWord = passWord; -
} -
public String getUserSex() { -
return userSex; -
} -
public void setUserSex(String userSex) { -
this.userSex = userSex; -
} -
public String getNickName() { -
return nickName; -
} -
public void setNickName(String nickName) { -
this.nickName = nickName; -
} -
public static long getSerialversionuid() { -
return serialVersionUID; -
} -
@Override -
public String toString() { -
// TODO Auto-generated method stub -
return "userName " + this.userName + ", pasword " + this.passWord + ", nickName " + this.nickName+ ", userSex " + this.userSex; -
} -
}
4.编写spring mapper。
-
public interface UserMapper { -
List<UserEntity> getAll(); -
UserEntity getOne(Long id); -
void insert(UserEntity user); -
void update(UserEntity user); -
void delete(Long id); -
}
5.mybatis中的xml配置文件
-
<?xml version="1.0" encoding="UTF-8" ?> -
<!DOCTYPE mapper PUBLIC "-//mybatis.org//DTD Mapper 3.0//EN" "http://mybatis.org/dtd/mybatis-3-mapper.dtd" > -
<mapper namespace="com.main.mapper.UserMapper" > -
<resultMap id="BaseResultMap" type="com.main.model.UserEntity" > -
<id column="id" property="id" jdbcType="BIGINT" /> -
<result column="userName" property="userName" jdbcType="VARCHAR" /> -
<result column="passWord" property="passWord" jdbcType="VARCHAR" /> -
<result column="user_sex" property="userSex" jdbcType="VARCHAR"/> -
<result column="nick_name" property="nickName" jdbcType="VARCHAR" /> -
</resultMap> -
<sql id="Base_Column_List" > -
id, userName, passWord, user_sex, nick_name -
</sql> -
<select id="getAll" resultMap="BaseResultMap" > -
SELECT -
<include refid="Base_Column_List" /> -
FROM test.userentity -
</select> -
<select id="getOne" parameterType="java.lang.Long" resultMap="BaseResultMap" > -
SELECT -
<include refid="Base_Column_List" /> -
FROM test.userentity -
WHERE id = #{id} -
</select> -
<insert id="insert" parameterType="com.main.model.UserEntity" > -
INSERT INTO -
test.userentity -
(userName,passWord,user_sex) -
VALUES -
(#{userName}, #{passWord}, #{userSex}) -
</insert> -
<update id="update" parameterType="com.main.model.UserEntity" > -
UPDATE -
test.userentity -
SET -
<if test="userName != null">userName = #{userName},</if> -
<if test="passWord != null">passWord = #{passWord},</if> -
nick_name = #{nickName} -
WHERE -
id = #{id} -
</update> -
<delete id="delete" parameterType="java.lang.Long" > -
DELETE FROM -
test.userentity -
WHERE -
id =#{id} -
</delete> -
</mapper>
这里的配置将com.main.mapper.UserMapper中的抽象方法进行实现。
6.配置mybatis.config.xml
-
<?xml version="1.0" encoding="UTF-8" ?> -
<!DOCTYPE configuration PUBLIC "-//mybatis.org//DTD Config 3.0//EN" "http://mybatis.org/dtd/mybatis-3-config.dtd"> -
<configuration> -
<typeAliases> -
<typeAlias alias="Integer" type="java.lang.Integer" /> -
<typeAlias alias="Long" type="java.lang.Long" /> -
<typeAlias alias="HashMap" type="java.util.HashMap" /> -
<typeAlias alias="LinkedHashMap" type="java.util.LinkedHashMap" /> -
<typeAlias alias="ArrayList" type="java.util.ArrayList" /> -
<typeAlias alias="LinkedList" type="java.util.LinkedList" /> -
</typeAliases> -
</configuration>
7.在controler中对mapper中的方法进行调用
-
package com.main.controler; -
import java.util.List; -
import org.springframework.beans.factory.annotation.Autowired; -
import org.springframework.web.bind.annotation.PathVariable; -
import org.springframework.web.bind.annotation.RequestMapping; -
import org.springframework.web.bind.annotation.RestController; -
import com.main.mapper.UserMapper; -
import com.main.model.UserEntity; -
@RestController -
@RequestMapping("/user") -
public class UserEntityControler { -
@Autowired -
private UserMapper userMapper; -
@RequestMapping("/getUsers") -
public List<UserEntity> getUsers() { -
List<UserEntity> users=userMapper.getAll(); -
return users; -
} -
@RequestMapping("/getUser") -
public UserEntity getUser(Long id) { -
UserEntity user=userMapper.getOne(id); -
return user; -
} -
@RequestMapping("/add") -
public void save(UserEntity user) { -
userMapper.insert(user); -
} -
@RequestMapping(value="update") -
public void update(UserEntity user) { -
userMapper.update(user); -
} -
@RequestMapping(value="/delete/{id}") -
public void delete(@PathVariable("id") Long id) { -
userMapper.delete(id); -
} -
}
8.在启动类中将mapper进行装载,否则会报错。
-
package com.main; -
import org.mybatis.spring.annotation.MapperScan; -
import org.springframework.boot.SpringApplication; -
import org.springframework.boot.autoconfigure.SpringBootApplication; -
@SpringBootApplication -
@MapperScan("com.main.mapper") -
public class SpringBootProgresqlApplication { -
public static void main(String[] args) { -
SpringApplication.run(SpringBootProgresqlApplication.class, args); -
} -
}
接下来只需启动就可以完成spring-boot使用mybatis进行数据库操作了。
附上git地址:
https://github.com/qichangyang/spring-boot-demo


 9299
9299


 被折叠的 条评论
为什么被折叠?
被折叠的 条评论
为什么被折叠?
 到【灌水乐园】发言


