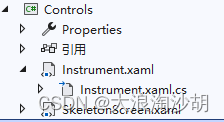
1、文件架构

2、Instrument.xaml
<UserControl x:Class="Controls.Instrument"
             xmlns="http://schemas.microsoft.com/winfx/2006/xaml/presentation"
             xmlns:x="http://schemas.microsoft.com/winfx/2006/xaml"
             xmlns:mc="http://schemas.openxmlformats.org/markup-compatibility/2006"
             xmlns:d="http://schemas.microsoft.com/expression/blend/2008"
             xmlns:local="clr-namespace:Controls"
             mc:Ignorable="d"
             d:DesignHeight="450" d:DesignWidth="450">
    <Grid>
        <Ellipse Fill="{Binding PlateBackground,RelativeSource={RelativeSource AncestorType=UserControl,Mode=FindAncestor}}" Name="BackEllipse"/>
        <Canvas Name="mainCanvas" Width="{Binding Width,ElementName=BackEllipse}" Height="{Binding Height,ElementName=BackEllipse}"/>
        <Path Stroke="White" StrokeThickness="4" Name="circle" RenderTransformOrigin="0.5 0.5"
              StrokeStartLineCap="Round" StrokeEndLineCap="Round"
              Width="{Binding Width,ElementName=BackEllipse}" Height="{Binding Height,ElementName=BackEllipse}">
            <Path.RenderTransform>
                <RotateTransform Angle="-45"/>
            </Path.RenderTransform>
        </Path>

        <Path Fill="White" Name="pointer" RenderTransformOrigin="0.5 0.5"
              Width="{Binding Width,ElementName=BackEllipse}" Height="{Binding Height,ElementName=BackEllipse}">
            <Path.RenderTransform>
                <RotateTransform Angle="-45" x:Name="rtPointer"/>
            </Path.RenderTransform>
        </Path>

        <Border Width="20" Height="20" CornerRadius="10">
            <Border.Background>
                <LinearGradientBrush EndPoint="0.5,1" StartPoint="0.5,0">
                    <GradientStop Color="White" Offset="0.583"/>
                    <GradientStop Color="#FF97B5B9" Offset="1"/>
                </LinearGradientBrush>
            </Border.Background>

        </Border>
    </Grid>
</UserControl>
3、Instrument.xaml.cs
using System;
using System.Collections.Generic;
using System.ComponentModel;
using System.Linq;
using System.Text;
using System.Threading.Tasks;
using System.Windows;
using System.Windows.Controls;
using System.Windows.Data;
using System.Windows.Documents;
using System.Windows.Input;
using System.Windows.Media;
using System.Windows.Media.Animation;
using System.Windows.Media.Imaging;
using System.Windows.Navigation;
using System.Windows.Shapes;

namespace Controls
{
    /// <summary>
    /// Instrument.xaml 的交互逻辑
    /// </summary>
    public partial class Instrument : UserControl
    {
        //依赖属性
        public Brush PlateBackground
        {
            get { return (Brush)this.GetValue(PlateBackgroundProperty); }
            set { this.SetValue(PlateBackgroundProperty, value); }
        }
        public static readonly DependencyProperty PlateBackgroundProperty = DependencyProperty.Register("PlateBackground", typeof(Brush), typeof(Instrument),
            new PropertyMetadata(default(Brush)));

        public double Value
        {
            get { return (double)this.GetValue(ValueProperty); }
            set { this.SetValue(ValueProperty, value); }
         }
        public static readonly DependencyProperty ValueProperty=DependencyProperty.Register("Value",typeof(double),typeof(Instrument),
            new PropertyMetadata(double.NaN, new PropertyChangedCallback(OnPropertyChanged)));

        public int Minimum
        {
            get { return (int)this.GetValue(MinimumProperty); }
            set { this.SetValue(MinimumProperty, value); }
        }
        public static readonly DependencyProperty MinimumProperty = DependencyProperty.Register("Minimum", typeof(int), typeof(Instrument),
            new PropertyMetadata(default(int), new PropertyChangedCallback(OnPropertyChanged)));

        public int Maximum
        {
            get { return (int)this.GetValue(MaximumProperty); }
            set { this.SetValue(MaximumProperty, value); }
        }
        public static readonly DependencyProperty MaximumProperty = DependencyProperty.Register("Maximum", typeof(int), typeof(Instrument),
            new PropertyMetadata(default(int), new PropertyChangedCallback(OnPropertyChanged)));

        public int Interval
        {
            get { return (int)this.GetValue(IntervalProperty); }
            set { this.SetValue(IntervalProperty, value); }
        }
        public static readonly DependencyProperty IntervalProperty = DependencyProperty.Register("Interval", typeof(int), typeof(Instrument),
            new PropertyMetadata(default(int), new PropertyChangedCallback(OnPropertyChanged)));

        public int ScaleTextSize
        {
            get { return (int)this.GetValue(ScaleTextSizeProperty); }
            set { this.SetValue(ScaleTextSizeProperty, value); }
        }
        public static readonly DependencyProperty ScaleTextSizeProperty = DependencyProperty.Register("ScaleTextSize", typeof(int), typeof(Instrument),
            new PropertyMetadata(default(int), new PropertyChangedCallback(OnPropertyChanged)));

        public static void OnPropertyChanged(DependencyObject d, DependencyPropertyChangedEventArgs e)
        {
            (d as Instrument).Refresh();
        }
        public Instrument()
        {
            InitializeComponent();
            this.SizeChanged += Instrument_SizeChanged;
        }

        private void Instrument_SizeChanged(object sender, SizeChangedEventArgs e)
        {
            double minSIze=Math.Min(this.RenderSize.Width, this.RenderSize.Height);
            this.BackEllipse.Width = minSIze;
            this.BackEllipse.Height = minSIze;
        }
        private void Refresh()
        {
            if (double.IsNaN(this.BackEllipse.Width)) return;
            double radius = this.BackEllipse.Width / 2;
            this.mainCanvas.Children.Clear();
            double min = this.Minimum, max = this.Maximum;
            int scaleAreaCount = this.Interval;
            double step=270.0/(max-min);
            for(int i = 0; i < max-min; i++)
            {
                Line lineScale = new Line();
                double angle = (i * step-45) * Math.PI / 180;
                lineScale.X1 = radius - (radius - 10) * Math.Cos(angle);
                lineScale.Y1 = radius - (radius - 10) * Math.Sin(angle);
                if(i% scaleAreaCount == 0 || i==(max-min-1))
                {
                    lineScale.X2 = radius - (radius - 30) * Math.Cos(angle);
                    lineScale.Y2 = radius - (radius - 30) * Math.Sin(angle);
                }
                else
                {
                    lineScale.X2 = radius - (radius - 20) * Math.Cos(angle);
                    lineScale.Y2 = radius - (radius - 20) * Math.Sin(angle);
                }
                lineScale.Stroke = Brushes.White;
                lineScale.StrokeThickness = 1;
                this.mainCanvas.Children.Add(lineScale);
            }
            step = 270.0 / scaleAreaCount;
            int scaleText = (int)min;
            for(int i = 0; i <= scaleAreaCount; i++)
            {
                TextBlock textScale = new TextBlock();
                textScale.Text=(scaleText+scaleAreaCount  * i).ToString();
                textScale.Foreground = Brushes.White;
                textScale.Width = 34;
                textScale.TextAlignment = TextAlignment.Center;
                textScale.FontSize = this.ScaleTextSize;
                //textScale.Background = Brushes.Green;
                double angle = (i * step - 45) * Math.PI / 180;
                Canvas.SetLeft(textScale, radius - (radius - 40) * Math.Cos(angle)-17);
                Canvas.SetTop(textScale, radius - (radius - 40) * Math.Sin(angle)-10);
                this.mainCanvas.Children.Add(textScale);
            }

            string sData = "M{0},{1} A{0} {0} 0 1 1 {1} {2}";
            sData = string.Format(sData, radius / 2, radius, radius * 1.5);
            var converter=TypeDescriptor.GetConverter(typeof(Geometry));
            this.circle.Data= (Geometry)converter.ConvertFrom(sData);

            step = 270.0 / (max - min);
            //this.rtPointer.Angle = this.Value * step-45;
            double value=double.IsNaN(this.Value) ? 0 : this.Value;
            DoubleAnimation da=new DoubleAnimation(value * step - 45,new Duration(TimeSpan.FromMilliseconds(200)));
            this.rtPointer.BeginAnimation(RotateTransform.AngleProperty, da);

            sData = "M{0},{1} {1},{2},{1} {3}";
            sData = string.Format(sData, radius*0.3, radius, radius-8, radius + 8);
            this.pointer.Data = (Geometry)converter.ConvertFrom(sData);
        }
    }
}
4、SkeletonScreen.xaml
<UserControl x:Class="Controls.SkeletonScreen"
             xmlns="http://schemas.microsoft.com/winfx/2006/xaml/presentation"
             xmlns:x="http://schemas.microsoft.com/winfx/2006/xaml"
             xmlns:mc="http://schemas.openxmlformats.org/markup-compatibility/2006"
             xmlns:d="http://schemas.microsoft.com/expression/blend/2008"
             xmlns:local="clr-namespace:Controls"
             mc:Ignorable="d"
             d:DesignHeight="100" d:DesignWidth="900">
    <UserControl.Triggers>
        <EventTrigger RoutedEvent="Window.Loaded">
            <BeginStoryboard>
                <Storyboard>
                    <ColorAnimation Duration="0:0:1" To="#F7F9FA" Storyboard.TargetName="imgBlock" Storyboard.TargetProperty="(Background).(SolidColorBrush.Color)"
                                    RepeatBehavior="Forever" AutoReverse="True"/>
                    <DoubleAnimation Duration="0:0:1.5" To="1" Storyboard.TargetName="border1" Storyboard.TargetProperty="Background.GradientStops[1].Offset"
                                    RepeatBehavior="Forever" AutoReverse="True"/>
                    <DoubleAnimation Duration="0:0:1.5" To="1" Storyboard.TargetName="border2" Storyboard.TargetProperty="Background.GradientStops[1].Offset"
                                    RepeatBehavior="Forever" AutoReverse="True"/>
                    <DoubleAnimation Duration="0:0:1.5" To="1" Storyboard.TargetName="border3" Storyboard.TargetProperty="Background.GradientStops[1].Offset"
                                    RepeatBehavior="Forever" AutoReverse="True"/>
                </Storyboard>
            </BeginStoryboard>
        </EventTrigger>
    </UserControl.Triggers>
    <Grid Margin="0 6">
        <Grid.ColumnDefinitions>
            <ColumnDefinition Width="160"/>
            <ColumnDefinition/>
        </Grid.ColumnDefinitions>
        <!--第1列图片骨架-->
        <Border Background="#DDD" Width="80" Height="65" CornerRadius="10" Name="imgBlock"/>
        <!--第2列文字骨架-->
        <StackPanel Grid.Column="1" VerticalAlignment="Center">
            <!--第1行-->
            <Border ClipToBounds="True">
                <Border Height="16" Width="450" HorizontalAlignment="Left" Name="border1" Margin="-200 0">
                    <Border.Background>
                        <LinearGradientBrush EndPoint="1,0.5" StartPoint="0,0.5">
                            <GradientStop Color="#DDD" Offset="0"/>
                            <GradientStop Color="#F7F9FA" Offset="0.5"/>
                            <GradientStop Color="#DDD" Offset="1"/>
                        </LinearGradientBrush>
                    </Border.Background>
                </Border>
            </Border>
            <!--第2行-->
            <Border ClipToBounds="True">
                <Border Height="16" Margin="-580 10" Name="border2">
                    <Border.Background>
                        <LinearGradientBrush EndPoint="1,0.5" StartPoint="0,0.5">
                            <GradientStop Color="#DDD" Offset="0"/>
                            <GradientStop Color="#F7F9FA" Offset="0.5"/>
                            <GradientStop Color="#DDD" Offset="1"/>
                        </LinearGradientBrush>
                    </Border.Background>
                </Border>
            </Border>
            <!--第3行-->
            <Border ClipToBounds="True">
                <Border Height="16" Width="580" HorizontalAlignment="Left" Name="border3" Margin="-200 0">
                    <Border.Background>
                        <LinearGradientBrush EndPoint="1,0.5" StartPoint="0,0.5">
                            <GradientStop Color="#DDD" Offset="0"/>
                            <GradientStop Color="#F7F9FA" Offset="0.5"/>
                            <GradientStop Color="#DDD" Offset="1"/>
                        </LinearGradientBrush>
                    </Border.Background>
                </Border>
            </Border>
        </StackPanel>
    </Grid>
</UserControl>
5、SkeletonScreen.xaml.cs
using System;
using System.Collections.Generic;
using System.Linq;
using System.Text;
using System.Threading.Tasks;
using System.Windows;
using System.Windows.Controls;
using System.Windows.Data;
using System.Windows.Documents;
using System.Windows.Input;
using System.Windows.Media;
using System.Windows.Media.Imaging;
using System.Windows.Navigation;
using System.Windows.Shapes;

namespace Controls
{
    /// <summary>
    /// SkeletonScreen.xaml 的交互逻辑
    /// </summary>
    public partial class SkeletonScreen : UserControl
    {
        public SkeletonScreen()
        {
            InitializeComponent();
        }
    }
}


 3293
3293


 被折叠的 条评论
为什么被折叠?


