


Mirai API 地址
https://docs.mirai.mamoe.net/CoreAPI.html
我们需要跟着api来进行实现和学习。
1.创建和配置Bot
//实例化bot,获取配置BotConfiguration
Bot bot = BotFactory.INSTANCE.newBot(new Long(userName), passWord);
 //获取bot配置
BotConfiguration configuration = bot.getConfiguration();
 //文件存储设备信息,登陆验证通过会默认为在derives.json文件记录
configuration.fileBasedDeviceInfo();
重要配置
心跳切换
//切换心跳策略
configuration.setHeartbeatStrategy(BotConfiguration.HeartbeatStrategy.STAT_HB);
心跳策略默认为最佳的 STAT_HB,但不适用于一些账号。
如果遇到 Bot 闲置一段时间后,发消息返回成功但群内收不到的情况,请切换心跳策略,依次尝试 STAT_HB、REGISTER 和 NONE
切换登录协议
 //设置登陆协
configuration.setProtocol(BotConfiguration.MiraiProtocol.ANDROID_PHONE);
协议包括以下几种
   public enum class MiraiProtocol {
        /**
         * Android 手机. 所有功能都支持.
         */
        ANDROID_PHONE,
        /**
         * Android 平板.
         *
         * 注意: 不支持戳一戳事件解析
         */
        ANDROID_PAD,
        /**
         * Android 手表.
         */
        ANDROID_WATCH,
        /**
         * iPad - 来自MiraiGo
         *
         * @since 2.8
         */
        IPAD,
        /**
         * MacOS - 来自MiraiGo
         *
         * @since 2.8
         */
        MACOS,
    }
默认协议为ANDROID_PHONE
覆盖登陆解决器
在登录时可能遇到图形验证码或滑动验证码,Mirai 会使用 LoginSolver 解决验证码。
在 JVM, Mirai 会根据环境支持情况选择 Swing/CLI 实现,通常不需要手动提供
configuration.setLoginSolver(new YourLoginSover());
当前版本JVM不支持手动提供登陆类,所以只能使用mirai提供的基础登陆
常用配置
修改运行目录
//设置运行路径
 configuration.setWorkingDir(new File(Consts.workingDir));
运行目录为账户登录过的ip地址,以json文件展示,可以使用下面的device.json文件,在文件末尾可以找到。
修改 Bot 缓存目录
// 设置bot缓存目录
configuration.setCacheDir(new File(Consts.cacheDir));
目前缓存目录会存储列表缓存、登录服务器、资源会话秘钥等。这些数据的存储方式有可能变化,请不要修改缓存目录中的文件。
网络日志打印
  configuration.setNetworkLoggerSupplier(new Function1<Bot, MiraiLogger>() {
                    @Override
                    public MiraiLogger invoke(Bot bot) {
                        File file = new File(Consts.miraiLog);
                        DirectoryLogger logger1 = new DirectoryLogger("", file);
                        return logger1;
                    }
                });
可以自行设置打印的路径
启用列表缓存
 // 开启所有列表缓存
configuration.enableContactCache();
BotConfiguration.ContactListCache contactListCache = configuration.getContactListCache();
// 开启好友列表缓存
contactListCache.setFriendListCacheEnabled(true);
// 开启群成员列表缓存contactListCache.setGroupMemberListCacheEnabled(true);
 // 可选设置有更新时的保存时间间隔, 默认 60 秒
contactListCache.setSaveIntervalMillis(60000);
2.登陆
创建 Bot 后不会自动登录,需要手动调用其 login() 方法。只需要调用一次 login() 即可,Bot 掉线时会自动重连。
bot.login();
处理滑动验证码
在程序运行时,jvm会弹出验证消息框,

需要把URL的路径复制到浏览器,回车,会出现一个滑动验证码

在滑动验证码之前,我们要打开开发者工具F12

再继续进行滑动验证,滑块之后
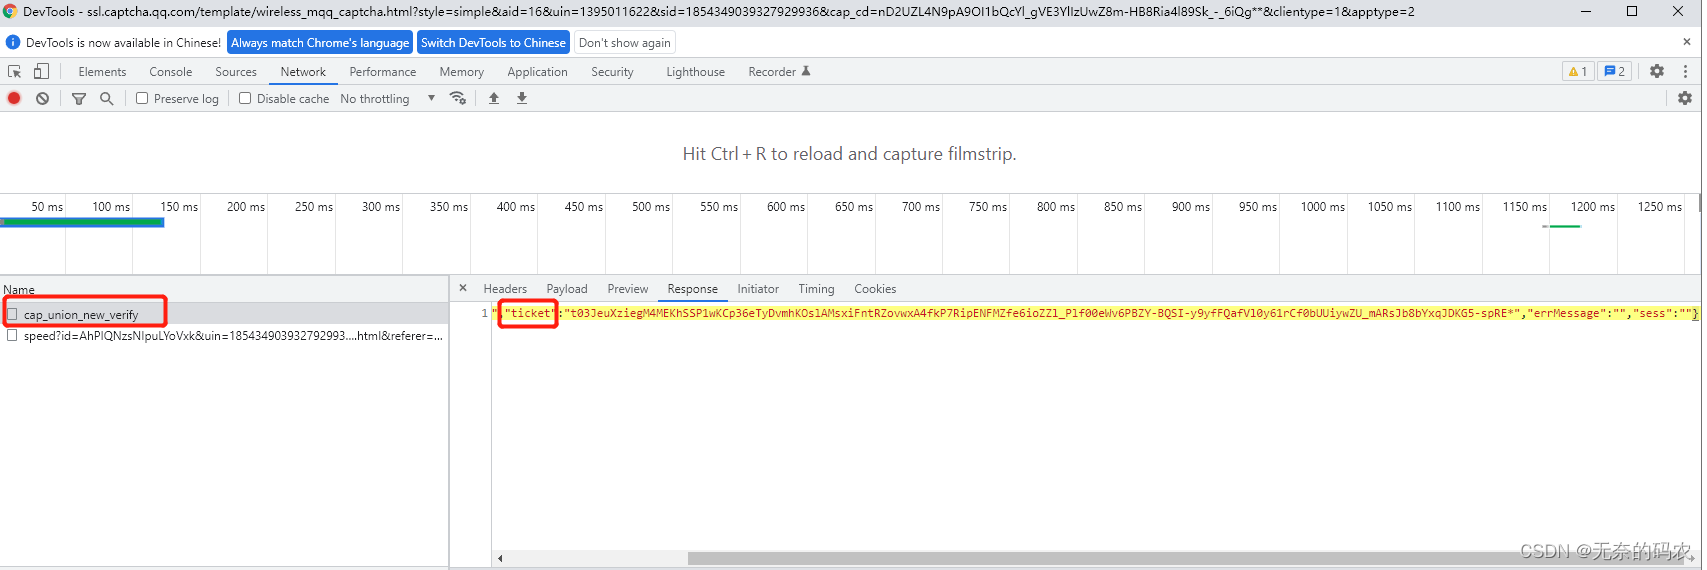
会出现调用的接口,需要找到cap_union_new_verify请求取出response中的ticker唯一校验码
然后返回jvm弹出的窗口,放入ticker中,回车,

回车之后会弹出设备验证锁

我们复制url到浏览器

会出现QQ扫码验证和账户信息验证,我们点击QQ扫码验证

最后一步,拿出手机扫二维码,关掉之前弹出的设备验证锁
,就登录成功了

接下来,我们看登录成功后,进行事件的监听操作
3.事件监听
群监听操作
  bot.getEventChannel().subscribeAlways(GroupMessageEvent.class, (event) -> {
            logger.info("group:[{}({})],send:[{}({})],->{}", event.getGroup().getId(),event.getGroup().getName(),event.getSender().getId(),event.getSender().getNick(), event.getMessage().contentToString());
            //业务逻辑部分
        });
//event.getGroup().getId() 获取群ID号       //event.getGroup().getName() 获取群名称
//event.getSender().getId() 获取发送人ID
//event.getSender().getNick(),  获取发送人昵称
//event.getMessage().contentToString()); 获取发送人信息
好友监听操作
 bot.getEventChannel().subscribeAlways(FriendMessageEvent.class, (event) -> {
            logger.info("friend:[{}({})],->{}", event.getFriend().getId(),event.getFriend().getNick(), event.getMessage().contentToString());
            //业务逻辑部分
        });
//event.getFriend().getId() 获取信息发送方的ID
//event.getFriend().getNick()获取信息发送方的昵称
//event.getMessage().contentToString()) 获取信息发送方的数据
监听部分都是继承自SimpleListenerHost类,我们可以对上面的代码进行优化一下
package sc.app.stc.qq.common;

import kotlin.coroutines.CoroutineContext;
import net.mamoe.mirai.event.EventHandler;
import net.mamoe.mirai.event.ListeningStatus;
import net.mamoe.mirai.event.SimpleListenerHost;
import net.mamoe.mirai.event.events.FriendMessageEvent;
import net.mamoe.mirai.event.events.GroupMessageEvent;
import net.mamoe.mirai.event.events.MessageEvent;
import org.jetbrains.annotations.NotNull;
import org.slf4j.Logger;
import org.slf4j.LoggerFactory;
import sc.app.stc.po.QQMessage;
import sc.app.stc.qq.utils.Consts;

public class MyEventHandlers extends SimpleListenerHost {
    private static Logger logger = LoggerFactory.getLogger(MyEventHandlers.class);
    @Override
    public void handleException(@NotNull CoroutineContext context, @NotNull Throwable exception){
        // 处理事件处理时抛出的异常
        logger.error("context:{},exception:{}",context.toString(),exception);
    }
    @NotNull
    @EventHandler
    public ListeningStatus onMessage(@NotNull MessageEvent event) throws Exception { // 可以抛出任何异常, 将在 handleException 处理
        if(event instanceof GroupMessageEvent){
            GroupMessageEvent groupMessageEvent = (GroupMessageEvent) event;
            logger.info("userId:{},group:[{}({})],send:[{}({})],->{}",groupMessageEvent.getBot().getId(), groupMessageEvent.getGroup().getId(),groupMessageEvent.getGroup().getName(),groupMessageEvent.getSender().getId(),groupMessageEvent.getSender().getNick(), groupMessageEvent.getMessage().contentToString());
            if (Consts.groupQQId.contains(String.valueOf(groupMessageEvent.getGroup().getId()))) {
               //业务逻辑代码
            }
        } else if(event instanceof FriendMessageEvent){
            FriendMessageEvent friendMessageEvent = (FriendMessageEvent) event;
            logger.info("userId:{},friend:[{}({})],->{}",friendMessageEvent.getBot().getId(), friendMessageEvent.getFriend().getId(),friendMessageEvent.getFriend().getNick(), friendMessageEvent.getMessage().contentToString());
           //业务逻辑代码
        }
        return ListeningStatus.LISTENING; // 表示继续监听事件
    }
};
监听可以直接修改为
bot.getEventChannel().registerListenerHost(new MyEventHandlers());
可以很大程度上减少代码的复杂度
总结一下
在上面都配置成功后,也进行滑块验证通过后,直接进行登录,登录后可以发送消息,但是,在登录成功后,手机上的QQ就会被挤掉,因为我们这里用的策略是ANDROID_PHONE,是用手机登陆的,结果如下,

配置文件使用
pom.xml
<dependencies>
		<dependency>
			<groupId>love.forte.simple-robot</groupId>
			<artifactId>core</artifactId>
			<version>2.3.8</version>
			<exclusions>
				<exclusion>
					<groupId>love.forte.common</groupId>
					<artifactId>log</artifactId>
				</exclusion>
			</exclusions>
		</dependency>

		<dependency>
			<groupId>org.apache.logging.log4j</groupId>
			<artifactId>log4j-api</artifactId>
			<version>2.14.1</version>
		</dependency>
		<dependency>
			<groupId>org.apache.logging.log4j</groupId>
			<artifactId>log4j-core</artifactId>
			<version>2.14.1</version>
		</dependency>
		<dependency>
			<groupId>net.mamoe</groupId>
			<artifactId>mirai-core-jvm</artifactId>
			<version>2.11.1</version>
			<exclusions>
				<exclusion>
					<groupId>org.apache.logging.log4j</groupId>
					<artifactId>slf4j-api</artifactId>
				</exclusion>
			</exclusions>
		</dependency>
        <dependency>
            <groupId>net.mamoe</groupId>
            <artifactId>mirai-core-api-jvm</artifactId>
            <version>2.11.1</version>
        </dependency>

        <!-- https://mvnrepository.com/artifact/net.mamoe/mirai-core-jvm -->
<!--		<dependency>-->
<!--			<groupId>net.mamoe</groupId>-->
<!--			<artifactId>mirai-core-jvm</artifactId>-->
<!--			<version>2.11.1</version>-->
<!--			<exclusions>-->
<!--				<exclusion>-->
<!--					<groupId>org.apache.logging.log4j</groupId>-->
<!--					<artifactId>slf4j-api</artifactId>-->
<!--				</exclusion>-->
<!--			</exclusions>-->
<!--		</dependency>-->


	</dependencies>
derives.json
{
    "display": [
        77,
        73,
        82,
        65,
        73,
        46,
        55,
        55,
        48,
        49,
        52,
        53,
        46,
        48,
        48,
        49
    ],
    "product": [
        109,
        105,
        114,
        97,
        105
    ],
    "device": [
        109,
        105,
        114,
        97,
        105
    ],
    "board": [
        109,
        105,
        114,
        97,
        105
    ],
    "brand": [
        109,
        97,
        109,
        111,
        101
    ],
    "model": [
        109,
        105,
        114,
        97,
        105
    ],
    "bootloader": [
        117,
        110,
        107,
        110,
        111,
        119,
        110
    ],
    "fingerprint": [
        109,
        97,
        109,
        111,
        101,
        47,
        109,
        105,
        114,
        97,
        105,
        47,
        109,
        105,
        114,
        97,
        105,
        58,
        49,
        48,
        47,
        77,
        73,
        82,
        65,
        73,
        46,
        50,
        48,
        48,
        49,
        50,
        50,
        46,
        48,
        48,
        49,
        47,
        53,
        56,
        53,
        52,
        57,
        52,
        51,
        58,
        117,
        115,
        101,
        114,
        47,
        114,
        101,
        108,
        101,
        97,
        115,
        101,
        45,
        107,
        101,
        121,
        115
    ],
    "bootId": [
        68,
        51,
        49,
        50,
        51,
        51,
        57,
        51,
        45,
        56,
        48,
        65,
        54,
        45,
        66,
        52,
        56,
        56,
        45,
        53,
        68,
        50,
        54,
        45,
        69,
        66,
        48,
        51,
        65,
        48,
        53,
        49,
        70,
        67,
        57,
        51
    ],
    "procVersion": [
        76,
        105,
        110,
        117,
        120,
        32,
        118,
        101,
        114,
        115,
        105,
        111,
        110,
        32,
        51,
        46,
        48,
        46,
        51,
        49,
        45,
        97,
        74,
        105,
        79,
        81,
        57,
        51,
        104,
        32,
        40,
        97,
        110,
        100,
        114,
        111,
        105,
        100,
        45,
        98,
        117,
        105,
        108,
        100,
        64,
        120,
        120,
        120,
        46,
        120,
        120,
        120,
        46,
        120,
        120,
        120,
        46,
        120,
        120,
        120,
        46,
        99,
        111,
        109,
        41
    ],
    "baseBand": [
    ],
    "version": {
        "incremental": [
            53,
            56,
            57,
            49,
            57,
            51,
            56
        ],
        "release": [
            49,
            48
        ],
        "codename": [
            82,
            69,
            76
        ]
    },
    "simInfo": [
        84,
        45,
        77,
        111,
        98,
        105,
        108,
        101
    ],
    "osType": [
        97,
        110,
        100,
        114,
        111,
        105,
        100
    ],
    "macAddress": [
        48,
        50,
        58,
        48,
        48,
        58,
        48,
        48,
        58,
        48,
        48,
        58,
        48,
        48,
        58,
        48,
        48
    ],
    "wifiBSSID": [
        48,
        50,
        58,
        48,
        48,
        58,
        48,
        48,
        58,
        48,
        48,
        58,
        48,
        48,
        58,
        48,
        48
    ],
    "wifiSSID": [
        60,
        117,
        110,
        107,
        110,
        111,
        119,
        110,
        32,
        115,
        115,
        105,
        100,
        62
    ],
    "imsiMd5": [
        -88,
        65,
        -112,
        63,
        51,
        57,
        68,
        -76,
        -12,
        -83,
        115,
        44,
        78,
        -109,
        -94,
        -6
    ],
    "imei": "131417402670993",
    "apn": [
        119,
        105,
        102,
        105
    ]
}


 7786
7786


 被折叠的 条评论
为什么被折叠?
被折叠的 条评论
为什么被折叠?
 到【灌水乐园】发言


