


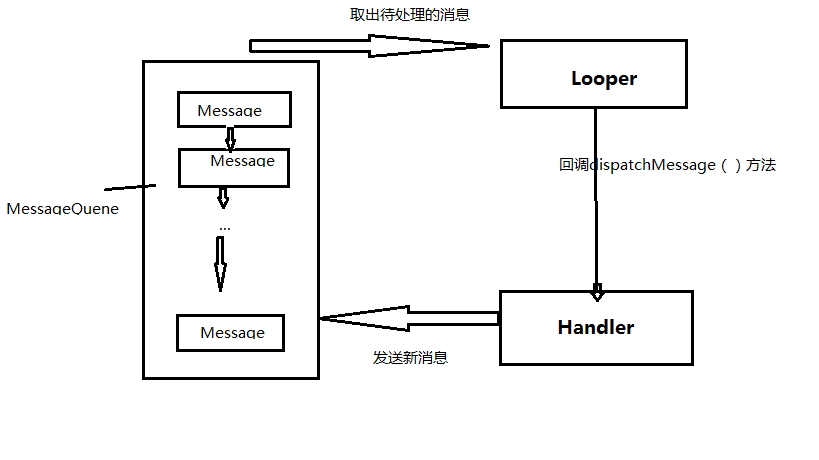
Handler , Loop , MessageQuene 的工作原理:
Handler:它把消息发送给MessageQuene来管理,并负责处理Looper发送给它的消息。
Message:是Handler发送和处理的的消息。
Looper:每个线程中只能有一个Looper,它的loop()方法主要负责读取MessageQuene中的消息,读到消息之后就把消息发送给Handler进行处理消息。
MessageQuene:消息队列,它采用先进先出的方式来管理Message。
程序使用Handler发送消息,这些消息都被送到MessageQuene里,也就是说,线程中必须得有一个MessageQuene,要不然消息就没办法保存了,而MessageQuene又是由Looper来管理的,也就是说线程中必须有一个Looper对象。
看一段代码:
<LinearLayout xmlns:android="http://schemas.android.com/apk/res/android"
    xmlns:tools="http://schemas.android.com/tools"
    android:layout_width="match_parent"
    android:layout_height="match_parent"
    android:orientation="vertical" >

    <Button
        android:id="@+id/btn"
        android:layout_width="match_parent"
        android:layout_height="wrap_content"
        android:text="@string/update" />

    <TextView
        android:id="@+id/tv"
        android:layout_width="wrap_content"
        android:layout_height="wrap_content"
        android:text="@string/hello" />

</LinearLayout>
package com.example.androidthreadtest;
import android.app.Activity;
import android.os.Bundle;
import android.os.Handler;
import android.os.Message;
import android.view.View;
import android.view.View.OnClickListener;
import android.widget.Button;
import android.widget.TextView;
public class MainActivity extends Activity {
private Button button;
private TextView textView;
private static final int Update = 1;
@Override
protected void onCreate(Bundle savedInstanceState) {
super.onCreate(savedInstanceState);
setContentView(R.layout.activity_main);
button = (Button) findViewById(R.id.btn);
textView = (TextView) findViewById(R.id.tv);
final Handler handler = new Handler() {
@Override
public void handleMessage(Message msg) {
switch (msg.what) {
case Update:
textView.setText("Update Success");
break;
default:
break;
}
}
};
button.setOnClickListener(new OnClickListener() {
@Override
public void onClick(View v) {
switch (v.getId()) {
case R.id.btn:
new Thread(new Runnable() {
@Override
public void run() {
Message message = new Message();
message.what = Update;
handler.sendMessage(message);
}
}).start();
break;
default:
break;
}
}
});
}
}
这里有一个例子是访问百度主页的:
activity_main.xml
<RelativeLayout xmlns:android="http://schemas.android.com/apk/res/android"
    xmlns:tools="http://schemas.android.com/tools"
    android:layout_width="match_parent"
    android:layout_height="match_parent"
    tools:context="com.example.http_01.MainActivity" >

    <WebView
        android:id="@+id/webView"
        android:layout_width="match_parent"
        android:layout_height="match_parent" />

</RelativeLayout>
HttpThread.java
package com.example.http_01;

import java.io.BufferedReader;
import java.io.IOException;
import java.io.InputStreamReader;
import java.net.HttpURLConnection;
import java.net.MalformedURLException;
import java.net.URL;

import android.os.Handler;
import android.webkit.WebView;

public class HttpThread extends Thread {
    private String path;
    private WebView webView;
    private Handler handler;

    // 创建构造函数
    public HttpThread(String path, WebView webView, Handler handler) {
        this.path = path;
        this.webView = webView;
        this.handler = handler;
    }

    @Override
    public void run() {
        try {
            URL url = new URL(path);// 把要解析的地址穿进去
            HttpURLConnection connection = (HttpURLConnection) url
                    .openConnection();
            connection.setReadTimeout(5000);// 设置超时时间
            connection.setRequestMethod("GET");// 利用get方式请求
            final StringBuffer sb = new StringBuffer();// 作为缓冲

            BufferedReader reader = new BufferedReader(new InputStreamReader(
                    connection.getInputStream()));
            String str;
            while ((str = reader.readLine()) != null) {
                sb.append(str);

            }
            handler.post(new Runnable() {

                @Override
                public void run() {
                    webView.loadData(sb.toString(), "text/html;charset=utf-8", null);
                }
            });
        } catch (MalformedURLException e) {
            e.printStackTrace();
        } catch (IOException e) {
            e.printStackTrace();
        }
    }
}
MainActivity.java
package com.example.http_01;

import android.os.Bundle;
import android.os.Handler;
import android.support.v7.app.ActionBarActivity;
import android.webkit.WebView;

public class MainActivity extends ActionBarActivity {
    private WebView view;
    private Handler handler = new Handler();

    @Override
    protected void onCreate(Bundle savedInstanceState) {
        super.onCreate(savedInstanceState);
        setContentView(R.layout.activity_main);
        view = (WebView) findViewById(R.id.webView);
        new HttpThread("http://www.baidu.com", view, handler).start();
    }
}
最后在AndroidManifest.xml中设置访问的网络权限即可
<uses-permission android:name="android.permission.INTERNET" />


 被折叠的 条评论
为什么被折叠?
被折叠的 条评论
为什么被折叠?
 到【灌水乐园】发言


