


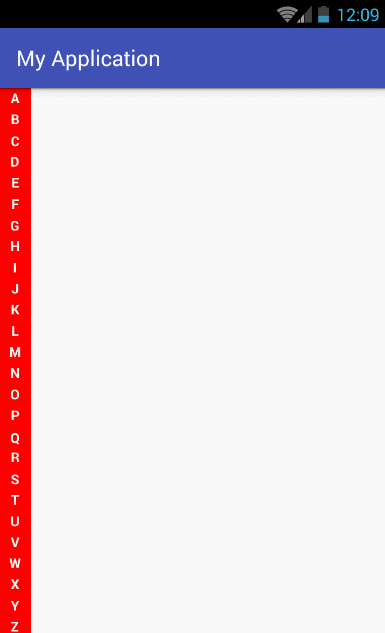
如上图所示:相信大家应该很熟悉,无论是在微信联系人管理界面还是自己手机联系人页面包括其他有些应用也会用到类似的索引,通过它可以方便我们快速定位到我们想要的某一个位置。接下来就是具体的实现代码。
1、首先新建一个自定义VIew集成VIew,重写带有两个参数的构造方法,然后在布局文件中引用该自定义View,如下图所示是我的布局文件代码:
<?xml version="1.0" encoding="utf-8"?>
<RelativeLayout xmlns:android="http://schemas.android.com/apk/res/android"
    xmlns:tools="http://schemas.android.com/tools" android:id="@+id/activity_main"
    android:layout_width="match_parent" android:layout_height="match_parent">

    <com.example.myapplication.FastIndex
        android:background="#ff0000"
        android:layout_width="30dip"
        android:layout_height="match_parent" />
</RelativeLayout>然后在自定义view的类里面加入这些字母字符串数组,代码如下:<pre name="code" class="java"> private static final String[] LETTERS = new String[]{
"A", "B", "C", "D", "E", "F",
"G", "H", "I", "J", "K", "L",
"M", "N", "O", "P", "Q", "R",
"S", "T", "U", "V", "W", "X",
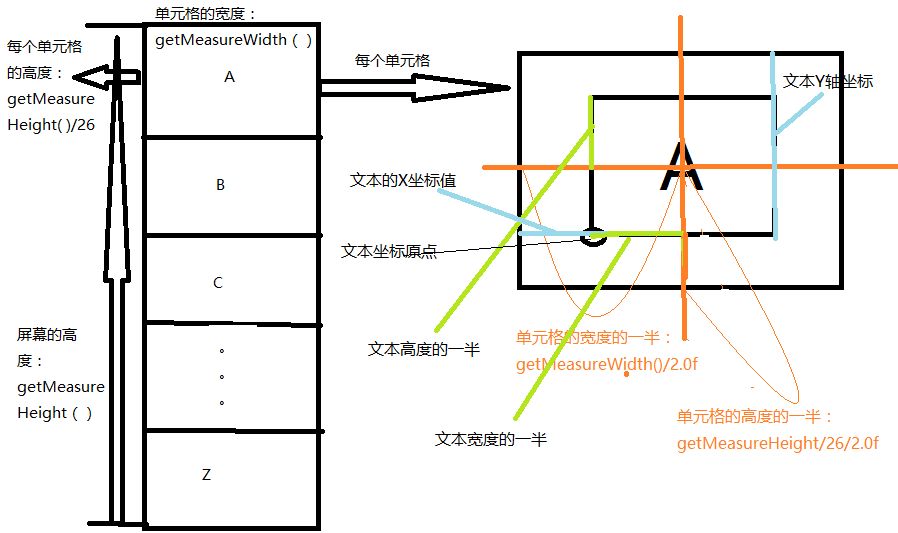
"Y", "Z"};2、重写onSizeChanged()方法,该方法在尺寸发生变化时调用,在里面我们可以得到屏幕的高度,每个单元格的宽度和高度等信息,为了让大家了解什么是单元格,我画了一张图以便大家能够清晰的理解,看懂接下来写得代码片段,每一个数字或者字母符号等都是一些文本信息他们占据的空间都会形成一个矩形,比如电脑桌面上的一个应用图标:
当鼠标点击图标时就会看到它会生成一个矩形的形状,所以像A,B,C,D,,,Z这样的字母所占据的空间也会形成一个矩形,如下图所示:
然后定义画笔设成全局变量,在构造方法里面定义一些属性,
public FastIndex(Context context, AttributeSet attrs) {
        super(context, attrs);
        mPaint = new Paint(Paint.ANTI_ALIAS_FLAG);//设置抗锯齿
        mPaint.setTextSize(25.0f);//设置字体的大小
        mPaint.setColor(Color.WHITE);//设置字体的颜色
        mPaint.setTypeface(Typeface.DEFAULT_BOLD);//设置饱和度
    }
onsizeChanged方法中代码片段如下:
protected void onSizeChanged(int w, int h, int oldw, int oldh) {
        super.onSizeChanged(w, h, oldw, oldh);
        //得到屏幕的高度
        int measuredHeight = getMeasuredHeight();
        //单元格的宽度
        cellWidth = getMeasuredWidth();
        //单元格的高度
        cellHeight = measuredHeight*1.0f / LETTERS.length;
} protected void onDraw(Canvas canvas) {
super.onDraw(canvas);
for (int i = 0; i < LETTERS.length; i++) {
//获取文本的坐标值
int x = (int) (cellWidth / 2.0f - mPaint.measureText(LETTERS[i]) / 2.0f);//x坐标,通过mPaint.measureText(LETTERS[i])得到文本的宽度
Rect bounds = new Rect();//矩形
mPaint.getTextBounds(LETTERS[i],0,LETTERS[i].length(),bounds);//第一个参数是数据信息,第二个参数为起始位置,第三个代表最终位置,第四个代表矩形
int textHeight = bounds.height();//获取文本的高度
int y = (int) (cellHeight / 2.0f + textHeight / 2.0f+i*cellHeight);//y轴坐标
canvas.drawText(LETTERS[i],x,y,mPaint);
}
}public boolean onTouchEvent(MotionEvent event) {
int index = -1;
switch (MotionEventCompat.getActionMasked(event)) {//使用event.getaction(event)效果也是一样的
case MotionEvent.ACTION_DOWN:
index = (int) (event.getY() / cellHeight);//这里我解释一下,通过event.getY()获取Y轴坐标然后除以每个单元格的高度就得到每个单元格的索引值
if (index >= 0 && index < LETTERS.length) {
if (index != preIndex) {
Utils.showToast(getContext(),LETTERS[index]);//这里我的土司是自定义的一个单例模式的,就是说当出现多个土司时,不会出现土司一次排序再去执行的情况
preIndex = index;//存取之前的索引值
}
}
break;
case MotionEvent.ACTION_MOVE:
index = (int) (event.getY() / cellHeight);
if (index >= 0 && index < LETTERS.length) {
if (index != preIndex) {
Utils.showToast(getContext(),LETTERS[index]);
preIndex = index;
}
}
break;
case MotionEvent.ACTION_UP:
preIndex = -1;
break;
}
return true;
}public static Toast mToast;
public static void showToast(Context mContext, String msg) {
if (mToast == null) {
mToast = Toast.makeText(mContext, "", Toast.LENGTH_SHORT);
}
mToast.setText(msg);
mToast.show();
}然后代码片段暂时就到这里啦,下一个讲解就是需要把这个索引和listview数据结合起来的效果。


 324
324


 被折叠的 条评论
为什么被折叠?
被折叠的 条评论
为什么被折叠?
 到【灌水乐园】发言


