


【JAVA 网络编程系列】NIO -- ByteBuffer 堆内与堆外内存
【1】Unsafe 与堆外内存分配
Unsafe 操作直接内存的方法
// 分配内存
public native long allocateMemory(long var1);
// 释放内存
public native void freeMemory(long var1);
// 设置内存值
public native void setMemory(Object var1, long var2, long var4, byte var6);
// 设置某种类型的值,比如putInt()
public native void putXxx(long var1, xxx var3);
// 获取某种类型的值,比如getInt()
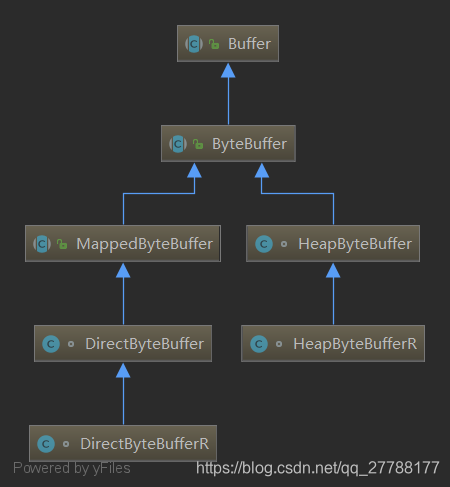
public native xxx getXxx(long var1);【2】ByteBuffer 的继承结构图
ByteBuffer 中分配堆内内存和堆外内存的方法
// 创建一个直接内存实现的ByteBuffer
public static ByteBuffer allocateDirect(int capacity) {
    return new DirectByteBuffer(capacity);
}

// 创建一个堆内存实现的ByteBuffer
public static ByteBuffer allocate(int capacity) {
    if (capacity < 0)
        throw new IllegalArgumentException();
    return new HeapByteBuffer(capacity, capacity);
}
【3】堆内内存 -- HeapByteBuffer
【3.1】HeapByteBuffer 使用示例
public class ByteBufferTest {
    public static void main(String[] args) {
        // 1. 创建一个堆内存实现的ByteBuffer
        ByteBuffer buffer = ByteBuffer.allocate(12);
        // 2. 写入值
        buffer.putInt(1);
        buffer.putInt(2);
        buffer.putInt(3);
        // 3. 切换为读模式
        buffer.flip();
        // 4. 读取值
        System.out.println(buffer.getInt());
        System.out.println(buffer.getInt());
        System.out.println(buffer.getInt());
    }
}
【3.2】HeapByteBuffer -- allocate 的执行流程
// 1. 创建堆内存实现的ByteBuffer
public static ByteBuffer allocate(int capacity) {
    if (capacity < 0)
        throw new IllegalArgumentException();
    return new HeapByteBuffer(capacity, capacity);
}
// 2. HeapByteBuffer的构造方法
HeapByteBuffer(int cap, int lim) {
    // lim = cap = 12
    // 创建了一个12大小的byte数组
    // 调用父构造方法
    super(-1, 0, lim, cap, new byte[cap], 0);
}
// 3. ByteBuffer的构造方法
ByteBuffer(int mark, int pos, int lim, int cap,
           byte[] hb, int offset)
{
    // 调用父构造方法
    // pos = 0,默认创建的就是写模式
    // lim = cap = 12
    super(mark, pos, lim, cap);
    // byte数组hb(heap buffer),为上面传过来的new byte[cap]
    this.hb = hb;
    this.offset = offset;
}
// 4. Buffer的构造方法
Buffer(int mark, int pos, int lim, int cap) {
    if (cap < 0)
        throw new IllegalArgumentException("Negative capacity: " + cap);
    // 三个非常重要的变量:capacity、limit、position
    this.capacity = cap;
    limit(lim);
    position(pos);
    if (mark >= 0) {
        if (mark > pos)
            throw new IllegalArgumentException("mark > position: ("
                                               + mark + " > " + pos + ")");
        this.mark = mark;
    }
}

/**
 * 设置此缓冲区的限制
 * 若 position 大于 newLimit 则将 position 设置为 newLimit
 * 若 mark 已定义且大于 newLimit 则丢弃该 mark
 */
public final Buffer limit(int newLimit) {
    if ((newLimit > capacity) || (newLimit < 0))
        throw new IllegalArgumentException();
    limit = newLimit;
    if (position > limit) position = limit;
    if (mark > limit) mark = -1;
    return this;
}

/**
 * 设置此缓冲区的位置
 * 若 mark 已定义且大于 newPosition 则丢弃该 mark
 */
public final Buffer position(int newPosition) {
    if ((newPosition > limit) || (newPosition < 0))
        throw new IllegalArgumentException();
    position = newPosition;
    if (mark > position) mark = -1;
    return this;
}
【3.3】HeapByteBuffer -- putInt 的执行流程
// 写入一个int类型的数值
public ByteBuffer putInt(int x) {
    // 调用Bits工具类的putInt()方法,Bits是位的意思
    // 堆内存的实现中使用大端法来存储数据
    Bits.putInt(this, ix(nextPutIndex(4)), x, bigEndian);
    return this;
}
// 移动position到下一个位置
// 因为一个int占4个字节,所以这里往后移动4位
final int nextPutIndex(int nb) {
    // 判断有没有越界
    if (limit - position < nb)
        throw new BufferOverflowException();
    int p = position;
    position += nb;
    // 注意,这里返回的是移动前的位置,初始值为0
    return p;
}
// 计算写入的偏移量,初始值为0
protected int ix(int i) {
    return i + offset;
}
// java.nio.Bits#putInt(java.nio.ByteBuffer, int, int, boolean)
static void putInt(ByteBuffer bb, int bi, int x, boolean bigEndian) {
    // 堆内存使用的是大端法
    if (bigEndian)
        // 大端法
        putIntB(bb, bi, x);
    else
        // 小端法
        putIntL(bb, bi, x);
}
// java.nio.Bits#putIntB(java.nio.ByteBuffer, int, int)
static void putIntB(ByteBuffer bb, int bi, int x) {
    // 把一个int拆分成4个byte,分别写入
    // int3(int x) { return (byte)(x >> 24); }
    bb._put(bi    , int3(x));
    // int2(int x) { return (byte)(x >> 16); }
    bb._put(bi + 1, int2(x));
    // int1(int x) { return (byte)(x >>  8); }
    bb._put(bi + 2, int1(x));
    // int0(int x) { return (byte)(x      ); }
    bb._put(bi + 3, int0(x));
}
// java.nio.HeapByteBuffer#_put
void _put(int i, byte b) {
    // 最终变成了修改byte数组
    hb[i] = b;
}
【3.4】HeapByteBuffer -- flip() 的执行流程
/**
 * 反转此缓冲区
 * 1. 将限制设置为当前位置
 * 2. 将位置设置为 0
 * 3. 若定义了标记则丢弃该标记
 * 效果 缩小 limit 的范围
 * 使用场景 向缓冲区存储数据,然后再从缓冲区读取这些数据时调用
 */
public final Buffer flip() {
    limit = position;
    position = 0;
    mark = -1;
    return this;
}
【3.5】HeapByteBuffer -- getInt() 的执行流程
java.nio.HeapByteBuffer
public int getInt() {
    // 调用Bits类的getInt方法
    return Bits.getInt(this, ix(nextGetIndex(4)), bigEndian);
}
// 计算偏移量
protected int ix(int i) {
    return i + offset;
}
// 返回byte数组索引i处的值
byte _get(int i) {
    return hb[i];
}

java.nio.Buffer
final int nextGetIndex(int nb) {
    if (limit - position < nb)
        throw new BufferUnderflowException();
    int p = position;
    position += nb;
    // 返回的是更新之前的位置
    return p;
}

java.nio.Bits
// 根据大小端构造int数据
static int getInt(ByteBuffer bb, int bi, boolean bigEndian) {
    // 此处使用大端
    return bigEndian ? getIntB(bb, bi) : getIntL(bb, bi) ;
}

// 按大端模式获取int数值
static int getIntB(ByteBuffer bb, int bi) {
    return makeInt(bb._get(bi    ),
                    bb._get(bi + 1),
                    bb._get(bi + 2),
                    bb._get(bi + 3));
}

static private int makeInt(byte b3, byte b2, byte b1, byte b0) {
    // 根据byte的值构造int数值
    return (((b3       ) << 24) |
            ((b2 & 0xff) << 16) |
            ((b1 & 0xff) <<  8) |
            ((b0 & 0xff)      ));
}
【4】堆外内存 -- DirectByteBuffer
【4.1】DirectByteBuffer 使用示例
public class ByteBufferTest {
    public static void main(String[] args) {
        // 创建一个直接内存实现的ByteBuffer
        ByteBuffer buffer = ByteBuffer.allocateDirect(12);
        // 写入值
        buffer.putInt(1);
        buffer.putInt(2);
        buffer.putInt(3);
        // 切换为读模式
        buffer.flip();
        // 读取值
        System.out.println(buffer.getInt());
        System.out.println(buffer.getInt());
        System.out.println(buffer.getInt());
    }
}
【4.2】DirectByteBuffer -- allocate 的执行流程
public static ByteBuffer allocateDirect(int capacity) {
    // 创建直接内存实现的ByteBuffer
    return new DirectByteBuffer(capacity);
}

DirectByteBuffer(int cap) {
    // 调用父构造方法,设置position/limit/capacity/mark这几个值
    // 与HeapByteBuffer类似,只不过没有创建hb那个数组
    super(-1, 0, cap, cap);
    // 是否页对齐,默认为否
    boolean pa = VM.isDirectMemoryPageAligned();
    // 每页大小
    int ps = Bits.pageSize();
    long size = Math.max(1L, (long)cap + (pa ? ps : 0));
    // 先预订内存,如果内存不够,会进行清理,并尝试几次
    Bits.reserveMemory(size, cap);

    long base = 0;
    try {
        // 调用unsafe的allocateMemory()方法来分配内存
        base = unsafe.allocateMemory(size);
    } catch (OutOfMemoryError x) {
        // 释放预定的内存
        Bits.unreserveMemory(size, cap);
        throw x;
    }
    // 初始化这片内存的值为0
    unsafe.setMemory(base, size, (byte) 0);
    // 根据是否页对齐计算实际的地址
    if (pa && (base % ps != 0)) {
        // address为Buffer类中的long类型变量
        address = base + ps - (base & (ps - 1));
    } else {
        // 默认不页对齐,地址取allocateMemory()返回的地址
        address = base;
    }
    // 创建cleaner用于释放内存
    cleaner = Cleaner.create(this, new Deallocator(base, size, cap));
    att = null;
}
【4.3】DirectByteBuffer -- getInt/putInt 的执行流程
java.nio.DirectByteBuffer
protected static final boolean unaligned = Bits.unaligned();

public ByteBuffer putInt(int x) {
    // 1 << 2 = 4,一个int占4个字节
    putInt(ix(nextPutIndex((1 << 2))), x);
    return this;
}
private ByteBuffer putInt(long a, int x) {
    if (unaligned) {
        int y = (x);
        // 对齐的情况下,直接调用unsafe.putInt
        unsafe.putInt(a, (nativeByteOrder ? y : Bits.swap(y)));
    } else {
        // 否则调用Bits.putInt
        Bits.putInt(a, x, bigEndian);
    }
    return this;
}

public int getInt() {
    // 1 << 2 = 4,一个int占4个字节
    return getInt(ix(nextGetIndex((1 << 2))));
}
private int getInt(long a) {
    if (unaligned) {
        int x = unsafe.getInt(a);
        return (nativeByteOrder ? x : Bits.swap(x));
    }
    return Bits.getInt(a, bigEndian);
}

// 计算偏移量,在address的基础上加上position的值
private long ix(int i) {
    return address + (i << 0);
}

java.nio.Buffer
final int nextPutIndex(int nb) {
    if (limit - position < nb)
        throw new BufferOverflowException();
    int p = position;
    position += nb;
    // 返回移动前的值
    return p;
}

java.nio.ByteBuffer
boolean nativeByteOrder = (Bits.byteOrder() == ByteOrder.BIG_ENDIAN);

java.nio.Bits
static int getInt(long a, boolean bigEndian) {
    return bigEndian ? getIntB(a) : getIntL(a) ;
}

static int getIntB(long a) {
    return makeInt(_get(a    ),
                    _get(a + 1),
                    _get(a + 2),
                    _get(a + 3));
}

private static byte _get(long a) {
    return unsafe.getByte(a);
}

static private int makeInt(byte b3, byte b2, byte b1, byte b0) {
    return (((b3       ) << 24) |
            ((b2 & 0xff) << 16) |
            ((b1 & 0xff) <<  8) |
            ((b0 & 0xff)      ));
}

static void putInt(long a, int x, boolean bigEndian) {
    if (bigEndian)
        putIntB(a, x);
    else
        putIntL(a, x);
}

static void putIntB(long a, int x) {
    // 把一个int拆分成4个byte,分别写入
    // int3(int x) { return (byte)(x >> 24); }
    _put(a    , int3(x));
    // int2(int x) { return (byte)(x >> 16); }
    _put(a + 1, int2(x));
    // int1(int x) { return (byte)(x >>  8); }
    _put(a + 2, int1(x));
    // int0(int x) { return (byte)(x      ); }
    _put(a + 3, int0(x));
}

private static void _put(long a, byte b) {
    unsafe.putByte(a, b);
}
【4.4】DirectByteBuffer -- 内存释放
【4.4.1】关键类 -- Deallocator/Cleaner
java.nio.DirectByteBuffer
private static class Deallocator
    implements Runnable
{

    private static Unsafe unsafe = Unsafe.getUnsafe();

    private long address;
    private long size;
    private int capacity;

    // 构造方法传入allocate的时候返回的地址,以及容量等参数
    private Deallocator(long address, long size, int capacity) {
        assert (address != 0);
        this.address = address;
        this.size = size;
        this.capacity = capacity;
    }

    public void run() {
        if (address == 0) {
            return;
        }
        // 调用unsafe的freeMemory释放内存
        unsafe.freeMemory(address);
        address = 0;
        // 取消预订的内存
        Bits.unreserveMemory(size, capacity);
    }
}
public class Cleaner extends PhantomReference<Object> {
private static final ReferenceQueue<Object> dummyQueue = new ReferenceQueue();
// Cleaner 内部有一个链表
private static Cleaner first = null;
private Cleaner next = null;
private Cleaner prev = null;
// Runnable 方法
private final Runnable thunk;
// 将var0添加到Cleaner链表的前端
private static synchronized Cleaner add(Cleaner var0) {
if (first != null) {
var0.next = first;
first.prev = var0;
}
first = var0;
return var0;
}
// 将var0从链表中移除
private static synchronized boolean remove(Cleaner var0) {
if (var0.next == var0) {
return false;
} else {
if (first == var0) {
if (var0.next != null) {
first = var0.next;
} else {
first = var0.prev;
}
}
if (var0.next != null) {
var0.next.prev = var0.prev;
}
if (var0.prev != null) {
var0.prev.next = var0.next;
}
var0.next = var0;
var0.prev = var0;
return true;
}
}
private Cleaner(Object var1, Runnable var2) {
// 调用父类的构造方法
// Cleaner这个虚引用引用的对象是var1
super(var1, dummyQueue);
// var2即Deallocator对象
this.thunk = var2;
}
public static Cleaner create(Object var0, Runnable var1) {
// 创建一个Cleaner对象,并返回这个对象
// 它里面封装了一个任务
return var1 == null ? null : add(new Cleaner(var0, var1));
}
public void clean() {
// 从链表中移除当前对象
if (remove(this)) {
try {
// 执行任务
this.thunk.run();
} catch (final Throwable var2) {
// 处理异常
AccessController.doPrivileged(new PrivilegedAction<Void>() {
public Void run() {
if (System.err != null) {
(new Error("Cleaner terminated abnormally", var2)).printStackTrace();
}
System.exit(1);
return null;
}
});
}
}
}
}【4.4.2】内存释放流程简介
1. DirectByteBuffer 本身是一个堆内存中的对象,其中具有 address 属性用于保存直接内存的地址,操作 DirectByteBuffer 实际上是通过 unsafe 对 address 指向地址的操作;
2. Cleaner 是一个虚引用,引用的对象是 DirectByteBuffer,并通过 Cleaner.create(this, new Deallocator(base, size, cap)) 注册 Deallocator 任务;
3. 当 DirectByteBuffer 不具有强引用时,随时都可能被 gc 从堆内存清理掉,此时,JVM 会把上面绑定的 Cleaner 对象放到 Reference 的 discovered 队列中;
4. Reference 中的线程 ReferenceHandler 不断轮循,把 discovered 队列中的虚引用赋值到 pending 队列中,并且若该虚引用是 Cleaner 对象,则执行其 clean() 方法,且会把该虚引用加入到 ReferenceQueue 队列中;
5. 执行 clean() 方法的时候将会执行 Deallocator 的 run() 方法,在这里调用 unsafe 的 freeMemory() 清理掉直接内存;
参考致谢
本博客为博主学习笔记,同时参考了网上众博主的博文以及相关专业书籍,在此表示感谢,本文若存在不足之处,请批评指正。
【1】慕课专栏,网络编程之Netty一站式精讲
【2】极客时间,Netty源码剖析与实战


 500
500


 被折叠的 条评论
为什么被折叠?
被折叠的 条评论
为什么被折叠?
 到【灌水乐园】发言


