


Spring Boot 入门教程继续,这里写一下Mybatis 的集成。废话不多说。
1.加入依赖,如果项目创建时已勾选Mybatis 和MySQL,这里可一省略。没有勾选的在pom.xml中加入以下代码:
		<dependency>
			<groupId>org.mybatis.spring.boot</groupId>
			<artifactId>mybatis-spring-boot-starter</artifactId>
			<version>1.3.1</version>
		</dependency>
		<dependency>
			<groupId>mysql</groupId>
			<artifactId>mysql-connector-java</artifactId>
			<scope>runtime</scope>
		</dependency>
2.application.proeperties加入数据源配置(根据数据库自行修改)
########################################################
###datasource
########################################################
spring.datasource.url = jdbc:mysql://localhost:3306/dabase_name?characterEncoding=utf8&useSSL=true
spring.datasource.username = root
spring.datasource.password = 0000
spring.datasource.driverClassName = com.mysql.jdbc.Driver
spring.datasource.max-active=20
spring.datasource.max-idle=8
spring.datasource.min-idle=8
spring.datasource.initial-size=10
3.创建表
CREATE TABLE `user` (
  `id` int(11) NOT NULL AUTO_INCREMENT,
  `username` varchar(40) DEFAULT NULL COMMENT '用户名',
  `password` varchar(40) DEFAULT NULL COMMENT '密码',
  PRIMARY KEY (`id`)
) ENGINE=InnoDB AUTO_INCREMENT=7 DEFAULT CHARSET=utf8;
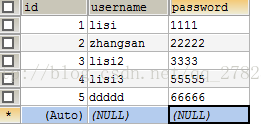
随便加几条数据:
4.创建实体类
public class User {
    private int id;
    private String username;
    private String password;
    ...
    setter /getter 省略
5.创建Mapper
public interface UserMapper {

    @Select("select * from User where id = #{id}")
    User getById(long id);

}
6.创建service 接口
public interface  IUserService {
    User getById(int id);
}
7.创建service实现类
@Service
public class UserServiceImpl implements IUserService {

    @Autowired
    private UserMapper userMapper;

    @Override
    public User getById(int id) {
        return userMapper.getById(id);
    }
}
8.在User Controller 中添加
 @Autowired
    private IUserService userService;

    @RequestMapping("get")
    @ResponseBody
    public User getUser(int id) {
        System.out.println(id);
        return userService.getById(id);
    }
9.在SpringBootDemoApplication 中加入
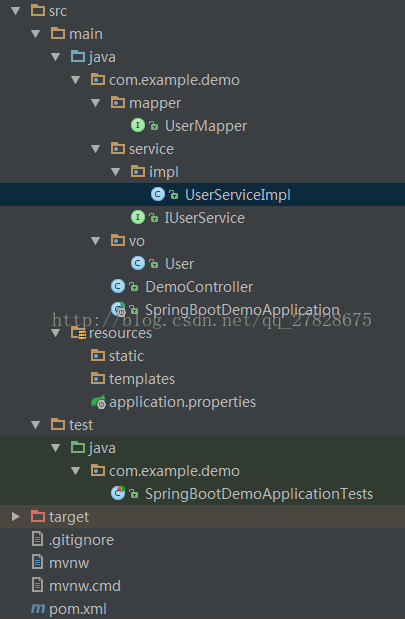
@MapperScan("com.example.demo.mapper")项目结构如图:
10.浏览器中请求 http://localhost:8080/get?id=1
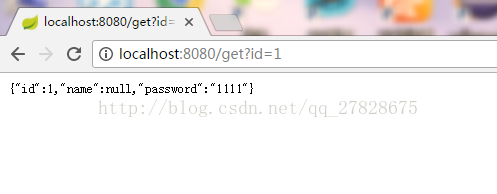
得到了我们想要的结果。
这种方式在实际项目中使用不太灵活,所以点到为止,后续博客会将传统的Mybatis 配置文件加入进来,那样畅快的书写SQL了。
Myatis xml配置方式 播客已发,欢迎点击
Spring boot 入门教程-mybatis xml方式集成


 1516
1516

 被折叠的 条评论
为什么被折叠?
被折叠的 条评论
为什么被折叠?
 到【灌水乐园】发言


