


版权声明:本文为博主原创文章,未经博主允许不得转载。
废话不多说,先看效果

http://www.bilibili.com/video/av3502072/ 这是视频链接,文章后面再给demo 链接
原理及实现方式
1.图片转字符画
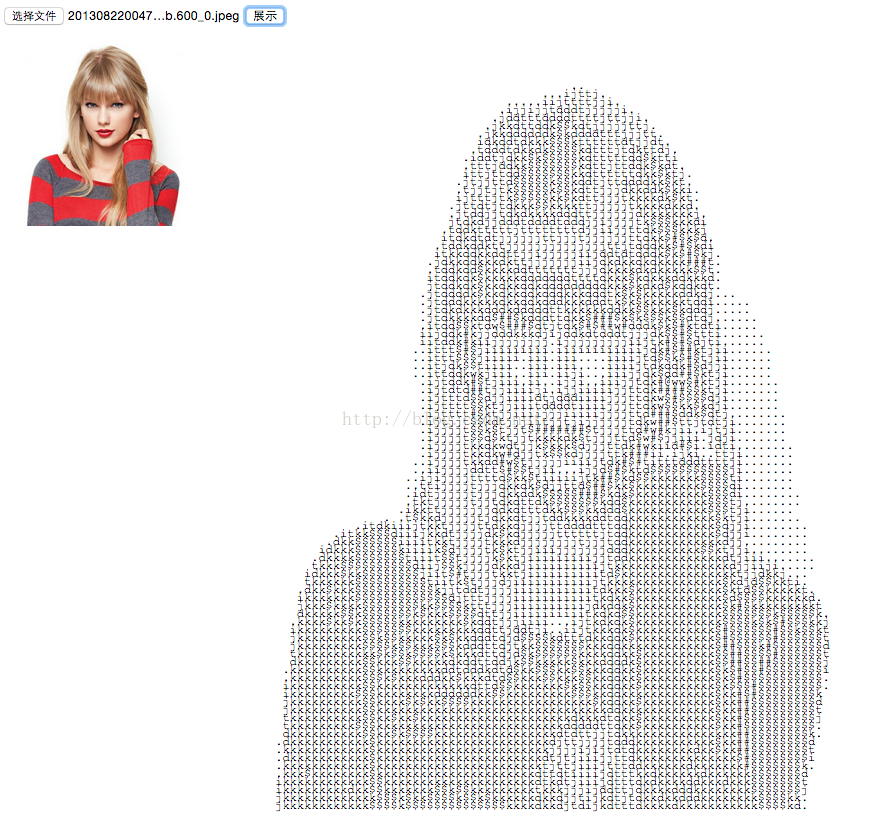
还是那句话,先看效果图:
Demo 地址:
首先,我们需要分析图片,获取相应的灰度信息。比如说,我们如果想要生成每行100个字符的字符画,我们就需要知道每一个字符所对应图片中的哪一块区域,我们将该区域的平均灰度获取到,然后输出一个字符,
我们用不同的字符来表示灰度,比如@表示最黑,空白表示白色,依次为:
1.拿到基本信息(图片的宽高,图片的像素数据,每行要生成的字符数),通过将img画到canvas,再从canvas中获取context.drawImage(img, 0, 0, canvas.width, canvas.height);
2.计算出每个字符对应图片中的像素宽度(比如图片宽1000px,每行字符数是100个。那么每个字符对应图片中10px,这里不用考虑文字宽度,文字宽度不会影响逻辑)。由于字符的列数是一开始由每行字符数确定的,所以只要计算行数,之前计算过每个字符对应图片的像素宽度,那么高度的对应关系也是如此,将图片的高度除以该倍数就是文字的行数。
3.根据文字的行列数,开始遍历。根据图片的像素数据,在其中找出合适的灰度,然后输出对应的字符。比如,我要输出第2行第2列的文字,我就去图片中找(x:1*10,y:1*10)到(x:2*10,y:2*10)的一个矩形区域,遍历每个点的RGB值。通过gray =R * 0.3 + G * 0.59 + B * 0.11来确定某一像素点的灰度,再求这一区域的平均灰度,根据这个灰度来确定字符。
4.在字符的一行结束时输出“\r\n”以换行,获取到整个字符串后,将其放入<pre>标签忠呈现。
注意点:
所谓的imageData,其实是通过canvas的context.getImageData(x,y,width,height)方法获取到的一个对象,其中imageData.data属性可以拿到所有rgba值,比如imageData.data[0]代表第一个像素点的R值,所以每四个数表示一个像素。所以我们要获取x,y点的RGBA值,通过index = (y * imageData.width + x) * 4 可以计算得到R值data[index],index依次+1,+2就为G,B的值,A值此处无实际作用。
还有一点要注意的是,生成的字符串要塞到<pre>标签中,不可以是div,一些特殊符号在pre中才能正常显示。
这里也是最核心的代码:如下:
- /**
- * Created by Roger on 16/1/2.
- */
- var map=getCharsMap();
- /*
- * this function can convert the image in canvas to a char-picture(string)
- * cotext:the canvas context;width:the image width;height:the image height; rowChars:how many chars in one row.
- */
- function toChars(context, width, height, rowChars) {
- var pixels = [],
- output = "",
- imageData = context.getImageData(0, 0, width, height),
- rowChars = width < rowChars ? width : rowChars,
- char_h = width / rowChars,
- char_w = char_h,
- rows = height / char_h,
- cols = rowChars,
- //to get a block of pixiels average gray-value.
- getBlockGray = function (x, y, w, h) {
- var sumGray = 0, pixels;
- for (var row = 0; row < w; row++) {
- for (var col = 0; col < h; col++) {
- var cx = x + col, //current position x
- cy = y + row, //current positon y
- index = (cy * imageData.width + cx) * 4, //current index in rgba data array
- data = imageData.data,
- R = data[index],
- G = data[index + 1],
- B = data[index + 2],
- gray = ~~(R * 0.3 + G * 0.59 + B * 0.11);
- sumGray += gray;
- }
- }
- pixels = w * h;
- return ~~(sumGray / pixels);
- };
- for (var r = 0; r < rows; r++) {
- for (var c = 0; c < cols; c++) {
- var pos_x = ~~(c * char_h),
- pos_y = ~~(r * char_h),
- avg = getBlockGray(pos_x, pos_y, ~~char_w, ~~char_h),
- ch = map[avg];
- output += ch;
- }
- output += '\r\n';
- }
- ;
- return output;
- }
- function getCharsMap() {
- var chars = ['@', 'w', '#', '$', 'k', 'd', 't', 'j', 'i', '.', ' '];
- var step = 25,
- map = {};
- for (var i = 0; i < 256; i++) {
- var index = ~~(i / 25)
- map[i] = chars[index];
- }
- ;
- return map;
- }
- <!DOCTYPE html>
- <html>
- <head lang="en">
- <meta charset="UTF-8">
- <title>Char Picture</title>
- <style>
- #show{
- font-family: Courier New;
- font-size: 10px;
- line-height: 8px;
- }
- </style>
- <script src="source/js/pic_to_chars.js"></script>
- </head>
- <body>
- <input type="file" id="file"><button type="button" onclick="showImage()">展示</button><br>
- <img src="" style="width: 100px"/>
- <pre id="show"></pre>
- <script>
- var map=getCharsMap(),show=document.getElementById("show"),
- img=document.getElementsByTagName("img")[0],
- canvas = document.createElement("canvas");
- function showImage(){
- var file = document.getElementById('file').files[0],
- ctx = canvas.getContext('2d'),
- url = URL.createObjectURL(file);
- if(!file){
- alert("请先选择文件");
- }
- img.src = url;
- img.onload=function(){
- canvas.width=img.naturalWidth;
- canvas.height=img.naturalHeight;
- ctx.drawImage(img, 0, 0, canvas.width, canvas.height);
- show.innerText=toChars(ctx,canvas.width,canvas.height,100);
- }
- }
- </script>
- </body>
- </html>
2.视频转图片
前面我们提到的图片转字符串,需要先将图片画到canvas上,再通过context的api来获取图片数据。我们知道canvas是可以画各种元素的,比如这里的视频,或者svg等等。所以,我们只需要建立video标签,然后加载视频,将视频draw到canvas上(此时为视频当前的一帧),然后通过之前的getImageData方法就可以拿到图片信息了,调用之前绘制图片的方法来绘制视频当前帧。
所以,只需要设立个timeInterval,让这个方法一秒走10次,这样字符画就会一秒更新10次,以带到同步视频播放的效果。
下面是视频的demo,由于在服务器上加载视频费用吃不消,所以视频给大家个链接,自己加载到demo上面吧。
视频:链接: http://pan.baidu.com/s/1qWW5mhA 密码: ixsj
可以下载视频,然后打开demo,点击选择该视频文件,然后点击播放。
视频部分逻辑代码如下
- <!DOCTYPE html>
- <html>
- <head lang="en">
- <meta charset="UTF-8">
- <meta name="viewport" content="width=device-width, initial-scale=1, maximum-scale=1, user-scalable=no"/>
- <title>Char Video</title>
- <style>
- html, body {
- width: 100%;
- }
- video {
- margin: auto;
- position: relative;
- top: 0;
- left: 0;
- width: 20%;
- height: 20%;
- }
- #stage {
- margin: auto;
- position: absolute;
- top: 0;
- left: 20%;
- right: 0;
- width: 80%;
- font-family: Courier New;
- font-size: 16px;
- line-height: 10px;
- }
- #stage img {
- width: 100%;
- height: 100%;
- }
- </style>
- <script src="source/js/pic_to_chars.js"></script>
- </head>
- <body>
- <input type="file" id="file">
- <button id="play" type="button" onclick="play()">播放</button>
- <br>
- <video controls="controls">
- </video>
- <!--<div id="stage"></div>-->
- <pre id="stage"></pre>
- <script type="text/javascript">
- var interval, video = document.getElementsByTagName("video")[0],
- stage = document.getElementById("stage"),
- canvas = document.createElement("canvas"),
- captureImage = function () {
- var ctx;
- canvas.width = video.videoWidth;
- canvas.height = video.videoHeight;
- if (canvas.width) {
- ctx = canvas.getContext('2d');
- ctx.clearRect(0, 0, canvas.width, canvas.height);
- ctx.drawImage(video, 0, 0, canvas.width, canvas.height);
- stage.innerText = toChars(ctx, canvas.width, canvas.height, 100);
- }
- },
- beginCapture = function () {
- interval = setInterval(function () {
- captureImage(1)
- }, 100);
- },
- endCapture = function () {
- if (interval) {
- clearInterval(interval);
- }
- },
- play = function () {
- var file = document.getElementById('file').files[0];
- var url = URL.createObjectURL(file);
- if (!file) {
- alert("请先选择文件");
- }
- console.log(url);
- video.src = url;
- video.play();
- };
- video.addEventListener("play", beginCapture);
- video.addEventListener("pause", endCapture);
- video.addEventListener("ended", endCapture);
- video.addEventListener("playing", function () {
- endCapture();
- beginCapture();
- });
- </script>
- </body>
- </html>


 250
250

 被折叠的 条评论
为什么被折叠?
被折叠的 条评论
为什么被折叠?
 到【灌水乐园】发言


