


1、Alluxio高可用部署
- 生产环境:使用具有高可用性的模式来运行Alluxio masters。
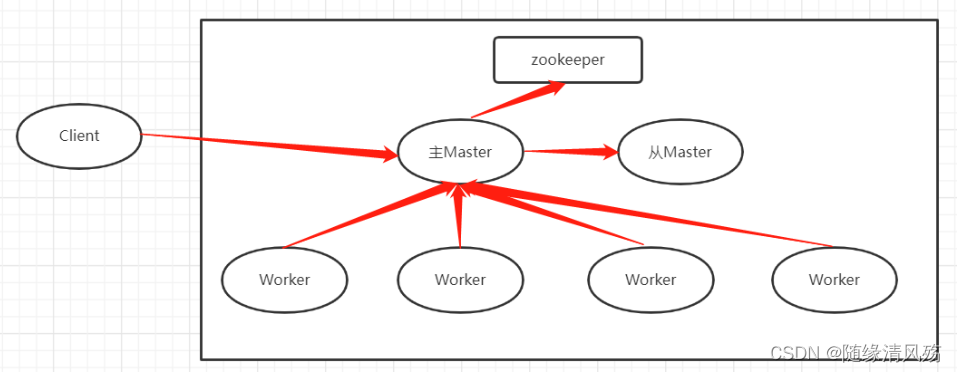
1.1、Alluxio架构
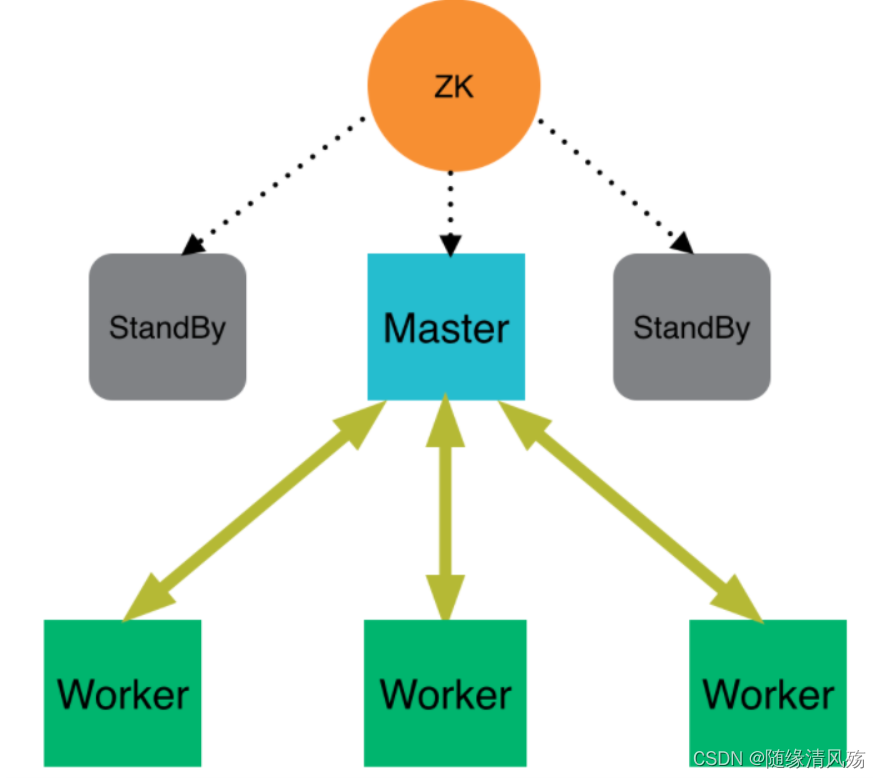
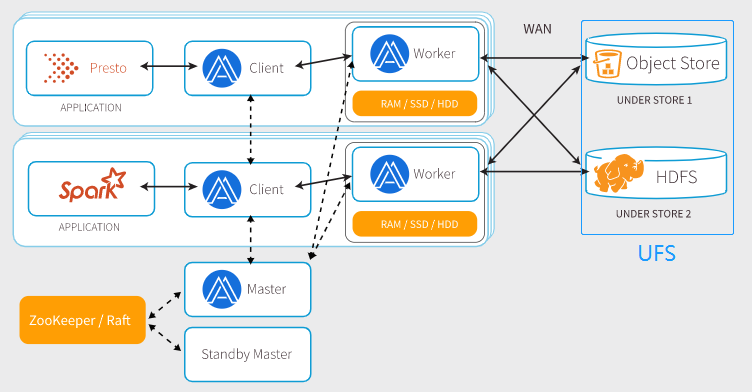
Alluxio可以被分为三个部分:**masters、workers以及clients。**一个典型的设置由一个主服务器、多个备用服务器和多个worker组成。客户端用于通过Spark或MapReduce作业、Alluxio命令行或FUSE层等应用程序与Alluxio服务器通信。
-
Master:管理文件和对象元数据
-
Worker:管理本地MSE、SSD和HDD
-
Client:向用户和应用提供接口,向Matser和Worker发送请求
-
Under File System:用于备份
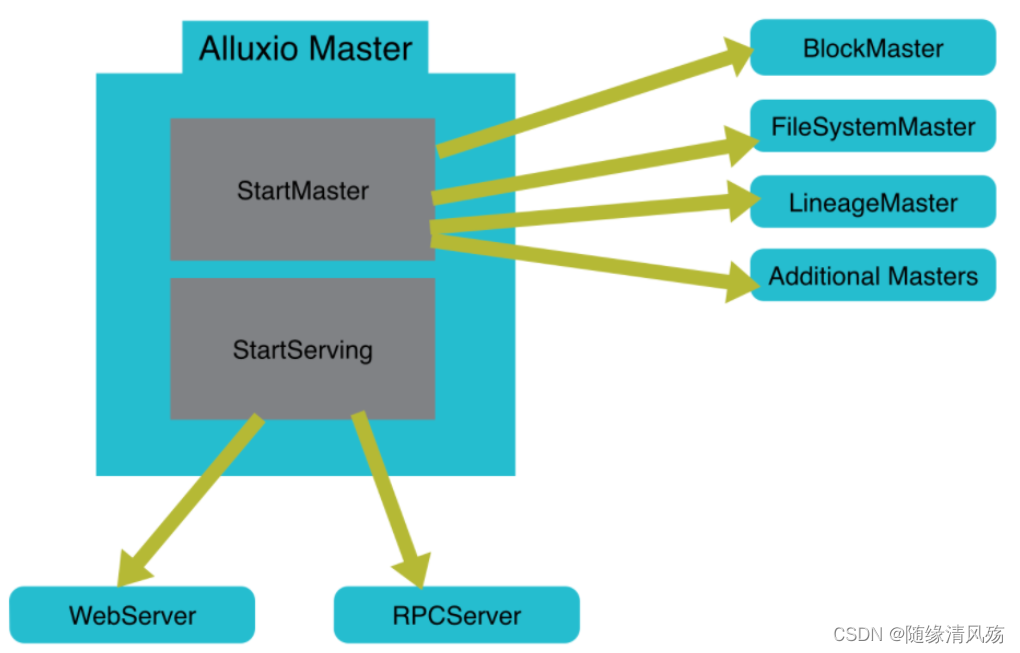
1.1.1、master
- 核心:master分为主master和备用master,以实现容错。
(1)主matser
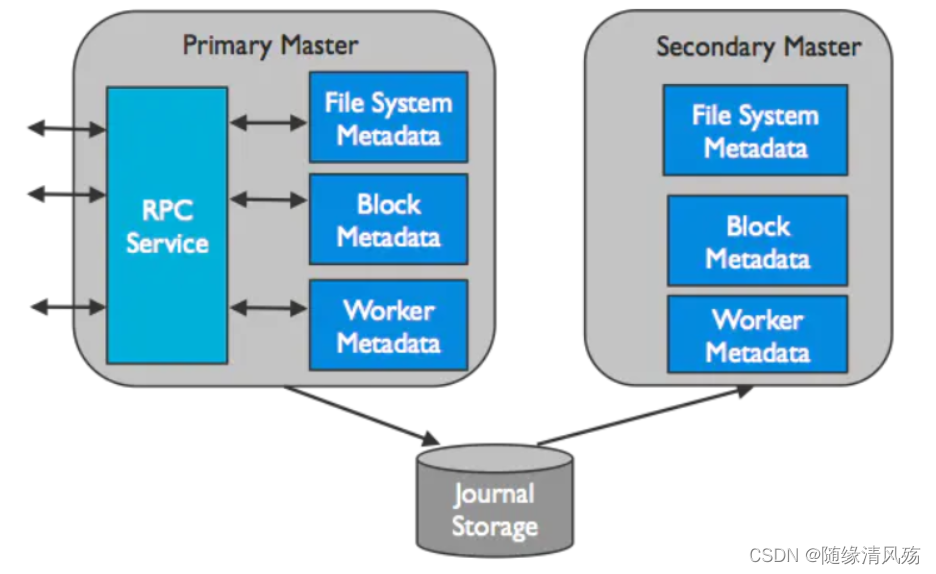
Alluxio中只有一个master进程为主master。主master用于管理全局的元数据,这里面包含文件系统元数据(文件系统节点树)、数据块元数据(数据块位置)、以及worker的容量元数据(空闲或已占用空间)。
Alluxio clients与主master通信用来读取或修改元数据。所有的worker都会定期的向主master发送心跳。主master会在一个分布式的持久化系统上记录所有的文件系统事务,这样可以恢复主master的信息。这组日志被称为journal。
(2)备用master
**备用master读取主master写入的journal日志,以保持与主master的状态同步**。它们会对journal日志写入检查点,用于快速恢复。它们不处理来自Alluxio组件的任何请求。
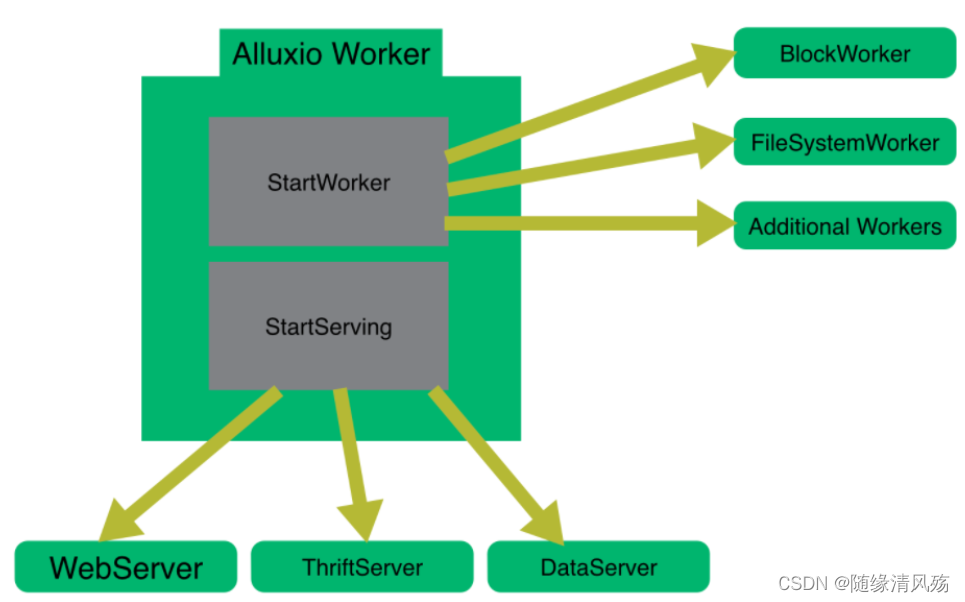
1.1.2、Worker
Alluxio的worker用于管理用户为Alluxio定义的本地资源(内存、SSD、HDD)。Alluxio的worker将数据存储为块,并通过在其本地资源上读或者创建新的数据块来响应client请求。Workers只用于管理数据块;文件到数据块的映射存储在master中。Workers在其底层存储上进行数据操作。
-
优势:
- 1、从底层存储系统读取的数据能被存储在worker中,这样别的client可以立即使用。
- 2、Client可以是轻量级的,不依赖于底层存储的连接器。
-
注意事项:因为RAM的容量有限,所以当空间满了的时候block会被清理。Workers使用清理策略决定什么数据留在Alluxio中。
1.2、Alluxio数据流读写架构
1.2.1、读数据流架构
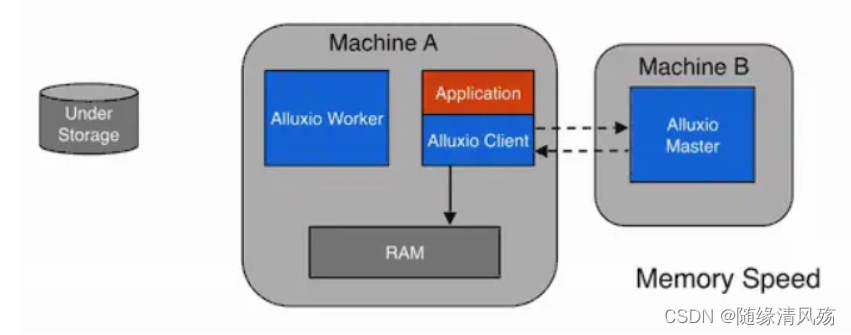
(1)本地缓存命中
本地缓存命中发生在请求数据位于本地Alluxio worker。举例说明,如果一个应用通过Alluxio client请求数据,client向Alluxio master请求数据所在的worker。如果数据在本地可用,Alluxio client使用“短路”读取来绕过Alluxio worker,并直接通过本地文件系统读取文件。短路读取避免通过TCP套接字传输数据,并提供数据的直接访问。

- 注意事项:Alluxio除了内存之外还可以管理其他存储介质(例如SSD、HDD),因此本地数据访问速度可能会因本地存储介质的不同而有所不同。
(2)远程缓存命中
当请求的数据存储在Alluxio中,而不是存储在client的本地worker上时,client将对具有数据的worker进行远程读取。client完成读取后,会要求本地的worker(如果存在)创建一个copy,这样以后读取的时候可以在本地读取相同的数据。远程缓存击中提供了网络级别速度的数据读取。
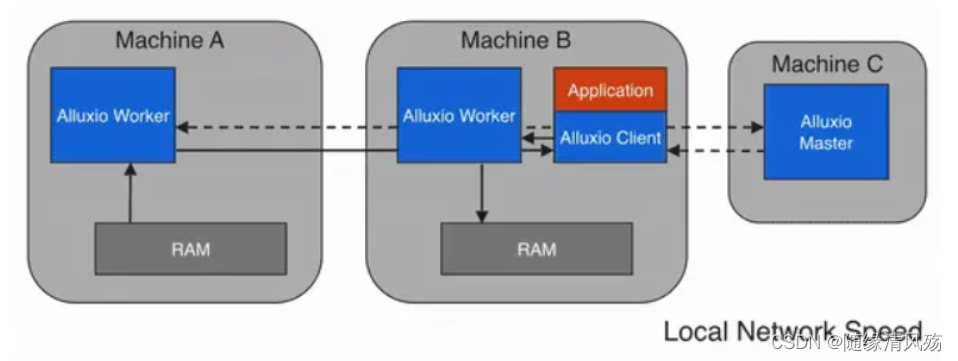
- 注意事项:Alluxio优先从远程worker读取数据,而不是从底层存储,因为Alluxio worker间的速度一般会快过Alluxio workers和底层存储的速度。
(3)缓存MISS
如果数据在Alluxio中找不到,则会发生缓存丢失,应用将不得不从底层存储读取数据。Alluxio client会将数据读取请求委托给worker(有限本地worker)。这个worker会从底层存储读取数据并缓存。缓存丢失通常会导致最大的延迟,因为数据必须从底层存储获取。
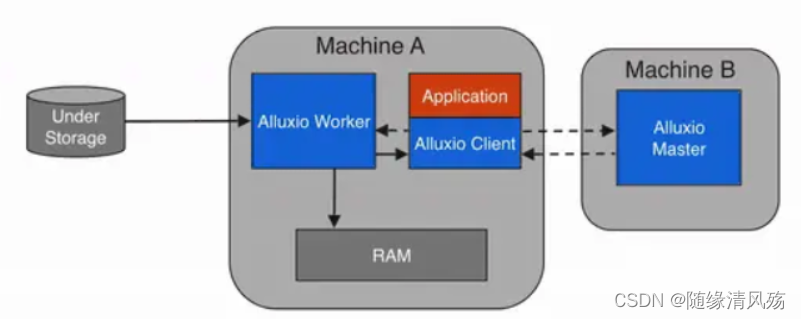
- 注意事项:当client只读取块的一部分或不按照顺序读取块时,client将指示worker异步缓存整个块。异步缓存不会阻塞client,但是如果Alluxio和底层存储系统之间的网络带宽是瓶颈,那么异步缓存仍然可能影响性能。
1.2.2、写数据流架构
(1)只写入到Alluxio
- 写类型设置:MUST_CACHE
Alluxio client将数据写入本地Alluxio worker,而不会写入到底层存储。如果“短路”写可用,Alluxio client直接写入到本地RAM的文件,绕过Alluxio worker,避免网络传输。当可以容忍数据丢失时,MUST_CACHE设置对于写临时数据非常有用。
- 注意事项:由于数据没有持久存储在under storage中,因此如果机器崩溃或需要释放数据以进行更新的写操作**,数据可能会丢失**。
(2)写到UFS
- 写类型设置:CACHE_THROUGH
数据被同步地写到一个Alluxio worker和下一个底层存储。Alluxio client将写操作委托给本地worker,而worker同时将对本地内存和底层存储进行写操作。由于底层存储的写入速度通常比本地存储慢,所以client的写入速度将与底层存储的速度相匹配。
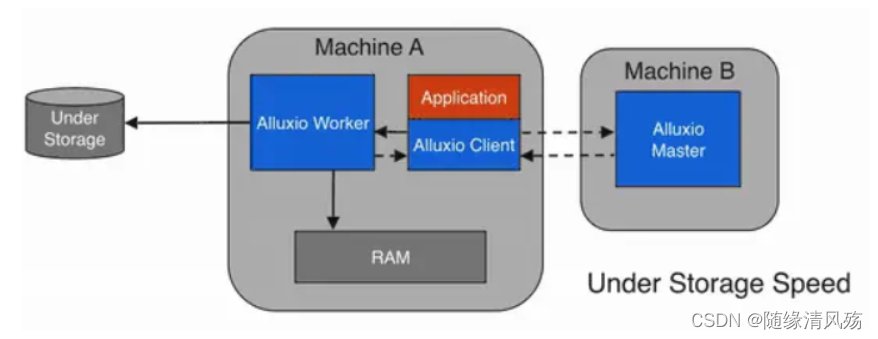
- 数据写入速度:client的写入速度将与底层存储的速度相匹配。
(3)写回UFS
- 写类型设置:ASYNC_THROUGH
数据被同步地写入到一个Alluxio worker,并异步地写入到底层存储。ASYNC_THROUGH可以在持久化数据的同时以内存速度提供数据写入。
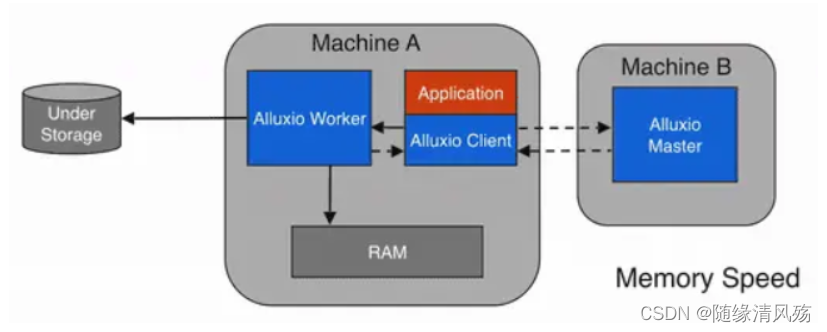
- 数据写入速度:持久化数据的同时以内存速度提供数据写入。
1.3、集群安装部署
(1)准备工作
①免密登录:设置从master节点到worker节点的SSH免密登录
②TCP通信:开放所有节点之间的TCP通信。 对于基本功能,确保所有节点上RPC端口都是打开的(默认值:19998)
③sudo权限:Alluxio自动在worker节点上上安装RAMFS时才需要给将运行Allluxio的OS用户授予sudo特权。
(2)下载Alliuxio安装包
- 注意事项:解压安装包目录复制到所有节点(包括运行master和worker的所有节点)
tar -xvzpf alluxio-2.9.1-bin.tar.gz
(3)配置文件
- 说明:在master节点上,参照模板创建
conf/alluxio-site.properties配置文件。
cp conf/alluxio-site.properties.template conf/alluxio-site.properties
(4)配置文件集群广播
- 说明:将配置文件复制到所有其他Alluxio节点。 通过将所有work节点的IP地址或主机名添加到
conf/workers文件中,操作员可以利用内置工具将配置文件复制到远程节点,
./bin/alluxio copyDir conf/
2、Ambari集成Alluxi安装部署
- 生命周期
| 方法名称 | 方法作用 | 备注 |
|---|---|---|
| install() | 通过 wget 的方式来下载解压服务安装包 | |
| configure() | 执行服务配置、设置目录用户组等相关逻辑 | |
| start() | 启动服务 | |
| status() | 监听服务状态 | |
| stop() | 停止服务 | |
| restart() | 重启服务、自动执行 stop() 和 start() 方法 |
2.1、metainfo文件
- 作用:主要是配置服务名,服务类型,服务操作脚本,metrics以及快速链接等
(1)服务组件配置
- 架构组件如下
| 组件名称 | 组件数量 | 备注 |
|---|---|---|
| master | 1+ | 管理节点 |
| worker | 1+ | 数据节点 |
| client | 1+ | 集群外提交查询机器 |
①Master组件配置
| 组件配置项 | 组件配置 | 备注 |
|---|---|---|
| 组件角色 | master | |
| 组件数量 | 1+ | |
| 组件依赖 | Zookeeepr、HDFS | |
| 组件生命周期管理脚本 | master.py |
- 代码实现
<component>
    <name>ALLUXIO_MASTER</name>
    <displayName>Alluxio Master</displayName>
    <category>MASTER</category>
    <cardinality>1+</cardinality>
    <dependencies>
        <dependency>
            <name>HDFS/HDFS_CLIENT</name>
            <scope>host</scope>
            <auto-deploy>
                <enabled>true</enabled>
            </auto-deploy>
        </dependency>
        <dependency>
            <name>ZOOKEEPER/ZOOKEEPER_SERVER</name>
            <scope>cluster</scope>
            <auto-deploy>
                <enabled>true</enabled>
                <co-locate>ALLUXIO/ALLUXIO_MASTER</co-locate>
            </auto-deploy>
        </dependency>
    </dependencies>
    <commandScript>
        <script>scripts/master.py</script>
        <scriptType>PYTHON</scriptType>
        <timeout>500</timeout>
    </commandScript>
</component>
②Worker组件配置
| 组件配置项 | 组件配置 | 备注 |
|---|---|---|
| 组件角色 | worker | |
| 组件数量 | 1+ | |
| 组件依赖 | 无 | |
| 父组件 | ALLUXIO_MASTER | |
| 组件生命周期管理脚本 | slave.py |
- 代码实现
<component>
    <name>ALLUXIO_SLAVE</name>
    <displayName>Alluxio Worker</displayName>
    <category>SLAVE</category>
    <cardinality>1+</cardinality>
    <bulkCommands>
        <displayName>Alluxio Workers</displayName>
        <!-- Used by decommission and recommission -->
        <masterComponent>ALLUXIO_MASTER</masterComponent>
    </bulkCommands>
    <commandScript>
        <script>scripts/slave.py</script>
        <scriptType>PYTHON</scriptType>
        <timeout>300</timeout>
    </commandScript>
</component>
③Client组件配置
| 组件配置项 | 组件配置 | 备注 |
|---|---|---|
| 组件角色 | client | |
| 组件数量 | 1+ | |
| 组件依赖 | 无 | |
| 组件配置文件 | conf目录下文件 | |
| 组件生命周期管理脚本 | client.py |
- 代码实现
<component>
    <name>ALLUXIO_CLIENT</name>
    <displayName>Alluxio Client</displayName>
    <category>CLIENT</category>
    <cardinality>1+</cardinality>
    <commandScript>
        <script>scripts/client.py</script>
        <scriptType>PYTHON</scriptType>
        <timeout>300</timeout>
    </commandScript>
    <configFiles>
        <configFile>
            <type>env</type>
            <fileName>alluxio-site.properties</fileName>
            <dictionaryName>alluxio-site</dictionaryName>
        </configFile>
        <configFile>
            <type>env</type>
            <fileName>alluxio-env.sh</fileName>
            <dictionaryName>alluxio-env</dictionaryName>
        </configFile>
        <configFile>
            <type>xml</type>
            <fileName>core-site.xml</fileName>
            <dictionaryName>alluxio-core-site</dictionaryName>
        </configFile>
        <configFile>
            <type>env</type>
            <fileName>log4j.properties</fileName>
            <dictionaryName>alluxio-log4j</dictionaryName>
        </configFile>
        <configFile>
            <type>env</type>
            <fileName>metrics.properties</fileName>
            <dictionaryName>alluxio-metrics</dictionaryName>
        </configFile>
    </configFiles>
</component>
(2)服务心跳脚本配置
-
配置说明:配置相关python脚本对服务状态进行监听。
-
代码实现
<commandScript>
    <script>scripts/service_check.py</script>
    <scriptType>PYTHON</scriptType>
    <timeout>300</timeout>
</commandScript>
(3)依赖服务配置
-
配置说明:alluxio服务依赖于HDFS、ZOOKEEPER
-
代码实现
<requiredServices>
    <service>ZOOKEEPER</service>
    <service>HDFS</service>
</requiredServices>
(4)依赖文件配置
-
配置说明:Alluxio服务依赖于
alluxio-config、alluxio-env、core-site、hdfs-site、yarn-site等xml文件 -
代码实现
<configuration-dependencies>
    <config-type>alluxio-site</config-type>
    <config-type>alluxio-env</config-type>
    <config-type>alluxio-metrics</config-type>
    <config-type>alluxio-log4j</config-type>
    <config-type>core-site</config-type>
    <config-type>hdfs-site</config-type>
    <config-type>yarn-site</config-type>
</configuration-dependencies>
(5)自定义连接配置
-
配置说明:配置Alluxio服务 web UI 链接
-
代码实现
<quickLinksConfigurations>
    <quickLinksConfiguration>
        <fileName>quicklinks.json</fileName>
        <default>true</default>
    </quickLinksConfiguration>
</quickLinksConfigurations>
(6)样式配置
-
配置说明:配置Alluxio的主题配置
-
代码实现
<themes>
    <theme>
        <fileName>directories.json</fileName>
        <default>true</default>
    </theme>
</themes>
(7) 系统匹配配置
-
注意事项:服务会根据操作系统的差异来选择不同的 rpm 包,此项不进行配置
-
代码实现
<osSpecifics>
    <osSpecific>
        <osFamily>any</osFamily>
        <packages>
            <package>
                <name>alluxio</name>
            </package>
        </packages>
    </osSpecific>
</osSpecifics>
2.2、本地集群下载
- 安装包拉取步骤

(1)配置本地集群安装包下载路径
- 说明:本地集群只在内网,不在外网,故使用http服务从本地文件拉取到各个
Matser/Slave节点
<!-->env.xml文件配置<-->
<property require-input="true">
    <name>flink.download.url</name>
    <value></value>
    <description>本地集群安装包路径</description>
</property>
(2)参数配置
- 说明:将安装包作为Python参数
#params.py

alluxio_download_url = config['configurations']['alluxio-env']['alluxio.download.url']

# 拉取文件到服务器路径
temp_alluxio_dir = "/tmp/alluxio_install"
(3)Master节点拉取安装包
# master.py

Execute('wget ' + params.alluxio_download_url + ' -P ' + params.temp_alluxio_dir)
(4)Slave节点拉取安装包
# slave.python

Execute('wget ' + params.alluxio_download_url + ' -P ' + params.temp_alluxio_dir)
2.3、公共配置文件实例化
(1)env.xml文件配置
①alluxio-env.sh配置项
<property require-input="true">
    <name>alluxio.log.dir</name>
    <description>Alluxio Log Directory</description>
    <value>/var/log/alluxio</value>
</property>
②alluxio-site.properties配置项
<property require-input="true">
    <name>alluxio.hdd.dirs</name>
    <description>Alluxio HDD Directory</description>
    <value>/hadoop/alluxio/hdd</value>
</property>

<property require-input="true">
    <name>alluxio.hdd.quota</name>
    <description>Alluxio HDD Size(GB)</description>
    <value>20GB</value>
</property>

<property require-input="true">
    <name>alluxio.underfs.address</name>
    <description>Alluxio UnderFS Address</description>
    <value>/hadoop/alluxio/underFSStorage</value>
</property>

<property require-input="true">
    <name>alluxio.master.journal.folder</name>
    <description>Alluxio Master Journal Folder</description>
    <value>/hadoop/alluxio/journal</value>
</property>

<property require-input="true">
    <name>alluxio.worker.memory</name>
    <description>Alluxio Worker Memory(GB)</description>
    <value>2GB</value>
</property>

<property require-input="true">
    <name>alluxio.zookeeper.address</name>
    <description>Alluxio Zookeeper Address</description>
    <value></value>
</property>
(2)文件参数实例化
①alluxio-env.sh参数项
# java dir
java_home = config['ambariLevelParams']['java_home']

# Set install dir
cmd = "/usr/bin/hdp-select versions"
usr_base = "/usr/hdp/"
base_dir = usr_base + commands.getoutput(cmd) + "/alluxio/"

# log dir
log_dir = config['configurations']['alluxio-env']['alluxio.log.dir']
②alluxio-site.properties参数项
- 说明:alluxio运行配置参数
# HA高可用
enabled_ha = 'alluxio.zookeeper.enabled=false'
zk_addr = 'alluxio.zookeeper.address=' + config['configurations']['core-site']['ha.zookeeper.quorum']
journal_folder = 'alluxio.master.journal.folder=' + config['configurations']['alluxio-env']['alluxio.master.journal.folder']
worker_timeout = 'alluxio.worker.block.heartbeat.timeout.ms=120000'
if len(alluxio_masters) > 1:
  enabled_ha = 'alluxio.zookeeper.enabled=true'
  zk_addr = 'alluxio.zookeeper.address=' + config['configurations']['alluxio-env']['alluxio.zookeeper.address']
  journal_folder = 'alluxio.master.journal.folder=' + config['configurations']['alluxio-env']['alluxio.master.journal.folder']
  worker_timeout = 'alluxio.worker.block.heartbeat.timeout.ms=120000'
else:
  alluxio_master = 'alluxio.master.hostname=' + alluxio_masters[0]

#alluxio_master = '#alluxio.master.hostname=' + host_name
alluxio_master_web_port = 'alluxio.master.web.port=' + config['configurations']['alluxio-env']['alluxio.master.web.port']


# alluxio underfs address
underfs_addr = config['configurations']['alluxio-env']['alluxio.underfs.address']

# alluxio worker memory alotment
worker_mem = config['configurations']['alluxio-env']['alluxio.worker.memory']


# alluxio hdd dirs
hdd_dirs = config['configurations']['alluxio-env']['alluxio.hdd.dirs']
hdd_quota = config['configurations']['alluxio-env']['alluxio.hdd.quota']
③masters参数项
- 说明:配置
masters的地址
# alluxio masters address
alluxio_masters = config['clusterHostInfo']['alluxio_master_hosts']
alluxio_masters_str = '\n'.join(alluxio_masters)
④slaves参数项
- 说明:配置
slaves的地址
# alluxio workers address
alluxio_workers = config['clusterHostInfo']['alluxio_slave_hosts']
alluxio_workers_str = '\n'.join(alluxio_workers)
(3)模板文件配置
- 说明:创建模板文件,与
conf目录下所需实例化文件相对应
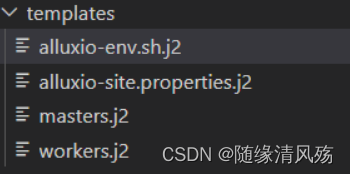
①alluxio-env.sh.j2
JAVA_HOME={{java_home}}
ALLUXIO_HOME={{base_dir}}
ALLUXIO_LOGS_DIR={{log_dir}}
- 对应conf目录下的
alluxio-env.sh文件

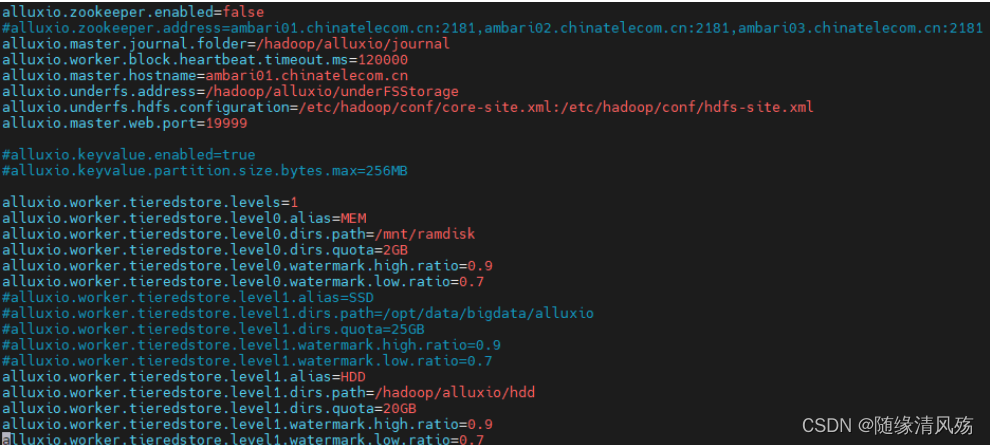
②alluxio-site.properties.j2
{{enabled_ha}}
{{zk_addr}}
{{journal_folder}}
{{worker_timeout}}
{{alluxio_master}}
alluxio.underfs.address={{underfs_addr}}
alluxio.underfs.hdfs.configuration=/etc/hadoop/conf/core-site.xml:/etc/hadoop/conf/hdfs-site.xml
{{alluxio_master_web_port}}

#alluxio.keyvalue.enabled=true
#alluxio.keyvalue.partition.size.bytes.max=256MB

alluxio.worker.tieredstore.levels=1
alluxio.worker.tieredstore.level0.alias=MEM
alluxio.worker.tieredstore.level0.dirs.path=/mnt/ramdisk
alluxio.worker.tieredstore.level0.dirs.quota={{worker_mem}}
alluxio.worker.tieredstore.level0.watermark.high.ratio=0.9
alluxio.worker.tieredstore.level0.watermark.low.ratio=0.7
#alluxio.worker.tieredstore.level1.alias=SSD
#alluxio.worker.tieredstore.level1.dirs.path=/opt/data/bigdata/alluxio
#alluxio.worker.tieredstore.level1.dirs.quota=25GB
#alluxio.worker.tieredstore.level1.watermark.high.ratio=0.9
#alluxio.worker.tieredstore.level1.watermark.low.ratio=0.7
alluxio.worker.tieredstore.level1.alias=HDD
alluxio.worker.tieredstore.level1.dirs.path={{hdd_dirs}}
alluxio.worker.tieredstore.level1.dirs.quota={{hdd_quota}}
alluxio.worker.tieredstore.level1.watermark.high.ratio=0.9
alluxio.worker.tieredstore.level1.watermark.low.ratio=0.7
- 对应conf目录下的
alluxio-site.properties文件
③master.j2
- 说明:对应
conf目录下的masters文件
{{alluxio_masters_str}}
④master.j2
- 说明:对应
conf目录下的slaves文件
{{alluxio_workers_str}}
(4)模板文件实例化
- 说明:创建conf目录下所需文件
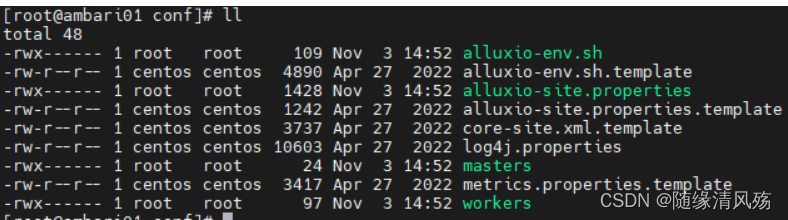
- 代码实现
def configure(self, env):
    import params

    env.set_params(params)

    alluxio_config_dir = params.base_dir + 'conf/'
    alluxio_libexec_dir = params.base_dir + 'libexec/'

    # alluxio-env.sh
    File(format("{alluxio_config_dir}/alluxio-env.sh"),
         owner='alluxio',
         group='alluxio',
         mode=0700,
         content=Template('alluxio-env.sh.j2', conf_dir=alluxio_config_dir)
        )

    # alluxio-site.properties
    File(format("{alluxio_config_dir}/alluxio-site.properties"),
         owner='alluxio',
         group='alluxio',
         mode=0700,
         content=Template('alluxio-site.properties.j2', conf_dir=alluxio_config_dir)
        )

    # masters
    File(format("{alluxio_config_dir}/masters"),
         owner='alluxio',
         group='alluxio',
         mode=0700,
         content=Template('masters.j2', conf_dir=alluxio_config_dir)
        )

    # workers
    File(format("{alluxio_config_dir}/workers"),
         owner='alluxio',
         group='alluxio',
         mode=0700,
         content=Template('workers.j2', conf_dir=alluxio_config_dir)
        )
2.4、Matser/Slave安装部署
(1)安装配置项
<property require-input="true">
    <name>alluxio.log.dir</name>
    <description>Alluxio Log Directory</description>
    <value>/var/log/alluxio</value>
</property>
(2)安装脚本参数项
- 说明:创建安装目录、日志目录等
# Set install dir
cmd = "/usr/bin/hdp-select versions"
usr_base = "/usr/hdp/"
base_dir = usr_base + commands.getoutput(cmd) + "/alluxio/"

# alluxio log dir
log_dir = config['configurations']['alluxio-env']['alluxio.log.dir']
journal_dir = config['configurations']['alluxio-env']['alluxio.master.journal.folder']

# alluxio hdd dirs
hdd_dirs = config['configurations']['alluxio-env']['alluxio.hdd.dirs']
hdd_quota = config['configurations']['alluxio-env']['alluxio.hdd.quota']
(3)Matser安装脚本
- 安装步骤
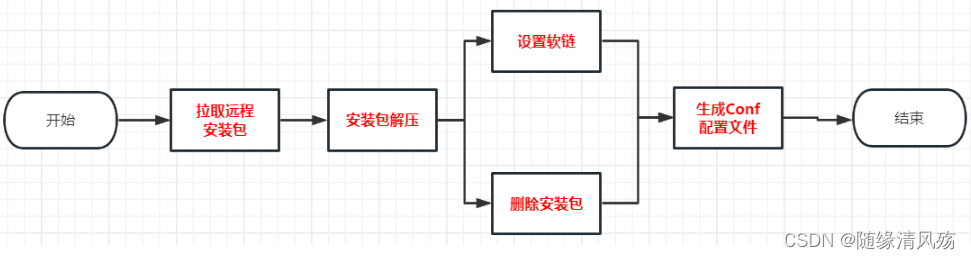
- 脚本实现
#Call setup.sh to install the service
def install(self, env):

    import params
    # Install packages listed in metainfo.xml
    self.install_packages(env)
    env.set_params(params)

    # Create the base_dir/alluxio dir
    cmd = '/bin/mkdir' + ' -p ' + params.base_dir
    Execute('echo "Running ' + cmd + '"')
    Execute(cmd)

    # Create the log_dir dir
    cmd = '/bin/mkdir' + ' -p ' + params.log_dir
    Execute('echo "Running ' + cmd + '"')
    Execute(cmd)

    # Create the hdd_dirs dir
    cmd = '/bin/mkdir' + ' -p ' + params.hdd_dirs
    Execute('echo "Running ' + cmd + '"')
    Execute(cmd)

    # Create the journal_dir dir
    cmd = '/bin/mkdir' + ' -p ' + params.journal_dir
    Execute('echo "Running ' + cmd + '"')
    Execute(cmd)

    # Create the underfs_addr dir
    cmd = '/bin/mkdir' + ' -p ' + params.underfs_addr
    Execute('echo "Running ' + cmd + '"')
    Execute(cmd)

    #extract archive and symlink dirs
    Execute('wget ' + params.alluxio_download_url + ' -P ' + params.temp_alluxio_dir)
    cmd = '/bin/tar' + ' -zxf ' + params.temp_alluxio_dir + '/* --strip 1 -C ' + params.base_dir
    Execute('echo "Running ' + cmd + '"')
    Execute(cmd)
    Execute('rm -rf ' + params.temp_alluxio_dir)

    cmd = '/bin/ln' + ' -s ' + params.base_dir + ' ' + params.usr_base + 'current/alluxio'
    Execute('echo "Running ' + cmd + '"')
    try:
        Execute(cmd)
        except:
            pass
        #call configure
    self.configure(env)
(4)Slave安装脚本
- 安装步骤
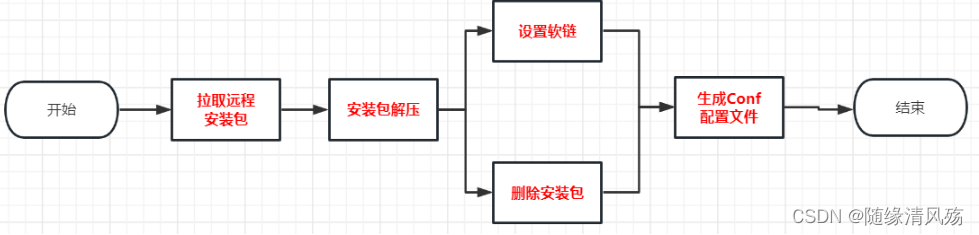
- 脚本实现
#Call setup.sh to install the service
def install(self, env):
    import params

    # Install packages listed in metainfo.xml
    self.install_packages(env)
    env.set_params(params)

    # Create the base_dir/alluxio dir
    cmd = '/bin/mkdir' + ' -p ' + params.base_dir
    Execute('echo "Running ' + cmd + '"')
    Execute(cmd)

    # Create the log_dir dir
    cmd = '/bin/mkdir' + ' -p ' + params.log_dir
    Execute('echo "Running ' + cmd + '"')
    Execute(cmd)

    # Create the hdd_dirs dir
    cmd = '/bin/mkdir' + ' -p ' + params.hdd_dirs
    Execute('echo "Running ' + cmd + '"')
    Execute(cmd)

    # Create the journal_dir dir
    cmd = '/bin/mkdir' + ' -p ' + params.journal_dir
    Execute('echo "Running ' + cmd + '"')
    Execute(cmd)

    # Create the underfs_addr dir
    cmd = '/bin/mkdir' + ' -p ' + params.underfs_addr
    Execute('echo "Running ' + cmd + '"')
    Execute(cmd)

    #extract archive and symlink dirs
    Execute('wget ' + params.alluxio_download_url + ' -P ' + params.temp_alluxio_dir)
    cmd = '/bin/tar' + ' -zxf ' + params.temp_alluxio_dir + '/* --strip 1 -C ' + params.base_dir
    Execute('echo "Running ' + cmd + '"')
    Execute(cmd)
    Execute('rm -rf ' + params.temp_alluxio_dir)

    cmd = '/bin/ln' + ' -s ' + params.base_dir  + ' ' + params.usr_base + 'current/'
    Execute('echo "Running ' + cmd + '"')

    try:
        Execute(cmd)
        except:
            pass

     self.configure(env)
2.5、Master/Slave服务生命周期
(1)服务生命周期
- 自定义服务生命周期:服务的 安装、配置、启动、监听状态、停止、删除(卸载) 操作
| 组件类型 | 组件生命周期 | 备注 |
|---|---|---|
| matser | 安装、启动、停止、配置、状态 | |
| slave | 安装、启动、停止、配置、状态 | |
| client | 安装、配置 |
(2)参数配置项
# alluxio pid dir
pid_dir = config['configurations']['alluxio-env']['alluxio.pid.dir']
(3)Matser服务生命周期
-
文件说明:master生命周期包括安装、启动、停止、配置、重启、状态,其文件里面有
install()、configure()、start()、status()、stop()、restart()六个方法 -
脚本实现
 #Call start.sh to start the service
  def start(self, env):
    import params
    env.set_params(params)

    #call configure
    self.configure(env)

    #execute the startup script
    cmd = params.base_dir + 'bin/alluxio-start.sh ' + 'master'

    Execute('echo "Running cmd: ' + cmd + '"')
    Execute(cmd)

    # Create pid file - note check_process_status expects a SINGLE int in the file
    cmd = "mkdir -p " + params.pid_dir
    Execute(cmd)
    cmd = "echo `ps -A -o pid,command | grep -i \"[j]ava\" | grep AlluxioMaster | awk '{print $1}'`> " + params.pid_dir + "/AlluxioMaster.pid"
    Execute(cmd)

  #Called to stop the service using alluxio provided stop
  def stop(self, env):
    import params
    env.set_params(params)

    #call configure
    self.configure(env)

    #execure the startup script
    cmd = params.base_dir + 'bin/alluxio-stop.sh ' + 'master'

    Execute('echo "Running cmd: ' + cmd + '"')
    Execute(cmd)

  def restart(self, env):
    self.stop(env)
    self.start(env)

  #Called to get status of the service using the pidfile
  def status(self, env):
    check_process_status("/var/run/alluxio/AlluxioMaster.pid")
(4)Slave服务生命周期
-
文件说明:slave生命周期包括安装、启动、停止、配置、重启、状态,其文件里面有
install()、configure()、start()、status()、stop()、restart()六个方法 -
脚本实现
#Call start.sh to start the service
def start(self, env):
    import params
    env.set_params(params)
    self.configure(env)
    #Mount ramfs
    cmd = params.base_dir + 'bin/alluxio-start.sh ' + 'worker' + ' Mount'

    Execute('echo "Running cmd: ' + cmd + '"')
    Execute(cmd)

    # Create pid file - note check_process_status expects a SINGLE int in the file
    cmd = "mkdir -p " + params.pid_dir
    Execute(cmd)
    cmd = "echo `ps -A -o pid,command | grep -i \"[j]ava\" | grep AlluxioWorker | awk '{print $1}'`> " + passrams.pid_dir + "/AlluxioWorker.pid"
    Execute(cmd)

    #Called to stop the service using the pidfile
    def stop(self, env):
        import params
        env.set_params(params)
        self.configure(env)
        #execure the startup script
        cmd = params.base_dir + 'bin/alluxio-stop.sh ' + 'worker'

        Execute('echo "Running cmd: ' + cmd + '"')
        Execute(cmd)

        #Check pid file using Ambari check_process_status
        def status(self, env):
            check_process_status("/var/run/alluxio/AlluxioWorker.pid")
2.6、Matser/Slave心跳检查
- 心跳检测逻辑:每间隔一段时间检测服务是否正常运行
ssh 192.168.6.102 /usr/hdp/3.1.0.0-78/alluxio /bin/alluxio format -s
- 运行结果

- 代码实现
def service_check(self, env):
    import params

    env.set_params(params)
    target_host = params.alluxio_masters[0]
    print ('Service check host is: ' + target_host)

    #call format
    format_command = [ "ssh", target_host, params.base_dir + "/bin/alluxio", "format", "-s"]
    format_proc = subprocess.Popen(format_command, stdout=subprocess.PIPE, stderr=subprocess.PIPE)
    (format_stdout, format_stderr) = format_proc.communicate()
    format_response = format_stdout

    if 'Failed' in format_response:
        raise ComponentIsNotRunning()

        full_command = [ "ssh", target_host, params.base_dir + "/bin/alluxio", "runTests"]
        proc = subprocess.Popen(full_command, stdout=subprocess.PIPE, stderr=subprocess.PIPE)
        (stdout, stderr) = proc.communicate()
        response = stdout

        if 'Failed' in response:
            raise ComponentIsNotRunning()
3、Ambari集成Alluxio
3.1、启动顺序
- 文件说明:文件可以定义组件在 Ambari 中启动顺序。

resource目录下的role_command_order.json定义着全局的的依赖。每个Stack目录下也会存在role_command_order.json。相同的配置,Stack下面的会覆盖全局的。不同的配置,Ambari会拼接在一起。高版本的Stack会继承低版本的配置。相同的也会overwrite,不同的merge。
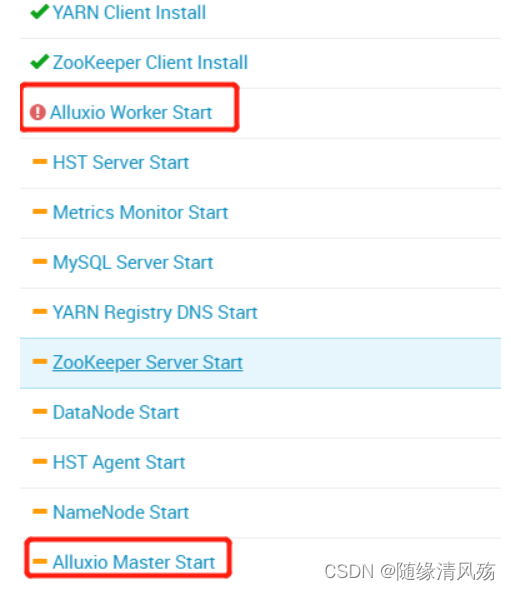
①定义组件启动顺序报错
{
    "general_deps" : {
        "_comment" : "dependencies for Alluxio",
        "ALLUXIO_WORKER-START": ["ALLUXIO_MASTER-START"],
        "ALLUXIO_SERVICE_CHECK-SERVICE_CHECK": ["ALLUXIO_MASTER-START", "ALLUXIO_WORKER-START"],
        "ALLUXIO_MASTER-STOP": ["ALLUXIO_WORKER-STOP"],
        "ALLUXIO_MASTER-START": ["NAMENODE-START", "DATANODE-START", "ZOOKEEPER_SERVER-START"]
    }
}
- 启动结果
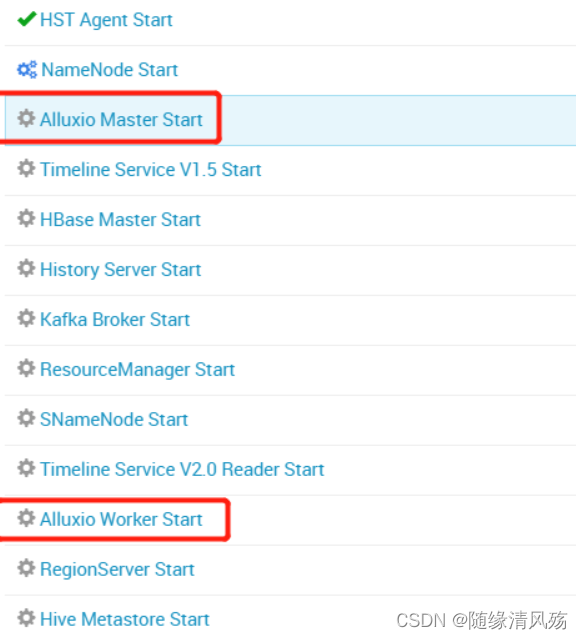
②定义组件启动顺序正确
{
    "general_deps" : {
        "_comment" : "dependencies for Alluxio",
        "ALLUXIO_MASTER-START": ["NAMENODE-START", "DATANODE-START", "ZOOKEEPER_SERVER-START"],
        "ALLUXIO_MASTER-STOP": ["ALLUXIO_SLAVE-STOP"],
        "ALLUXIO_SLAVE-START": ["ALLUXIO_MASTER-START"],
        "ALLUXIO_SERVICE_CHECK-SERVICE_CHECK": ["ALLUXIO_MASTER-START", "ALLUXIO_SLAVE-START"]
    }
}
- 运行结果
③问题说明:启动顺序脚本组件名称未与组件定义脚本名称未保持一致,尴尬!!!
3.2、自定义页面快链
服务可以通过将元信息添加到遵循预定义 JSON 格式的文件中来添加到 Ambari Web UI 的快速链接列表。Ambari 服务器解析快速链接 JSON 文件并将其内容提供给 UI,以便 Ambari Web UI 可以根据信息计算快速链接 URL,并相应地填充快速链接下拉列表。具体集成步骤如下:
(1)metainfo.xml文件配置启用
- 配置说明:默认情况下,JSON 文件名为 quicklinks.json,位于服务根目录下的 quicklinks 目录中。
<quickLinksConfigurations>
    <quickLinksConfiguration>
        <fileName>quicklinks.json</fileName>
        <default>true</default>
    </quickLinksConfiguration>
</quickLinksConfigurations>
(2)quicklinks文件
- 配置说明:快速链接 JSON 文件有两个主要部分,“配置”部分用于确定协议(HTTP 与 HTTPS),“链接”部分用于在 Ambari Web UI 上显示的每个快速链接的元信息。JSON 文件还在顶部包含一个“名称”部分,该部分定义了服务器用于识别的快速链接 JSON 文件的名称。
{
  "name": "default",
  "description": "default quick links configuration",
  "configuration": {
    "links": [
      {
        "name": "Alluxio_WEB_UI",
        "label": "Alluxio Web UI",
        "requires_user_name": "false",
        "component_name": "ALLUXIO_MASTER",
        "url":"%@://%@:%@",
        "port":{
          "http_property": "alluxio.master.web.port",
          "http_default_port": "19999",
          "regex": "^(\\d+)$",
          "site": "alluxio-ambari-config"
        }
      }
    ]
  }
}
- 参数说明
| 配置属性 | 配置说明 | 备注 |
|---|---|---|
| links/name | 快链名称 | |
| links/label | 快链显示名称 | |
| requires_user_name | ||
| component_name | 快链所关联的组件名称 | |
| url | 第一个%@为通信协议,第二个是主机名,第三个是端口号 | |
| port/http_property | 端口号,动态获取 | |
| port/http_default_port | 默认端口 | |
| port/regex | 正则规则 | |
| port/site | http_property参数所在的文件名称,省略了”.xml“ |
(3)显示规则
- 注意事项:界面显示如下

3.3、自定义警告
- 配置文件:
alerts.json
(1)alter概述
在Ambari中的告警机制用来监控各个模块及其机器的状态。对于告警来说主要包括AlertDefinition和Alert Instance。
- Alert Definition:告警任务定义,即定义告警的检测时间间隔(interval)、类型(type)、以及阈值等。
- Alert Instance:告警实例,即Ambari会读取alert definition,然后创建对应实例去执行告警任务。
(2)alter类型
- alert类型分为五种,分别如下
| 类型 | 用途 | 阈值是否可分配 | 阈值单位 |
|---|---|---|---|
| PORT | 用来监测机器上的一个端口进程是否存在 | 是 | 秒 |
| METRIC | 用来监测Metric相关的配置属性 | 是 | % |
| AGGREGATE | 用来收集其他某些Alert的状态 | 是 | % |
| WEB | 用来监测一个WEB UI(URL)地址是否可用 | 否 | 无 |
| SCRIPT | Alert的检测逻辑由一个自定义的python脚本执行 | 否 | 无 |
- 注意事项:alert检查结果有五个级别,分别是
OK、WARNING、CRITICAL、UNKNOWN和NONE
(3)Alter开发实例
Ⅰ、第一步_PORT告警示例实现
{
  "ALLUXIO": {
      "service": [],
      "ALLUXIO_MASTER": [
          {
              "name": "ALLUXIO_server_process",
              "label": "ALLUXIO服务进程",
              "description": "如果您不能确定ALLUXIO服务器进程已启动并且正在网络上侦听,则将触发此主机级别警报。",
              "interval": 1,
              "scope": "ANY",
              "enabled": true,
              "source": {
                  "type": "PORT",
                  "uri": "{{alluxio-env/alluxio.master.web.port}}",
                  "default_port": 19999,
                  "reporting": {
                      "ok": {
                          "text": "TCP OK - {0:.3f}s response on port {1}"
                      },
                      "warning": {
                          "text": "TCP OK - {0:.3f}s response on port {1}",
                          "value": 1.5
                      },
                      "critical": {
                          "text": "Connection failed",
                          "value": 5
                      }
                  }
              }
          }
      ]
  }
}
- 参数说明:依据
metainfo.xml文件的service.name/component.name属性表示用来定义这个 Alert 属于哪个 Service 的哪个模块
| 属性 | 说明 | 备注 |
|---|---|---|
| name | 告警名称 | |
| label | 告警显示名称 | |
| description | 告警描述 | |
| interval | 告警检测周期 | 单位为分钟 |
| scope | 告警范围 | |
| enabled | 是否启用告警 | |
| source | 告警实例 | |
| source/type | 告警类型 | |
| source/uri | 定义变量,获取conf的参数值 | |
| source/default_port | 监测告警的默认端口号。 | 如果 uri 参数失效,就会读取该参数。 |
| source/reporting | 代表告警级别 | 分别是OK、WARNING,CRITICAL、UNKNOWN 和 NONE |
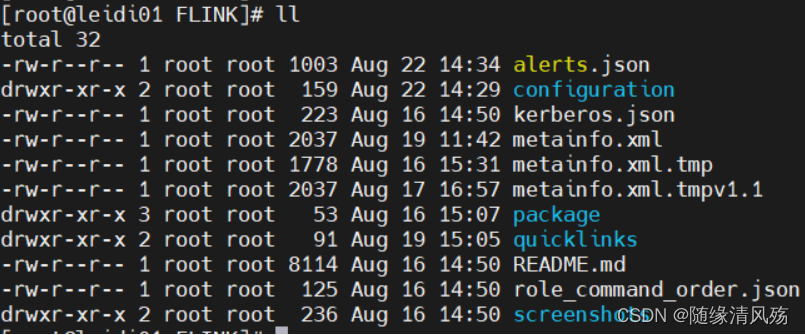
Ⅱ、第二步:上传文件
cd /var/lib/ambari-server/resources/stacks/HDP/3.1/services/FLINK
rz alerts.json
- 结果如下
Ⅲ、第三步:调试运行
- 如果是修改
alerts.json文件内容:则需要重启 Ambari Server ,并卸载、重新安装服务,Ambari 会将新预定义的 Alert 信息保存到数据库中。 - 如果是修改
SCRIPT 类型的 py 文件,则只需要将修改后的 py 文件放置到 告警组件所在机器的 /var/lib/ambari-agent/cache/stacks/HDP/3.1/services/ALLUXIO/package/alerts 目录下即可(以 Elasticsearch 为例)。实时更新,不需要重启 ambari-server ,大概等待一分钟后,程序刷新。
Ⅳ、运行结果

3.4、自定义监控指标
3.4.1、Ambari Metrics概述
- 说明:Metrics在Metrics 页面上,有多个小程序(widget), 表现 HDP 集群服务的操作状态信息。多数小程序显示一个度量值(metric), 例如,HDFS Disk Usage 表示为一个负载图表和一个百分数指示。
(1)AWS概述
Ambari Metrics System 简称为 AMS,它主要为系统管理员提供了集群性能的监察功能。Metrics 一般分为 Cluster、Host 以及 Service 三个层级。
- Cluster/Host 级:主要负责监察集群机器相关的性能
- Service级:主要负责 Host Component 的性能。
AMS 涉及的模块如下图所示:
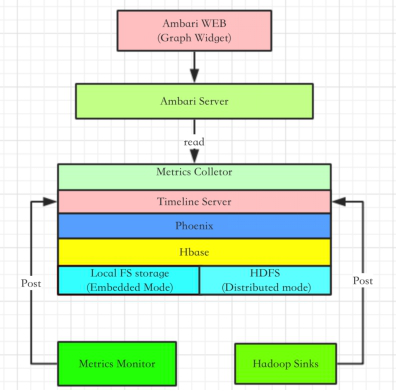
①Master 模块:即Metrics Collector
②Slave:包括Metrics Monitor 和 Hadoop Sinks,Salve 模块负责收集信息,并发送给 Collector。
- Metrics Monitor:负责收集机器本身相关的指标,例如 CPU、Mem、Disk 等
- Hadoop Sinks:负责收集 Hadoop 相关 Service 模块的性能数据,例如该模块占用了多少 Mem,以及该模块的 CPU 占用率等
(2)Ambari Widget介绍
- 核心:显示 AMS 收集的 Metrics 属性

3.4.2、AWS监控指标接口
- 核心:通过接口查看
(1)接口说明
- 说明:该接口给出所有可用指标的列表
http://AMS_SERVER:6188/ws/v1/timeline/metrics/metadata
- 查看结果

(3)获取指标值
http://leidi01:6188/ws/v1/timeline/metrics?metricNames=<>&hostname=<>&appId=<>&startTime=<>&endTime=<>&precision=<>

# 样例数据:我需要从运行 Hbase appId 的主机名中获取 default.General.heap.max 和 default.General.heap.used 指标名称
http://leidi01:6188/ws/v1/timeline/metrics?metricNames=default.General.heap.max,default.General.heap.used&appId=hivemetastore&hostname=leidi01
- 运行结果

3.4.3、第三方服务增加Metrics和Widgets
- 核心:配置相关的 metrics.json 以及 widget.json
(1)metainfo.xml文件配置
- 注意事项:timelineAppId,该值是唯一的,一般用 Service Name 即可,并且不区分大小写。Metrics Collector 中的 Tmeline Server 会通过 timelineAppid 区分各个模块的 Metrics 信息。
<!-->AmbariMetrics搜集该组件时的名称<-->
<component>
    ......
    <timelineAppid>alluxio</timelineAppid>
    ......
</component>
(2)widgets.json文件配置
- 核心:自定义服务仪表盘
{
    "layouts": [
        {
            "layout_name": "default_alluxio_dashboard",
            "display_name": "Standard Alluxio Dashboard",
            "section_name": "Alluxio_SUMMARY",
            "widgetLayoutInfo": [
                {
                    "widget_name": "ALLUXIO GC count",
                    "description": "Count of total garbage collections and count of major type garbage collections of the JVM.",
                    "widget_type": "GRAPH",
                    "is_visible": true,
                    "metrics": [
                        {
                            "name": "master.CapacityTotal._rate",
                            "metric_path": "metrics/master/capacitytotal._rate",
                            "service_name": "ALLUXIO",
                            "component_name": "ALLUXIO_MASTER"
                        },
                        {
                            "name": "master.PathsTotal._rate",
                            "metric_path": "metrics/master/pathstotal._rate",
                            "service_name": "ALLUXIO",
                            "component_name": "ALLUXIO_MASTER"
                        }
                    ],
                    "values": [
                        {
                            "name": "Master CapacityTotal count",
                            "value": "${master.CapacityTotal._rate}"
                        },
                        {
                            "name": "master.PathsTotal",
                            "value": "${metrics/master/pathstotal._rate}"
                        }
                    ],
                    "properties": {
                        "graph_type": "LINE",
                        "time_range": "1"
                    }
                }
            ]
        }
    ]
}
- 属性说明
| 属性 | 说明 | 备注 |
|---|---|---|
| metrics/name | 数据推送到collector的实际名称 | |
| metrics/metric_path | 与metrics.json文件的metricKey要保持一致 | 去掉._rate的部分 |
| metrics/service_name | 服务名 | |
| metrics/component_name | 组件名 | |
| metrics/host_component_criteria | 可选参数 | 该值为主机指标,不加这个参数的话,就是服务指标 |
| values/name | 仅用于“GRAPH图形”窗口小部件类型。 | 作为放大图例中的标签名称。 |
| values/value | 计算数据集值的表达式 |
(3)metrics.json文件配置
- 核心:自定义监控信息,声明服务指标
{
    "ALLUXIO_MASTER": {
        "Component": [
            {
                "type": "ganglia",
                "metrics": {
                    "default": {
                        "metrics/master/capacitytotal": {
                            "metric": "master.CapacityTotal",
                            "pointInTime": true,
                            "temporal": true
                          },
                          "metrics/master/pathstotal": {
                            "metric": "master.PathsTotal",
                            "pointInTime": true,
                            "temporal": true
                          }
                    }
                }
            }
        ]
    }
}
- 属性说明
| 属性 | 说明 | 备注 |
|---|---|---|
| type | ganglia是负责收集指标数据的 | |
| 为widgets.json里面的metrics[i].metric_path的值 | 去掉._max、._min之类的聚合标识 | |
| metric | widgets.json里面的metrics[i].name的值 | 去掉._max、._min之类的聚合标识 |
| pointInTime | 是否允许时间段的查询 | 如果为 false 则代表不允许 |
| temporal | 是否支持时间段的查询 |
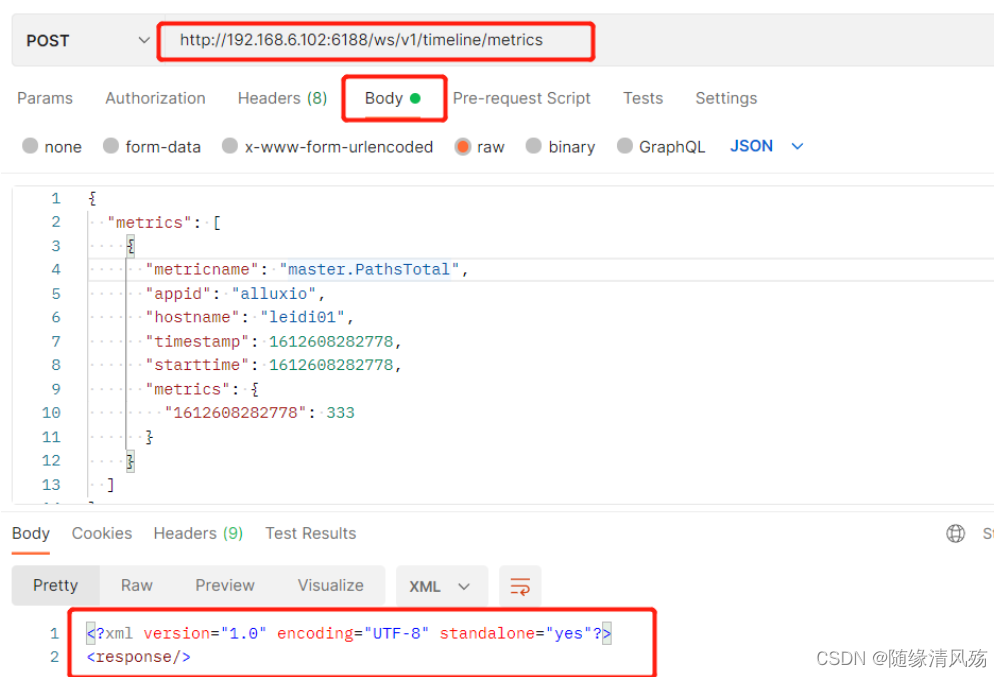
(4)发送指标数据
- 核心:向 Ambari Metrics Collector 发送指标数据
①使用postman发送监控指标
{
  "metrics": [
    {
      "metricname": "master.PathsTotal",
      "appid": "alluxio",
      "hostname": "leidi01",
      "timestamp": 1612608282778,
      "starttime": 1612608282778,
      "metrics": {
        "1612608282778": 333
      }
    }
  ]
}
- 发送结果
②通过脚本定时发送
import requests
import json

# -----------------------------------------------------------------------------
#                       Functions
# -----------------------------------------------------------------------------
def human_readable(num):
  """
  this function will convert bytes to MB.... GB... etc
  """
  step_unit = 1024.0
  for x in ['bytes', 'KB', 'MB', 'GB', 'TB']:
    if num < step_unit:
      return "%3.1f %s" % (num, x)
    num /= step_unit

# -----------------------------------------------------------------------------
#         Variables
# -----------------------------------------------------------------------------
AMS_SERVER = 'amshost01.domain.com'
AMS_PORT = '6188'
AMS_URL = 'http://' + AMS_SERVER + ':' + AMS_PORT + '/ws/v1/timeline/'

# -----------------------------------------------------------------------------
#                Main
# -----------------------------------------------------------------------------

try:
  request01 = requests.get(AMS_URL + "metrics?metricNames=default.General.heap.max,default.General.heap.used&appId=hivemetastore&hostname=hiveserver01.domain.com")
  request01_dict = json.loads(request01.text)
  output = {}
  for row in request01_dict['metrics']:
    for key01, value01 in row.items():
      if key01 == 'metricname':
        metricname = value01
      if key01 == 'metrics':
        for key02, value02 in value01.items():
          metricvalue = value02
    output[metricname] = metricvalue
  print('Hive Metastore Heap Max: ' + human_readable(output['default.General.heap.max']))
  print('Hive Metastore Heap Used: ' + human_readable(output['default.General.heap.used']))
  print(("Hive Metastore percentage memory used: {:.0f}").format(output['default.General.heap.used']*100/output['default.General.heap.max']))
except:
  print("Cannot contact AMS server")
  exit(1)
exit(0)
(5)调试步骤
①首次 widgets.json 和 metrics.json 文件上传到服务器后,仅需重启 ambari-server 即可生效。后续的 widgets.json 和 metrics.json 文件如果要修改的话,均需要重启 ambari-server 和 重装服务 才可生效。
但是,生效以后,需要在 “widget Browser” 里面手动添加最新的 widget 部件。默认,ambari 会一直展示旧的数据。这些 widget 部件信息存储在 widget 这个表中。所以需要在 “widget Browser” 里面手动添加最新的 widget 部件。
②如果 package 里面有文件增删或修改,重启ambari-server,这个package 文件也会覆盖实时更新,实时更新后,我们重启组件来验证修改的功能。
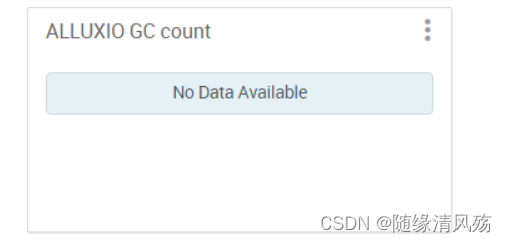
(6)运行结果
- 说明:无数据…


 被折叠的 条评论
为什么被折叠?
被折叠的 条评论
为什么被折叠?
 到【灌水乐园】发言


