


 本文详细介绍了如何在Android应用中使用App Bar,包括如何添加Toolbar,处理Actions,添加Overflow Menu,响应用户操作,以及如何添加回退按钮和Action View。通过设置Toolbar并使用v7支持库,开发者可以实现更一致的界面体验。同时,文中还提到如何创建和管理菜单项,以及利用Action Provider增强功能。
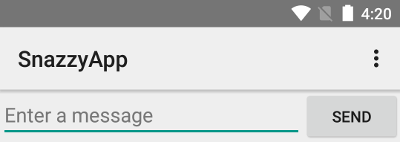
在大部分基本的表单中,都有一个 在一边显示Activity的标题,另一边显示overflow menu 的actionbar 如下:
从 android 3.0 开始,所有的Activity都使用默认的主题,将 action bar 作为 app bar,但是不断增减的bar的特性,原生的 Action bar在不同的 Sysytem中并不一致。
相比之下,最新的一些特性都包含在了 Toolbar 的支持库 控件中
添加一个Toolbar 到 Activity
1 . 添加一个 v7 的支持库到项目中
2 . 确保这个Activity继承 AppCompatActivity
(以上两点,现在android studio在默认创建一个activity(项目)的时候,已经确保了)
3 . 在清单文件中确定,当前的 activity 不使用 action bar
<application
    android:theme="@style/Theme.AppCompat.Light.NoActionBar"
    />
4 . 添加一个 Toolbar 在 布局文件中
<android.support.v7.widget.Toolbar
   android:id="@+id/my_toolbar"
   android:layout_width="match_parent"
   android:layout_height="?attr/actionBarSize"
   android:background="?attr/colorPrimary"
   android:elevation="4dp"
   android:theme="@style/ThemeOverlay.AppCompat.ActionBar"
   app:popupTheme="@style/ThemeOverlay.AppCompat.Light"/>
elevation 这个属性的大小 为 4dp,是根据 material 风格确定的 是一个叠加阴影的效果,值越大,这个空间的 z 轴位置越高 本例中使用的颜色,大小都是系统资源
5 . 最后一步,在代码总设置当前的actionbar为此 Toolbar(注意,一定是是使用v7的库,而不是其他)
@Override
protected void onCreate(Bundle savedInstanceState) {
    super.onCreate(savedInstanceState);
    setContentView(R.layout.activity_my);
    Toolbar myToolbar = (Toolbar) findViewById(R.id.my_toolbar);
    setSupportActionBar(myToolbar);
    }
此时,toolbar就会显示 activity 的 title 了
一旦你设置了 toolbar 作为 activity 的 app bar,可以通过 v7 兼容库 来支持 你做一些有用的事,比如获取(getSupportActionBar),显示,隐藏 actionbar
添加和处理 Actions
如下图所示:
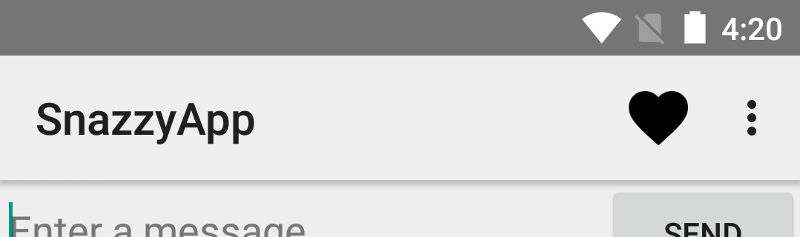
如果你app要显示很多的actions,那么控件是不够的,这时可以吧一些action放在overflow menu中。当然你也将一些action一直放在 overflow menu 中
添加 action button
首先创建一个 新的 XML 文件 在 路径 res/menu/ directory 下
<menu xmlns:android="http://schemas.android.com/apk/res/android" >

    <!-- "Mark Favorite", 如果可以的话,显示在bar中 -->
    <item
        android:id="@+id/action_favorite"
        android:icon="@drawable/ic_favorite_black_48dp"
        android:title="@string/action_favorite"
        <!--当在overflow中显示的时候,都是title的形式-->
        app:showAsAction="ifRoom"/>

    <!-- 表示一直显示在 overflow 中 -->
    <item android:id="@+id/action_settings"
          android:title="@string/action_settings"
          app:showAsAction="never"/>

</menu>
响应动作
当用户点选一个bar item的时候,系统会调用你的 activity的 onOptionsItemSelected() 方法,然后传入一个 MenuItem 值来指明 哪一个item是被点击的。
@Override
public boolean onOptionsItemSelected(MenuItem item) {
    switch (item.getItemId()) {
        case R.id.action_settings:
            // User chose the "Settings" item, show the app settings UI...
            return true;

        case R.id.action_favorite:
            // User chose the "Favorite" action, mark the current item
            // as a favorite...
            return true;

        // 只要是点击中了,都是返回true的

        default:
            // If we got here, the user's action was not recognized.
            // Invoke the superclass to handle it.
            return super.onOptionsItemSelected(item);
    }
}当然也要在onCreateOptionsMenu中给menu填入样式
如何添加一个回退按钮
这个在之前讲过,这里就不赘述了
最后问题,如何添加一个 action view
action view 就是封装好的一些有复杂功能的 action,比如 searchView 或者是 shareView等等
添加也是只许简单的两步:
@Override
public boolean onCreateOptionsMenu(Menu menu) {
    getMenuInflater().inflate(R.menu.options, menu);
    // ...

    // 定义一个listener,来确定当 action 是展开或者折叠的时候,应有的行为
    OnActionExpandListener expandListener = new OnActionExpandListener() {
        @Override
        public boolean onMenuItemActionCollapse(MenuItem item) {
            // Do something when action item collapses
            return true;  // Return true to collapse action view
        }

        @Override
        public boolean onMenuItemActionExpand(MenuItem item) {
            // Do something when expanded
            return true;  // Return true to expand action view
        }
    };

    // Get the MenuItem for the action item
    MenuItem actionMenuItem = menu.findItem(R.id.myActionItem);

    // Assign the listener to that action item
    MenuItemCompat.setOnActionExpandListener(actionMenuItem, expandListener);

    // Any other things you have to do when creating the options menu…

    return true;
}
添加一个 action的 供应者
<item android:id="@+id/action_share"
    android:title="@string/share"
    app:showAsAction="ifRoom"
    app:actionProviderClass="android.support.v7.widget.ShareActionProvider"/>
actionProviderClass 这个属性标明了当前view是哪一种


 被折叠的 条评论
为什么被折叠?
被折叠的 条评论
为什么被折叠?
 到【灌水乐园】发言


