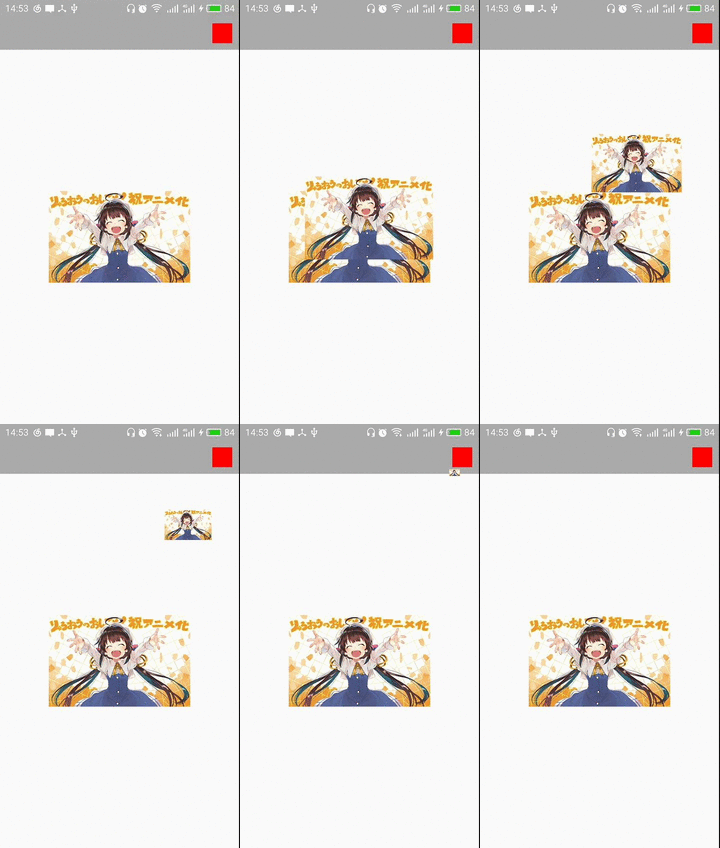
我们知道在Android动画里,子类的动画很难飞出父类的范围,然而项目中又会经常需要各种大范围动画特效,比如购物车特效,拖拽特效等等,攻城狮们给出的解决方案也是多种多样,今天我给大家带来的就是一种常见的方法,即在Activity的顶层添加一层RelativeLayout布局,此布局专用于执行动画特效,结合动画工厂类AnimalHelper,可以很方便的实现我们想要的全局动画特效,由于其位于布局的最顶层,且全局随用随到,于是我把这种方式形象的定义为"动画空中支援方式".
代码如下:
1, MainActivity.java
public class MainActivity extends Activity {

    @Override
    public void onCreate(Bundle savedInstanceState) {
        super.onCreate(savedInstanceState);
        setContentView(R.layout.activity_main);
        initView();
    }

    private void initView() {
    	final ImageView srcIv = (ImageView)findViewById(R.id.srcImageView);
    	final ImageView targetIv = (ImageView)findViewById(R.id.targetImageView);
    	srcIv.setOnClickListener(new OnClickListener() {

			@Override
			public void onClick(View v) {
				if (!AnimationHelper.isFlyAnimationWorking) {
					AnimationHelper.flyAnimation(MainActivity.this, srcIv, targetIv);
				}
			}
		});
    }

    public RelativeLayout getAnimationLayout() {
    	return (RelativeLayout)findViewById(R.id.animation_layout);
    }
}
我们给srcIv设置监听,点击后执行购物车动画,飞向targetIv,在监听里判断是否在滑动状态,已保持飞行过程中不响应点击事件
2, activity_main.xml
<?xml version="1.0" encoding="utf-8"?>
<FrameLayout xmlns:android="http://schemas.android.com/apk/res/android"
    android:layout_width="match_parent"
    android:layout_height="match_parent">

    <LinearLayout
    	android:layout_width="match_parent"
    	android:layout_height="match_parent"
    	android:orientation="vertical">

	    <LinearLayout
	    	android:layout_width="match_parent"
	    	android:layout_height="wrap_content"
	    	android:background="#AAAAAA"
	    	android:orientation="vertical">

		    <ImageView
		        android:id="@+id/targetImageView"
		    	android:layout_width="30dp"
		    	android:layout_height="30dp"
		    	android:layout_margin="10dp"
		    	android:layout_gravity="right"
		    	android:background="#FF0000"/>

	    </LinearLayout>

	    <LinearLayout
	    	android:layout_width="match_parent"
	    	android:layout_height="0dp"
	    	android:layout_weight="1"
	    	android:gravity="center"
	    	android:orientation="vertical">

		    <ImageView
		        android:id="@+id/srcImageView"
		    	android:layout_width="wrap_content"
		    	android:layout_height="wrap_content"
		    	android:src="@drawable/child"
		    	android:background="#00FF00"/>

        </LinearLayout>

    </LinearLayout>

    <RelativeLayout
        android:id="@+id/animation_layout"
    	android:layout_width="match_parent"
    	android:layout_height="match_parent"/>

</FrameLayout>
主布局里主要是2层,从下往上第一层是模拟标题栏布局,第二层就是我们的动画层.
3, AnimationHelper.java
public class AnimationHelper {

	/*用于记录是否有购物车动画在运行*/
	public static boolean isFlyAnimationWorking = false;

	/*
	 * 	activity:传入的带有动画层的Activity
	 * 	srcView:购物车动画的起点View
	 * 	targetView:购物车动画的终点View
	 */
	public static void flyAnimation(Activity activity, View srcView, final View targetView) {
		flyAnimation(activity, srcView, targetView, getBitmapFromView(srcView));
	}

	/*
	 * 	activity:传入的带有动画层的Activity
	 * 	srcView:购物车动画的起点View
	 * 	targetView:购物车动画的终点View
	 *  animationBitmap:显示在动画层上的位图数据
	 */
	public static void flyAnimation(Activity activity, View srcView, final View targetView, Bitmap animationBitmap) {
		if (srcView == null || targetView == null) {
			return;
		}

	    int[] srcXY = new int[2];
	    srcView.getLocationOnScreen(srcXY);
	    int[] targetXY = new int[2];
	    targetView.getLocationOnScreen(targetXY);

		Rect srcRect = new Rect(srcXY[0], srcXY[1], srcXY[0]+srcView.getWidth(), srcXY[1]+srcView.getHeight());
		Rect targetRect = new Rect(targetXY[0], targetXY[1], targetXY[0]+targetView.getWidth(), targetXY[1]+targetView.getHeight());

		flyAnimation(activity, srcRect, targetRect, animationBitmap);
	}

	/*
	 * 	activity:传入的带有动画层的Activity
	 * 	srcRect:购物车动画的起点矩形区域
	 * 	targetRect:购物车动画的终点矩形区域
	 *  animationBitmap:显示在动画层上的位图数据
	 */
	public static void flyAnimation(Activity activity, Rect srcRect, final Rect targetRect, Bitmap animationBitmap) {
		if (srcRect == null || targetRect == null) {
			return;
		}

	    int[] srcXY = new int[2];
	    srcXY[0] = srcRect.left;
	    srcXY[1] = srcRect.top;
	    /*获取系统动画层的RelativeLayout*/
	    final RelativeLayout animationRl= (RelativeLayout) ((MainActivity) activity).getAnimationLayout();
		final ImageView animationIv = new ImageView(activity);
		animationIv.setImageBitmap(animationBitmap);
		RelativeLayout.LayoutParams params = new RelativeLayout.LayoutParams(srcRect.width(), srcRect.height());
		params.leftMargin = srcXY[0];
		params.topMargin = srcXY[1]-getStatusBarHeight(activity);
		animationRl.addView(animationIv, params);

		/*等待setLayoutParams值完全生效*/
		animationIv.getViewTreeObserver().addOnGlobalLayoutListener(new ViewTreeObserver.OnGlobalLayoutListener() {

			@SuppressWarnings("deprecation") @Override
			public void onGlobalLayout() {
				animationIv.getViewTreeObserver().removeGlobalOnLayoutListener(this);

				int targetWidth = targetRect.width();
				int targetHeight = targetRect.height();
				int[] targetXY = new int[2];
				targetXY[0] = targetRect.left;
				targetXY[1] = targetRect.top;

				int animationIvWidth = animationIv.getWidth();
				int animationIvHeight = animationIv.getHeight();
				int[] animationIvXY = new int[2];
				animationIv.getLocationOnScreen(animationIvXY);

				AnimatorSet aSet = new AnimatorSet();
				ObjectAnimator scaleXOA = ObjectAnimator.ofFloat(animationIv, "scaleX", 1.0f, 0f);
				ObjectAnimator scaleYOA = ObjectAnimator.ofFloat(animationIv, "scaleY", 1.0f, 0f);
				ObjectAnimator translationXOA = ObjectAnimator.ofFloat(animationIv, "translationX", 0,
						targetXY[0] + targetWidth / 2.0f - (animationIvXY[0] + animationIvWidth / 2.0f));
				ObjectAnimator translationYOA = ObjectAnimator.ofFloat(animationIv, "translationY", 0,
						targetXY[1] + targetHeight / 2.0f - (animationIvXY[1] + animationIvHeight / 2.0f));
				aSet.playTogether(scaleXOA);
				aSet.playTogether(scaleYOA);
				aSet.playTogether(translationXOA);
				aSet.playTogether(translationYOA);
				aSet.setTarget(animationIv);
				aSet.setDuration(1000);
				aSet.addListener(new AnimatorListenerAdapter() {

					@Override
					public void onAnimationEnd(Animator animation) {
						/*位移缩放动画执行完毕*/
						new Handler().post(new Runnable() {
						     public void run() {
								animationRl.removeAllViews();
								isFlyAnimationWorking = false;
						     }
						});
					}
				});
				aSet.start();
				isFlyAnimationWorking = true;
			}
		});
	}

	/*获取视频的第一帧,用于对视频做动画,建议在异步线程中提前取短视频的第一帧用于飞出动画*/
    public static Bitmap getVideoFrame(String path) {
    	MediaMetadataRetriever media = new MediaMetadataRetriever();
    	try {
    		media.setDataSource(path);
    	} catch (IllegalArgumentException e) {
    		e.printStackTrace();
    	}
    	return media.getFrameAtTime();
    }

    /*获取状态栏的高度*/
	public static int getStatusBarHeight(Activity activity) {
	    Resources resources = activity.getResources();
	    int resourceId = resources.getIdentifier("status_bar_height", "dimen","android");
	    int height = resources.getDimensionPixelSize(resourceId);
	    return height;
	}

	/*获取View的截图*/
	public static Bitmap getBitmapFromView(View v) {
	    Bitmap b = Bitmap.createBitmap(v.getWidth(), v.getHeight(), Bitmap.Config.RGB_565);
	    Canvas c = new Canvas(b);
	    v.layout(v.getLeft(), v.getTop(), v.getRight(), v.getBottom());
	    Drawable bgDrawable = v.getBackground();
	    if (bgDrawable != null)
	        bgDrawable.draw(c);
	    else
	        c.drawColor(Color.WHITE);
	    v.draw(c);
	    return b;
	}

	/*清空动画层上的所有动画View*/
	public static void clearView(Activity activity) {
	    RelativeLayout animationRl= (RelativeLayout) ((MainActivity) activity).getAnimationLayout();
	    animationRl.removeAllViews();
	}
}
需要动画的时候只要呼叫AnimationHelper中的静态方法就可以了,就像空中支援一样,是不是很嗨?!
最终效果:
(写的不好, 还请多多包涵)
源码下载: AnimationAirHelper.tar.gz


 被折叠的 条评论
为什么被折叠?


