


一、添加依赖
创建 Core 对应 WebApplication ,选择项目类型为 Web Api ,需要引入 Nuget 包 ,Microsoft.AspNetCore.Authentication.JwtBearer 。

二、添加认证服务
在 ConfigureServices 中添加 AddAuthentication 函数,配置如下:
public void ConfigureServices(IServiceCollection services)
{
    services.AddControllers();
    //设置secret
    byte[] secret = System.Text.Encoding.UTF8.GetBytes("1234567890123456");
    //添加认证服务
    services.AddAuthentication(config => {
        //设置默认架构
        config.DefaultScheme = JwtBearerDefaults.AuthenticationScheme;
    })

    //添加Jwt自定义配置
    .AddJwtBearer(config => {
        //设置Token验证参数项
        config.TokenValidationParameters = new TokenValidationParameters
        {
            //认证秘钥
            IssuerSigningKey = new SymmetricSecurityKey(secret),
            //是否调用对 securityToken 签名的
            //Microsoft.IdentityModel.Tokens.SecurityKey 的验证
            ValidateIssuerSigningKey = true,

            //颁发者
            ValidIssuer = "ggcy",
            //是否验证颁发者
            ValidateIssuer = true,

            //受众
            ValidAudience = "Audience",
            //是否验证受众
            ValidateAudience = true,

            //是否验证凭证有效时限
            ValidateLifetime = true,
            ClockSkew = TimeSpan.FromMinutes(5)
        };
    });
}
上述代码中 TokenValidationParameters 中的认证秘钥 IssuerSigningKey 、颁发者 ValidIssuer 、受众 ValidAudience 中,认证秘钥作为必须验证项,后者两项,理论上也需要进行校验,提高数据到安全性,需要设置对应配置为启用状态。
AddAuthentication 对应源码结构如下:
public static class AuthenticationServiceCollectionExtensions
{
    public static AuthenticationBuilder AddAuthentication(this IServiceCollection services)
    {
        //
    }

    public static AuthenticationBuilder AddAuthentication(this IServiceCollection services, Action<AuthenticationOptions> configureOptions)
    {
        //
    }

    public static AuthenticationBuilder AddAuthentication(this IServiceCollection services, string defaultScheme)
    {
        //
    }
}
三、启用认证中间件
服务中,在介于路由中间件 UseRouting 与节点中间件 UseEndpoints 之间添加认证中间件 UseAuthentication,结构如下:
public void Configure(IApplicationBuilder app, IWebHostEnvironment env)
{
    //忽略

    app.UseRouting();

    //启用认证管道中间件
    app.UseAuthentication();

    app.UseAuthorization();

    app.UseEndpoints(endpoints =>
    {
        //
    });
}
四、添加认证接口
创建简单的获取凭证的 Api,创建一个控制器 TokenController,添加内容如下:
[ApiController]
[Route("[controller]")]
public class TokenController : ControllerBase
{
    [HttpGet]
    public object Get()
    {
        //秘钥
        byte[] secret = System.Text.Encoding.UTF8.GetBytes("1234567890123456");
        //生成秘钥
        var key = new SymmetricSecurityKey(secret);
        //生成数字签名的签名密钥、签名密钥标识符和安全算法
        var credential = new SigningCredentials(key, SecurityAlgorithms.HmacSha256);
        //构建JwtSecurityToken类实例
        var token = new JwtSecurityToken(
            //添加颁发者
            issuer: "ggcy",
            //添加受众
            audience: "Audience",
            //添加其他声明
            new List<Claim> {
                new Claim(ClaimTypes.Name,"zhangsan"),
                new Claim(ClaimTypes.Role,"admin")
            },
            expires: DateTime.UtcNow.AddMinutes(5)
            ,signingCredentials:credential);
        //签发token
        return Ok(new
        {
            access_token = new JwtSecurityTokenHandler().WriteToken(token)
        });
    }
}
其中 JwtSecurityToken 函数的参数 issuer 、 audience 服务配置时的对应内容 ValidIssuer、 ValidIssuer 保持一致。
五、测试效果
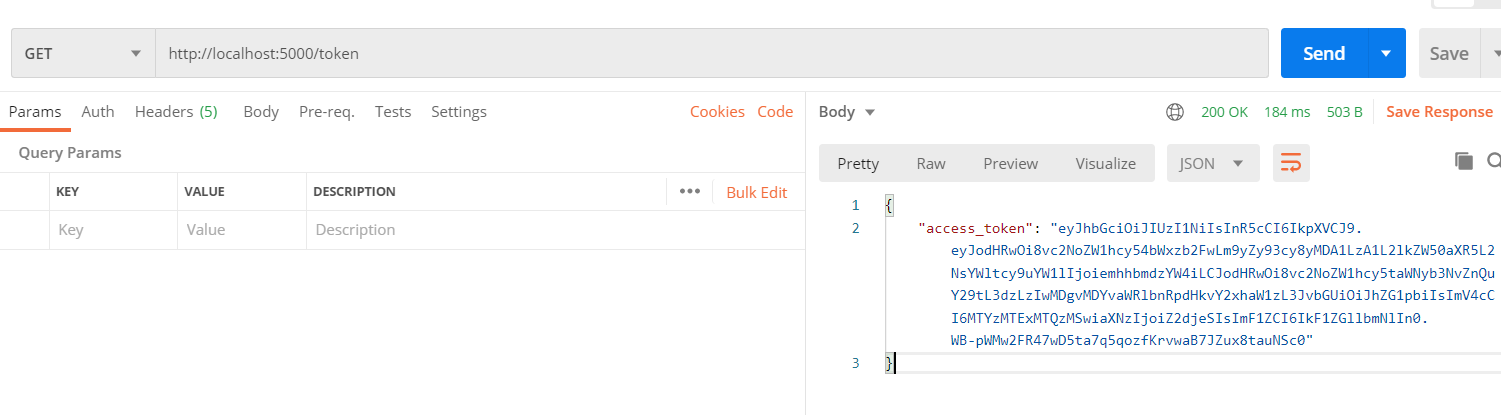
运行项目,使用 Postman 请求链接 http://localhost:5000/token,获取结果如下:
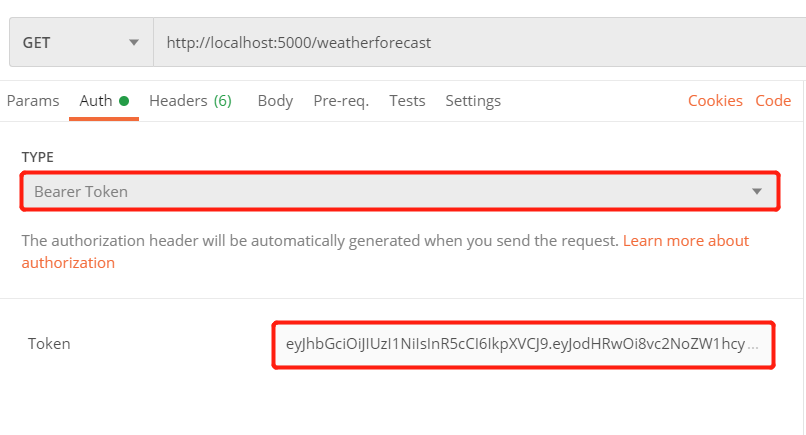
将获取到的 access_token 本地保留,请求获取 http://localhost:5000/weatherforecast ,链接数据时,在Auth页签中,选择添加类型为 Bearer Token 类型的认证方式,填入对应 access_token ,内容如下:
1、请求结果
1)成功
请求成功时,能够获取到对应的 api 请求结果,返回如下结果:

2)错误
当带有的 token 无效或者验证不通过时,响应结果常常是 401Unauthorized,具体反馈错误内容,从实际请求响应结果中进行查看。具体常见内容如下:
token 过期
HTTP/1.1 401 Unauthorized
Date: Wed, 08 Sep 2021 15:16:10 GMT
Server: Kestrel
Content-Length: 0
WWW-Authenticate: Bearer error="invalid_token", error_description="The token expired at '09/08/2021 15:06:28'"
token 不合法
HTTP/1.1 401 Unauthorized
Date: Wed, 08 Sep 2021 14:59:02 GMT
Server: Kestrel
Content-Length: 0
WWW-Authenticate: Bearer error="invalid_token", error_description="The signature is invalid"
issuer或 aduenice 内容与服务配置不匹配
HTTP/1.1 401 Unauthorized
Date: Wed, 08 Sep 2021 15:02:30 GMT
Server: Kestrel
Content-Length: 0
WWW-Authenticate: Bearer error="invalid_token", error_description="The issuer 'xxx' is invalid"
HTTP/1.1 401 Unauthorized
Date: Wed, 08 Sep 2021 15:04:28 GMT
Server: Kestrel
Content-Length: 0
WWW-Authenticate: Bearer error="invalid_token", error_description="The audience 'xxx' is invalid"
以上为 Asp.Net Core 使用 Jwt 基本操作和常见细节问题。
六、参考链接
[1]
https://www.cnblogs.com/ittranslator/p/asp-net-core-5-rest-api-authentication-with-jwt-step-by-step.html


 868
868


 被折叠的 条评论
为什么被折叠?
被折叠的 条评论
为什么被折叠?
 到【灌水乐园】发言


