我的简书同步发布:制作圆形图片,你会以下几种?
转载请注明出处:【huachao1001的专栏:http://blog.csdn.net/huachao1001】
说起圆角图片,相信每个人心中都有自己的圆角图片制作方法。但是你是否想知道,除了你所会的那几张方法以外,还什么什么方法制作圆形图片呢?我们一一学习~
1 XferMode
关于通过使用XferMode方式创建圆形图片,hongyang大神的《 Android Xfermode 实战 实现圆形、圆角图片 》有讲,我这里大致把思路总结一下,我们知道,XferMode主要是将2张图片合在一起,由用户自己决定是选中图片重叠的部分还是非重叠的部分,可以参考Android官方提供的图片:

我们可以选择DstIn的方式来绘制圆形图,即在我们的原图上面再画一个实心圆形图,首先,我们先写一个函数,用于生成实心圆形的Bitmap:
    private Bitmap mCircleBitmap;

    //生成一个实心圆形Bitmap,这个Bitmap宽高要与当前的View的宽高相同
    private Bitmap getCircleBitmap() {
        if (mCircleBitmap == null) {
            mCircleBitmap = Bitmap.createBitmap(2 * mRadius, 2 * mRadius,
                    Config.ARGB_8888);
            Canvas canvas = new Canvas(mCircleBitmap);

            mPaint.reset();
            mPaint.setStyle(Style.FILL);
            canvas.drawCircle(mRadius, mRadius, mRadius, mPaint);
        }
        return mCircleBitmap;
    }
- 1
- 2
- 3
- 4
- 5
- 6
- 7
- 8
- 9
- 10
- 11
- 12
- 13
- 14
- 15
- 16
然后,再将这个Bitmap“盖”到用户设置的图片上面:
//将两张图片以XferMode(DST_IN)的方式组合到一张照片中
    private Bitmap combineBitmap(Drawable drawable, Bitmap maskBitmap) {
        int width = drawable.getIntrinsicWidth();
        int height = drawable.getIntrinsicHeight();
        // 将drawable转bitmap
        Bitmap bitmap = Bitmap.createBitmap(width, height, Config.ARGB_8888);
        Canvas canvas = new Canvas(bitmap);
        //将图片自动放缩到View的宽高,即2倍的半径
        drawable.setBounds(0, 0, mRadius*2, mRadius*2);
        drawable.draw(canvas);

        // 先将XferMode设置好,然后将盖在上面的bitmap绘制出来
        mPaint.reset();
        mPaint.setXfermode(xfermode);
        canvas.drawBitmap(maskBitmap, 0, 0, mPaint);
        mPaint.setXfermode(null);

        return bitmap;
    }
- 1
- 2
- 3
- 4
- 5
- 6
- 7
- 8
- 9
- 10
- 11
- 12
- 13
- 14
- 15
- 16
- 17
- 18
- 19
最后再将最终的Bitmap绘制到画板上面:
@Override
    protected void onDraw(Canvas canvas) {
        //获取设置的src图片
        Drawable drawable = getDrawable();
        //获取盖在src上面的实心圆形Bitmap
        Bitmap circleBitmap = getCircleBitmap();

        //两张图片以XferMode(DST_IN)的方式组合
        Bitmap bitmap = combineBitmap(drawable, circleBitmap);

        //将最终的bitmap画到画板上面
        canvas.drawBitmap(bitmap, 0, 0, mPaint);

    }
- 1
- 2
- 3
- 4
- 5
- 6
- 7
- 8
- 9
- 10
- 11
- 12
- 13
- 14
- 15
看看完整的代码吧~
package com.hc.circleimage;

import android.content.Context;
import android.graphics.Bitmap;
import android.graphics.Bitmap.Config;
import android.graphics.Canvas;
import android.graphics.Paint;
import android.graphics.Paint.Style;
import android.graphics.PorterDuff;
import android.graphics.PorterDuffXfermode;
import android.graphics.Xfermode;
import android.graphics.drawable.Drawable;
import android.util.AttributeSet;
import android.widget.ImageView;

public class XfermodeCircleImage extends ImageView {
    private int mRadius;
    private Paint mPaint;
    private Xfermode xfermode;
    private Bitmap mCircleBitmap;

    public XfermodeCircleImage(Context context) {
        super(context);
        init();
    }

    public XfermodeCircleImage(Context context, AttributeSet attrs) {
        super(context, attrs);
        init();
    }

    private void init() {
        mPaint = new Paint();
        xfermode = new PorterDuffXfermode(PorterDuff.Mode.DST_IN);
    }

    @Override
    protected void onMeasure(int widthMeasureSpec, int heightMeasureSpec) {
        super.onMeasure(widthMeasureSpec, heightMeasureSpec);
        int width = getMeasuredWidth();
        int height = getMeasuredHeight();

        if (width > height) {
            mRadius = height / 2;
        } else {
            mRadius = width / 2;
        }

        setMeasuredDimension(mRadius * 2, mRadius * 2);
    }

    //生成一个实心圆形Bitmap,这个Bitmap宽高要与当前的View的宽高相同
    private Bitmap getCircleBitmap() {
        if (mCircleBitmap == null) {
            mCircleBitmap = Bitmap.createBitmap(2 * mRadius, 2 * mRadius,
                    Config.ARGB_8888);
            Canvas canvas = new Canvas(mCircleBitmap);

            mPaint.reset();
            mPaint.setStyle(Style.FILL);
            canvas.drawCircle(mRadius, mRadius, mRadius, mPaint);
        }
        return mCircleBitmap;
    }

    //将两张图片以XferMode(DST_IN)的方式组合到一张照片中
    private Bitmap combineBitmap(Drawable drawable, Bitmap maskBitmap) {
        int width = drawable.getIntrinsicWidth();
        int height = drawable.getIntrinsicHeight();
        // 将drawable转bitmap
        Bitmap bitmap = Bitmap.createBitmap(width, height, Config.ARGB_8888);
        Canvas canvas = new Canvas(bitmap);
        //将图片自动放缩到View的宽高,即2倍的半径
        drawable.setBounds(0, 0, mRadius*2, mRadius*2);
        drawable.draw(canvas);

        // 先将XferMode设置好,然后将盖在上面的bitmap绘制出来
        mPaint.reset();
        mPaint.setXfermode(xfermode);
        canvas.drawBitmap(maskBitmap, 0, 0, mPaint);
        mPaint.setXfermode(null);

        return bitmap;
    }

    @Override
    protected void onDraw(Canvas canvas) {
        //获取设置的src图片
        Drawable drawable = getDrawable();
        //获取盖在src上面的实心圆形Bitmap
        Bitmap circleBitmap = getCircleBitmap();

        //两张图片以XferMode(DST_IN)的方式组合
        Bitmap bitmap = combineBitmap(drawable, circleBitmap);

        //将最终的bitmap画到画板上面
        canvas.drawBitmap(bitmap, 0, 0, mPaint);

    }

}
- 1
- 2
- 3
- 4
- 5
- 6
- 7
- 8
- 9
- 10
- 11
- 12
- 13
- 14
- 15
- 16
- 17
- 18
- 19
- 20
- 21
- 22
- 23
- 24
- 25
- 26
- 27
- 28
- 29
- 30
- 31
- 32
- 33
- 34
- 35
- 36
- 37
- 38
- 39
- 40
- 41
- 42
- 43
- 44
- 45
- 46
- 47
- 48
- 49
- 50
- 51
- 52
- 53
- 54
- 55
- 56
- 57
- 58
- 59
- 60
- 61
- 62
- 63
- 64
- 65
- 66
- 67
- 68
- 69
- 70
- 71
- 72
- 73
- 74
- 75
- 76
- 77
- 78
- 79
- 80
- 81
- 82
- 83
- 84
- 85
- 86
- 87
- 88
- 89
- 90
- 91
- 92
- 93
- 94
- 95
- 96
- 97
- 98
- 99
- 100
- 101
- 102
- 103
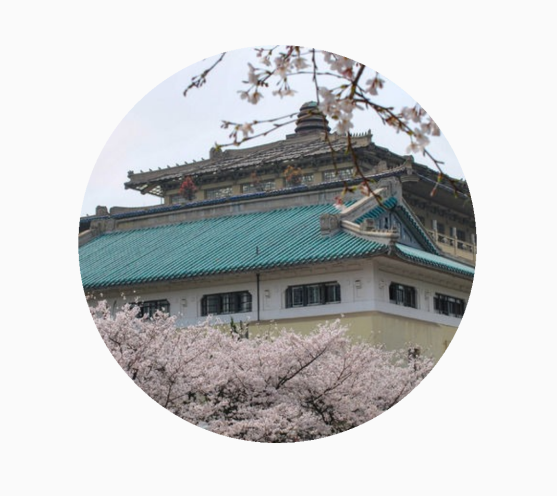
对自定义View不熟的童鞋可以参考《自定义View,有这一篇就够了》 。最后看看效果吧~
2 BitmapShader
同样的,hongyang大神也写过关于BitmapShader方式绘制圆形图片《 Android BitmapShader 实战 实现圆形、圆角图片 》,我们同样来个简单总结,Shader翻译成中文叫“着色器”,而我们的BitmapShader是Shader的子类,BitmapShader有啥作用呢,它可以根据你设置的方式(下面介绍)将图片铺满你所选的区域,有哪几种方式“铺”呢?有以下几种:
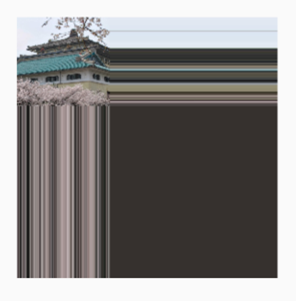
(1)CLAMP:拉伸,在x方向上是图片的最后一列像素重复平铺,而y方向是最后一行往下拉伸
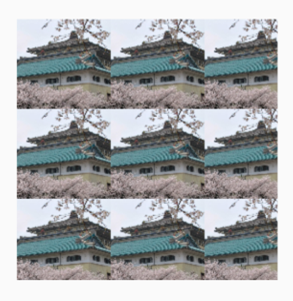
(2)REPEAT: 重复,很容易理解,图片重复平铺过去
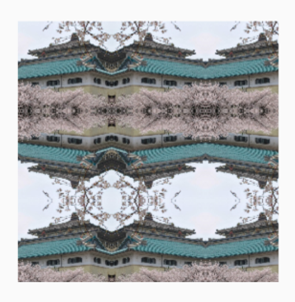
(3)MIRROR:镜像,就是将图片翻转
我们来看几张图片感受一下:
CLAMP的方式:

REPEAT方式

MIRROR方式
使用BitmapShader制作圆形图片的方法非常简单,只需通过Bitmap构造出一个BitmapShader,并将这个BitmapShader设置到当前的Paint当中,用这个Paint绘制一个圆就可以了,先看看onDraw函数:
    @Override
    protected void onDraw(Canvas canvas) {
        // 将Drawable转为Bitmap
        Bitmap bmp = drawableToBitmap(getDrawable());
        // 通过Bitmap和指定x,y方向的平铺方式构造出BitmapShader对象
        BitmapShader mBitmapShader = new BitmapShader(bmp, TileMode.CLAMP,
                TileMode.CLAMP);
        // 将BitmapShader设置到当前的Paint对象中
        mPaint.setShader(mBitmapShader);
        // 绘制出一个圆
        canvas.drawCircle(mRadius, mRadius, mRadius, mPaint);

    }
- 1
- 2
- 3
- 4
- 5
- 6
- 7
- 8
- 9
- 10
- 11
- 12
- 13
其中,drawableToBitmap是将Drawable对象转为Bitmap对象:
private Bitmap drawableToBitmap(Drawable drawable) {
    if (drawable instanceof BitmapDrawable) {
        return ((BitmapDrawable) drawable).getBitmap();
    } else {
        int width = drawable.getIntrinsicWidth();
        int height = drawable.getIntrinsicHeight();
        Bitmap bitmap = Bitmap.createBitmap(width, height,
                Bitmap.Config.ARGB_8888);
        Canvas canvas = new Canvas(bitmap);
        drawable.setBounds(0, 0, width, height);
        drawable.draw(canvas);
        return bitmap;
    }
}
- 1
- 2
- 3
- 4
- 5
- 6
- 7
- 8
- 9
- 10
- 11
- 12
- 13
- 14
- 15
我们看看完整代码吧
package com.hc.circleimage;

import android.content.Context;
import android.graphics.Bitmap;
import android.graphics.BitmapShader;
import android.graphics.Canvas;
import android.graphics.Paint;
import android.graphics.Shader.TileMode;
import android.graphics.drawable.BitmapDrawable;
import android.graphics.drawable.Drawable;
import android.util.AttributeSet;
import android.widget.ImageView;

public class ShaderCircleImage extends ImageView {

    private int mRadius;
    private Paint mPaint;

    public ShaderCircleImage(Context context) {
        super(context);
        init();
    }

    public ShaderCircleImage(Context context, AttributeSet attrs) {
        super(context, attrs);
        init();
    }

    private void init() {
        mPaint = new Paint();
    }

    @Override
    protected void onMeasure(int widthMeasureSpec, int heightMeasureSpec) {
        super.onMeasure(widthMeasureSpec, heightMeasureSpec);
        int width = getMeasuredWidth();
        int height = getMeasuredHeight();

        if (width > height) {
            mRadius = height / 2;
        } else {
            mRadius = width / 2;
        }

        setMeasuredDimension(mRadius * 2, 2 * mRadius);
    }

    private Bitmap drawableToBitmap(Drawable drawable) {
        if (drawable instanceof BitmapDrawable) {
            return ((BitmapDrawable) drawable).getBitmap();
        } else {
            int width = drawable.getIntrinsicWidth();
            int height = drawable.getIntrinsicHeight();
            Bitmap bitmap = Bitmap.createBitmap(width, height,
                    Bitmap.Config.ARGB_8888);
            Canvas canvas = new Canvas(bitmap);
            drawable.setBounds(0, 0, mRadius*2, mRadius*2);
            drawable.draw(canvas);
            return bitmap;
        }
    }

    @Override
    protected void onDraw(Canvas canvas) {
        // 将Drawable转为Bitmap
        Bitmap bmp = drawableToBitmap(getDrawable());
        // 通过Bitmap和指定x,y方向的平铺方式构造出BitmapShader对象
        BitmapShader mBitmapShader = new BitmapShader(bmp, TileMode.CLAMP,
                TileMode.CLAMP);
        // 将BitmapShader设置到当前的Paint对象中
        mPaint.setShader(mBitmapShader);
        // 绘制出一个圆
        canvas.drawCircle(mRadius, mRadius, mRadius, mPaint);

    }
}
- 1
- 2
- 3
- 4
- 5
- 6
- 7
- 8
- 9
- 10
- 11
- 12
- 13
- 14
- 15
- 16
- 17
- 18
- 19
- 20
- 21
- 22
- 23
- 24
- 25
- 26
- 27
- 28
- 29
- 30
- 31
- 32
- 33
- 34
- 35
- 36
- 37
- 38
- 39
- 40
- 41
- 42
- 43
- 44
- 45
- 46
- 47
- 48
- 49
- 50
- 51
- 52
- 53
- 54
- 55
- 56
- 57
- 58
- 59
- 60
- 61
- 62
- 63
- 64
- 65
- 66
- 67
- 68
- 69
- 70
- 71
- 72
- 73
- 74
- 75
- 76
- 77
- 78
最后是要看看效果的,但是效果跟前面的效果是一样的,我们还是看一下吧~
3 ClipPath
前面的2中方法我们都见过,我们在看另一种方法吧ClipPath,或许你听说过Canvas对象的clipPath方法,或者是用过这个方法,可是有没有想过这个方法也可以用来绘制圆形图片呢?
我们看看代码吧:
@Override
protected void onDraw(Canvas canvas) {
    // 将Drawable转为Bitmap
    Bitmap bmp = drawableToBitmap(getDrawable());
    Path path = new Path();
    //按照逆时针方向添加一个圆
    path.addCircle(mRadius, mRadius, mRadius, Direction.CCW);
    //先将canvas保存
    canvas.save();
    //设置为在圆形区域内绘制
    canvas.clipPath(path);
    //绘制Bitmap
    canvas.drawBitmap(bmp, 0, 0, mPaint);
    //恢复Canvas
    canvas.restore();
}
- 1
- 2
- 3
- 4
- 5
- 6
- 7
- 8
- 9
- 10
- 11
- 12
- 13
- 14
- 15
- 16
是不是如此简单?过于简单,注释已经写明各行代码的意思啦!drawableToBitmap函数在上面一节解释过啦,这里就不再重复解释了,看看完整代码吧:
package com.hc.circleimage;

import android.content.Context;
import android.graphics.Bitmap;
import android.graphics.Canvas;
import android.graphics.Paint;
import android.graphics.Path;
import android.graphics.Path.Direction;
import android.graphics.drawable.BitmapDrawable;
import android.graphics.drawable.Drawable;
import android.util.AttributeSet;
import android.widget.ImageView;

public class ClipCircleImage extends ImageView {
    private int mRadius;
    private Paint mPaint;

    public ClipCircleImage(Context context) {
        super(context);
        init();
    }

    public ClipCircleImage(Context context, AttributeSet attrs) {
        super(context, attrs);
        init();
    }

    private void init() {
        mPaint = new Paint();
    }

    @Override
    protected void onMeasure(int widthMeasureSpec, int heightMeasureSpec) {
        super.onMeasure(widthMeasureSpec, heightMeasureSpec);
        int width = getMeasuredWidth();
        int height = getMeasuredHeight();

        if (width > height) {
            mRadius = height / 2;
        } else {
            mRadius = width / 2;
        }

        setMeasuredDimension(mRadius * 2, 2 * mRadius);
    }

    private Bitmap drawableToBitmap(Drawable drawable) {
        if (drawable instanceof BitmapDrawable) {
            return ((BitmapDrawable) drawable).getBitmap();
        } else {
            int width = drawable.getIntrinsicWidth();
            int height = drawable.getIntrinsicHeight();
            Bitmap bitmap = Bitmap.createBitmap(width, height,
                    Bitmap.Config.ARGB_8888);
            Canvas canvas = new Canvas(bitmap);
            drawable.setBounds(0, 0, mRadius*2, mRadius*2);
            drawable.draw(canvas);
            return bitmap;
        }
    }

    @Override
    protected void onDraw(Canvas canvas) {
        // 将Drawable转为Bitmap
        Bitmap bmp = drawableToBitmap(getDrawable());
        Path path = new Path();
        //按照逆时针方向添加一个圆
        path.addCircle(mRadius, mRadius, mRadius, Direction.CCW);
        //先将canvas保存
        canvas.save();
        //设置为在圆形区域内绘制
        canvas.clipPath(path);
        //绘制Bitmap
        canvas.drawBitmap(bmp, 0, 0, mPaint);
        //恢复Canvas
        canvas.restore();
    }
}
- 1
- 2
- 3
- 4
- 5
- 6
- 7
- 8
- 9
- 10
- 11
- 12
- 13
- 14
- 15
- 16
- 17
- 18
- 19
- 20
- 21
- 22
- 23
- 24
- 25
- 26
- 27
- 28
- 29
- 30
- 31
- 32
- 33
- 34
- 35
- 36
- 37
- 38
- 39
- 40
- 41
- 42
- 43
- 44
- 45
- 46
- 47
- 48
- 49
- 50
- 51
- 52
- 53
- 54
- 55
- 56
- 57
- 58
- 59
- 60
- 61
- 62
- 63
- 64
- 65
- 66
- 67
- 68
- 69
- 70
- 71
- 72
- 73
- 74
- 75
- 76
- 77
- 78
- 79
- 80
效果虽然跟上面两节是一样的,但是我们还是看一下效果吧~
4 Alpha提取
现在我们看看一个很少见的方法,这个方法也是我不怎么推荐的方法,它是通过将一个张图的Alpha通道值设置到另外一张图中,啥意思呢?就是说,将两张图片的透明度设置为一模一样!看上去很酷的样子~,虽然不推荐,但是我们可以去学习一下嘛~可能某些项目需求中只能用这种方法去实现呢?
//获取圆形Bitmap
private Bitmap getCircleMask() {
    Bitmap bitmap = Bitmap.createBitmap(mRadius * 2, mRadius * 2,
            Config.ARGB_8888);
    Canvas canvas = new Canvas(bitmap);
    canvas.drawCircle(mRadius, mRadius, mRadius, mPaint);
    return bitmap;
}
//将rgbBitmap的RGB值与alphaBitmap的alpha值组成新的Bitmap
private Bitmap getBitmap(Bitmap rgbBitmap, Bitmap alphaBitmap) {
    Bitmap newBmp = Bitmap.createBitmap(mRadius * 2, mRadius * 2,
            Config.ARGB_8888);

    int alphaMask = 0xFF << 24;
    int rgbMask = ~alphaMask;
    for (int x = 0; x < 2 * mRadius; x++) {
        for (int y = 0; y < 2 * mRadius; y++) {
            int color = (rgbMask & rgbBitmap.getPixel(x, y))
                    | (alphaMask & alphaBitmap.getPixel(x, y));
            newBmp.setPixel(x, y, color);
        }

    }
    return newBmp;
}

@Override
protected void onDraw(Canvas canvas) {
    // 将Drawable转为Bitmap
    Bitmap rgbBitmap = drawableToBitmap(getDrawable());
    //提取alpha值通道
    Bitmap alphaBitmap = getCircleMask().extractAlpha();
    //将最终图片绘制出来
    canvas.drawBitmap(getBitmap(rgbBitmap, alphaBitmap), 0, 0, mPaint);
}
- 1
- 2
- 3
- 4
- 5
- 6
- 7
- 8
- 9
- 10
- 11
- 12
- 13
- 14
- 15
- 16
- 17
- 18
- 19
- 20
- 21
- 22
- 23
- 24
- 25
- 26
- 27
- 28
- 29
- 30
- 31
- 32
- 33
- 34
- 35
我们可以看到,通过两个for循环来新建合成一个新的图片,这个效率非常的低下!!!!!实际中不推荐采用这种方式,当然了,我们可以通过使用RenderScript并行处理,最终效率也不会比前面3种方法差!最终效果我就不贴上来了,依然是与前面几种方法是相同的
最后,把源码献上:http://download.csdn.net/detail/huachao1001/9541176


 1万+
1万+

 被折叠的 条评论
为什么被折叠?


