


文章目录
一、自动配置
1.主程序类
@SpringBootApplication标注在某个类上说明这个类是springboot的主配置类,springboot就应该运行这个类的main方法启动springboot应用。
@Target({ElementType.TYPE})
@Retention(RetentionPolicy.RUNTIME)
@Documented
@Inherited
@SpringBootConfiguration
@EnableAutoConfiguration
@ComponentScan(
    excludeFilters = {@Filter(
    type = FilterType.CUSTOM,
    classes = {TypeExcludeFilter.class}
), @Filter(
    type = FilterType.CUSTOM,
    classes = {AutoConfigurationExcludeFilter.class}
)}
)
@SpringBootConfiguration 表示:
这是springboot的配置类,表示这是一个springboot的配置类,@Configuration配置类上来标注这个注解,配置类等于配置文件,配置类也是容器中的一个组件@component
@EnableAutoConfiguration
开启自动配置功能,以前需要配置的东西,springboot帮我们自动配置。
@AutoConfigurationPackage 自动配置包,本身的含义就是将主配置类SpringBootApplication标注类的所在包及下面子包下面的所有组件扫描的spring容器中。
@Import({AutoConfigurationPackage .Registrar.class})spring的底层注解,给容器中导入的一个组件,导入的组件由AutoConfigurationPackage .Registrar.class这个类来指定。
@Import({EnableAutoConfigurationImportSelector.class}) 给容器中导入组件
EnableAutoConfigurationImportSelector:导入哪些组件的选择器
将所需要的组件以全类名的方式返回,这些组件就会被添加到容器中。会给容器中导入非常多的自动配置类,叫做xxxAutoConfiguration,自动配置类的作用就是给容器中导入这个场景所需要的所有组件,并配置好这些组件。
有了自动配置类。免去了我们手动编写配置注入功能组件等工作。
List<String> configurations = this.getCandidateConfigurations(annotationMetadata, attributes);

List<String> configurations = SpringFactoriesLoader.loadFactoryNames(EnableAutoConfiguration.class, classLoader);
springboot 在启动的时候从类路径下的META-INF/spring.factories中获取EnableAutoConfiguration指定的值,将这些值作为自动配置类导入到容器中,自动配置类就生效了,帮我们进行自动配置工作。
J2EE的整体解决方案和自动配置都在spring-boot-autoconfigure-1.5.9.RELEASE.jar中
2.使用向导快速创建Spring Boot
spring Initializer快速创建,idea都支持使用spring的项目创建向导快速创建一个springboot项目
选择我们需要的模块,向导会联网创建springboot项目。
默认生成的springboot项目:
主程序已经生成好了,我们只需要写自己的业务逻辑
resource文件目录结构中有
static:保存所有的静态资源,js css images
templates:保存所有的模板页面(默认使用jar包的方式使用嵌入式的Tomcat,默认不支持jsp页面),可以使用模板引擎(freemaker,thymeleaf)
application.properties :springboot应用的配置文件,可以修改一些默认设置,比如修改端口,server.port=8081
3.配置文件
springboot会使用一个全局的配置文件,文件名称固定的:application.properties 和application.yml
配置文件的作用就是来修改springboot的自动配置的默认值,springboot在底层都给我们自动配置好
YAML(YAML Ain‘t Markup Language)
YAML A Markup Language:是一个标记语言
YAML isn‘t Markup Language:不是一个标记语言
标记语言:以前的配置文件,大多都是xx.xml文件。
YAML:是以数据为中心,比json,xml更适合做配置文件
YAML配置示例
server:
  port: 8081
以前XML配置
<server>
	<port>8081</port>
</server>
4.YAML语法
1.基本语法
k:(空格)v:表示一对键值对(空格必须有)
以空格的缩进来控制层级关系,只要是左对齐的一列数据,都是同一个层级的
属性和值也是大小写敏感
2.值的写法
字面量:普通的值(数字,字符串,布尔)
k: v:字面直接来写;
字符串默认不用加上单引号或者双引号
“”:双引号;不会转义字符串里面的特殊字符;特殊字符会作为本身想表示的意思
name: “zhangsan \n lisi”:输出:zhangsan 换行 lisi
‘’:单引号;会转义特殊字符,特殊字符最终只是一个普通的字符串数据
name: ‘zhangsan \n lisi’:输出:zhangsan \n lisi
3.对象、Map(属性和值)(键值对):
k: v:在下一行来写对象的属性和值的关系,注意缩进,对象还是k: v的方式
friends:
lastName: zhangsan
age: 20
行内写法:
friends: {lastName: zhangsan,age: 18}
4.数组(List、set)
用- 空格值表示数组中的一个元素
pets:
 ‐ cat
 ‐ dog
 ‐ pig
行内写法
pets: [cat,dog,pig]
5.配置文件值的获取
 person:
  lastName: 张三
  age: 20
  boss: true
  date: 2021/12/12
  maps: {k1: 香蕉,k2: 青菜}
  lists:
    - lisi
    - zhangsan
  dog:
    name: 小狗
    age: 3
package com.ming.bean;


import org.springframework.boot.context.properties.ConfigurationProperties;
import org.springframework.stereotype.Component;

import java.util.Date;
import java.util.List;
import java.util.Map;

/**
 * 将配置文件yml中的每一个属性的值,映射到这个组件中
 * @ ConfigurationProperties:告诉springboot将本类中的所有属性和配置文件中相关的配置进行绑定
 * prefix = "person":配置文件中哪个下面的所有属性进行一一映射
 * 只有是容器中的组件,才能使用容器提供的功能,加入@Component
 *
 */
@Component
@ConfigurationProperties(prefix = "person")
public class Person {
    private String lastName;
    private Integer age;
    private Boolean boss;
    private Date birth;

    private Map<String,Object> maps;

    private List<Object> lists;

    private Dog dog;
}


package com.ming;

import com.ming.bean.Person;
import org.junit.Test;
import org.junit.runner.RunWith;
import org.springframework.beans.factory.annotation.Autowired;
import org.springframework.boot.test.context.SpringBootTest;
import org.springframework.test.context.junit4.SpringRunner;

/**
 * springboot 单元测试
 *
 */
@SpringBootTest
@RunWith(SpringRunner.class)
public class SpringBootProConfigApplicationTests {

    @Autowired
    Person person;

    @Test
    public void contextLoads(){
        System.out.println(person);
    }

}
java.lang.NoSuchMethodError: org.springframework.util.Assert.state(ZLjava/util/function/Supplier;)V jar包版本不对,解决方法版本一致
导入配置文件处理器,配置文件绑定就会有提示
        <!--导入配置文件处理器,配置文件绑定就会有提示-->
        <dependency>
            <groupId>org.springframework.boot</groupId>
            <artifactId>spring-boot-configuration-processor</artifactId>
            <optional>true</optional>
        </dependency>
6.配置文件编码问题
同样在properties文件中也可以获取到,但是出现配置文件乱码
解决:第一种

7.@configurationProperties和@value区别
除过用@configurationProerties从配置文件中获取值,还可以用@value注解获取
- bean 里面的value和@value注解是一样的
- @ component注解的作用是把Bean加入到容器中,xml中bean标签的作用也是加入到容器中
<bean class="Person">
	<property name="lastName" value="字面量/${key}从环境变量、配置文件中获取值的/#{SpEl}">  </property>
</bean>
package com.ming.bean;


import org.springframework.beans.factory.annotation.Value;
import org.springframework.boot.context.properties.ConfigurationProperties;
import org.springframework.boot.context.properties.EnableConfigurationProperties;
import org.springframework.stereotype.Component;

import java.util.Date;
import java.util.List;
import java.util.Map;

/**
 * 将配置文件yml中的每一个属性的值,映射到这个组件中
 * @ ConfigurationProperties:告诉springboot将本类中的所有属性和配置文件中相关的配置进行绑定
 * prefix = "person":配置文件中哪个下面的所有属性进行一一映射
 * 只有是容器中的组件,才能使用容器提供的功能,加入@Component
 *
 */
@Component
//@ConfigurationProperties(prefix = "person")
public class Person {
    /**
     * <bean class="Person">
     *     <property name="lastName" value=“字面量/${key}从环境变量、配置文件中获取值的/#{SpEl}”></property>
     * </bean>
     * bean 里面的value和@value注解是一样的
     * @ component注解的作用是把Bean加入到容器中,xml中bean标签的作用也是加入到容器中
     */
    @Value("${person.last-name}")
    private String lastName;
    @Value("#{11*2}")
    private Integer age;
    @Value("true")
    private Boolean boss;
    private Date birth;

    private Map<String,Object> maps;

    private List<Object> lists;

    private Dog dog;


}
区别:

配置文件是yml或properties都能获取到值
如果说,我们只是在某个业务逻辑中需要获取一下配置文件中的某项值,使用@Value
如果说,我们专门编写了一个javaBean来和配置文件进行映射,我们就直接使用@ConfigurationProperties
8.@PropertySource&@ImportResource&@Bean
@ConfigurationProperties 默认是从全局配置文件中获取值
@PropertySource:加载指定的配置文件
@Component
//@ConfigurationProperties(prefix = "person")
@PropertySource(value = "classpath:person.properties")
public class Person {
    /**
     * <bean class="Person">
     *     <property name="lastName" value=“字面量/${key}从环境变量、配置文件中获取值的/#{SpEl}”></property>
     * </bean>
     * bean 里面的value和@value注解是一样的
     * @ component注解的作用是把Bean加入到容器中,xml中bean标签的作用也是加入到容器中
     */
    @Value("${person.last-name}")
    private String lastName;
    @Value("#{11*2}")
    private Integer age;
    @Value("true")
    private Boolean boss;
    private Date birth;

    private Map<String,Object> maps;

    private List<Object> lists;

    private Dog dog;
@ImportResource:导入spring容器中的配置文件,让配置文件里面的内容生效
/**
 * @SpringBootApplication 来标注一个主程序类,说明是一个Springboot应用
 */
@ImportResource(locations = "{classpath:bean.xml}")//导入Spring的配置文件让其生效
@SpringBootApplication
public class HelloWorldMainApplication {

    public static void main(String[] args) {
        //spring应用启动起来
        SpringApplication.run(HelloWorldMainApplication.class,args);
    }
}
不来编写spring的配置文件,spring boot推荐使用全注解的配置方式
<?xml version="1.0" encoding="UTF-8"?>
<beans xmlns="http://www.springframework.org/schema/beans"
       xmlns:xsi="http://www.w3.org/2001/XMLSchema-instance"
       xsi:schemaLocation="http://www.springframework.org/schema/beans http://www.springframework.org/schema/beans/spring-beans.xsd">
    <bean id="helloService" class="com.ming.service.HelloService"></bean>
</beans>
Spring Boot里面没有spring配置文件,我们自己编写的配置文件不能自动识别,想让spring的配置文件生效,加载进来,就用@ImportResource 标注在一个配置类上
Spring Boot 给容器中添加组件的方式,推荐使用全注解的方式
1.配置类@configuration-----spring的配置文件
2.@Bean给容器中添加组件
package com.ming.config;

import com.ming.service.HelloService;
import org.springframework.context.annotation.Bean;
import org.springframework.context.annotation.Configuration;

/**
 * @ Configuration作用:指明当前类是一个配置类,就是来替代之前的spring配置文件
 * 以前在配置文件中是用<benan></benan>添加组件的
 */
@Configuration
public class MyAppConfig {

    /**
     * 将方法的返回值添加到容器中,容器中这个组件默认的id就是方法名
     * @return
     */
    @Bean
    public HelloService helloService(){
        System.out.println("配置类给容器中添加组件了...");
        return new HelloService();
    }
}
9.配置文件占位符
1、随机数
${random.value}、${random.int}、${random.long}
${random.int(10)}、${random.int[1024,65536]}
2、占位符获取之前配置的值,如果没有可以是用:指定默认值
person.last‐name=张三${random.uuid}
person.age=${random.int}
person.birth=2017/12/15
person.boss=false
person.maps.k1=v1
person.maps.k2=14
person.lists=a,b,c
person.dog.name=${person.last‐name}_dog
#如果没有可以是用:指定默认值
person.dog.name=${person.hello:hello}_dog
person.dog.age=1
10.Profile多环境支持
1、多Profile文件
我们在主配置文件编写的时候,文件名可以是 application-{profile}.properties/yml
默认使用application.properties的配置;
比如: application-dev.properties dev开发环境 、 application-prod.properties prod生成环境
2、yml支持多文档块方式
server:
  port: 8081
#激活生成环境prod
spring:
  profiles:
    active: prod
‐‐‐
server:
  port: 8083
spring:
  profiles: dev
‐‐‐
server:
  port: 8084
spring:
  profiles: prod  #指定属于哪个环境
3、激活指定profile
1、在配置文件中指定 spring.profiles.active=dev
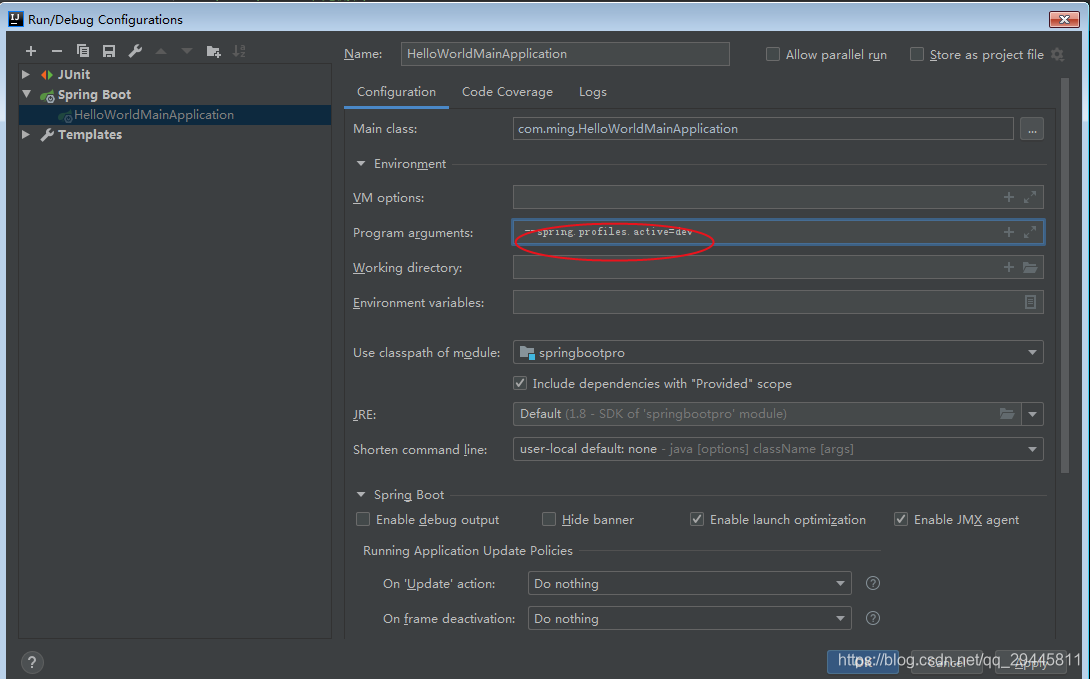
2、命令行:
java -jar spring-boot-02-config-0.0.1-SNAPSHOT.jar --spring.profiles.active=dev;
可以直接在测试的时候,配置传入命令行参数,如下图
3、虚拟机参数 -Dspring.profiles.active=dev

11.配置文件的加载位置
springboot 启动会扫描以下位置的application.properties或者application.yml文件作为Spring boot的默认配置文
件
–file:./config/
–file:./
–classpath:/config/
–classpath:/
优先级由高到底,高优先级的配置会覆盖低优先级的配置
配置项目的访问路径:server.context-path=/myboot
SpringBoot会从这四个位置全部加载主配置文件;互补配置
我们还可以通过spring.config.location来改变默认的配置文件位置
项目打包好以后,我们可以使用命令行参数的形式,启动项目的时候来指定配置文件的新位置;指定配置文件和默认加载的这些配置文件共同起作用形成互补配置
12.外部配置加载顺序
SpringBoot也可以从以下位置加载配置; 优先级从高到低;高优先级的配置覆盖低优先级的配置,所有的配置会形成互补配置
1.命令行参数
所有的配置都可以在命令行上进行指定
java -jar spring-boot-02-config-02-0.0.1-SNAPSHOT.jar --server.port=8087 --server.context-path=/abc
多个配置用空格分开; --配置项=值
2.来自java:comp/env的JNDI属性
3.Java系统属性(System.getProperties())
4.操作系统环境变量
5.RandomValuePropertySource配置的random.*属性值
由jar包外向jar包内进行寻找;
优先加载带profile
6.jar包外部的application-{profile}.properties或application.yml(带spring.profile)配置文件
7.jar包内部的application-{profile}.properties或application.yml(带spring.profile)配置文件
再来加载不带profile
8.jar包外部的application.properties或application.yml(不带spring.profile)配置文件
9.jar包内部的application.properties或application.yml(不带spring.profile)配置文件
10.@Configuration注解类上的@PropertySource
11.通过SpringApplication.setDefaultProperties指定的默认属性
二、自动配置原理
1.自动配置原理
1.spring boot启动的时候加载主配置类,开启了自动配置功能@EnableAutoConfiguration
2.EnableAutoConfiguration 作用:
利用@EnableAutoConfigurationImportSelector给容器中导入一些组件
可以查看导入的组件是selectImports()方法的内容
List configurations = this.getCandidateConfigurations(annotationMetadata, attributes);获取候选的配置
List configurations = SpringFactoriesLoader.loadFactoryNames(this.getSpringFactoriesLoaderFactoryClass(), this.getBeanClassLoader());作用:就是从类路径下得到一个资源classLoader.getResources(“META-INF/spring.factories”) ,扫描所有jar包类路径下META-INF/spring.factories,把扫描到的这些文件的内容包装成一个properties对象,从properties中获取到EnableAutoConfiguration.classs类(类名)对应的值,然后把他们添加到容器中。
将类路径下META-INF/spring.factories配置的所有EnableAutoConfiguration的值加入到了容器中
每一个这样的xxxAutoConfiguration类都是容器中的一个组件,都加入到容器中,用他们来做自动配置。
3.每一个自动配置类,进行自动配置功能
4.以HttpEncodingAutoConfiguration(http自动编码配置)为例解释自动配置原理
@Configuration//表示这是一个配置类,以前编写的配置文件一样,也可以给容器中添加组件
@EnableConfigurationProperties({HttpEncodingProperties.class})//启用configurationproperties功能,将配置文件中的值和HttpEncodingProperties类绑定起来,并把HttpEncodingProperties加到容器中。
@ConditionalOnWebApplication//spring底层conditional注解根据不同的条件,如果满足指定的条件,整个配置类的配置才会生效,判断当前应用是否web应用。
@ConditionalOnClass({CharacterEncodingFilter.class})//判断当前项目有没有这个类CharacterEncodingFilter,这个是springmvc中解决乱码的,以前是配置在web.xml中的
@ConditionalOnProperty(
    prefix = "spring.http.encoding",
    value = {"enabled"},
    matchIfMissing = true
    //判断配置文件中是否存在spring.http.encoding,如果不存在,判断也是成立的
    //也就是说配置文件中不配置spring.http.encoding=true这个配置文件也是默认生效的
)
public class HttpEncodingAutoConfiguration {
	//他已经和springboot的配置文件映射了
	private final HttpEncodingProperties properties;

	//只有一个有参构造器的情况下,参数的值会从容器中拿
   public HttpEncodingAutoConfiguration(HttpEncodingProperties properties) {
       this.properties = properties;
    }

   @Bean//给容器中添加一个组件filter,这个组件的某些值需要从properties中获取
    @ConditionalOnMissingBean({CharacterEncodingFilter.class})
    public CharacterEncodingFilter characterEncodingFilter() {
        CharacterEncodingFilter filter = new OrderedCharacterEncodingFilter();
        filter.setEncoding(this.properties.getCharset().name());
        filter.setForceRequestEncoding(this.properties.shouldForce(Type.REQUEST));
        filter.setForceResponseEncoding(this.properties.shouldForce(Type.RESPONSE));
        return filter;
    }
}
根据当前不同的条件判断,决定这个配置类是否生效?
一旦这个配置类生效,这个配置类就会给容器中添加各种组件,这些组件的属性是从对应的proerties类中获取的,这些类的每一个属性是和properties配置文件绑定的
5.所有在配置文件中能配置的属性都是在XXXProperties类中封装着,配置文件能配置什么就可以参照某一个功能所对应的属性类
@ConfigurationProperties( prefix = "spring.http.encoding")//从配置文件中获取指定的值和bean属性进行绑定
public class HttpEncodingProperties {
    public static final Charset DEFAULT_CHARSET = Charset.forName("UTF-8");
精髓:
1.springboot启动会加载大量的自动配置类
2.我们需要的功能有没有springboot默认写好的默认配置类
3.我们再来看自动配置类中到底配置了哪些组件,只要我们用到的组件有了就不需要配置了
4.给容器中的自动配置类添加组件的时候,会从properties类中获取某些属性。我们就可以从配置文件中指定这些属性的值。
xxxAutoConfiguration:自动配置类
给容器中添加组件
XXXProperties:封装配置文件中相关的属性。
2.@Conditional派生注解
@Conditional派生注解,Spring注解版原生的@Conditional
作用:必须是@Conditional指定的条件成立,才给容器中添加组件,配置配里面的所有内容才生效
自动配置类必须在一定的条件下才能生效
我们怎么知道哪些自动配置类生效了?
可以在配置文件中比如properties中写上debug=true开启springboot的debug模式,我们可以在控制台打印自动配置报告,我们就可以很方便的知道哪些自动配置类生效
自动配置报告生效的配置:
=========================
AUTO-CONFIGURATION REPORT
=========================


Positive matches:
-----------------

   DispatcherServletAutoConfiguration matched:
      - @ConditionalOnClass found required class 'org.springframework.web.servlet.DispatcherServlet'; @ConditionalOnMissingClass did not find unwanted class (OnClassCondition)
      - @ConditionalOnWebApplication (required) found StandardServletEnvironment (OnWebApplicationCondition)

   DispatcherServletAutoConfiguration.DispatcherServletConfiguration matched:
      - @ConditionalOnClass found required class 'javax.servlet.ServletRegistration'; @ConditionalOnMissingClass did not find unwanted class (OnClassCondition)
      - Default DispatcherServlet did not find dispatcher servlet beans (DispatcherServletAutoConfiguration.DefaultDispatcherServletCondition)
没有生效的配置:
Negative matches:
-----------------

   ActiveMQAutoConfiguration:
      Did not match:
         - @ConditionalOnClass did not find required classes 'javax.jms.ConnectionFactory', 'org.apache.activemq.ActiveMQConnectionFactory' (OnClassCondition)

   AopAutoConfiguration:
      Did not match:
         - @ConditionalOnClass did not find required classes 'org.aspectj.lang.annotation.Aspect', 'org.aspectj.lang.reflect.Advice' (OnClassCondition)


 403
403


 被折叠的 条评论
为什么被折叠?
被折叠的 条评论
为什么被折叠?
 到【灌水乐园】发言


