


目录
大纲
Linux系统目录结构
Linux命令快速入门体验
Linux命令使用技巧
Linux命令格式详解
Linux目录操作命令
Linux复制和移动命令
Linux文件操作命令
Linux查找命令
压缩解压命令
Vim文本编辑
Vim介绍 命令
vim安装 命令
Vim语法 命令
Linux系统目录结构
查看Linux系统目录结构
使用Windows系统时用户通常是使用鼠标点击进行文件或文件夹的创建、删除等操作,在Linux系统中是通过敲命令来控制系统的,Windows系统和Linux系统的目录结构不同,我们需要先熟悉Linux系统的目录结构。
登录系统后,在当前命令窗口中输入以下命令:
ls /
效果如下:
连接主机...
连接主机成功
Last login: Thu Jul 14 12:18:46 2022 from 192.168.100.2
[root@localhost ~]# ls /
bin  boot  dev  etc  home  lib  lib64  media  mnt  opt  proc  root  run  sbin  srv  sys  tmp  usr  var
[root@localhost ~]#

在Linux中没有盘符概念,它是树状目录结构,最顶层是根目录,效果如下:
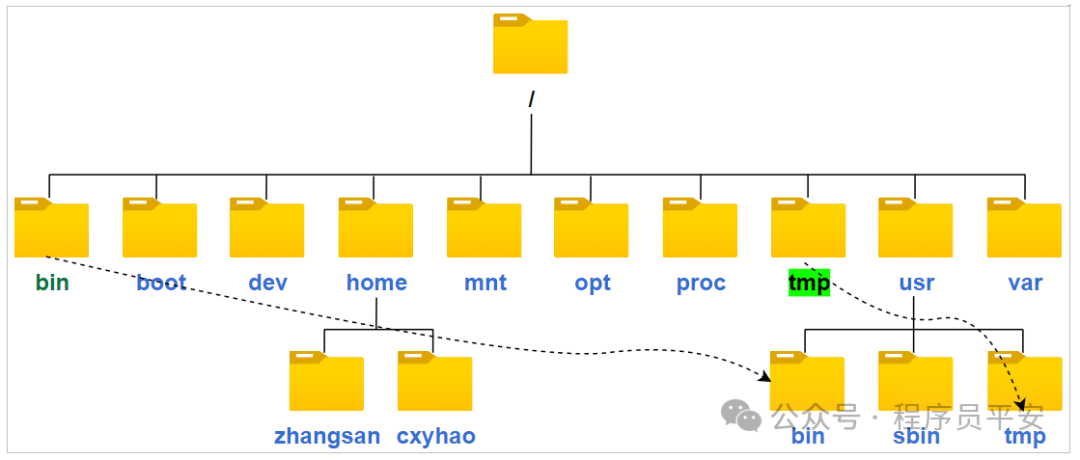
Linux系统不同颜色的含义
| 颜色 | 说明 |
|---|---|
| **白色 ** | 普通文件 |
| 深蓝色 | 文件夹(目录) |
| 青色 | 链接,类似于Windows下快捷方式 |
| 绿色 | 可执行文件 |
| 红色 | 压缩包 |
| 橙色 | 设备文件 |
Linux常用目录说明
| 目录 | 说明 |
|---|---|
| root | 系统管理员的主目录,其它用户不能访问的。 |
| home | 普通用户的主目录,每个用户都有一个自己的目录,一般是以用户的账号命名的,如上图中的 zhangsan 和 cyxpa。 |
| bin | binary (二进制文件) 的缩写,这个目录存放着最经常使用的命令。 |
| sbin | superuser binary (超级用户的二进制文件) 的缩写,存放的是系统管理员使用的系统管理程序。 |
| etc | etcetera(等等) 的缩写,这个目录用来存放所有的系统管理所需要的配置文件和子目录。 |
| usr | unix shared resources(共享资源) 的缩写,用户的很多应用程序和文件都放在这个目录下,类似于 windows 下的 program files 目录。 |
| opt | optional(可选) 的缩写,给主机额外安装软件所存放的目录,比如安装一个MySQL数据库可以放到这个目录下。 |
| mnt | 用户临时挂载文件系统在该目录下面,我们可以将USB设备挂载在 /mnt下,进入该目录就可以查看USB设备里的内容。 |
| media | Linux系统会自动识别一些设备例如:U盘、光驱等等,当识别后会把识别的设备挂载到这个目录下。 |
| dev | device(设备) 的缩写,该目录下存放的是 Linux 的外部设备,在 Linux 中访问设备的方式和访问文件的方式是相同的。 |
Linux命令快速入门体验
这里主要介绍几个常用的命令,先来感受一下Linux命令的操作方式,后面再详细学习Linux的命令,下面列出几个使用频率很高的几个命令。
命令:**ls**
说明:
ls:查看当前目录的内容,当前是在/root目录中,说明/root目录中有anaconda-ks.cfg这个文件。
ls /:查看
/根目录的内容。
效果:
[root@localhost ~]# pwd
/root
[root@localhost ~]# ls
anaconda-ks.cfg
[root@localhost ~]# ls /
bin  boot  dev  etc  home  lib  lib64  media  mnt  opt  proc  root  run  sbin  srv  sys  tmp  usr  var
命令:**mkdir**
说明:
mkdir:创建目录(make directory)
mkdir test01:创建test01目录
效果:
[root@localhost ~]# pwd
/root
[root@localhost ~]# ls
anaconda-ks.cfg
[root@localhost ~]# mkdir test01
[root@localhost ~]# mkdir test02
[root@localhost ~]# ls
anaconda-ks.cfg  test01  test02
[root@localhost ~]#
命令:**cd**
说明:
cd:切换目录(change directory)
cd test01:切换到test01目录
cd /:切换到根目录
效果:
[root@localhost ~]# cd test01
[root@localhost test01]# pwd
/root/test01
[root@localhost test01]# cd /
[root@localhost /]# pwd
/
[root@localhost /]# cd /root
Linux命令使用技巧
Linux命令技巧说明
使用Linux命令时,可以使用以下几个技巧:
-
Tab键自动补全。 -
连续两次
Tab键,给出操作提示。 -
使用
上下箭头快速调出使用过的命令。 -
使用
clear命令或者Ctrl+l快捷键实现清屏。
Linux命令技巧演示
-
Tab键自动补全。
-
连续两次
Tab键,给出操作提示。
-
使用
上下箭头快速调出使用过的命令。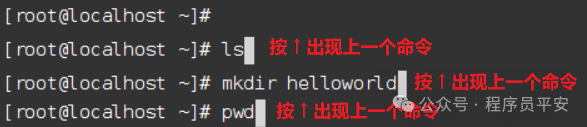
-
使用
clear命令或者Ctrl+l快捷键实现清除屏幕内容。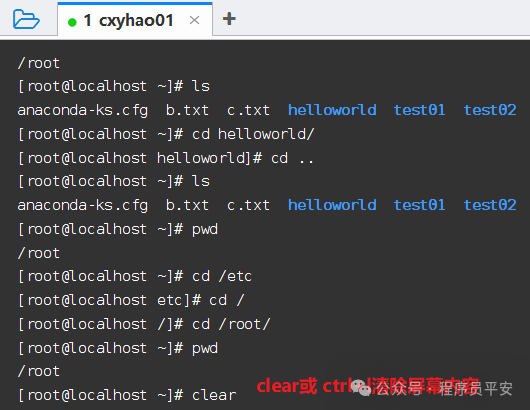
清除屏幕后: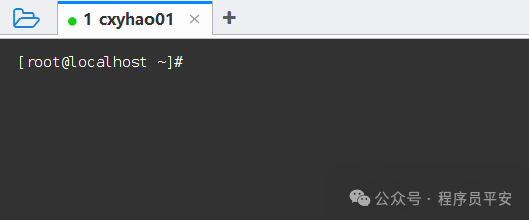
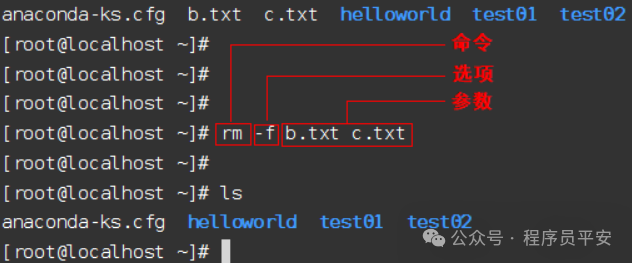
Linux命令格式详解
命令 [选项] [参数]
说明:
[选项]:可用来对命令进行控制,也可以省略。
[参数]:传给命令的参数,可以是零个、一个或者多个。
注意:
[]:代表可选
命令名、选项、参数之间有空格进行分隔
通过man 命令进入General Commands Manual命令手册,可以查看命令支持的选项和参数,效果如下:
[root@localhost ~]# man rm
NAME
       rm - 移除文件或者目录

总览
       rm [options"]file...

POSIX(Portable Operating System Interface 可移植的操作系统接口) 选项:
       [-fiRr]

GNU 选项 (最短格式):
       [-dfirvR][--help][--version][--]

描述
       rm移除每个给定的文件。默认情况下,它不能移除目录。但是当给定了-r或者-R选          项时,在指定目录之下的整个目录树都会被移除(而且对通过`rm          -r'能够移除的目
       录树深度是没有限制的)。当文件路径末端部分只有.和..时会出错(因此可用`rm -r .*'之类来避免这些不愉快的诧异)。

       如果给定了-i选项,或者如果一个文件不可写,  而且标准输入是终端,又没有给定-f选项,那么rm会提   示用户是否要删除该文件,它写一个问题到stderr并且从stdin读入一个应答。
       如果应答是否定的,该文件将被跳过。

POSIX选项
       -f     不作确认提示。不会写出诊断信息。 如果错误只是文件不存在,那么不会生成一个状态返回的错误。
在General Commands Manual命令手册界面可以按回车下翻,按 q 退出命令手册。
示例效果:
Linux目录操作命令
pwd 命令
说明:
pwd:查看当前工作目录(print work directory)
/root:表示当前的工作目录是 /root
操作示例:
[root@localhost ~]# pwd
/root
[root@localhost ~]#
ls 命令
命令说明:
作用: 显示指定目录下的内容
语法: ls [选项] [文件名...]
选项:
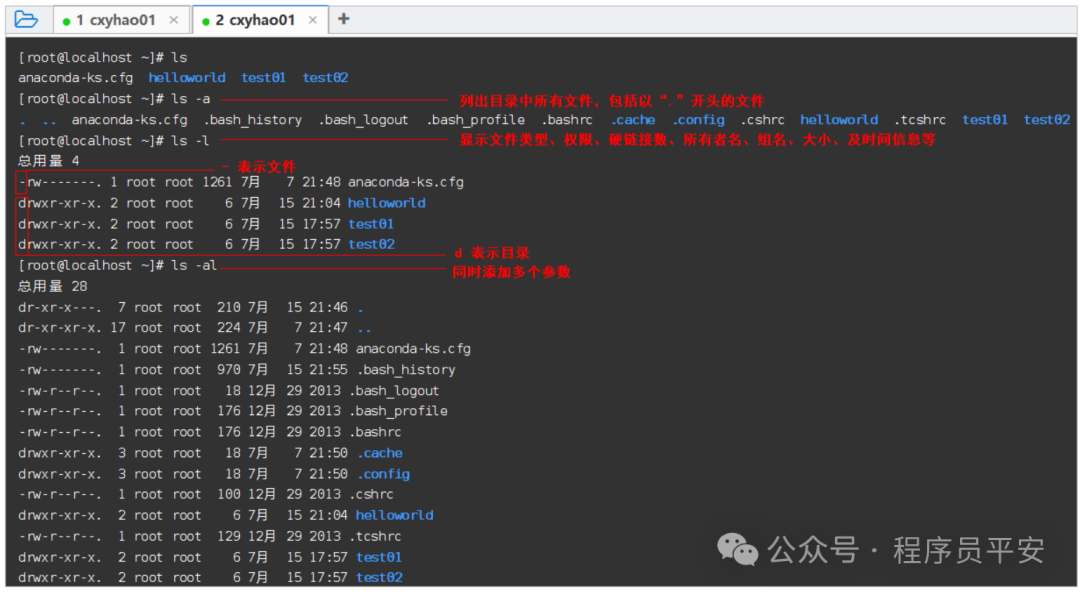
-a 列出目录中所有文件,包括以“.”开头的文件。
-l 除每个文件名外,增加显示文件类型、权限、硬链接数、所有者名、组名、大小、及时间信息等。
-R 递归列出遇到的子目录。
常见用法:
ls -a 列出当前目录中所有文件,包括以“.”开头的文件。
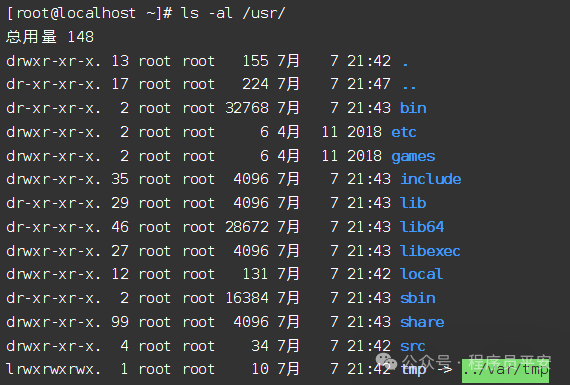
ls -al /usr 列出/usr目录下所有文件及显示文件类型、权限、硬链接数、所有者名、组名、大小、及时间信息等。
ll 由于我们使用ls命令时经常需要加入-l选项,所以Linux为ls -l命令提供了一种简写方式,即ll
操作示例:

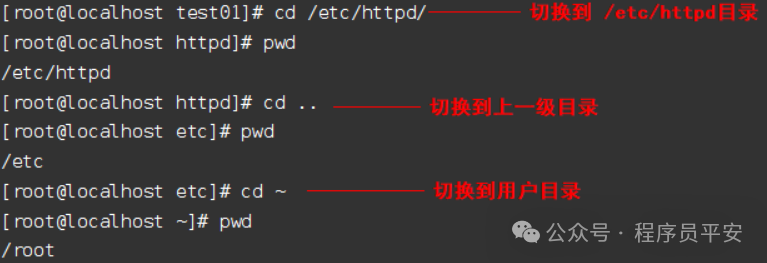
cd 命令
命令说明:
作用: 切换当前工作目录
语法: cd [目录]

特殊目录:
    .   表示当前所在的目录
    ..  表示当前目录的上级目录
    -   退到上一个目录
    ~   表示用户的目录     root用户的目录为: /root   普通用户的目录为: /home/用户名

常见用法:
    cd  ..      切换到当前目录的上级目录
    cd  ~       切换到用户的home目录
    cd /etc/sysconfig/  切换到/etc/sysconfig/目录
操作示例:
mkdir 命令
命令说明:
作用: 创建目录
语法: mkdir [选项] 目录...
选项:
-p 为所给出的目录建立丢失了的父目录
常见用法:
mkdir java 在当前目录下创建java目录
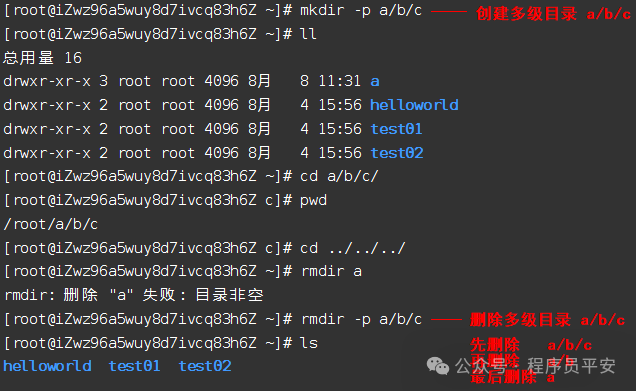
mkdir -p /opt/hello/java 在/opt/hello目录下创建java目录,父目录不存在也会创建
操作示例:

rmdir 命令
命令说明:
作用: 删除空目录
语法: rmdir [选项] 目录...
选项:
-p 如果目录由多个路径名组成,从最后一个路径名开始依次删除,直到所有的路径名都被删完。例如:命令'rmdir -p a/b/c'按 照'rmdir a/b/c'; 'rmdir a/b'; 'rmdir a'的顺序删除目录
常见用法:
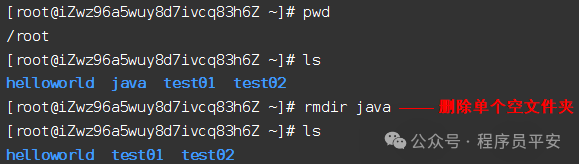
rmdir java 删除当前目录下的java目录
rmdir -p a/b/c 相当于'rmdir a/b/c'、'rmdir a/b'、'rmdir a'
操作示例:
rm 命令
命令说明:
作用: 移除文件或者目录
语法: rm [选项] 文件或目录...
选项:
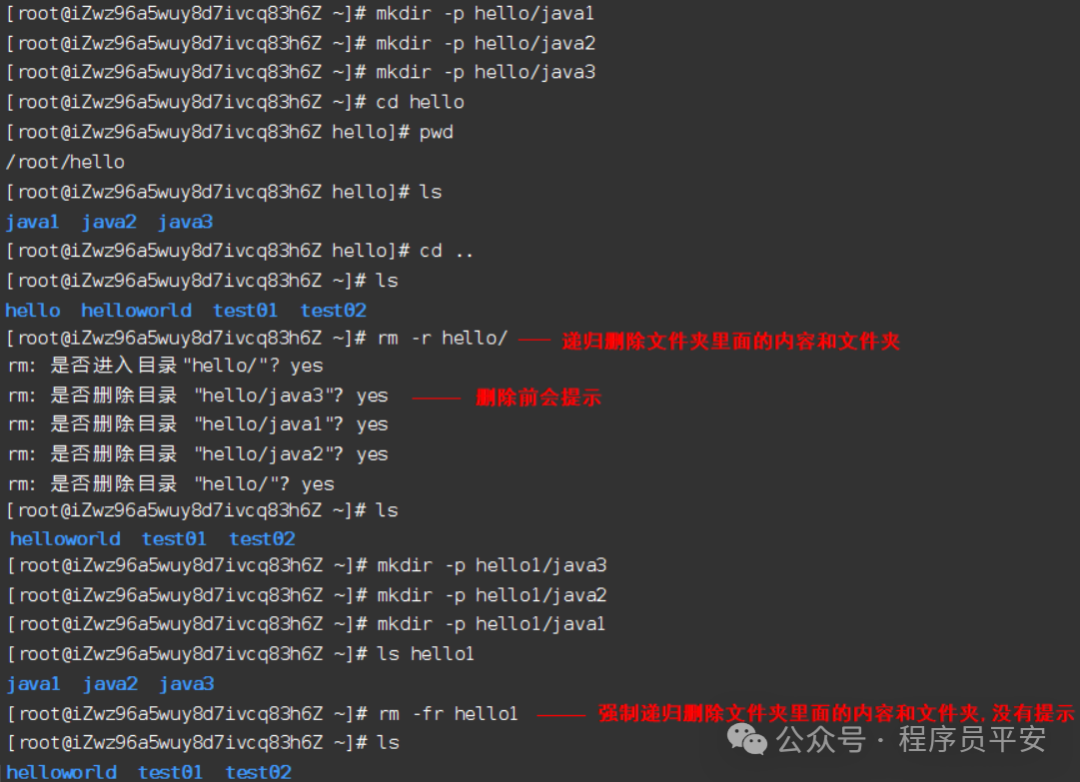
-r 或者 -R 递归地移除目录树
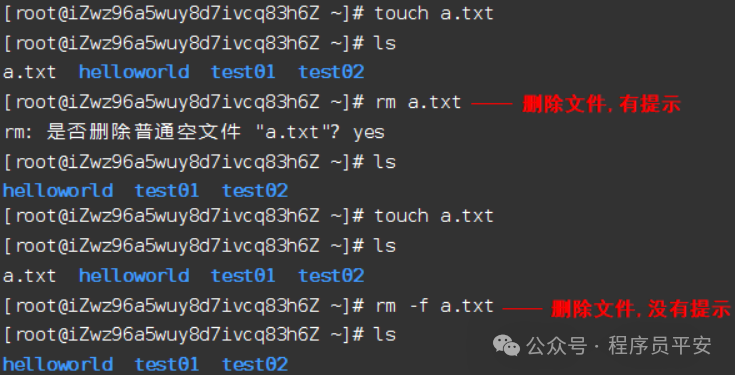
-f 忽略不存在的文件,并且从不向用户提示
-i 提示是否移除每个文件。如果回答是否定的,文件将被跳过
常见用法:
rm a.txt 删除a.txt文件,删除前会提示确认
rm -r hello/ 删除hello文件和所有内容,删除前会提示确认
rm -fr hello1/ 删除hello1文件和所有内容,删除不需要确认
rm -fr test* 删除任何以test开头的内容
操作示例:
Linux复制和移动命令
cp 命令
命令说明:
作用: 复制文件和目录
语法: cp [选项] 文件路径 文件路径
cp [选项] 文件...目录
选项:
-p 为所给出的目录建立丢失了的父目录
注意: 如果最后一个命令参数为一个已经存在的目录名,cp会将每一个源文件复制到那个目录下(维持原文件名). 如果所给的参数只有两个文件名.它把前一个文件复制到后一个文件上
常见用法:
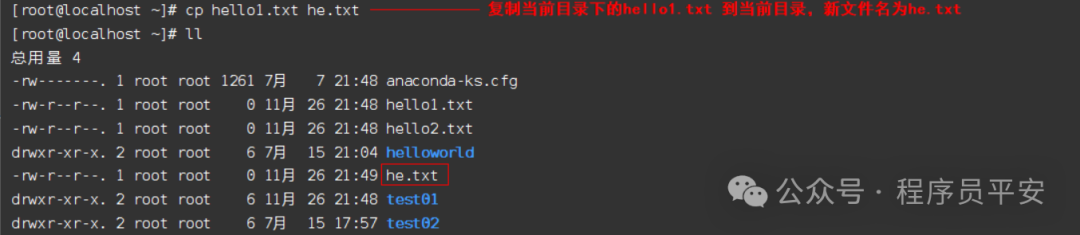
cp hello1.txt he.txt 复制当前目录下的hello1.txt 到当前目录,新文件名为he.txt
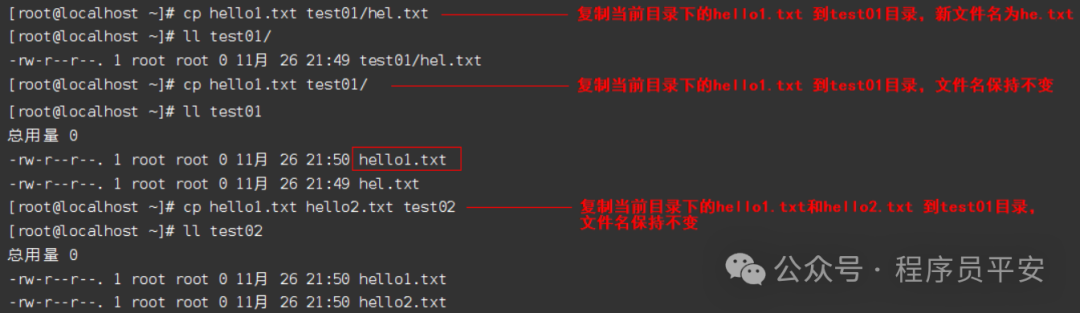
cp hello1.txt test01/hel.txt 复制当前目录下的hello1.txt 到test01目录,新文件名为he.txt
cp hello1.txt test01/ 复制当前目录下的hello1.txt 到test01目录,文件名保持不变
cp hello1.txt hello2.txt test02 复制当前目录下的hello1.txt和hello2.txt 到test01目录,文件名保持不变
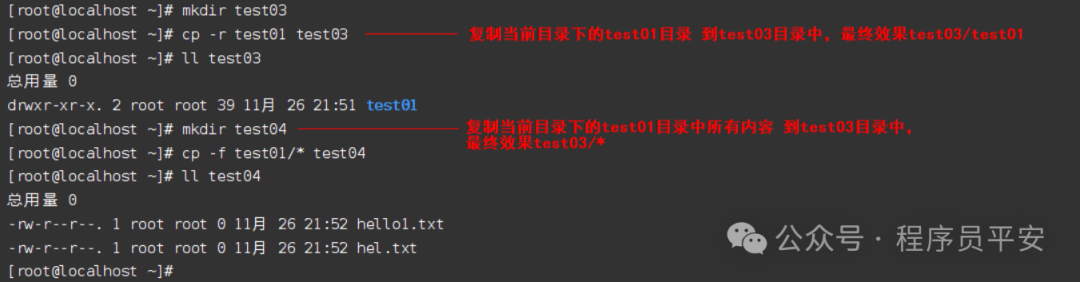
cp -r test01 test03 复制当前目录下的test01目录 到test03目录中,最终效果test03/test01
cp -f test01/* test04 复制当前目录下的test01目录中所有内容 到test03目录中,最终效果test03/*
操作示例:
mv 命令
命令说明:
作用: 移动或改名
语法: mv [选项] 源文件 目标文件
mv [选项] 源文件... 目录
选项:
-v, --verbose 说明完成了什么
常见用法:
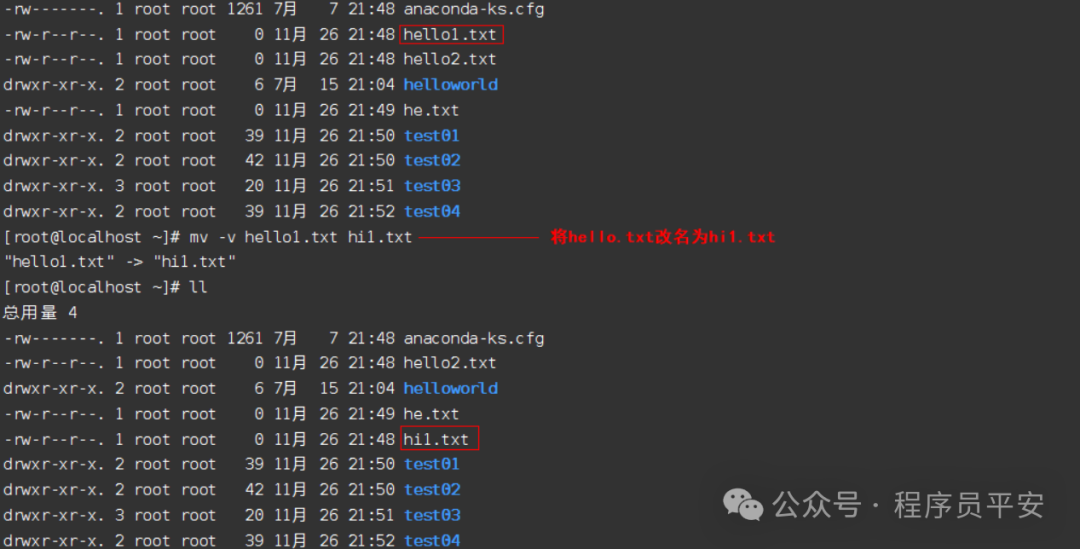
mv hello1.txt hi1.txt 将hello.txt改名为hi1.txt
mv hi1.txt test05/ 将文件hi1.txt移动到test05目录中
mv hello2.txt test05/hello3.txt 将hello2.txt移动到test05目录中,并改名为hello3.txt
mv test01/ test05/ test05目录存在,将test01目录移动到test05目录中
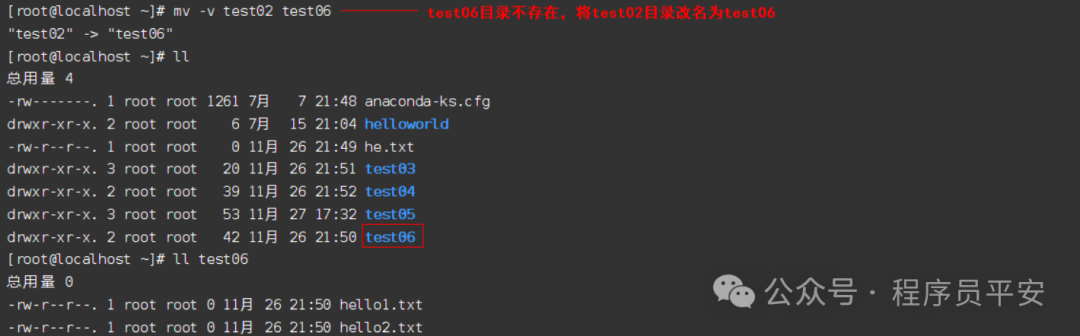
mv test02 test06 test06目录不存在,将test02目录改名为test06
操作示例:

![]()

Linux文件操作命令
touch 命令
命令说明:
touch:如果文件不存在,创建文件
touch a.txt:创建a.txt
touch b.txt c.txt:一次创建多个文件b.txt和c.txt
操作示例:
[root@localhost ~]# ls
anaconda-ks.cfg  test01  test02
[root@localhost ~]# touch a.txt
[root@localhost ~]# touch b.txt c.txt
[root@localhost ~]# ls
anaconda-ks.cfg  a.txt  b.txt  c.txt  test01  test02
cat 命令
命令说明:
作用: 连接文件并在标准输出上输出
语法: cat [选项] [文件列表]...
选项:
-n, --number 给所有输出行编号
常见用法:
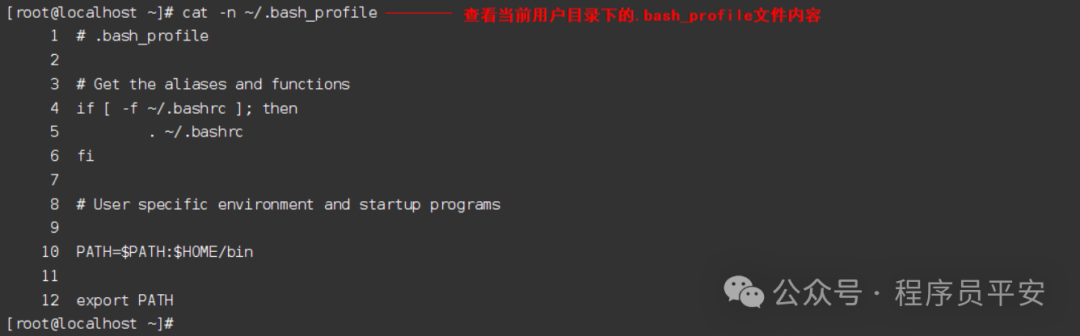
cat -n ~/.bash_profile 查看当前用户目录下的.bash_profile文件内容
操作示例:
more 命令
命令说明:
作用: 用于分页显示文本 (一次一屏)
语法: more 文件名
操作说明:
回车键 向下滚动一行
空格键 或 s 向下滚动一屏
b 返回上一屏
:p 回到最前
q或者Ctrl+C 退出
常见用法:
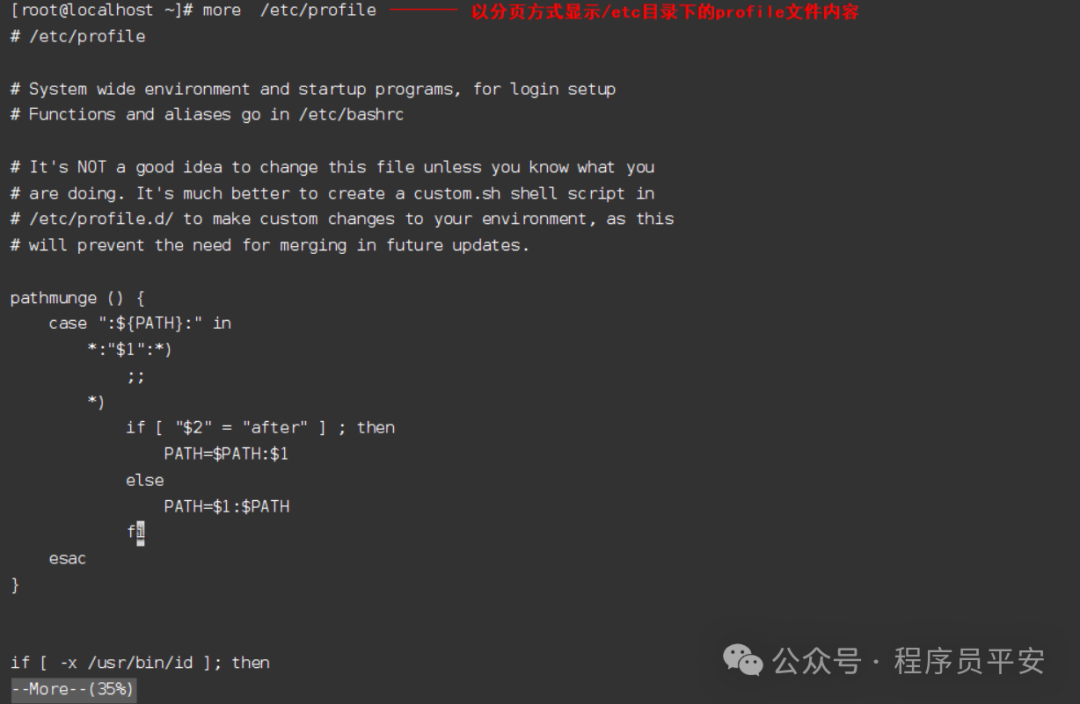
more /etc/profile 以分页方式显示/etc目录下的profile文件内容
操作示例:
head 命令
命令说明:
作用: 输出文件的开始部分,显示起始10行
语法: head [选项] 文件
选项:
-n 输出最前N行,而非默认的起始10行
常见用法:
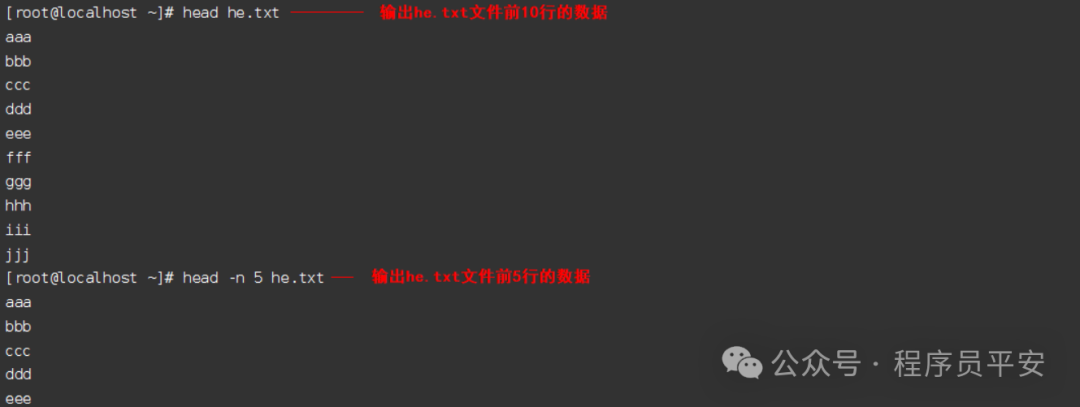
head he.txt 输出he.txt文件前10行的数据
head -n 5 he.txt 输出he.txt文件前5行的数据
操作示例:
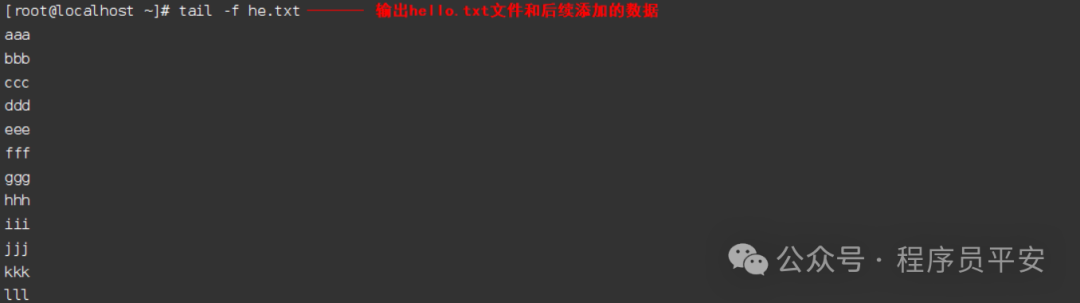
tail 命令
命令说明:
作用: tail 输出文件的末尾部分,显示最后10行
语法: tail [选项] 文件

选项:
    -n  输出最后N行,而非默认的最后10行
    -f  当文件增长时,输出后续添加的数据

常见用法:
    tail -f he.txt  输出he.txt文件和后续添加的数据
    tail -n 5 he.txt    输出he.txt最后5行
操作示例:

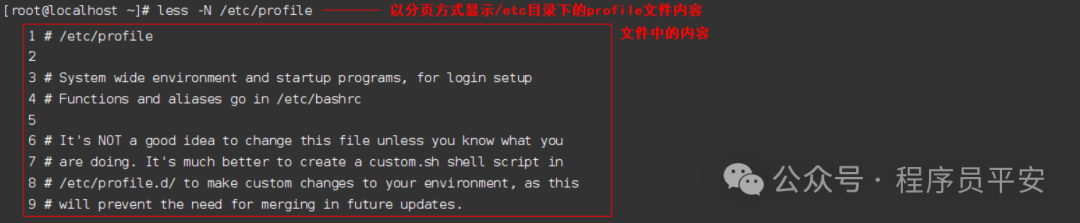
less 命令
命令说明:
作用: 和more类似,用于分页显示文本 (一次一屏),less可以按上下方向键来显示上下内容,less不必读整个文件,加载速度比more更快。
语法: less 文件名

操作说明:
    回车键                向下滚动一行
    空格键                向下滚动一屏
    b                  返回上一屏
    q或者Ctrl+C         退出

常见用法:
    less /etc/profile       以分页方式显示/etc目录下的profile文件内容
操作示例:
echo 命令
命令说明:
作用: 显示一行文本
语法: echo [OPTION] [STRING]...

选项:
    -e  允许对下面列出的加反斜线转义的字符进行解释

常见用法:
    echo "hello world"          在终端输出字符串"hello world"
    echo -e "hello\tworld"      在终端输出字符串"hello  world"
操作示例:
[root@cyxpa02 ~]# echo "hello world"
hello world
[root@cyxpa02 ~]# echo -e "hello\tworld"
hello   world
>输出重定向和>>追加
命令说明:
| 符号 | 用法 | 说明 |
|---|---|---|
| > | 命令 >文件名 | 重定向输出符号,覆盖文件以前内容 |
| >> | 命令 >>文件名 | 重定向输出符号,追加写 |
| 2> | 命令 2>文件名 | 错误重定向输出符号,覆盖文件以前内容 |
| 2>> | 命令 2>>文件名 | 错误重定向输出符号,追加写 |
操作示例:
[root@cyxpa02 ~]# echo "abc" > a.txt
[root@cyxpa02 ~]# cat a.txt
abc
[root@cyxpa02 ~]# echo "aaa" > a.txt
[root@cyxpa02 ~]# cat a.txt
aaa
[root@cyxpa02 ~]# echo "bbb" >> b.txt
[root@cyxpa02 ~]# echo "ccc" >> b.txt
[root@cyxpa02 ~]# cat b.txt
bbb
ccc
ln 命令
在Unix世界里有两个link(连接)概念,一般称之为硬连接和软连接。
一个硬连接仅仅是一个文件名。一个文件可以有好几个文件名,只有将最后一个文件名从磁盘上删除,才能把这个文件删掉。所有的文件名都处于同一个状态,也就没有什么源名字之说。不允许给目录创建硬链接。
一个软连接是一个包含了路径信息的小小的指定文件。类似于Windows操作系统中的快捷方式,软链接可以对目录进行链接,软连接可以指向不同文件系统里的文件。
ln命令会保持每一处链接文件的同步性,也就是说,不论你改动了哪一处,其它的文件都会发生相同的变化。
ln 在文件间产生连接。缺省时,产生硬连接,有-s选项,则产生符号(软)连接。
命令说明:
作用: 在文件之间建立连接
语法: ln [options] source [dest]

选项:
    -f, --force     删除已存在的目的文件
    -s, --symbolic  建立符号连接以替代硬连接。 在不支持符号连接的系统上,这个选项仅仅会产生一个错误提示而已

常见用法:
    ln -s a.txt asoftlink       给a.txt建立软连接名为asoftlink
    ln b.txt bhardlink          给b.txt建立硬连接名为bhardlink
操作示例:
[root@cyxpa02 ~]# ll
-rw-------. 1 root root  1261 7月   7 21:48 anaconda-ks.cfg
-rw-r--r--. 1 root root     8 12月 23 18:03 a.txt
-rw-r--r--. 1 root root     8 12月 20 21:34 b.txt
-rw-r--r--. 1 root root     4 12月 20 21:34 e.txt
[root@cyxpa02 ~]# ln -s a.txt asoftlink
[root@cyxpa02 ~]# ll
-rw-------. 1 root root  1261 7月   7 21:48 anaconda-ks.cfg
lrwxrwxrwx. 1 root root     5 12月 23 18:04 asoftlink -> a.txt
-rw-r--r--. 1 root root     8 12月 23 18:03 a.txt
-rw-r--r--. 1 root root     8 12月 20 21:34 b.txt
-rw-r--r--. 1 root root     4 12月 20 21:34 e.txt
[root@cyxpa02 ~]# cat a.txt
aaa
[root@cyxpa02 ~]# cat asoftlink
aaa
[root@cyxpa02 ~]# echo bbb >> a.txt
[root@cyxpa02 ~]# cat asoftlink
aaa
bbb
[root@cyxpa02 ~]#
[root@cyxpa02 ~]#
[root@cyxpa02 ~]# ll
-rw-------. 1 root root  1261 7月   7 21:48 anaconda-ks.cfg
lrwxrwxrwx. 1 root root     5 12月 23 18:04 asoftlink -> a.txt
-rw-r--r--. 1 root root    12 12月 23 18:04 a.txt
-rw-r--r--. 1 root root     8 12月 20 21:34 b.txt
-rw-r--r--. 1 root root     4 12月 20 21:34 e.txt
[root@cyxpa02 ~]# ln b.txt bhardlink
[root@cyxpa02 ~]# ll
-rw-------. 1 root root  1261 7月   7 21:48 anaconda-ks.cfg
lrwxrwxrwx. 1 root root     5 12月 23 18:04 asoftlink -> a.txt
-rw-r--r--. 1 root root    12 12月 23 18:04 a.txt
-rw-r--r--. 2 root root     8 12月 20 21:34 bhardlink
-rw-r--r--. 2 root root     8 12月 20 21:34 b.txt
-rw-r--r--. 1 root root     4 12月 20 21:34 e.txt
[root@cyxpa02 ~]# cat b.txt
bbb
[root@cyxpa02 ~]# cat bhardlink
bbb
[root@cyxpa02 ~]# echo ccc >> b.txt
[root@cyxpa02 ~]# cat bhardlink
bbb
ccc
[root@cyxpa02 ~]#
删除硬连接对应的文件硬链接还能正常使用,只有所有文件被删除,这个文件才被删除。
[root@cyxpa02 ~]# ll
-rw-------. 1 root root  1261 7月   7 21:48 anaconda-ks.cfg
lrwxrwxrwx. 1 root root     5 12月 23 18:04 asoftlink -> a.txt
-rw-r--r--. 1 root root    12 12月 23 18:04 a.txt
-rw-r--r--. 2 root root     8 12月 20 21:34 bhardlink
-rw-r--r--. 2 root root     8 12月 20 21:34 b.txt
-rw-r--r--. 1 root root     4 12月 20 21:34 e.txt
[root@cyxpa02 ~]# rm -f b.txt
[root@cyxpa02 ~]# ll
-rw-------. 1 root root  1261 7月   7 21:48 anaconda-ks.cfg
lrwxrwxrwx. 1 root root     5 12月 23 18:04 asoftlink -> a.txt
-rw-r--r--. 1 root root    12 12月 23 18:04 a.txt
-rw-r--r--. 1 root root    12 12月 23 18:06 bhardlink
-rw-r--r--. 1 root root     4 12月 20 21:34 e.txt
[root@cyxpa02 ~]# cat bhardlink
bbb
ccc
[root@cyxpa02 ~]#
删除软连接对应的文件,软连接对应的文件名出现红色的警告。
[root@cyxpa02 ~]# ll
-rw-------. 1 root root  1261 7月   7 21:48 anaconda-ks.cfg
lrwxrwxrwx. 1 root root     5 12月 23 18:04 asoftlink -> a.txt
-rw-r--r--. 1 root root    12 12月 23 18:04 a.txt
-rw-r--r--. 1 root root    12 12月 23 18:06 bhardlink
-rw-r--r--. 1 root root     4 12月 20 21:34 e.txt
[root@cyxpa02 ~]# rm -f a.txt
[root@cyxpa02 ~]# ll
-rw-------. 1 root root  1261 7月   7 21:48 anaconda-ks.cfg
lrwxrwxrwx. 1 root root     5 12月 23 18:04 asoftlink -> a.txt    # 显示红色警告
-rw-r--r--. 1 root root    12 12月 23 18:06 bhardlink
-rw-r--r--. 1 root root     4 12月 20 21:34 e.txt
[root@cyxpa02 ~]# cat asoftlink
cat: asoftlink: 没有那个文件或目录
[root@cyxpa02 ~]#
删除软连接
[root@cyxpa02 ~]# ll
-rw-------. 1 root root  1261 7月   7 21:48 anaconda-ks.cfg
lrwxrwxrwx. 1 root root     5 12月 23 18:20 esoftlink -> e.txt
-rw-r--r--. 1 root root     4 12月 20 21:34 e.txt
drwxr-xr-x. 2 root root     6 7月  15 21:04 helloworld
-rw-r--r--. 1 root root   297 11月 29 11:36 HelloWorld.java
[root@cyxpa02 ~]# rm -f esoftlink
[root@cyxpa02 ~]# ll
-rw-------. 1 root root  1261 7月   7 21:48 anaconda-ks.cfg
-rw-r--r--. 1 root root     4 12月 20 21:34 e.txt
drwxr-xr-x. 2 root root     6 7月  15 21:04 helloworld
-rw-r--r--. 1 root root   297 11月 29 11:36 HelloWorld.java
[root@cyxpa02 ~]#
注意:删除软连接时,如果软连接的是一个文件夹,使用rm -fr 软连接名/时多了/是把软连接对应文件中的内容给删除了。
[root@cyxpa02 ~]# ll
-rw-------. 1 root root  1261 7月   7 21:48 anaconda-ks.cfg
-rw-r--r--. 1 root root     4 12月 20 21:34 e.txt
drwxr-xr-x. 2 root root     6 7月  15 21:04 helloworld
-rw-r--r--. 1 root root   297 11月 29 11:36 HelloWorld.java
-rw-r--r--. 1 root root    52 11月 27 21:34 he.txt
drwxr-xr-x. 3 root root    35 11月 27 20:34 test03
[root@cyxpa02 ~]# ll test03
-rw-r--r--. 1 root root  0 11月 27 20:34 abc.TXT
drwxr-xr-x. 2 root root 39 11月 26 21:51 test01
[root@cyxpa02 ~]#
[root@cyxpa02 ~]# ln -s test03 test03softlink
[root@cyxpa02 ~]# ll
-rw-------. 1 root root  1261 7月   7 21:48 anaconda-ks.cfg
-rw-r--r--. 1 root root     4 12月 20 21:34 e.txt
drwxr-xr-x. 2 root root     6 7月  15 21:04 helloworld
-rw-r--r--. 1 root root   297 11月 29 11:36 HelloWorld.java
-rw-r--r--. 1 root root    52 11月 27 21:34 he.txt
drwxr-xr-x. 3 root root    35 11月 27 20:34 test03
lrwxrwxrwx. 1 root root     6 12月 23 18:29 test03softlink -> test03
[root@cyxpa02 ~]# rm -fr test03softlink/    # 多了/是把软连接对应文件中的内容给删除了
[root@cyxpa02 ~]# ll

-rw-------. 1 root root  1261 7月   7 21:48 anaconda-ks.cfg
-rw-r--r--. 1 root root     4 12月 20 21:34 e.txt
drwxr-xr-x. 2 root root     6 7月  15 21:04 helloworld
-rw-r--r--. 1 root root   297 11月 29 11:36 HelloWorld.java
-rw-r--r--. 1 root root    52 11月 27 21:34 he.txt
drwxr-xr-x. 2 root root     6 12月 23 18:30 test03
lrwxrwxrwx. 1 root root     6 12月 23 18:29 test03softlink -> test03
[root@cyxpa02 ~]# ll test03
总用量 0
[root@cyxpa02 ~]#
Linux查找命令
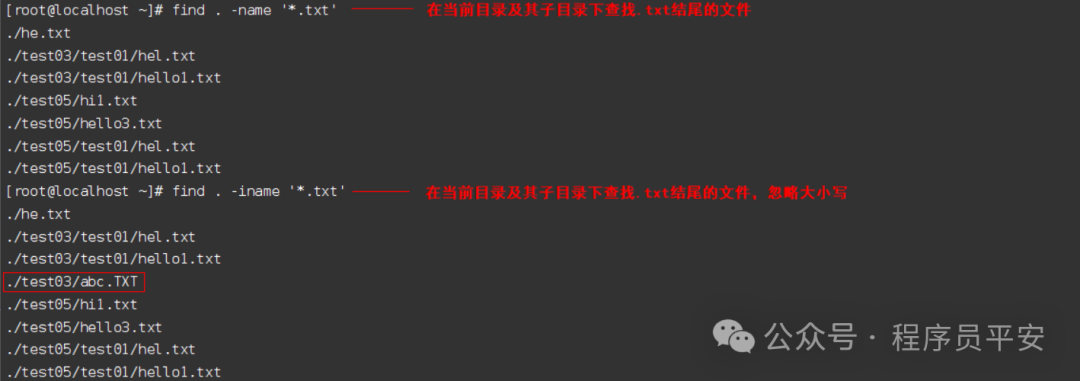
find 命令
命令说明:
作用: 递归地在层次目录中处理文件
语法: find [path...] [expression]

选项:
    -name pattern   根据pattern匹配文件名
    -iname pattern    和-name类似,但是匹配时是不区分大小写的

常见用法:
    find . -name '*.txt'    在当前目录及其子目录下查找.txt结尾的文件
    find . -iname '*.txt'   在当前目录及其子目录下查找.txt结尾的文件,忽略大小写
操作示例:
grep 命令
命令说明:
作用: 打印匹配给定模式的行
语法: grep [选项] PATTERN [FILE...]

选项:
    -n, --line-number   在输出的每行前面加上它所在的文件中它的行号
    -R, -r, --recursive 递归地读每一目录下的所有文件

常见用法:
    grep g he.txt       查找he.txt文件中出现的g所在行
    grep -n g he.txt    查找he.txt文件中出现的g所在行并显示行号
操作示例:

pgrep 命令
命令说明:
作用: 打印进程的进程号
语法: pgrep [选项] PATTERN

常见用法:
    pgrep tail  查找tail命令的进程号
操作示例:
[root@cyxpa02 ~]# ps -ef | grep tail
root      12192   7441  0 16:13 pts/0    00:00:00 tail -f he.txt
root      23641  12407  0 16:16 pts/4    00:00:00 grep --color=auto tail
[root@cyxpa02 ~]# pgrep tail
12192
管道命令
命令说明:
作用: 上一个的命令输出作为下一个命令的输入
语法: 命令1 | 命令2

常见用法:
    ll /proc/ | more        # 显示/proc的内容作为 more 的输入内容
    ll /proc/ | grep at     # 显示/proc的内容作为 grep 的输入内容,查找包含at的内容
    ps aux | grep sshd      # 把ps的结果作为 grep 的输入内容,查找包含sshd的内容
操作示例:
[root@cyxpa02 ~]# ll /proc/ | more        # 显示/proc的内容作为 more 的输入内容
[root@cyxpa02 ~]# ll /proc/ | grep at    # 显示/proc的内容作为 grep 的输入内容,查找包含at的内容
-r--r--r--.  1 root           root                         0 12月 20 21:46 diskstats
-r--r--r--.  1 root           root                         0 12月 20 21:46 mdstat
-r--r--r--.  1 root           root                         0 12月 20 21:46 schedstat
-r--r--r--.  1 root           root                         0 12月 20 14:37 stat
-rw-r--r--.  1 root           root                         0 12月 20 21:46 timer_stats
-r--r--r--.  1 root           root                         0 12月 20 21:46 vmstat
[root@cyxpa02 ~]#
[root@cyxpa02 ~]# ps aux | grep sshd    # 把ps的结果作为 grep 的输入内容,查找包含sshd的内容
root       6927  0.0  0.2 112756  4320 ?        Ss   14:36   0:00 /usr/sbin/sshd -D
root       7437  1.3  0.3 161260  6080 ?        Ss   14:36   5:48 sshd: root@pts/0,pts/1
root      12373  1.2  0.3 161260  6096 ?        Ss   16:13   4:10 sshd: root@pts/4,pts/5
root      96061  0.0  0.0 112728   988 pts/2    S+   21:49   0:00 grep --color=auto sshd
root     113448  1.2  0.3 161268  6088 ?        Ss   16:01   4:30 sshd: root@pts/2,pts/3
压缩解压命令
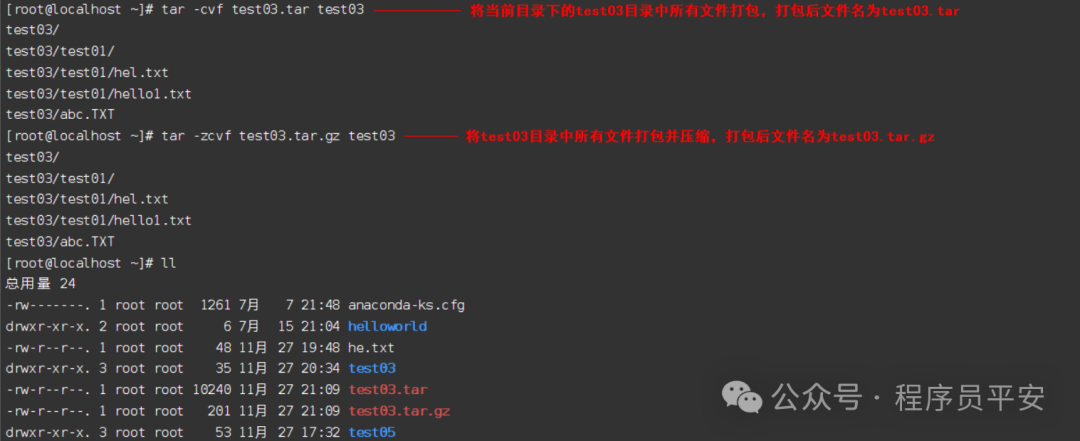
tar 命令
命令说明:
作用: 打包、压缩、解包、解压
语法: tar filename1 [filename2, ... filenameN]
文件后缀为.tar表示只是完成了打包但没有压缩
文件后缀为.tar.gz表示打包的同时还进行了压缩
选项:
-z 用 gzip 对存档压缩或解压
-c, --create 建立新的存档
-x, --extract, --get 从存档展开文件
-v, --verbose 详细显示处理的文件
-f, --file 指定存档文件的名称
常见用法:
打包
tar -cvf test03.tar test03 将test03目录中所有文件打包,打包后文件名为test03.tar
tar -zcvf test03.tar.gz test03 将test03目录中所有文件打包并压缩,打包后文件名为test03.tar.gz
解包
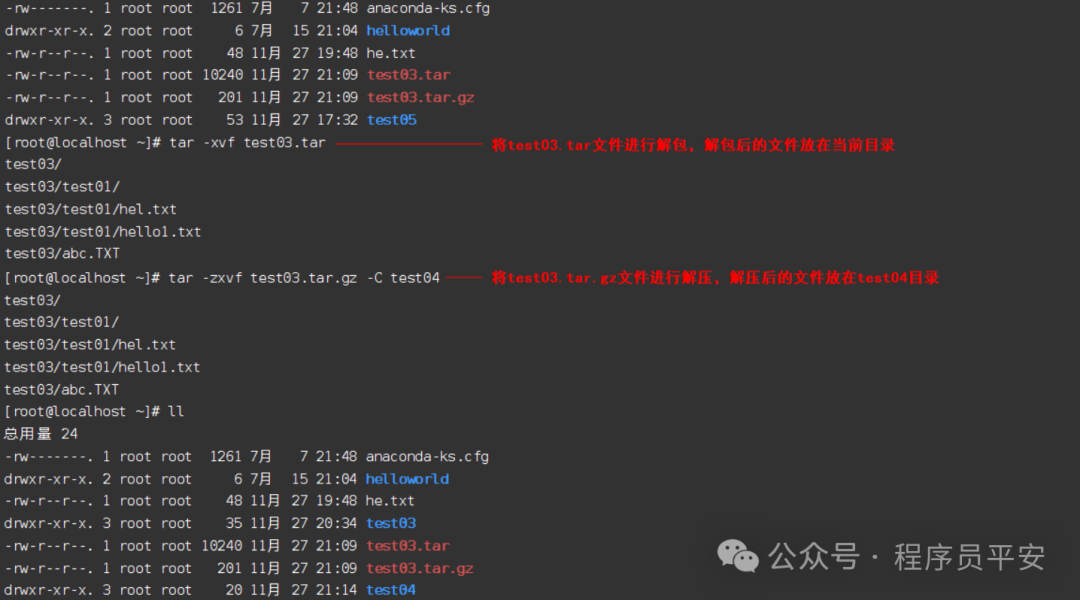
tar -xvf test03.tar 将test03.tar文件进行解包,解包后的文件放在当前目录
tar -zxvf test03.tar.gz 将test03.tar.gz文件进行解压,解压后的文件放在当前目录
tar -zxvf test03.tar.gz -C test04 将test03.tar.gz文件进行解压,解压后的文件放在test04目录
操作示例:
其他命令
clear 命令
命令说明:
作用: 清除终端屏幕
语法: clear

常见用法:
    clear   清除终端屏幕,本质是把内容滚动到了上一页
操作示例:
[root@cyxpa02 ~]# clear
reset 命令
命令说明:
作用: 终端初始化,彻底清除终端的内容
语法: reset

常见用法:
    reset   清除终端屏幕,本质是把内容滚动到了上一页
操作示例:
[root@cyxpa02 ~]# clear
history 命令
命令说明:
作用: 显示历史命令
语法: history

常见用法:
    history     显示历史命令
操作示例:
662  ln b.txt bhard
663  ll
664  cat a.txt
665  cat b.txt
666  cat bhard
667  cat asoft
668  echo sss >> a.txt
669  cat asoft
670  rm -f asoft
671  rm -f bhard
672  ll
673  clear
674  ll
675  ln -s a.txt asoftlink
Vim文本编辑
Vim介绍 命令
Vim是 一个 同Vi向上兼容的文本编辑器,可以用来编辑任何ASCII文本,可以把Vim理解为Windows的记事本。
它对 Vi 作了 许多 增强:多层撤销,多窗口,多缓冲区(buffer),高亮度语法显示,命令行编辑,文件名匹配,在线帮助,可视选定等等. 用。
vim安装 命令
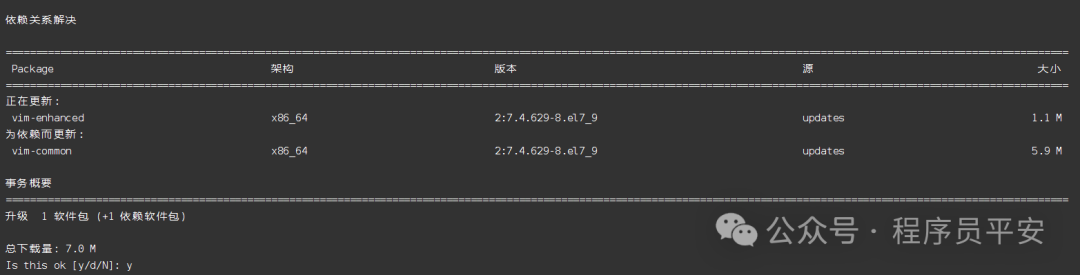
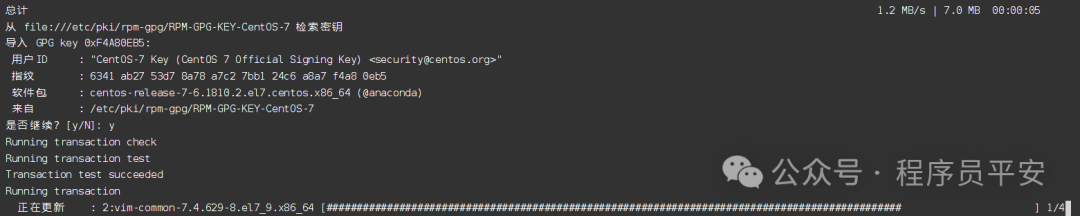
yum install vim

安装过程会提示确认,此时输入 y然后回车,继续安装。
Vim语法 命令
命令说明:
作用: 如果指定的文件存在则直接打开此文件,如果指定的文件不存在则新建文件
语法: vim file

说明:
    三种模式:
        1.命令模式下可以查看文件内容、移动光标
        2.插入模式下可以对文件内容进行编辑
        3.底行模式下可以通过命令对文件内容进行查找、显示行号、退出等操作
操作示例:

| 命令模式 | 作用 | 命令模式 | 作用 | 命令模式 | 作用 | ||
| jkhl | 上下左右移动 | /abc | 向下查找abc | u | 撤销 | ||
| gg | 移动到文档首行 | /^abc | 查找abc开头的行 | ctrl+r | 恢复 | ||
| G | 移动到文档尾行 | /abc$ | 查找abc结尾的行 | ||||
| $ | 移动到行尾 | n或; | 查找下一个 | ||||
| ^ | 移动到行首 | N或, | 查找上一个 | ||||
| ctrl+b或pageUp键 | 向上翻一页 | ||||||
| ctrl+f或pageDn键 | 向下翻一页 | ||||||
| z+Enter | 当前行在屏幕顶部 |
| 命令模式(选中) | 作用 | 命令模式(复制/粘贴) | 作用 | |
|---|---|---|---|---|
| v | 选中字符 | y | 复制已选中的 | |
| V | 选中行 | yy | 复制一行 | |
| ctrl+v | 选中块 | dd | 剪切一行 | |
| x | 删除字符 | |||
| p | 粘贴到光标后 | |||
| P | 粘贴到光标前 |
| 底行模式 | 作用 |
|---|---|
| :wq | 保存并退出 |
| :q! | 不保存退出 |
| :set nu | 显示行号 |
| :set nonu | 取消行号显示 |
| :n | 跳转到第n行 |
| :w filename | 另存到 filename 文件 |


 被折叠的 条评论
为什么被折叠?
被折叠的 条评论
为什么被折叠?
 到【灌水乐园】发言


