


仅Yolo8合集~~ whaosoft aiot Taobao 开发板商城 天皓智联 www.143ai.com
一、目标检测、跟踪与计数
介绍
目标检测:识别并定位图像或视频中的物体,用边界框指定它们的位置。YOLO(You Only Look Once)是一种流行的单阶段物体检测算法,以其速度和准确性而闻名。与两阶段检测器不同,YOLO 一次性处理整个图像,使实时检测成为可能。这种方法通过提供高效可靠的物体检测功能,彻底改变了自动驾驶、监控和机器人等应用。
目标跟踪:在视频的多个帧中跟踪已识别的对象。SORT(简单在线实时跟踪)算法被广泛用于此目的,因为它通过预测对象的运动并实时更新其位置来有效地跟踪对象。结合使用 YOLO 进行检测和 SORT 进行跟踪可以持续监控和分析对象,确保在整个视频序列中进行准确且一致的跟踪。
实现步骤
我们将使用 YOLOv8m、OpenCV 和 SORT 进行对象检测来计算通过视频中特定区域的汽车数量,以确保准确性和效率。
1. 选择视频
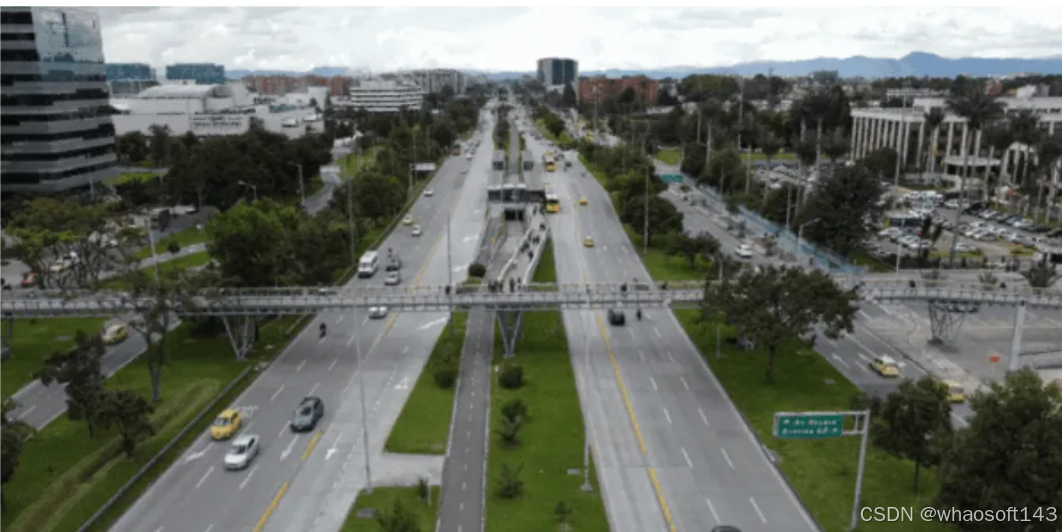
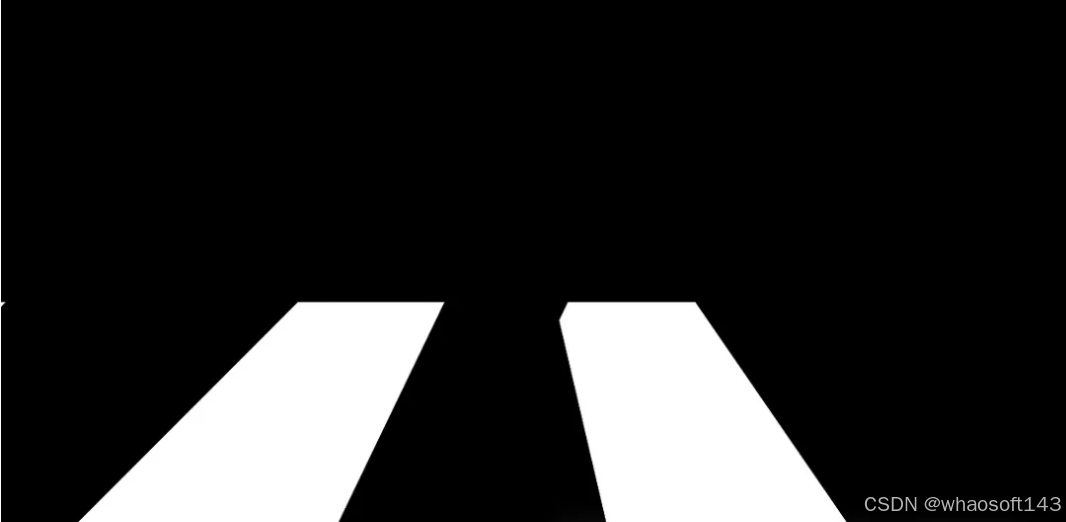
2. 创建掩码
我们只想识别桥下的汽车。为此,我们将使用画布创建一个蒙版。蒙版通常是二进制图像,其中像素为黑色 (0) 或白色 (255)。在 RGB 图像中,这意味着蒙版仅使用两个值:
白色(255, 255, 255)表示感兴趣的区域,算法将在此进行处理。
黑色(0, 0, 0)表示要忽略或排除在处理之外的区域。
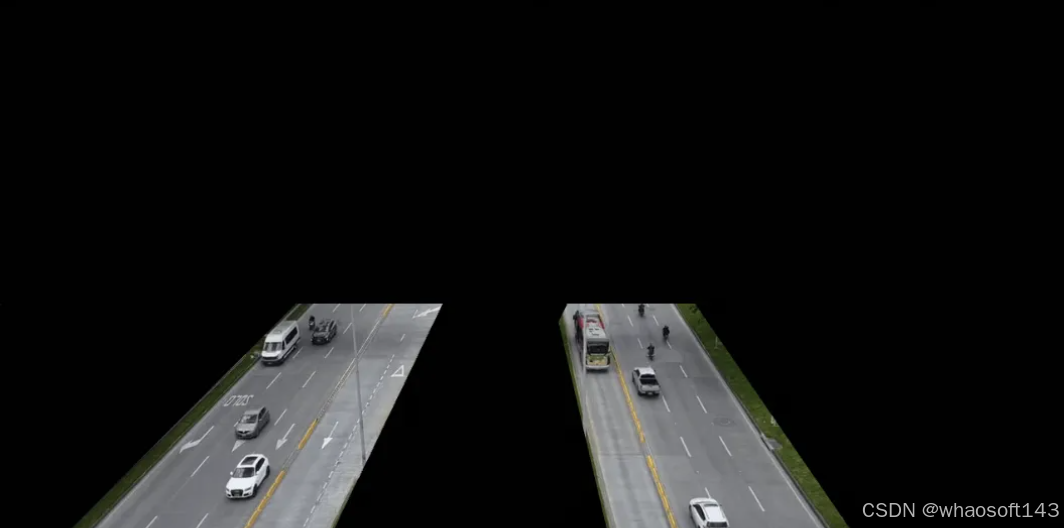
使用按位运算将掩码与视频结合起来,我们得到以下结果:
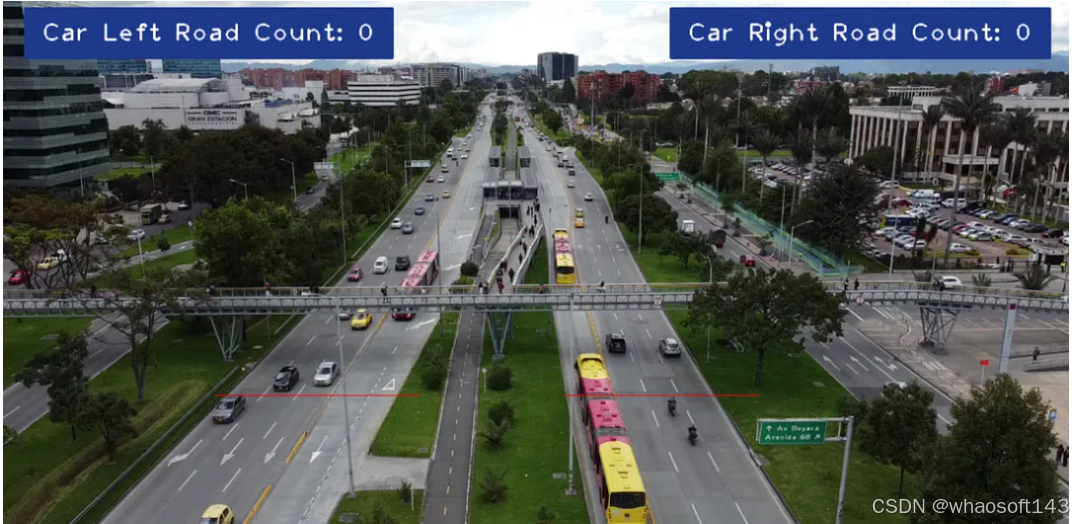
3. 定义区域
我们将在视频中定义两个区域:一个区域用于计数下行的汽车数量,另一个区域用于计数上行的汽车数量。

当在指定区域内识别出汽车时,我们会将该区域的颜色更改为绿色,表示检测到。

4. 构建布局
让我们使用 cvzone 构建计数器的布局。
5. 编写代码
-
-
cv2:执行图像和视频处理
-
cvzone:与 OpenCV 协同工作
-
numpy:处理数值运算
-
YOLO:应用物体检测
-
sort:用于跟踪检测到的对象(SORT)库。
-
import cv2
import numpy as np
from ultralytics import YOLO
import cvzone
from sort import sort

class_names = [
  'person', 'bicycle', 'car', 'motorcycle', 'airplane', 'bus', 'train', 'truck', 'boat', 'traffic light', 'fire hydrant', 'stop sign', 'parking meter', 'bench',
  'bird', 'cat', 'dog', 'horse', 'sheep', 'cow', 'elephant', 'bear', 'zebra', 'giraffe', 'backpack', 'umbrella', 'handbag', 'tie', 'suitcase', 'frisbee', 'skis',
  'snowboard', 'sports ball', 'kite', 'baseball bat', 'baseball glove', 'skateboard', 'surfboard', 'tennis racket', 'bottle', 'wine glass', 'cup', 'fork', 'knife',
  'spoon', 'bowl', 'banana', 'apple', 'sandwich', 'orange', 'broccoli', 'carrot', 'hot dog', 'pizza', 'donut', 'cake', 'chair', 'couch', 'potted plant', 'bed',
  'dining table', 'toilet', 'tv', 'laptop', 'mouse', 'remote', 'keyboard', 'cell phone', 'microwave', 'oven', 'toaster', 'sink', 'refrigerator', 'book', 'clock',
  'vase', 'scissors', 'teddy bear', 'hair drier', 'toothbrush'
]

class_names_goal = ['car']

model = YOLO('yolov8m.pt')
tracker = sort.Sort(max_age=20)

mask = cv2.imread('mask.png')

video = cv2.VideoCapture('traffic.mp4')

width = 1280
height = 720

line_left_road_x1 = 256
line_left_road_x2 = 500
line_left_road_y = 472

line_right_road_x1 = 672
line_right_road_x2 = 904
line_right_road_y = 472

vehicle_left_road_id_count = []
vehicle_right_road_id_count = []

while True:
  success, frame = video.read()

  if not success:
    break

  frame = cv2.resize(frame, (width, height))

  image_region = cv2.bitwise_and(frame, mask)

  results = model(image_region, stream=True)

  detections = []

  cv2.line(frame, (line_left_road_x1, line_left_road_y) ,(line_left_road_x2, line_left_road_y), (0, 0, 255))
  cv2.line(frame, (line_right_road_x1, line_right_road_y) ,(line_right_road_x2, line_right_road_y), (0, 0, 255))

  for result in results:
    for box in result.boxes:
      class_name = class_names[int(box.cls[0])]

      if not class_name in class_names_goal:
        continue

      confidence = round(float(box.conf[0]) * 100, 2)

      if confidence < 30:
        continue

      x1, y1, x2, y2 = box.xyxy[0]
      x1, y1, x2, y2 = int(x1), int(y1), int(x2), int(y2)

      detections.append([x1, y1, x2, y2, float(box.conf[0])])

    tracked_objects = tracker.update(np.array(detections))

    for obj in tracked_objects:
      x1, y1, x2, y2, obj_id = [int(i) for i in obj]

      confidence_pos_x1 = max(0, x1)
      confidence_pos_y1 = max(36, y1)

      cv2.rectangle(frame, (x1, y1), (x2, y2), (255, 0, 255), 2)
      cvzone.putTextRect(frame, f'ID: {obj_id}', (confidence_pos_x1, confidence_pos_y1), 1, 1)

      center_x = (x1 + x2) // 2
      center_y = (y1 + y2) // 2

      if  line_left_road_y - 10 < center_y < line_left_road_y + 10 and line_left_road_x1 < center_x < line_left_road_x2:
        if not obj_id in vehicle_left_road_id_count:
          vehicle_left_road_id_count.append(obj_id)

          cv2.line(frame, (line_left_road_x1, line_left_road_y) ,(line_left_road_x2, line_left_road_y), (0, 255, 0), 2)

      if  line_right_road_y - 10 < center_y < line_right_road_y + 10 and line_right_road_x1 < center_x < line_right_road_x2:
        if not obj_id in vehicle_right_road_id_count:
          vehicle_right_road_id_count.append(obj_id)

          cv2.line(frame, (line_right_road_x1, line_right_road_y) ,(line_right_road_x2, line_right_road_y), (0, 255, 0), 2)

  cvzone.putTextRect(frame, f'Car Left Road Count: {len(vehicle_left_road_id_count)}', (50, 50), 2, 2, offset=20, border=2, colorR=(140, 57, 31), colorB=(140, 57, 31))
  cvzone.putTextRect(frame, f'Car Right Road Count: {len(vehicle_right_road_id_count)}', (width - 460, 50), 2, 2, offset=20, border=2, colorR=(140, 57, 31), colorB=(140, 57, 31))

  cv2.imshow('Image', frame)

  if cv2.waitKey(1) & 0xFF == ord('q'):
    break

video.release()
cv2.destroyAllWindows()
6. 运行结果


完整代码与视频素材下载:
https://github.com/VladeMelo/car-counter二、带方向の目标检测
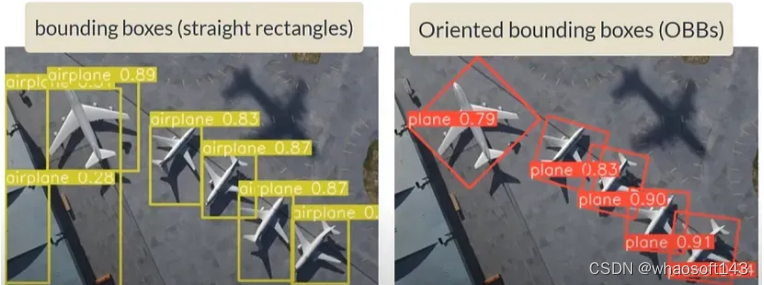
目标检测是指在图像或视频帧内识别和定位物体的任务。定向目标检测具体涉及检测具有定义方向或旋转的物体,例如检测具有不同角度的车辆或检测自然场景中具有不同方向的文本。
此任务通常需要专门的算法或模型,能够准确检测和识别图像中的物体,无论其方向或旋转如何。定向物体检测可应用于各个领域,包括自动驾驶、文档分析和工业自动化。
在本文中,我们将学习如何使用 YOLOv8 进行有向物体检测。
官方文档可以在下面链接找到:
https://docs.ultralytics.com/tasks/obb/从计算上来说,这比传统的物体检测稍微昂贵一些,因为传统的物体检测中所有框都是完美的矩形,没有任何方向。这是因为 OBB 除了需要检测物体外,还需要检测方向。
首先,使用 pip 安装 ultralytics:
pip install ultralytics导入包和模型:
import ultralyticsfrom ultralytics import YOLO# Load a modelmodel = YOLO('yolov8x-obb.pt') # load an official model
这将导入 Ultralytics 包并下载预先训练的 yolov8 OBB 模型。在本例中,我使用了 yolov8x-obb.pt。其他模型可以参考链接:
https://docs.ultralytics.com/tasks/obb/#visual-samples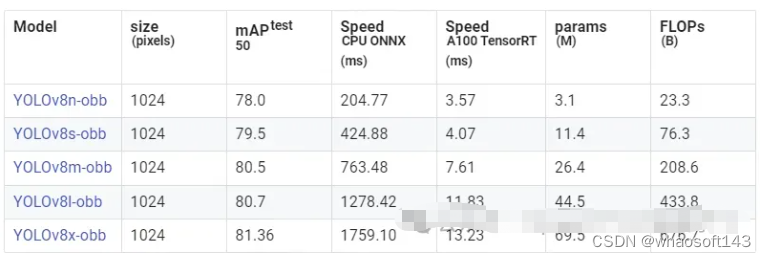
我们使用预训练模型对样本图像进行样本检测。请注意,这些模型是在DOTA数据集上训练的。
https://universe.roboflow.com/felipe-coradesque-6gmum/dota-aerial-images# Predict with the modelresults = model('sample.jpg',imgsz=640, save=True) # predict on an image
默认情况下,预测结果会保存在 runs/obb/predict 文件夹中。请注意,每次运行的预测结果都会带有后缀,例如 predict1 或 predict2。
我们可以看到,预测结果有一个根据物体方向而定的有角度的矩形,而不是像传统物体检测方法中的直线矩形。
让我们在 DOTA 数据集上进一步训练模型,这样我们就可以了解训练数据和标注(ground truth)是什么样的。
为了使用 YOLOV8 训练模型,我们需要一个 .yml 文件。
我们可以从 Ultralytics Github Repo 中的ultralytics/cfg/datasets下载此 DOTA 数据集的文件。当我们运行以下代码时,这将自动完成。
运行之前,如果您有 GPU 并且想要使用 GPU 来运行训练,请按照以下额外步骤操作。首先,卸载 torch 和作为 ultralytics 的一部分下载的 torchvision。它们对应于 CPU 版本。仅当您计划运行 GPU 进行训练时,才运行以下代码。
pip uninstall torch torchvision这将卸载 torch 和 torchvision。现在是时候安装支持 CUDA 的 torch 和 torchvision 了。
在我的计算机上,我使用的是 CUDA 12.1 版本,因此我使用此命令安装 Torch。
pip3 install torch torchvision torchaudio --index-url https://download.pytorch.org/whl/cu121我将给出以下包含 CPU 和 GPU 的代码。首先,对于 CPU,这非常简单,我们可以直接运行训练而不通过设备,或者我们可以明确将其称为设备“cpu”
# CPUresults = model.train(data='DOTAv1.yaml', epochs=5, imgsz=640, device=cpu)
# GPU- Use the device=0 for Single GPU Training.if __name__=='__main__':results = model.train(data='DOTAv1.yaml', epochs=5, imgsz=640, device=0)
一旦我们运行此文件,训练和测试图像及其注释将自动下载。这是因为在“DOTAv1.yaml”文件中我们有一行用于下载文件。
Download script/URL (optional)download: https://github.com/ultralytics/yolov5/releases/download/v1.0/DOTAv1.zip
OBB 标注文件
OBB 标注使用的格式如下,
class_index, x1, y1, x2, y2, x3, y3, x4, y4 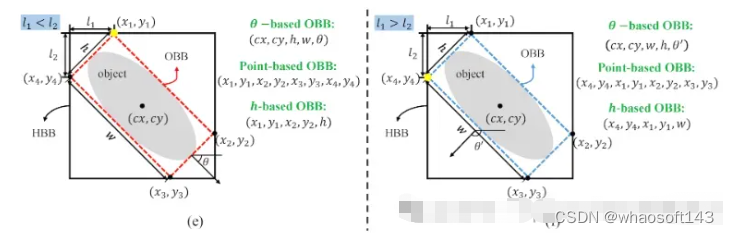
图像显示了每个角的所有点的 x1、y1 等。在此示例中,我们使用基于点的 OBB。
请注意,YOLO OBB 格式通过四个角点指定边界框,其坐标在 0 到 1 之间标准化。因此,所有点的 x1、x2 等都将在 0 到 1 之间标准化。
所有训练结果都将存储在runs\obb\train7文件夹中。这里是 train 7,表示我的第 7 次训练。开始训练时将自动创建这些文件夹。
权重文件将自动存储在runs\obb\train7\weights文件夹中。
预测
我们运行下面的代码来获得预测:
from ultralytics import YOLO

# Load a model
model = YOLO('runs/obb/train7/weights/best.pt')  # load a custom model

# Predict with the model
results = model('test_prediction',imgsz=640, save=True)  # predict on an image
这里的“test_prediction”是包含我们要测试的预测图像的文件夹。
一旦我们运行预测,预测图像就会自动存储在runs\obb\predict3文件夹中。再次,这个 predict3 表示这是第三次运行预测函数。每个人的情况可能都不一样。
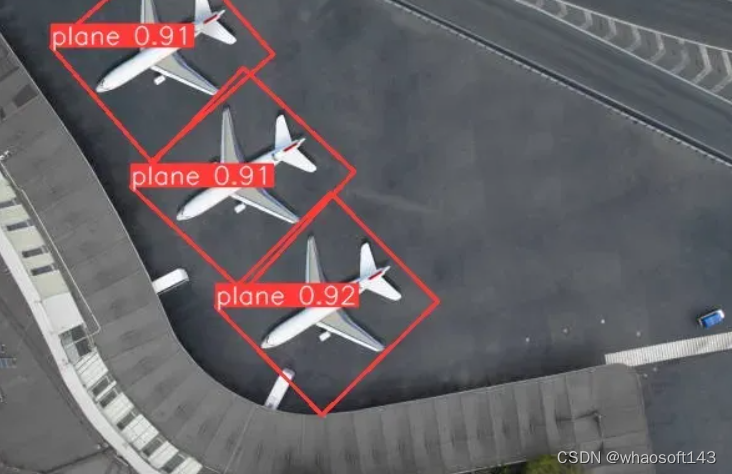
以下是预测结果:
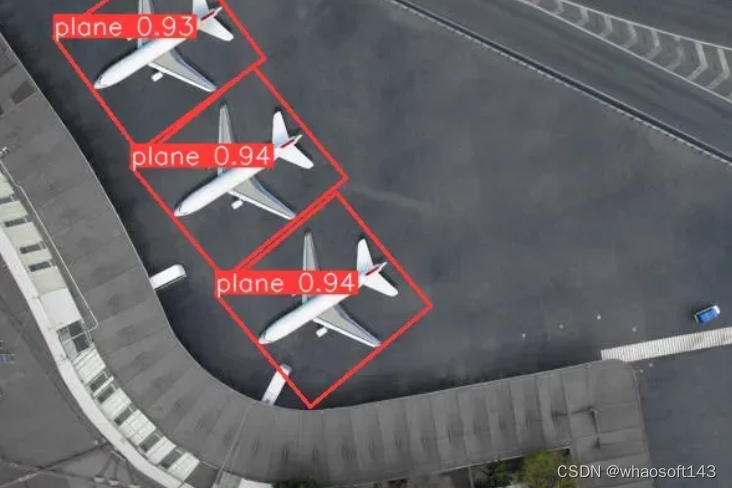
由于我们又训练了 5个epoch,与预训练模型的预测相比,置信度得分略有增加。
三、路面坑洞检测
使用YOLOv8图像分割实现路面坑洞检测
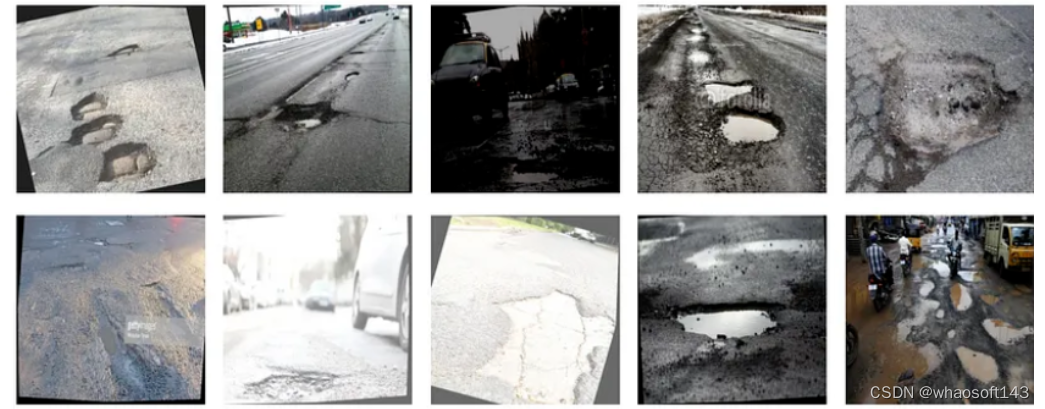 如上图所示,现实生活中路面坑洞对车辆和驾驶员安全来说存在巨大隐患,本文将介绍如何使用YoloV8图像分割技术来检测路面坑洞,从而提示驾驶员注意避让,尽可能保证安全。
实现步骤
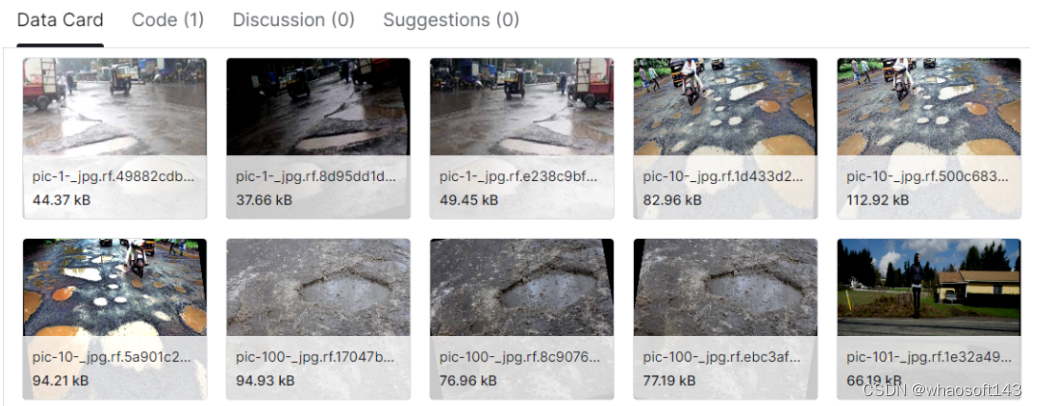
【1】准备数据集。
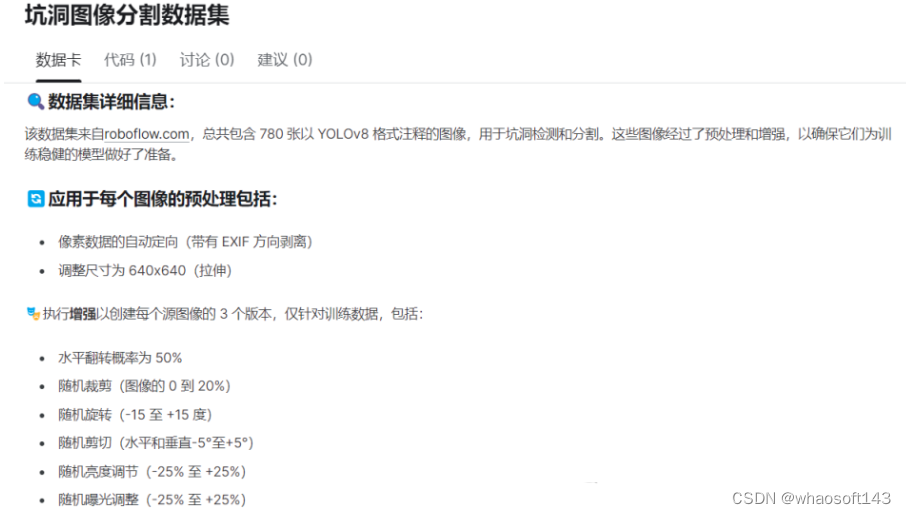
本教程中使用Pothole图像分割数据集。获取坑洼图像分割数据集。您可以从 Kaggle 访问它,这是一个流行的数据科学竞赛、数据集和机器学习资源平台。数据集下载链接:
https://www.kaggle.com/datasets/farzadnekouei/pothole-image-segmentation-dataset下载数据集后,如果数据集已打包,您可能需要从压缩格式(例如 ZIP 或 TAR 文件)中提取文件。
【2】安装Ultralytics,导入必要的库。
安装Ultralytics:
pip install ultralytics导入必要的库:
import pandas as pdimport numpy as npimport matplotlib.pyplot as pltimport seaborn as snsimport osimport warningsfrom ultralytics import YOLOimport cv2from PIL import Imageimport yamlimport random
【3】设置数据路径。
dataDir = '/content/Pothole_Segmentation_YOLOv8/'dataDir目录路径“/content/Pothole_Segmentation_YOLOv8/”的变量。该变量表示存储图像分割任务的数据集的目录。
【4】加载并绘制图像。
trainImagePath = os.path.join(dataDir, 'train','images')

#list of the images
imageFiles = [f for f in os.listdir(trainImagePath) if f.endswith('.jpg')]

randomImages = random.sample(imageFiles, 15)

plt.figure(figsize=(10, 10))

for i, image_file in enumerate(randomImages):

    image_path = os.path.join(trainImagePath, image_file)
    image = Image.open(image_path)
    plt.subplot(3, 5, i + 1)
    plt.imshow(image)
    plt.axis('off')

  # Add a suptitle
plt.suptitle('Random Selection of Dataset Images', fontsize=24)

# Show the plot
plt.tight_layout()
plt.show()
设置训练图像路径:
trainImagePath = os.path.join(dataDir, 'train','images'):此行构造包含训练图像的目录的路径。它使用该os.path.join()函数将基本目录路径 ( dataDir) 与存储训练图像的子目录“train”和“images”连接起来。
列出图像文件:
imageFiles = [f for f in os.listdir(trainImagePath) if f.endswith('.jpg')]:此行在目录中创建图像文件列表trainImagePath。它使用列表理解来迭代目录中的文件,并仅过滤那些以“.jpg”扩展名结尾的文件。
选择随机图像:
randomImages = random.sample(imageFiles, 15):此行从上一步使用该函数获得的图像文件列表中随机选择 15 个图像random.sample()。
绘制图像:
-
-
以下代码行迭代随机选择的图像,使用 PIL ( Image.open()) 打开每个图像,然后用于matplotlib.pyplot创建显示所选图像的子图网格。
-
该plt.subplot()函数用于定位网格中的每个图像。
-
plt.imshow()在子图中显示图像。
-
plt.axis('off')删除轴标签以获得更清晰的可视化效果。
-
添加标题并显示绘图:
plt.suptitle('Random Selection of Dataset Images', fontsize=24):为整个情节添加标题。
plt.tight_layout()调整子图的布局以防止重叠。
plt.show()显示情节。

随机选择数据集图像
【5】下载并训练YoloV8分割模型。
model = YOLO('yolov8n-seg.pt')加载预训练权重:'yolov8n-seg.pt'传递给 YOLO 构造函数指定 YOLOv8n 模型预训练权重的文件路径。这些权重对于使用训练过程中学到的参数初始化神经网络至关重要。
yamlFilePath = os.path.join(dataDir,'data.yaml' )yamlFilePath = os.path.join(dataDir,'data.yaml')用于构造名为 的 YAML 文件的文件路径data.yaml。
results = model.train(data= yamlFilePath,epochs= 30 ,imgsz= 640 ,batch= 32 ,optimizationr= 'auto' ,lr0= 0.0001 , # 初始学习率lrf= 0.01 , # 最终学习率 (lr0 * lrf)dropout = 0.25 , # 使用 dropout 正则化device= 0 , # 运行的设备,即 cuda device=0seed= 42)
开始 YOLOv8 图像分割模型的训练过程。让我们分解一下传递给该model.train()方法的参数:
-
data:此参数指定 YAML 文件 ( ) 的路径,yamlFilePath其中包含配置设置和有关用于训练的数据集的信息。YAML 文件可能包含图像文件路径、注释文件、类名等详细信息。
-
epochs:该参数决定训练过程中的 epoch 数(完整遍历整个数据集)。在我们的例子中,模型将训练 30 个 epoch。
-
imgsz:该参数指定训练时模型的输入图像大小。图像在输入网络之前可能会调整为 640x640 像素。
-
batch:该参数设置训练期间使用的批量大小。它确定在训练过程的每次迭代中同时处理的图像数量。这里使用的批量大小为 32。
-
optimizer:该参数指定用于训练模型的优化器。该值'auto'表明训练过程会根据模型架构或其他设置自动选择优化器。
-
lr0:该参数设置优化器的初始学习率。指定学习率为 0.0001,这是许多优化任务的常见起始值。
-
lrf:该参数指定最终学习率,其计算方式为初始学习率乘以lrf。它有助于在训练过程中逐渐降低学习率以稳定学习过程。
-
dropout:该参数指定 dropout 率,这是一种用于防止训练期间过度拟合的正则化技术。丢弃率为 0.25 表示在每次训练迭代期间将随机丢弃 25% 的神经元。
-
device:此参数指定模型将在其上进行训练的设备。值0通常表示在第一个 CUDA 设备 (GPU) 上进行训练(如果可用),否则将使用 CPU。
-
seed:此参数设置用于训练期间再现性的随机种子。设置固定种子可确保每次执行代码时生成相同的随机数序列,这对于调试和结果再现性很有用。
【6】加载性能最佳的模型。
bestModelpath = '/content/runs/segment/train/weights/best.pt'bestModel = YOLO(bestModelpath)
-
-
bestModelpath:该变量包含训练期间获得的最佳模型的文件路径。
-
'/content/runs/segment/train/weights/best.pt':该字符串指定包含最佳模型权重的文件的路径。
-
【7】加载图像做推理。
validImagePath = os.path.join(dataDir, 'valid', 'images')
imageFiles = [f for f in os.listdir(validImagePath) if f.endswith('.jpg')]
#select Random images
numImages = len(imageFiles)
selectedImage = [imageFiles[i] for i in range(0, numImages, numImages // 9)]
fig, axes = plt.subplots(3, 3, figsize=(10, 10))
fig.suptitle('Validation Set Inferences')
for i, ax in enumerate(axes.flatten()):
imagePath = os.path.join(validImagePath, selectedImage[i])
results = bestModel.predict(source= imagePath, imgsz=640)
annotatedImage = results[0].plot()
annotatedImageRGB = cv2.cvtColor(annotatedImage, cv2.COLOR_BGR2RGB)
ax.imshow(annotatedImageRGB)
ax.axis('off')
plt.tight_layout()
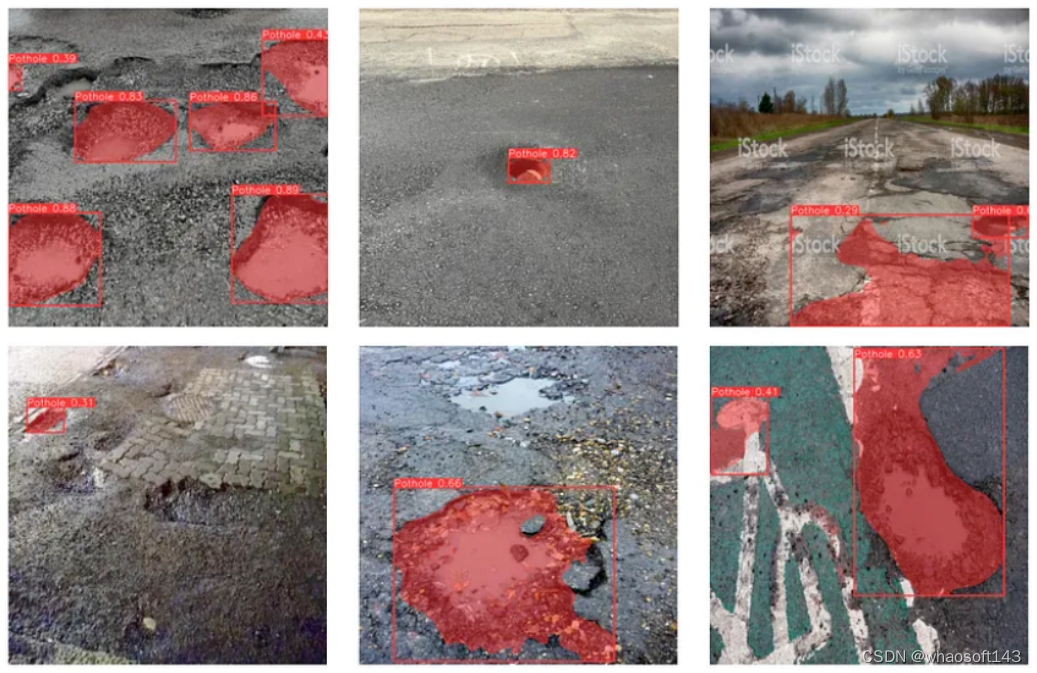
plt.show()使用训练期间获得的最佳模型对验证图像集进行推断。
设置验证图像路径:
-
-
validImagePath = os.path.join(dataDir, 'valid', 'images'):此行构造包含验证图像的目录的路径。
-
列出验证图像文件:
-
-
imageFiles = [f for f in os.listdir(validImagePath) if f.endswith('.jpg')]:此行在目录中创建图像文件列表validImagePath。
-
选择随机图像:
-
-
numImages = len(imageFiles):此行计算验证集中的图像总数。
-
selectedImage = [imageFiles[i] for i in range(0, numImages, numImages // 9)]:此行从验证集中选择图像的子集。似乎通过将图像总数 ( numImages) 除以 9 来选择 9 个图像。
-
绘制推断图像:
-
-
然后,代码继续使用 来创建 3x3 子图网格plt.subplots()。整个图的标题设置为“验证集推断”,使用fig.suptitle().
-
它使用 迭代子图enumerate(axes.flatten()),其中每个子图代表验证集中的一个图像。
-
对于每个子图,它使用 加载相应的图像os.path.join(validImagePath, selectedImage[i]),使用 方法执行推理bestModel.predict(),并使用 绘制带注释的图像results[0].plot()。
-
OpenCV的cv2.cvtColor()函数用于将带注释的图像从BGR转换为RGB格式,适合用Matplotlib显示。
-
最后,它使用 隐藏每个子图的轴ax.axis('off')。 whaosoft aiot http://143ai.com
-
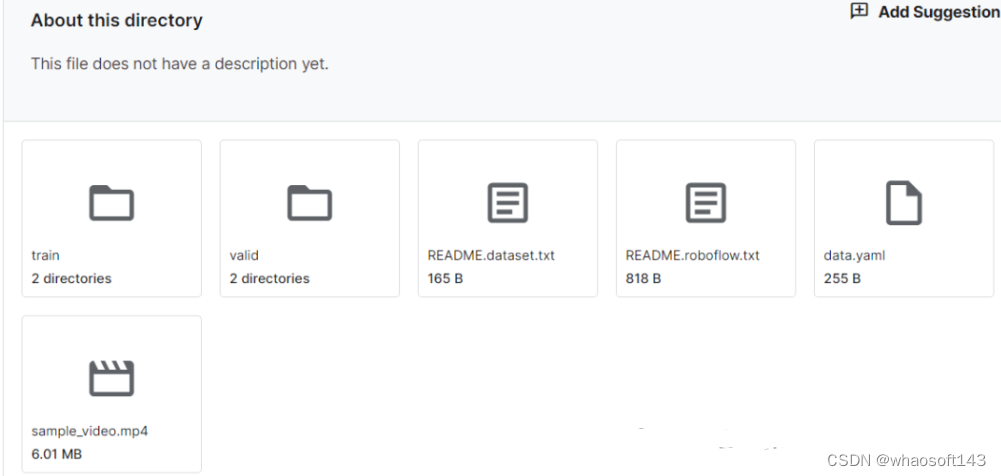
【8】加载视频做推理。
import shutil
videoPath = '/content/Pothole_Segmentation_YOLOv8/sample_video.mp4'

bestModel.predict(source=videoPath, save=True)
import subprocess

# Convert AVI to MP4 using FFmpeg
subprocess.call(['ffmpeg', '-y', '-loglevel', 'panic', '-i', '/content/runs/segment/predict/sample_video.avi', 'output_video.mp4'])

from IPython.display import Video

# Display the converted MP4 video
Video("output_video.mp4", embed=True, width=960)
结论:
当我们结束使用 YOLOv8 的图像分割迷人世界的旅程时,我们发现自己配备了新的见解、技能和可能性。在整个项目中,我们从数据管理到模型训练、推理和评估,揭示了图像分割的复杂性及其在计算机视觉中的变革潜力。
四、疲劳状态检测
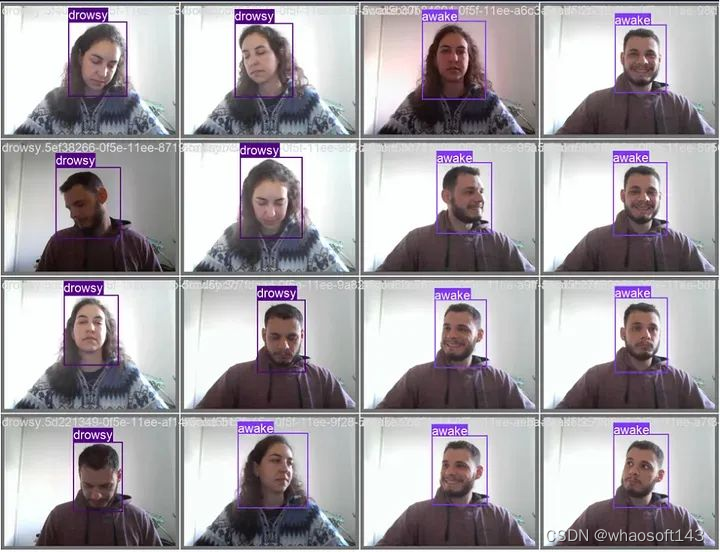
最终训练模型的推断结果
该项目旨在使用 YOLOv8,一种先进的目标检测模型,检测疲劳驾驶的迹象。目标是通过对从网络摄像头采集的图像进行训练,以检测疲劳迹象,如闭眼或头部下垂,从而创建一个自定义模型。一旦检测到疲劳,就会触发音频警报,以提醒个人并防止潜在事故。该项目专注于提高那些需要长时间驾驶或从事对警觉度至关重要的行业,如轮班工作的个人的安全性。
在我们深入了解运行该项目的详细信息之前,有一点需要注意,即您可以使用 YOLO 创建任何您想要的分类器(如果您能获得数据),尽管本例是一个疲劳检测器。
正如 ultralytics 的文档所说:
Yolov8 是备受赞誉的实时目标检测和图像分割模型的最新版本。
该模型将是我们项目的中心,它将允许我们快速轻松地创建图像检测模型。同样,根据文档:
训练模式用于在自定义数据集上训练 YOLOv8 模型。在此模式下,使用指定的数据集和超参数对模型进行训练。训练过程涉及优化模型的参数,以便它能够准确地预测图像中对象的类别和位置。
让我们专注于了解这两个基本步骤:数据收集和模型训练。对于技术读者,可以查看为整个项目从头到尾设计的这个架构模型。
疲劳检测架构
那么让我们开始第一步:
1)数据收集
在这里,您需要一个基本的功能,即通过您自己的网络摄像头收集数据。
def collect_images_from_webcam(
        labels: list, number_imgs: int, images_path: str) -> None:
    '''
    Collects images from the webcam and saves them to a folder.

    Args:
        labels (list): List of labels for the images.
        number_imgs (int): Number of images to be collected for each label.
        images_path (str): Path to the folder where the images will be saved.

    Returns:
        None
    '''
    cap = cv2.VideoCapture(0)

    # Loop through labels
    for label in labels:
        print('Collecting images for {}'.format(label))
        time.sleep(5)

        # Loop through image range
        for img_num in range(number_imgs):
            logging.info(f'Collecting images for {label}, image number {img_num}')

            # Webcam feed
            ret, frame = cap.read()

            # Naming our image path
            imgname = os.path.join(images_path, label + '.' + str(uuid.uuid1()) + '.jpg')

            # Write out image to file
            cv2.imwrite(imgname, frame)

            # Render to the screen
            cv2.imshow('Image Collection', frame)

            # 3-second delay between captures
            time.sleep(3)

            if cv2.waitKey(10) & 0xFF == ord('q'):
                logging.info(f'You broke the sequence of collection for {label} images')
                break

    cap.release()
    cv2.destroyAllWindows()
通过填写参数,您可以收集尽可能多的数据,并将其存储到您选择的文件夹中。我做的一件非常有用的事情,是创建一个函数,它可以直接将收集的图像定向到正确的文件夹,您很快就会看到为什么这很有用。
def split_images(images_path: str, labels_path: str):
    '''
    Split the collected images into train, val, and test sets.

    Args:
        images_path (str): Path to the folder where the images are stored.
        labels_path (str): Path to the folder where the labels are stored.

    Returns:
        None
    '''
    dest_folders = ['train', 'val', 'test']
    for folder in dest_folders:
        os.makedirs(os.path.join(images_path, folder), exist_ok=True)
        os.makedirs(os.path.join(labels_path, folder), exist_ok=True)

    file_list = os.listdir(images_path)
    random.shuffle(file_list)

    num_files = len(file_list)
    train_count = int(TRAIN_RATIO * num_files)
    val_count = int(VAL_RATIO * num_files)

    for i, file_name in enumerate(file_list):
        if file_name.endswith('.jpg'):
            src_path = os.path.join(images_path, file_name)

            if i < train_count:
                dest_folder = 'train'
            elif i < train_count + val_count:
                dest_folder = 'val'
            else:
                dest_folder = 'test'

            dest_path = os.path.join(images_path, dest_folder)
            shutil.move(src_path, dest_path)

            logging.info(f'Moved {file_name} to {dest_folder} folder.')
2)模型训练
为了使用上一步收集的数据训练模型,我创建了一个自定义的 YOLO 模型函数,以便我们可以更改超参数。 whaosoft aiot http://143ai.com
def train_custom_yolo_model(
    data: str,
    epochs: int,
    batch: int,
    model_name: str,
    lr0: float,
    lrf: float,
    weight_decay: float) -> tuple:
    '''
    Function to train a custom model using YOLO v8.

    Args:
    - data (str): Data configuration file path. Default is 'data.yaml'.
    - epochs (int): Number of training epochs. Default is 20.
    - batch (int): Batch size. Default is 8.
    - augment (bool): Flag to enable data augmentation. Default is True.
    - model_name (str): Output model name. Default is 'yolov8n_drowsiness'.
    - lr0 (float): Initial learning rate for optimizer. Default is 0.01.
    - lrf (float): Final learning rate for optimizer. Default is 0.01.
    - weight_decay (float): Weight decay for optimizer. Default is 0.0005.

    Returns:
    - results (Tuple): A tuple containing the training results.
    '''
    # Load the pretrained model
    model = YOLO('yolov8n.pt')

    # Training settings
    logging.info('Starting training...')
    logging.info(f'Data configuration: {data}')
    logging.info(f'Epochs: {epochs}')
    logging.info(f'Batch size: {batch}')
    logging.info(f'Model name: {model_name}')
    logging.info(f'Initial learning rate: {lr0}')
    logging.info(f'Final learning rate: {lrf}')
    logging.info(f'Weight decay: {weight_decay}')

    # Train the model
    results = model.train(
        data=data,
        epochs=epochs,
        batch=batch,
        name=model_name,
        lr0=lr0,
        lrf=lrf,
        weight_decay=weight_decay,
    )

    logging.info('Training completed.')
    return results
这就是您所需要的!相对容易,对吧?冷静下来,这并不那么容易,我们有一项至关重要的工作要做,它是一种更手动、更费力的工作。这是标记和创建 yaml 文件以供上面的模型训练函数使用的部分。看到上面的 "data" 参数,它由一个 yaml 文件提供,我们来详细了解一下。
3)yaml 文件
Ultralytics 框架使用 YAML 文件格式来定义训练检测模型的数据集和模型配置。以下是用于定义检测数据集的 YAML 格式示例:
path: /{your_local_path}/datatrain: images/trainval: images/valtest: images/test
您必须使用此文件为您的模型提供数据,它就像您收集并存储在这些相应文件夹(train、val、test)中的数据与您的 YOLO 模型之间的桥梁。我们还应该谈论标记数据,这是最难和最烦人的部分,但却是必要的。
4)标记您的数据
在这里,很难用文章的文字来解释这一步骤,所以我将重定向您到一篇非常好的内容,它在这方面帮助了我很多。我在这一步中使用的软件包是 labelImg。
要使用此软件包并标记您的数据,您可以访问此链接,从第 52:20 分钟开始观看,Nicholas Renotte 在那里轻松解释了如何使用它。我甚至建议您观看整个视频,这是一份令人惊叹的内容!
好吧,这就是这类项目的主要阶段,希望已经阐述清楚并让您的生活变得更轻松,如果您想使用 ultralytics 的这个令人难以置信的工具 Yolo 复制或进行类似的项目。
而在执行了所有这些步骤之后,您将能够在自己的网络摄像头上进行实时推断,甚至可以在检测到 "疲劳" 标签时触发警报!非常酷,对吧?
潜在应用:
-
驾驶员安全:疲劳检测模型可以集成到车辆中,以在驾驶员表现出疲劳迹象时发出警报,减少由疲劳引起的事故风险。
-
轮班工作:该模型可以部署在员工轮班工作的行业,如医疗保健或交通运输,以确保工人保持警觉并能够有效履行职责。
-
个人警报系统:个人可以将该模型用作个人安全设备,以防止在需要专注力的活动中发生与疲劳有关的事故,如学习或操作机械。
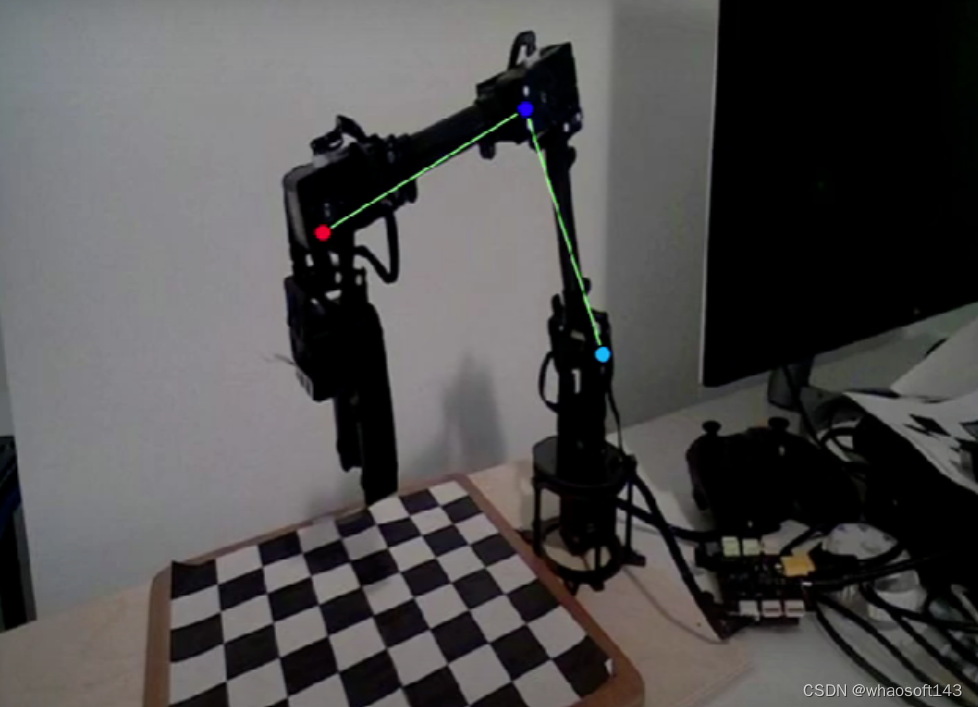
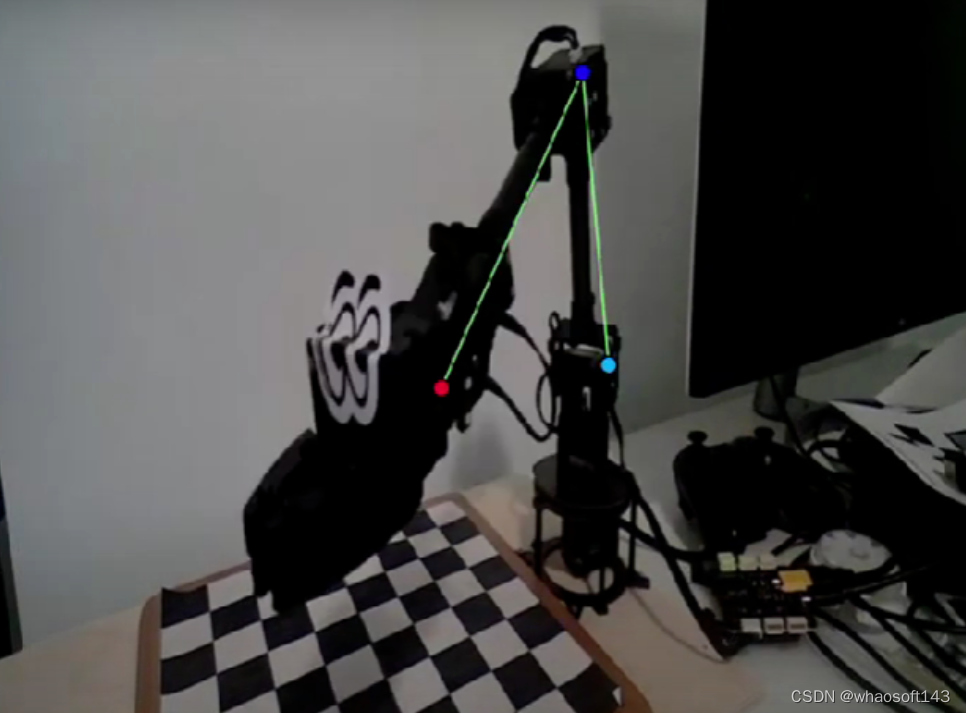
五、自定义姿势关键点检测
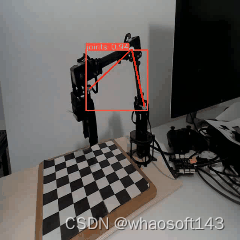
YoloV8自定义姿势关键点检测教程:机械臂关键点姿势跟踪。
下面是通过自定义姿势关键点检测下棋机器人效果:
自定义姿势关键点检测是一种计算机视觉技术,涉及识别和跟踪对象上的特定点或关键点。对于下棋机器人手臂来说,这些关键点可以代表棋子的位置、棋盘的方向,甚至机器人手臂本身的配置。
为什么下棋机器人需要自定义姿态关键点检测?
-
精确的棋子识别:下棋机器人必须能够精确地识别棋盘上每个棋子的位置。自定义姿势关键点检测使机器人能够识别每个棋子的类型和位置,使其能够在游戏过程中做出明智的决定。
-
规划复杂的动作:国际象棋是一种复杂战略和战术的游戏。为了有效地规划其动作,机器人需要了解棋盘的当前状态、潜在威胁以及未来可能的位置。自定义姿态关键点检测为机器人提供必要的数据来分析电路板并制定相应的策略。
-
避免碰撞:机器人手臂可以有多个关节和大范围的运动。为了避免与棋盘、其他棋子甚至自身发生碰撞,机械臂需要实时了解自身的配置。自定义姿态关键点检测帮助机器人监控其关节位置并确保安全高效的运动。
-
适应性:国际象棋是一种具有各种棋盘尺寸和棋子配置的游戏。自定义姿势关键点检测可以适应不同的棋盘尺寸和棋子设置,使机器人具有多功能性并能够下不同的国际象棋变体。
实现步骤
下面是具体步骤:
【1】使用CVAT标注样本。可以参考下面视频操作:
https://youtu.be/kOlEC30hK7o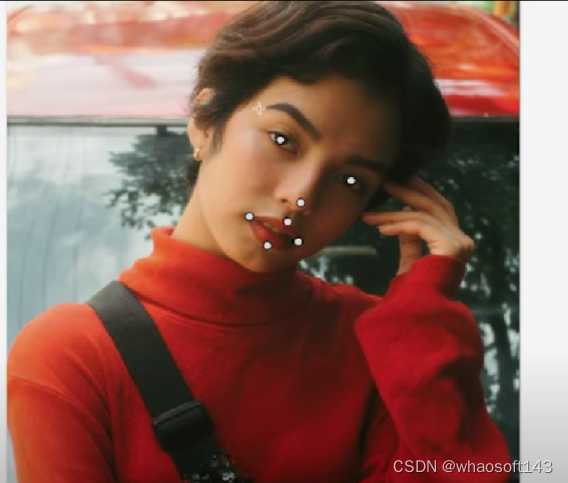
Step1:创建项目->任务->导入数据集。
Step2:为项目创建一个骨架,这有助于避免不知疲倦地注释单个图像的过程。确保所有图像的尺寸为 640x640,因为 YOLO Pose 训练仅接受此尺寸。 whaosoft aiot http://143ai.com
底部会有一个名为“骨架”的选项,选择您当前的图像并根据您的需要调整点。
Step3:底部会有一个名为“骨架”的选项,选择您当前的图像并根据您的需要调整点。
Step4:单击保存并转到任务部分并以 CocoKeypoints 格式导出任务数据集。
Step5:创建train文件夹并将样本放入子文件夹images和labels中。
Step6:在给定的 python 脚本中运行 json,将 Coco.json 转换为 YOLO 格式。这会自动给出规范化注释。标准化关键点应该在0到1的范围内。否则 Yolo Pose不会进行训练:
import json
import os

def convert_coco_to_yolo(coco_json_path, output_dir, image_width, image_height):
    # Load COCO JSON file
    with open(coco_json_path, 'r') as f:
        coco_data = json.load(f)

    # Create output directory if it doesn't exist
    if not os.path.exists(output_dir):
        os.makedirs(output_dir)

    # Iterate over each image in the dataset
    for image_data in coco_data['images']:
        image_id = image_data['id']
        image_name = image_data['file_name']
        keypoints_list = []

        # Find annotations for the current image
        for annotation in coco_data['annotations']:
            if annotation['image_id'] == image_id:
                keypoints = annotation['keypoints']
                keypoints_list.append(keypoints)

        # Skip images without annotations
        if not keypoints_list:
            continue

        # Create YOLO annotation file
        annotation_file_name = os.path.splitext(image_name)[0] + '.txt'
        annotation_file_path = os.path.join(output_dir, annotation_file_name)
        with open(annotation_file_path, 'w') as f:
            for keypoints in keypoints_list:
                # Find bounding box coordinates
                x_min = min(keypoints[0::3])
                y_min = min(keypoints[1::3])
                x_max = max(keypoints[0::3])
                y_max = max(keypoints[1::3])

                # Normalize bounding box coordinates to range [0, 1]
                x_center = (x_min + x_max) / (2 * image_width)
                y_center = (y_min + y_max) / (2 * image_height)
                width = (x_max - x_min) / image_width
                height = (y_max - y_min) / image_height

                # Write the annotation to the YOLO file
                f.write(f'{0} {round(x_center, 6)} {round(y_center, 6)} {round(width, 6)} {round(height, 6)} ')

                # Append normalized keypoints to the annotation
                for i in range(0, len(keypoints), 3):
                    x = round(keypoints[i] / image_width, 6)
                    y = round(keypoints[i + 1] / image_height, 6)
                    v = round(keypoints[i + 2], 6)
                    f.write(f'{x} {y} {v} ')
                f.write('\n')

    print('Conversion complete.')

# Example usage
coco_json_path = "C:\\Users\\jaikr\\Downloads\\Subset\\annotations\\person_keypoints_default.json"
output_dir = "C:\\Users\\jaikr\\Downloads\\Subset640"
image_width = 640 #Recommended for YOLOV8_Pose
image_height = 640 #Recommended for YOLOV8_Pose
print(output_dir)
convert_coco_to_yolo(coco_json_path, output_dir, image_width, image_height)
#Output format expected for eg img.txt files for each img
0 0.485896 0.332236 0.255865 0.248009 0.357964 0.351019
2 0.545229 0.208231 2 0.613828 0.456241 2
#where
0:class name
0.485896 0.332236 0.255865 0.248009 :Bounding boxes
0.357964 0.351019 2 #first keypoint[0] x,y,visible(whether keypoint will be visible
0.545229 0.208231 2 kpt[1]
0.613828 0.456241 2 kpt[2]
【2】在colab中训练。文件夹结构创建如下:
Main dir
 -Train
   -images
   -labels

 -Val
   -images
   -labels
!pip install ultralytics

from ultralytics import YOLO

# Load a model

model = YOLO('yolov8n-pose.pt')  # load a pretrained model (recommended for training)


# Train the model
results = model.train(data='data.yaml', epochs=100, imgsz=640)
Data.yaml should be of this:

#change this to your file structure

train: /content/RobotArm/train/images
val: /content/RobotArm/val/images
test: /content/RobotArm/test/images
nc: 1
names:
 0: joints
# Keypoints
kpt_shape: [3, 3]  # number of keypoints,number of dims (2 for x,y or 3 for x,y,visible)
#( in my robot arm its 3 kpts,and 3 for visible kpts)
```
```
names:
    0: joints
```

 I ve used number/index as if multiple classes were there means we can augment

```
names:
     0: joints
     1: skeleton
     2: face_keypoints
```

For proper mapping of classes used while annoattaion and assigning the,m while training is important in multi class.【3】在本地使用best.pt进行预测。图片预测:
import matplotlib.pyplot as plt
from ultralytics import YOLO
from PIL import Image, ImageDraw

model = YOLO("C:\\Users\\jaikr\\Downloads\\Final\\best.pt")
results = model.predict(source="C:\\Users\\jaikr\\Downloads\\Subset640\\train\\images\\WIN_20230915_20_27_08_Pro.jpg")

for r in results:
    print(r.keypoints)

    # this line is changed
    keypoints = r.keypoints.xy.int().numpy()  # get the keypoints
    img_array = r.plot(kpt_line=True, kpt_radius=6)  # plot a BGR array of predictions
    im = Image.fromarray(img_array[..., ::-1])  # Convert array to a PIL Image

    draw = ImageDraw.Draw(im)
    draw.line([(keypoints[0][0][0], keypoints[0][0][1]), (keypoints[0][1][0],
            keypoints[0][1][1]), (keypoints[0][2][0], keypoints[0][2][1])],
             fill=(0, 0,255), width=5)
    im.show()

#change the keypoints order and no.of keypoints accordingly
#As keypoints returns a tensor in r.keypoints we convert extract the kptpoints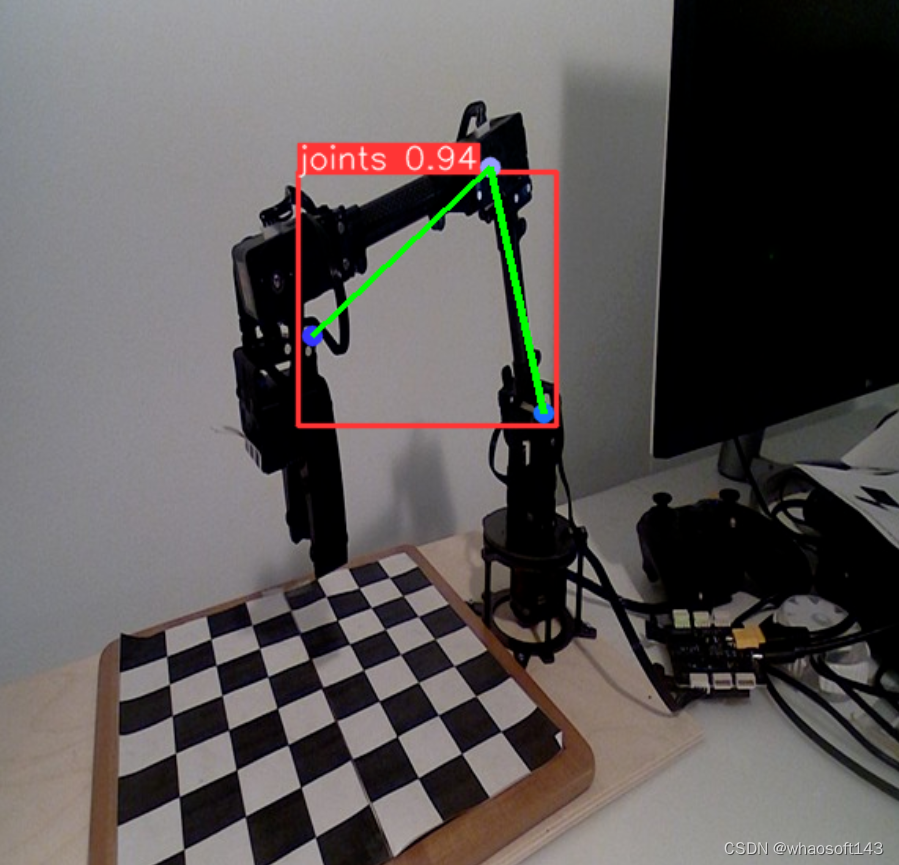
视频预测:
import os
import cv2
from ultralytics import YOLO
from PIL import Image, ImageDraw
import subprocess
import time  # Add the time module

model = YOLO("C:\\Users\\jaikr\\Downloads\\Final\\best.pt")

# Folder containing input images
input_folder = "C:\\Users\\jaikr\\Downloads\\Final\\train\\images"
output_folder = "output_images"  # Output folder for saving images
output_video = "output_video.mp4"  # Output video file name

# Create the output folder if it doesn't exist
os.makedirs(output_folder, exist_ok=True)

# Get a list of image files in the input folder
image_files = [f for f in os.listdir(input_folder) if f.endswith((".jpg", ".jpeg", ".png"))]

# Sort the image files to maintain order
image_files.sort()

for idx, image_file in enumerate(image_files):
    image_path = os.path.join(input_folder, image_file)

    try:
        results = model.predict(source=image_path)

        for r in results:
            print(r.keypoints)

            # This line is changed
            keypoints = r.keypoints.xy.int().numpy()  # Get the keypoints
            img_array = r.plot(kpt_line=True, kpt_radius=6)  # Plot a BGR array of predictions
            im = Image.fromarray(img_array[..., ::-1])  # Convert array to a PIL Image

            draw = ImageDraw.Draw(im)
            draw.line([(keypoints[0][0][0], keypoints[0][0][1]), (keypoints[0][1][0],
                                                                  keypoints[0][1][1]),
                       (keypoints[0][2][0], keypoints[0][2][1])], fill=(255, 0, 0), width=5)

            # Save the image with a sequence number
            output_path = os.path.join(output_folder, f"output_image_{idx:04d}.png")
            im.save(output_path)

        print(f"Processed image '{image_file}'.")

    except Exception as e:
        print(f"Error processing image '{image_file}': {e}")
        continue  # Continue to the next image if an error occurs

print("Image processing completed.")

# Use OpenCV to create a video from the saved images with a delay of 0.5 seconds
frame_array = []
for i in range(len(image_files)):
    img_path = os.path.join(output_folder, f"output_image_{i:04d}.png")

    # Check if the image file exists
    if not os.path.exists(img_path):
        print(f"Image '{img_path}' not found or has an issue with format. Skipping.")
        continue

    img = cv2.imread(img_path)
    height, width, layers = img.shape
    size = (width, height)
    frame_array.append(img)

out = cv2.VideoWriter(output_video, cv2.VideoWriter_fourcc(*'mp4v'), 30, size)

for i in range(len(frame_array)):
    out.write(frame_array[i])
    time.sleep(1)  # Add a delay of 0.5 seconds between frames

out.release()

print(f"Video '{output_video}' created successfully.")
源码下载:
https://github.com/Jaykumaran/Robotic_Arm_Keypoint_Tracking_YoloV8-Pose/tree/main
六、车速检测
这个可能不能用啊 就学学就得了 车速感觉还是应该用雷视融合做
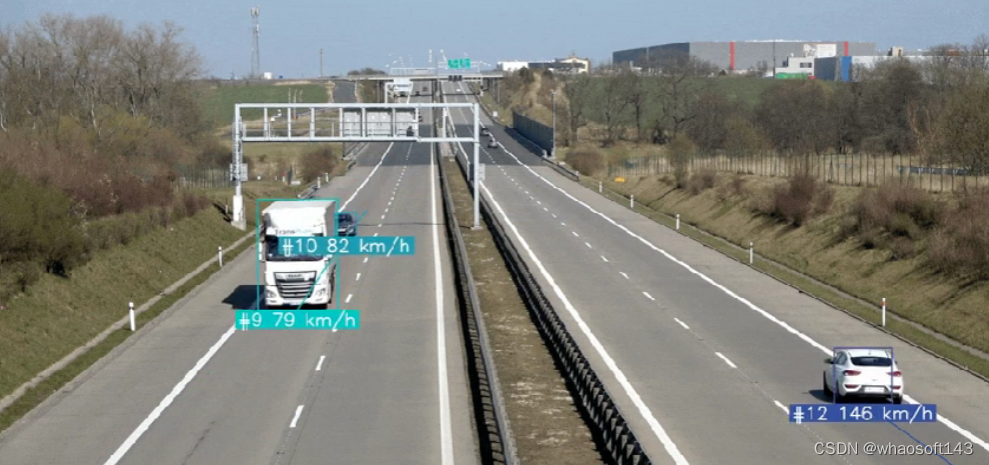
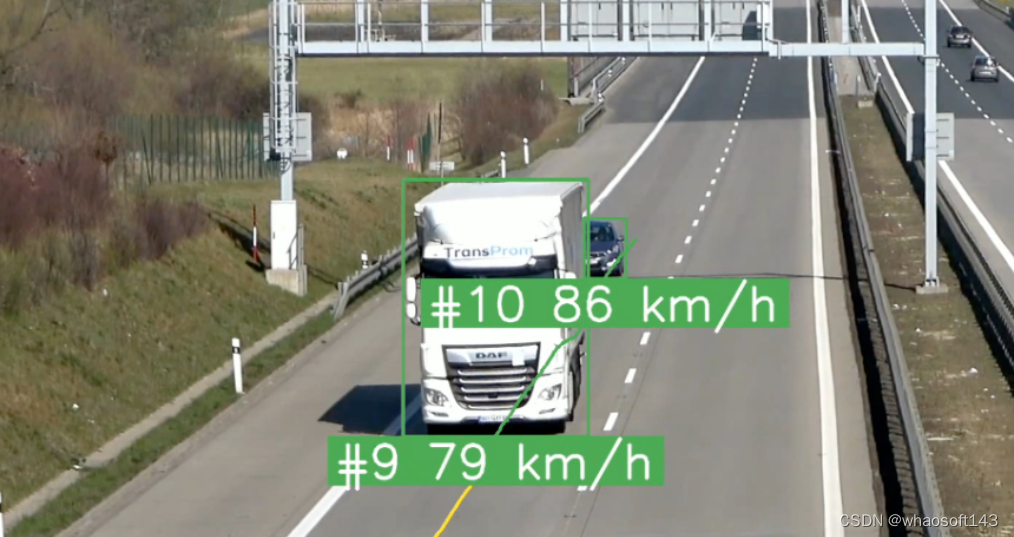
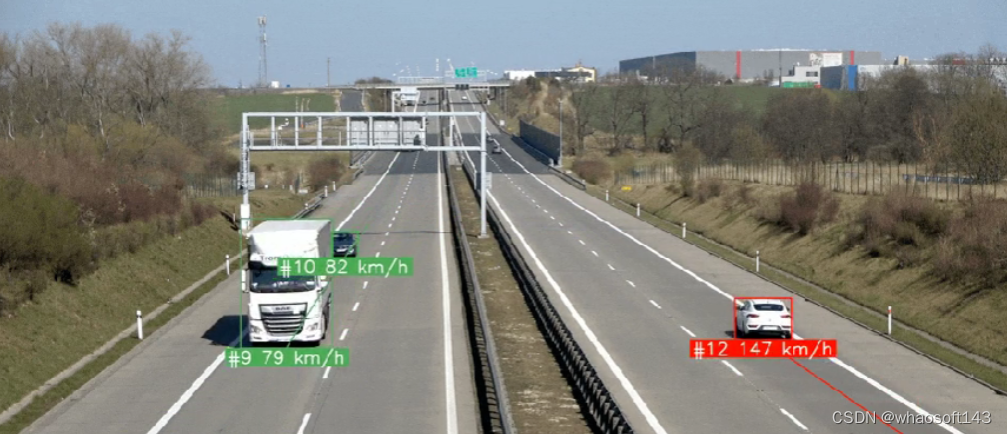
使用YOLOv8+BYTETrack+OpenCV实现车辆速度的计算
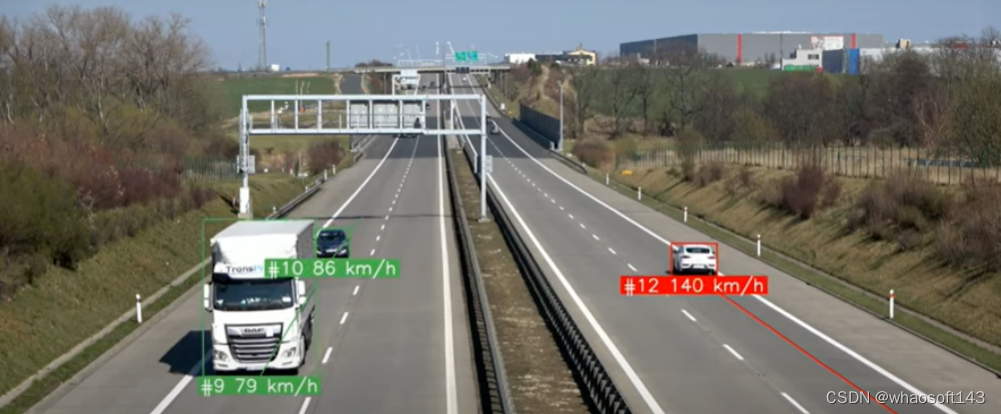
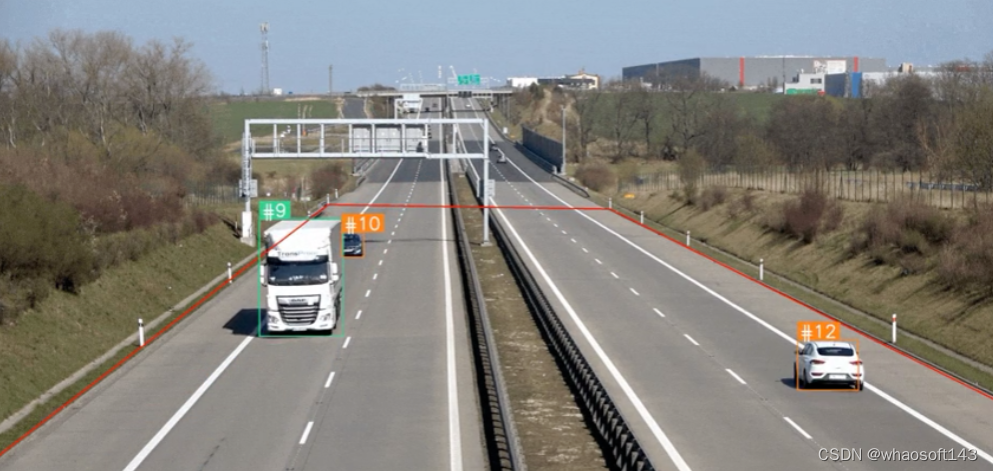
您是否想过如何使用计算机视觉来估计车辆的速度?在本教程中,我们将探索从对象检测到跟踪再到速度估计的整个过程。
本文的实现主要包含以下三个主要步骤,分别是对象检测、对象跟踪和速度估计,下面我们将一一介绍其实现步骤。
车辆检测
要对视频执行对象检测,我们需要迭代视频的帧,然后对每个帧运行我们的检测模型。推理则提供对预先训练的对象检测模型的访问,我们使用yolov8x-640模型。相关代码和文档可参考链接:
https://github.com/roboflow/inference?ref=blog.roboflow.comhttps://inference.roboflow.com/?ref=blog.roboflow.com
import supervision as sv
from inference.models.utils import get_roboflow_model

model = get_roboflow_model(‘yolov8x-640’)
frame_generator = sv.get_video_frames_generator(‘vehicles.mp4’)
bounding_box_annotator = sv.BoundingBoxAnnotator()

for frame in frame_generator:
    results = model.infer(frame)[0]
    detections = sv.Detections.from_inference(results)

    annotated_frame = trace_annotator.annotate(
        scene=frame.copy(), detections=detections)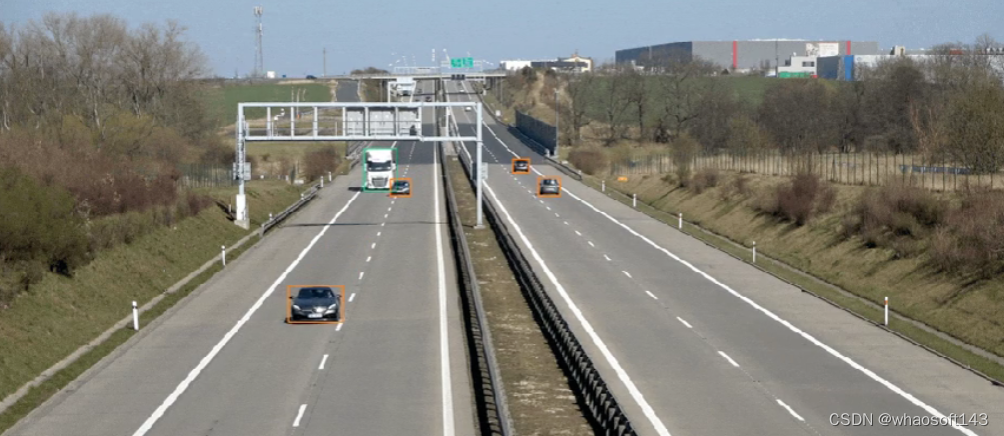
当然您也可以将其替换为Ultralytics YOLOv8、YOLO-NAS或任何其他模型。您需要更改代码中的几行,然后就可以了。
import supervision as sv
from ultralytics import YOLO
model = YOLO("yolov8x.pt")
frame_generator = sv.get_video_frames_generator(‘vehicles.mp4’)
bounding_box_annotator = sv.BoundingBoxAnnotator()
for frame in frame_generator:
result = model(frame)[0]
detections = sv.Detections.from_ultralytics(result)
annotated_frame = trace_annotator.annotate(
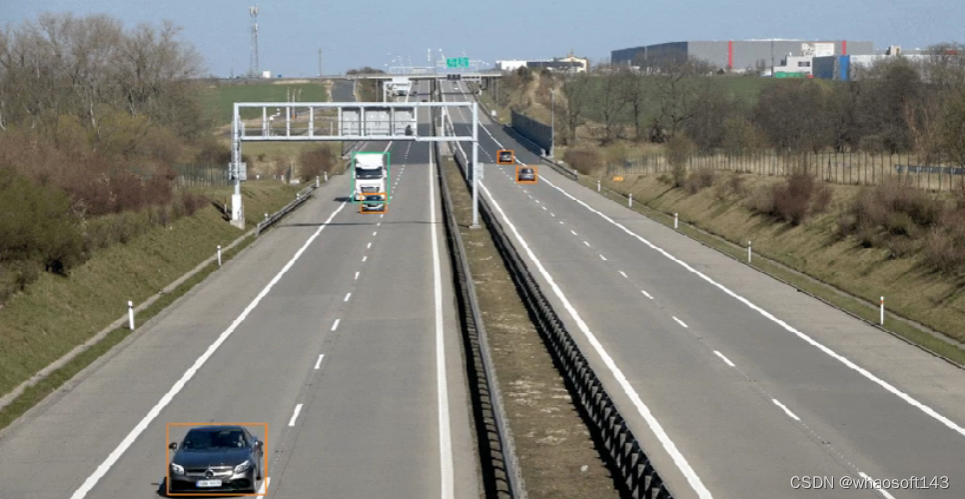
scene=frame.copy(), detections=detections)车辆跟踪
物体检测不足以执行速度估计。为了计算每辆车行驶的距离,我们需要能够跟踪它们。为此,我们使用 BYTETrack,可在 Supervision pip 包中访问。
...

# initialize tracker
byte_track = sv.ByteTrack()

...

for frame in frame_generator:
    results = model.infer(frame)[0]
    detections = sv.Detections.from_inference(results)

    # plug the tracker into an existing detection pipeline
    detections = byte_track.update_with_detections(detections=detections)

    ...
如果您想了解有关将 BYTETrack 集成到对象检测项目中的更多信息,请访问 Supervision文档页面。在那里,您将找到一个端到端示例,展示如何使用不同的检测模型来做到这一点。
https://supervision.roboflow.com/how_to/track_objects/?ref=blog.roboflow.com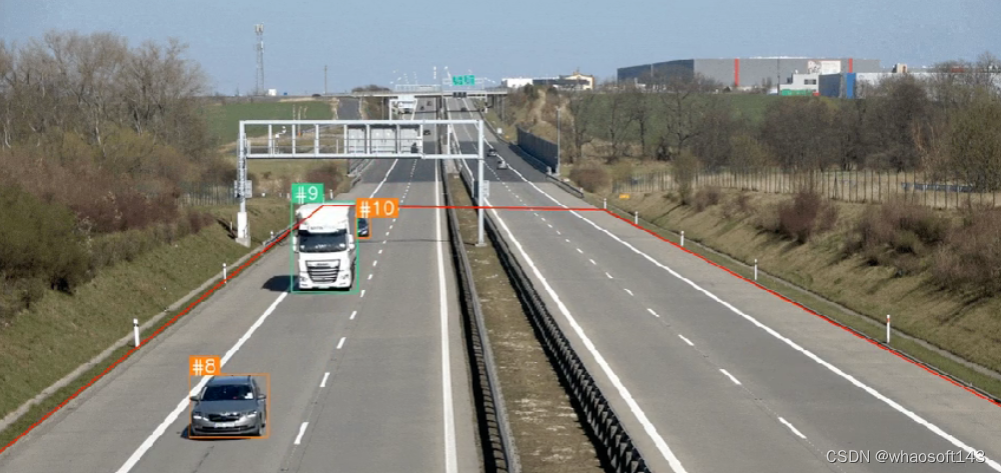
车速计算
让我们考虑一种简单的方法,根据边界框移动的像素数来估计距离。
当您使用点来记住每辆车每秒的位置时,会发生以下情况。即使汽车以恒定速度移动,其行驶的像素距离也会发生变化。距离相机越远,覆盖的距离越小。
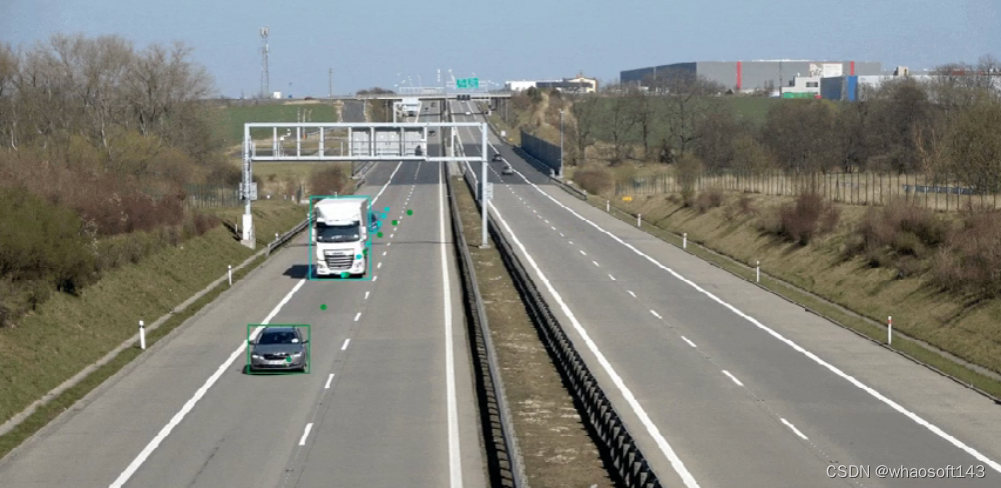
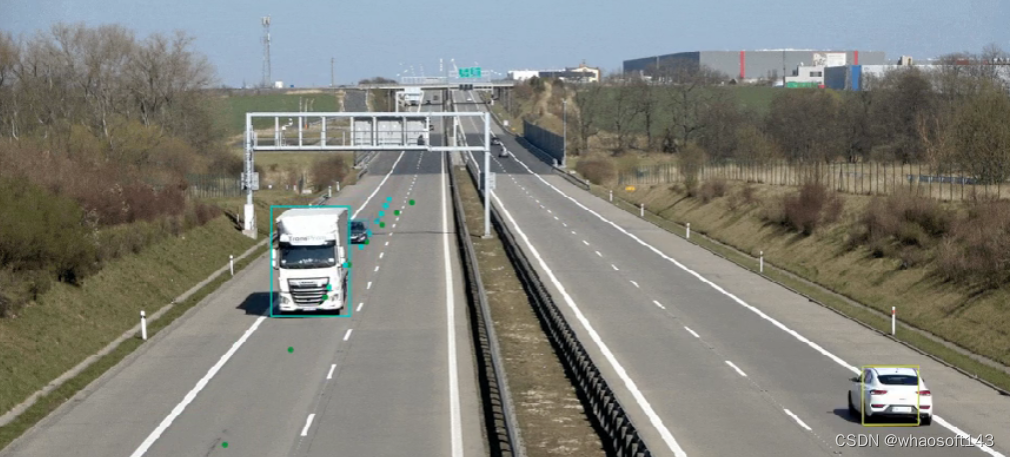
因此,我们很难使用原始图像坐标来计算速度。我们需要一种方法将图像中的坐标转换为道路上的实际坐标,从而消除沿途与透视相关的失真。幸运的是,我们可以使用 OpenCV 和一些数学来做到这一点。
视角转换背后的数学
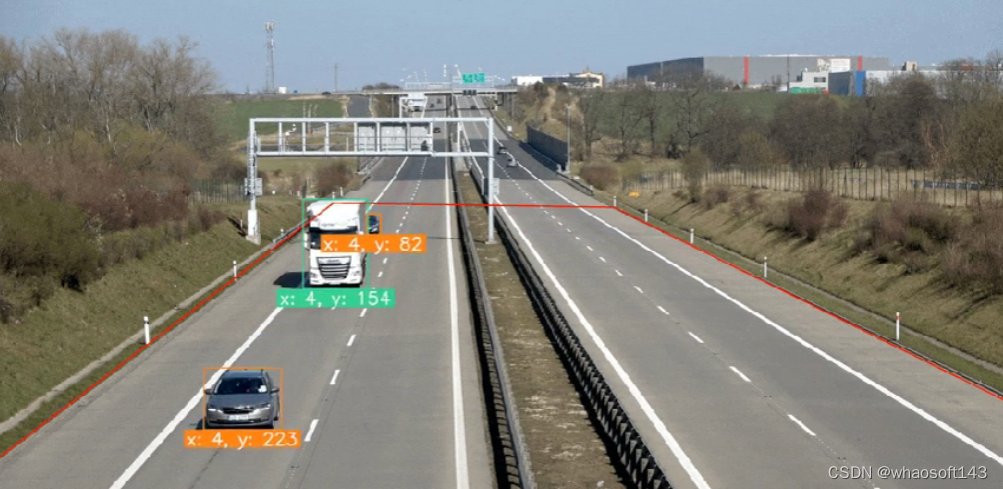
为了变换视角,我们需要一个变换矩阵,我们使用OpenCV 中的函数getPerspectiveTransform确定它。该函数有两个参数:源感兴趣区域和目标感兴趣区域。在下面的可视化中,这些区域分别标记为A-B-C-D和A'-B'-C'-D'。
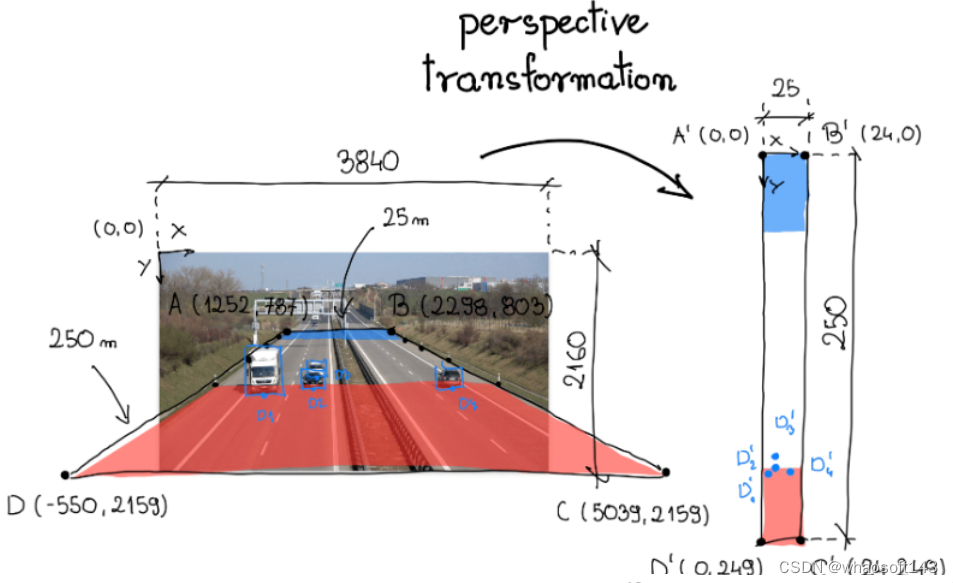
在分析单个视频帧时,我们选择了一段道路作为感兴趣的源区域。在高速公路的路肩上,通常有垂直的柱子——标记,每隔固定的距离间隔开。在本例中为 50 米。感兴趣的区域横跨道路的整个宽度以及连接上述六个柱子的部分。
在我们的例子中,我们正在处理一条高速公路。Google 地图研究表明,感兴趣源区域周围的区域大约宽 25 米,长 250 米。我们使用此信息来定义相应四边形的顶点,将新坐标系锚定在左上角。
最后,我们将顶点A-B-C-D和的坐标分别重新组织A'-B'-C'-D'为二维SOURCE和TARGET矩阵,其中矩阵的每一行包含一个点的坐标。
SOURCE = np.array([
    [1252, 787],
    [2298, 803],
    [5039, 2159],
    [-550, 2159]
])

TARGET = np.array([
    [0, 0],
    [24, 0],
    [24, 249],
    [0, 249],
])
视角转换
需要一使用源矩阵和目标矩阵,我们创建一个 ViewTransformer 类。该类使用OpenCV的getPerspectiveTransform函数来计算变换矩阵。Transform_points 方法应用此矩阵将图像坐标转换为现实世界坐标。
class ViewTransformer:
    def __init__(self, source: np.ndarray, target: np.ndarray) -> None:
        source = source.astype(np.float32)
        target = target.astype(np.float32)
        self.m = cv2.getPerspectiveTransform(source, target)

    def transform_points(self, points: np.ndarray) -> np.ndarray:
        if points.size == 0:
            return points

        reshaped_points = points.reshape(-1, 1, 2).astype(np.float32)
        transformed_points = cv2.perspectiveTransform(
                reshaped_points, self.m)
        return transformed_points.reshape(-1, 2)

view_transformer = ViewTransformer(source=SOURCE, target=TARGET)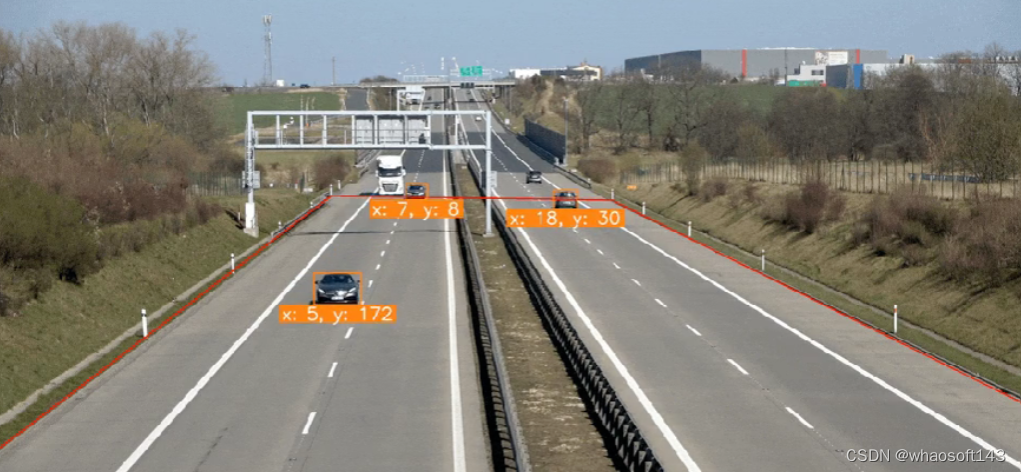
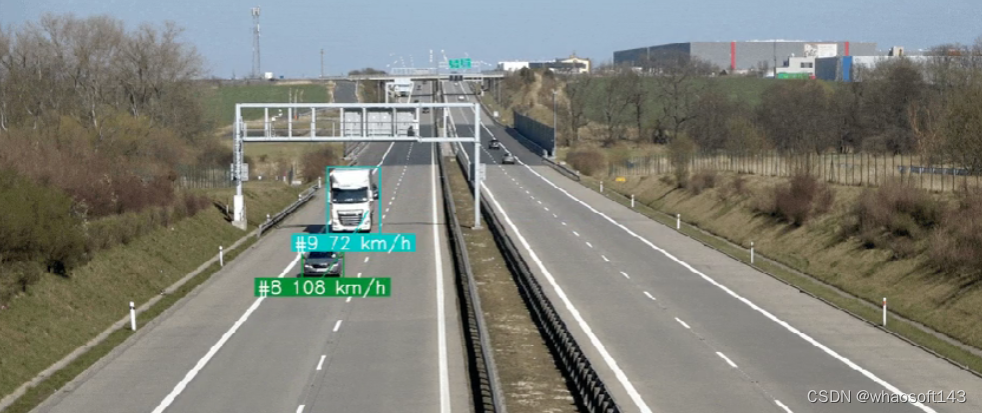
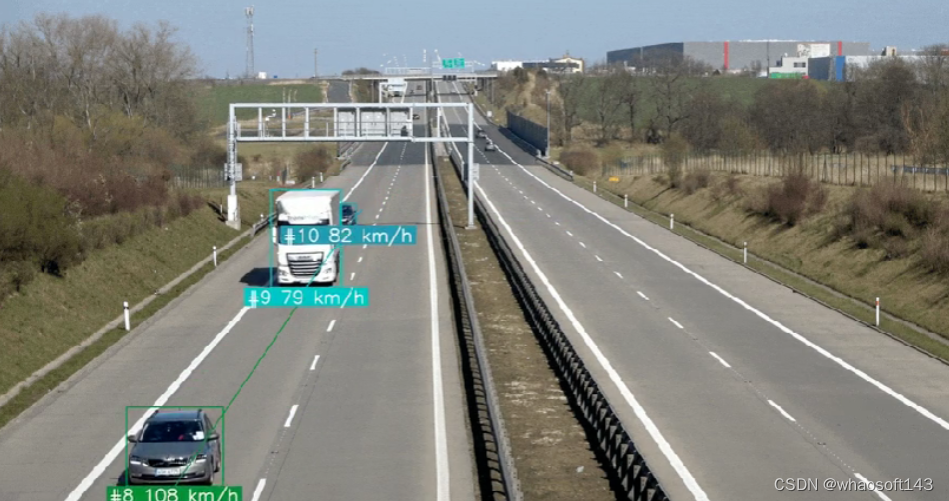
用计算机视觉计算速度
现在我们已经有了检测器、跟踪器和透视转换逻辑。是时候计算速度了。原则上很简单:将行驶的距离除以行驶该距离所需的时间。然而,这项任务有其复杂性。
在一种情况下,我们可以计算每一帧的速度:计算两个视频帧之间行进的距离,并将其除以 FPS 的倒数,在我的例子中为 1/25。不幸的是,这种方法可能会导致非常不稳定和不切实际的速度值。

为了防止这种情况,我们对一秒钟内获得的值进行平均。这样,汽车行驶的距离明显大于闪烁引起的小盒子移动,我们的速度测量也更接近真实情况。 whaosoft aiot http://143ai.com
...

video_info = sv.VideoInfo.from_video_path('vehicles.mp4')

# initialize the dictionary that we will use to store the coordinates
coordinates = defaultdict(lambda: deque(maxlen=video_info.fps))

for frame in frame_generator:
    result = model(frame)[0]
    detections = sv.Detections.from_ultralytics(result)
    detections = byte_track.update_with_detections(detections=detections)

    points = detections.get_anchors_coordinates(
        anchor=sv.Position.BOTTOM_CENTER)

    # plug the view transformer into an existing detection pipeline
    points = view_transformer.transform_points(points=points).astype(int)

    # store the transformed coordinates
    for tracker_id, [_, y] in zip(detections.tracker_id, points):
        coordinates[tracker_id].append(y)

    for tracker_id in detections.tracker_id:

        # wait to have enough data
        if len(coordinates[tracker_id]) > video_info.fps / 2:

            # calculate the speed
            coordinate_start = coordinates[tracker_id][-1]
            coordinate_end = coordinates[tracker_id][0]
            distance = abs(coordinate_start - coordinate_end)
            time = len(coordinates[tracker_id]) / video_info.fps
            speed = distance / time * 3.6

...
速度估计隐藏的复杂性
在构建现实世界的车辆速度估计系统时,应考虑许多其他因素。让我们简要讨论其中的几个。
遮挡和修剪的盒子:盒子的稳定性是影响速度估计质量的关键因素。当一辆车暂时遮挡另一辆车时,方框大小的微小变化可能会导致估计速度值的巨大变化。
设置固定参考点:在本例中,我们使用边界框的底部中心作为参考点。这是可能的,因为视频中的天气条件很好——晴天,没有下雨。然而,很容易想象找到这一点会困难得多的情况。
道路的坡度:在本例中,假设道路完全平坦。事实上,这种情况很少发生。为了尽量减少坡度的影响,我们必须将自己限制在道路相对平坦的部分,或者将坡度纳入计算中。


 被折叠的 条评论
为什么被折叠?
被折叠的 条评论
为什么被折叠?
 到【灌水乐园】发言


