


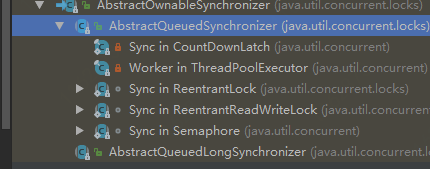
AbstractQueuedSynchronizer
1. 获得锁
公平锁
        final void lock() {
//    直接通过CAS获得锁
            if (compareAndSetState(0, 1))
                setExclusiveOwnerThread(Thread.currentThread());
            else
//    没有获得到 再次尝试获得 如果还是失败就放入等待队列
                acquire(1);
        }

    public final void acquire(int arg) {
        if (!tryAcquire(arg) &&
            acquireQueued(addWaiter(Node.EXCLUSIVE), arg))
            selfInterrupt();
    }

        final boolean nonfairTryAcquire(int acquires) {
            final Thread current = Thread.currentThread();
            int c = getState();
            if (c == 0) {
                if (compareAndSetState(0, acquires)) {
                    setExclusiveOwnerThread(current);
                    return true;
                }
            }
            else if (current == getExclusiveOwnerThread()) {
                int nextc = c + acquires;
                if (nextc < 0) // overflow
                    throw new Error("Maximum lock count exceeded");
                setState(nextc);
                return true;
            }
            return false;
        }
2. 释放锁
    public final boolean release(int arg) {
//    释放当前锁
        if (tryRelease(arg)) {
            Node h = head;
            if (h != null && h.waitStatus != 0)
//    unpark等待队列中的可被唤醒的节点
                unparkSuccessor(h);
            return true;
        }
        return false;
    }

    protected final boolean tryRelease(int releases) {
//    state减去入参
            int c = getState() - releases;
            if (Thread.currentThread() != getExclusiveOwnerThread())
                throw new IllegalMonitorStateException();
            boolean free = false;
//    如果state=0 清空互斥锁持有线程
            if (c == 0) {
                free = true;
                setExclusiveOwnerThread(null);
            }
//    更新state
            setState(c);
            return free;
        }
3. 进入等待队列
首先将当前线程包装成node,然后通过CAS插入队列,成功则返回
失败则再次插入,并且是死循环 直到插入队列为止。
private Node addWaiter(Node mode) {
        Node node = new Node(Thread.currentThread(), mode);
        // Try the fast path of enq; backup to full enq on failure
        Node pred = tail;
        if (pred != null) {
            node.prev = pred;
            if (compareAndSetTail(pred, node)) {
                pred.next = node;
                return node;
            }
        }
        enq(node);
        return node;
    }

    final boolean acquireQueued(final Node node, int arg) {
        boolean failed = true;
        try {
            boolean interrupted = false;
            for (;;) {
                final Node p = node.predecessor();
                if (p == head && tryAcquire(arg)) {
                    setHead(node);
                    p.next = null; // help GC
                    failed = false;
                    return interrupted;
                }
//  将当前线程中断并追加到队尾,状态为可被唤醒
                if (shouldParkAfterFailedAcquire(p, node) &&
                    parkAndCheckInterrupt())
                    interrupted = true;
            }
        } finally {
            if (failed)
                cancelAcquire(node);
        }
    }
4. 唤醒队列中的线程
/**
     * Wakes up node's successor, if one exists.
     *
     * @param node the node
     */
    private void unparkSuccessor(Node node) {
        /*
         * If status is negative (i.e., possibly needing signal) try
         * to clear in anticipation of signalling.  It is OK if this
         * fails or if status is changed by waiting thread.
         */
        int ws = node.waitStatus;
        if (ws < 0)
            compareAndSetWaitStatus(node, ws, 0);

        /*
         * Thread to unpark is held in successor, which is normally
         * just the next node.  But if cancelled or apparently null,
         * traverse backwards from tail to find the actual
         * non-cancelled successor.
         */

//    正常唤醒下一个节点
        Node s = node.next;
//    如果下个节点的状态为取消,则直到找到下一个可以被唤醒的节点位置
        if (s == null || s.waitStatus > 0) {
            s = null;
            for (Node t = tail; t != null && t != node; t = t.prev)
                if (t.waitStatus <= 0)
                    s = t;
        }
        if (s != null)
//    底层使用UNSAFE的native方法实现
            LockSupport.unpark(s.thread);
    }
基于AQS实现的并发工具类:ReentrantLock,Semaphore,CountDownLatch,CyclicBarrier
Lock
AbstractQueuedSynchronizer
LockSupport
并发集合
1. ConcurrentHashMap 底层采用锁 单个数组下标 实现 不同数组下标可以并发读写
2. ConcurrentLinkedQueue 底层采用volatile + cas实现
3. CopyOnWriteArrayList 底层采用copy的方式实现读写并发。
4. BlockingQueue
ArrayBlockingQueue,底层采用数组 + 线程阻塞唤醒机制实现
LinkedBlockingQueue, 底层采用链表 + 线程阻塞唤醒机制实现
PriorityBlockingQueue 底层采用红黑树 + 线程阻塞唤醒机制实现
DelayQueue 底层采用优先队列 + timer + 线程阻塞唤醒机制实现
package com.dack.test;
import java.util.Calendar;
import java.util.concurrent.DelayQueue;
import java.util.concurrent.Delayed;
import java.util.concurrent.TimeUnit;
public class DelayedTask implements Delayed {
	public static DelayQueue<DelayedTask> queue;
	// 任务的执行时间
	private int executeTime = 0;
	// 业务需要的参数
	private String outStr = "";
	public static void main(String[] args) {
		DelayedTask.queue = new DelayQueue<DelayedTask>();
		// 可有可无
		DelayedTask.queue.add(new DelayedTask(2, "hello"));
		System.out.println(System.currentTimeMillis() + "服务启动");
		while (true) {
			DelayedTask delayedTask = DelayedTask.queue.poll();
			if (delayedTask != null) {
				String os = delayedTask.getOutStr();
				//可以随时添加新的延时任务
				DelayedTask.queue.add(new DelayedTask(2, "hello"));
				System.out.println(System.currentTimeMillis() + " 消费服务 ,传参" + os);
			}
		}
	}
	public DelayedTask(int delay) {
		Calendar calendar = Calendar.getInstance();
		calendar.add(Calendar.SECOND, delay);
		this.executeTime = (int) (calendar.getTimeInMillis());
	}
	// 业务所需的参数构造方法
	public DelayedTask(int delay, String str) {
		Calendar calendar = Calendar.getInstance();
		calendar.add(Calendar.SECOND, delay);
		this.executeTime = (int) (calendar.getTimeInMillis());
		this.outStr = str;
	}
	/**
	 * 元素在队列中的剩余时间
	 *
	 * @param unit
	 * @return
	 */
	@Override
	public long getDelay(TimeUnit unit) {
		Calendar calendar = Calendar.getInstance();
		return executeTime - (calendar.getTimeInMillis());
	}
	/**
	 * 元素排序
	 *
	 * @param o
	 * @return
	 */
	@Override
	public int compareTo(Delayed o) {
		long val = this.getDelay(TimeUnit.NANOSECONDS) - o.getDelay(TimeUnit.NANOSECONDS);
		return val == 0 ? 0 : (val < 0 ? -1 : 1);
	}
	public int getExecuteTime() {
		return executeTime;
	}
	public void setExecuteTime(int executeTime) {
		this.executeTime = executeTime;
	}
	public String getOutStr() {
		return outStr;
	}
	public void setOutStr(String outStr) {
		this.outStr = outStr;
	}
}
Semaphore(信号量)
class TestSema implements Runnable {

  private final Semaphore semaphore;

  public TestSema(Semaphore semaphore) {
    this.semaphore = semaphore;
  }

  @Override
  public void run() {
    try {
      boolean get = semaphore.tryAcquire();
      if (!get) {
        System.out.println(Thread.currentThread().getName() + ",no get");
        return;
      }
      System.out.println(Thread.currentThread().getName() + ",get");
    } catch (Exception e) {
      e.printStackTrace();
    }finally {
      semaphore.release();
      System.out.println(Thread.currentThread().getName() + ",release");
    }
  }
}

  public static void main(String[] args) throws InterruptedException {
    Semaphore semaphore = new Semaphore(2);
    Thread aThread = new Thread(new TestSema(semaphore), "A");
    Thread bThread = new Thread(new TestSema(semaphore), "B");
    Thread cThread = new Thread(new TestSema(semaphore), "C");
    aThread.start();
    bThread.start();
    cThread.start();
  }
Atomic
public final int getAndAddInt(Object var1, long var2, int var4) {
        int var5;
        do {
            var5 = this.getIntVolatile(var1, var2);
        } while(!this.compareAndSwapInt(var1, var2, var5, var5 + var4));

        return var5;
    }
CountDownLatch
public class MyCountDownLatch {

    public static void main(String[] args) throws InterruptedException {
        CountDownLatch countDownLatch = new CountDownLatch(2);
        new MyTask(countDownLatch).start();
        new MyTask(countDownLatch).start();
        countDownLatch.await();
        System.out.println("任务全部完成");
    }
}

class MyTask extends Thread {
    private CountDownLatch countDownLatch;

    public MyTask(CountDownLatch countDownLatch) {
        this.countDownLatch = countDownLatch;
    }

    @Override
    public void run() {
        try {
            Thread.sleep(30000);
        } catch (InterruptedException e) {
            e.printStackTrace();
        }
        countDownLatch.countDown();
        System.out.println("任务完成");
    }
}
原理:当主线程调用await()时, 会判断count==0 如果不等于0 则将当前节点放入等待队列,阻塞当前线程,
然后自旋,不断判断count==0, 当满足时,取出等待队列中的节点进行释放对应线程
子线程每执行countDown则count-1
使用场景:比赛时各个队员全部准备就绪后 开始比赛
CyclicBarrier(循环栅(zha)栏)
public class MyCyclicBarrier {
    static class MyTask extends Thread {
        private CyclicBarrier cyclicBarrier;

        public MyTask(CyclicBarrier cyclicBarrier) {
            this.cyclicBarrier = cyclicBarrier;
        }

        @Override
        public void run() {
            System.out.println(Thread.currentThread().getName() + "到达");
            try {
                cyclicBarrier.await();
            } catch (InterruptedException e) {
                e.printStackTrace();
            } catch (BrokenBarrierException e) {
                e.printStackTrace();
            }
            System.out.println(Thread.currentThread().getName() + "离开");
        }
    }

    public static void main(String[] args) {
        CyclicBarrier cyclicBarrier = new CyclicBarrier(5, new Runnable() {
            @Override
            public void run() {
                System.out.println("完成");
            }
        });
        for (int i = 0; i < 5; i++) {
            new MyTask(cyclicBarrier).start();
        }
    }
}
原理:每次调用await() count-1, 当count==0 时, 执行回调函数, 并重置count
CompletionService
主要是针对需要返回结果的异步任务进行设计的,一边生成任务,一边获取任务的返回值。让两件事分开执行,任务之间不会互相阻塞,可以实现先执行完的先取结果,不再依赖任务顺序了。
多线程计算累加和
import java.util.concurrent.*;

public class ConcurrentAccumulation {
    public static void main(String[] args) throws InterruptedException {
        int total = 100000;
        int threads = 10;
        ExecutorService executor = Executors.newFixedThreadPool(threads);
        CompletionService<Integer> completionService = new ExecutorCompletionService<>(executor);

        int increment = total / threads;
        for (int i = 0; i < threads; i++) {
            final int start = i * increment;
            final int end = (i == threads - 1) ? total : (i + 1) * increment;
            completionService.submit(new AccumulationTask(start, end));
        }

        int sum = 0;
        for (int i = 0; i < threads; i++) {
            try {
                sum += completionService.take().get();
            } catch (ExecutionException e) {
                e.printStackTrace();
            }
        }

        System.out.println("Sum: " + sum);
        executor.shutdown();
    }

    static class AccumulationTask implements Callable<Integer> {
        private final int start;
        private final int end;

        public AccumulationTask(int start, int end) {
            this.start = start;
            this.end = end;
        }

        @Override
        public Integer call() throws Exception {
            int sum = 0;
            for (int i = start; i < end; i++) {
                sum += i;
            }
            return sum;
        }
    }
}= Executor + LinkedBlockingQueue

典型的适配器模式
线程池
实现多线程的方式

execute

线程池的种类
-
FixedThreadPool:这是一个定长线程池,核心线程数和最大线程数相同,线程数量固定。当线程达到核心线程数后,如果任务队列满了,不会创建额外的非核心线程去执行任务,而是执行拒绝策略。任务队列为链表结构的有界队列,用于控制线程的最大并发数。
-
CachedThreadPool:也称为缓存线程池,无核心线程,非核心线程数量无限。线程在执行完毕后如果闲置超过60秒会被回收。任务队列为不存储元素的阻塞队列,适合执行大量、耗时少的任务。
-
ScheduledThreadPool:支持定时或周期性执行任务。核心线程数量固定,非核心线程数量无限,执行完闲置10秒后回收。任务队列为延时阻塞队列,用于执行定时或周期性任务。
-
自定义线程池,指定队列大小
-
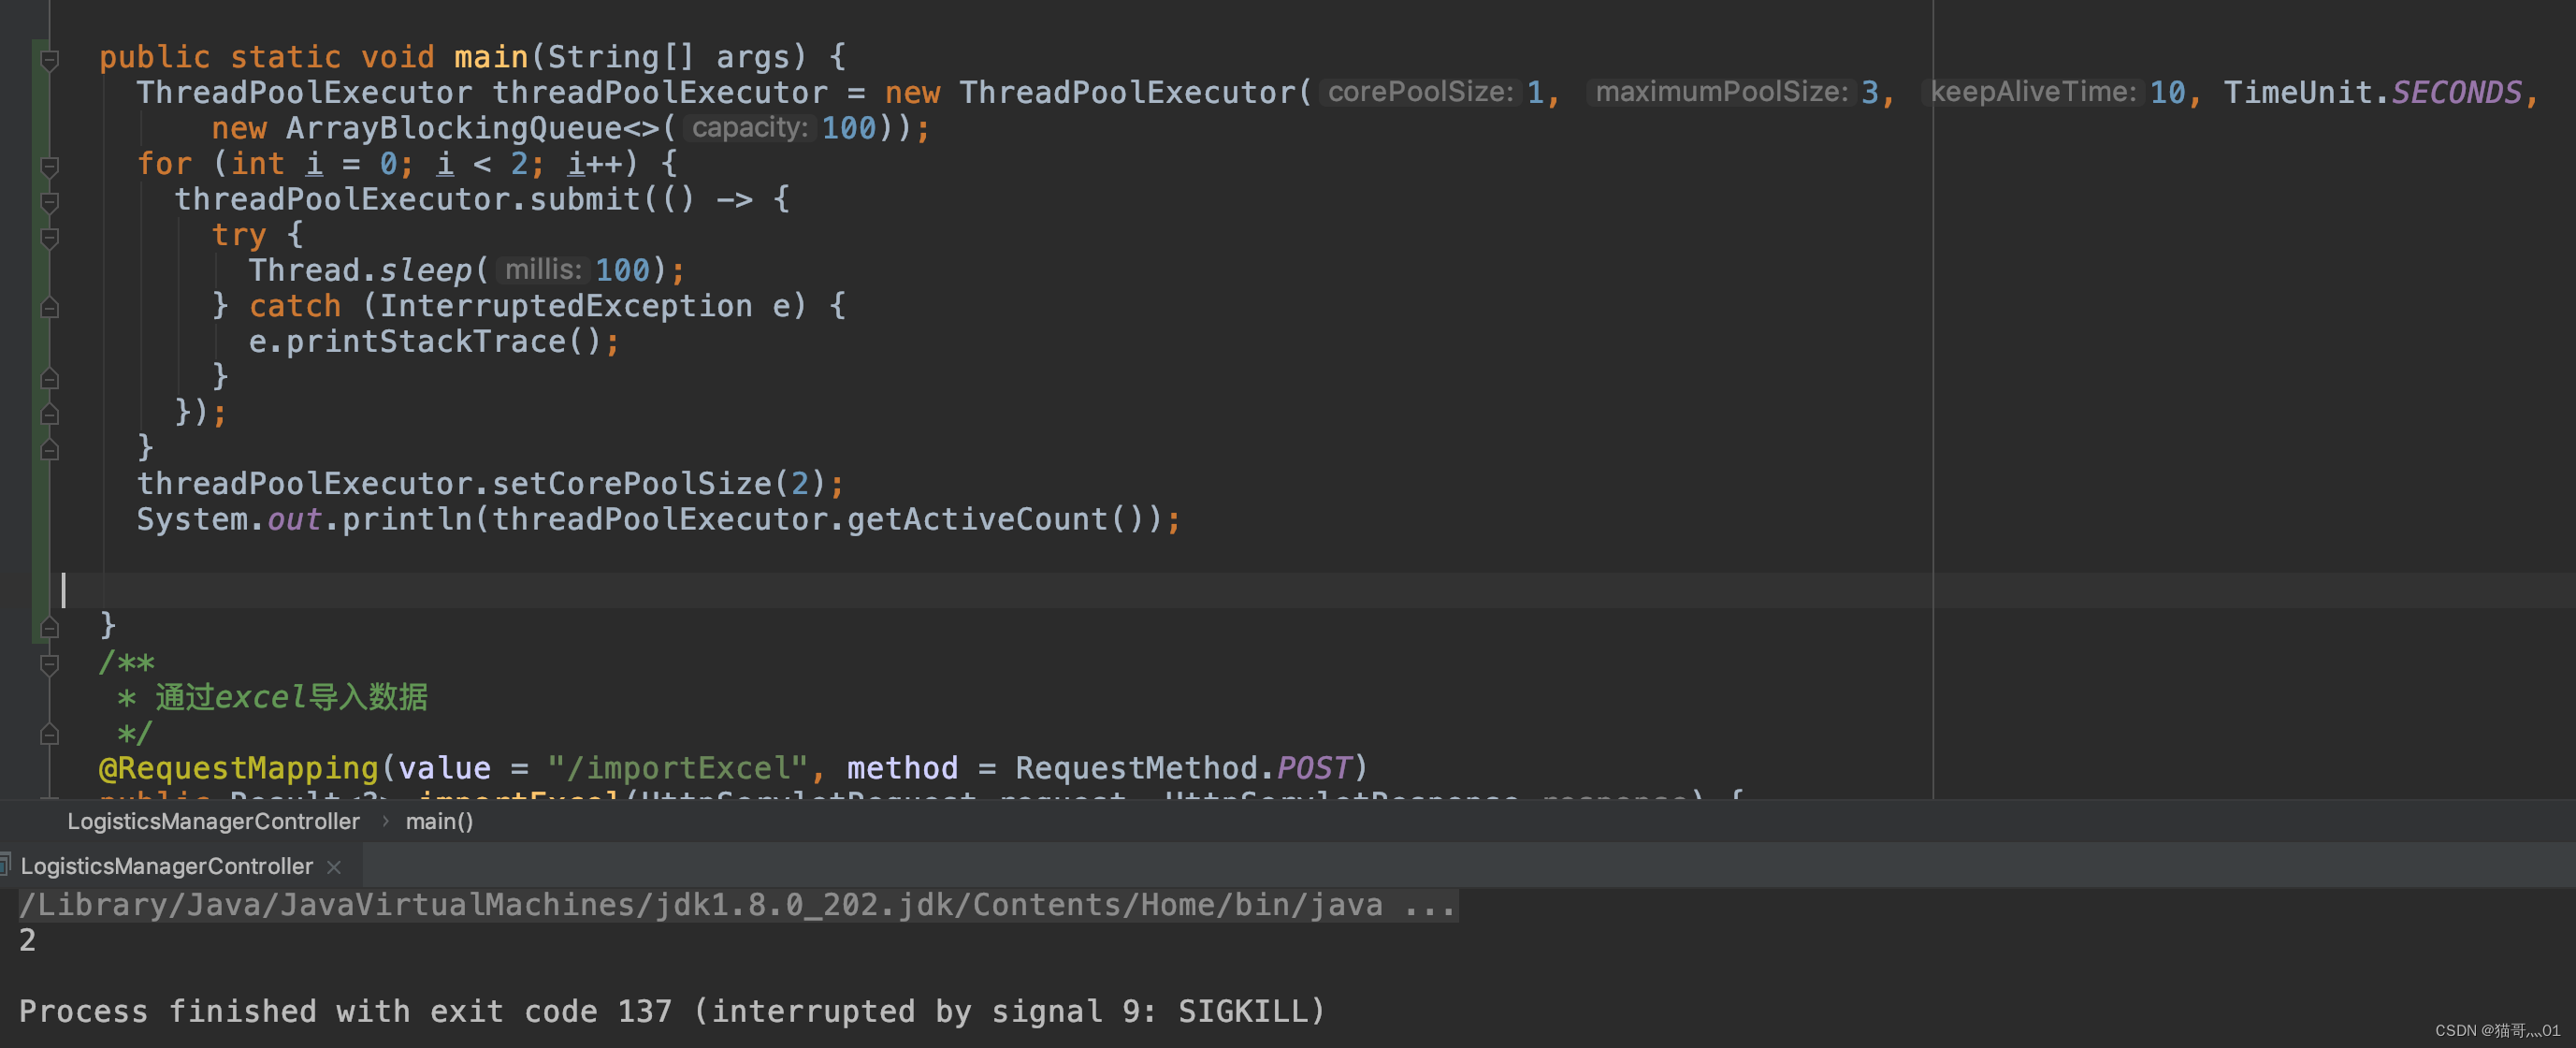
ThreadPoolExecutor threadPoolExecutor = new ThreadPoolExecutor(1, 3, 10, TimeUnit.SECONDS, new ArrayBlockingQueue<>(100)); -
动态调整线程池核心线程数
-
ThreadFactory(自定义)
import java.util.concurrent.ThreadFactory;
import java.util.concurrent.atomic.AtomicInteger;

public class CustomThreadFactory implements ThreadFactory {
    private static final AtomicInteger poolNumber = new AtomicInteger(1);
    private final ThreadGroup group;
    private final AtomicInteger threadNumber = new AtomicInteger(1);
    private final String namePrefix;

    public CustomThreadFactory(String namePrefix) {
        this.namePrefix = namePrefix;
        SecurityManager s = System.getSecurityManager();
        this.group = (s != null) ? s.getThreadGroup() :
                                  Thread.currentThread().getThreadGroup();
    }

    @Override
    public Thread newThread(Runnable r) {
        Thread t = new Thread(group, r,
                              namePrefix + "-thread-" + threadNumber.getAndIncrement(),
                              0);
        if (t.isDaemon())
            t.setDaemon(false);
        if (t.getPriority() != Thread.NORM_PRIORITY)
            t.setPriority(Thread.NORM_PRIORITY);
        return t;
    }
}


 876
876


 被折叠的 条评论
为什么被折叠?
被折叠的 条评论
为什么被折叠?
 到【灌水乐园】发言


