


目录
一.前言
本篇文章写于2023年7月8日,使用的包和工具基本上都是最新的(Vue3, VS code),如果你查看的时间比较晚,请注意版本的区别.
前面几篇文章介绍了Vue的使用,项目的搭建和一些基本信息.
Vue3案例详解(一)_flame.liu的博客-CSDN博客
Vue3案例详解(二)_flame.liu的博客-CSDN博客
Vue3案例详解(三)_flame.liu的博客-CSDN博客
Vue3案例详解(四)_flame.liu的博客-CSDN博客
Vue3案例详解(五)_flame.liu的博客-CSDN博客
Vue3案例详解(六)_flame.liu的博客-CSDN博客
二.概要
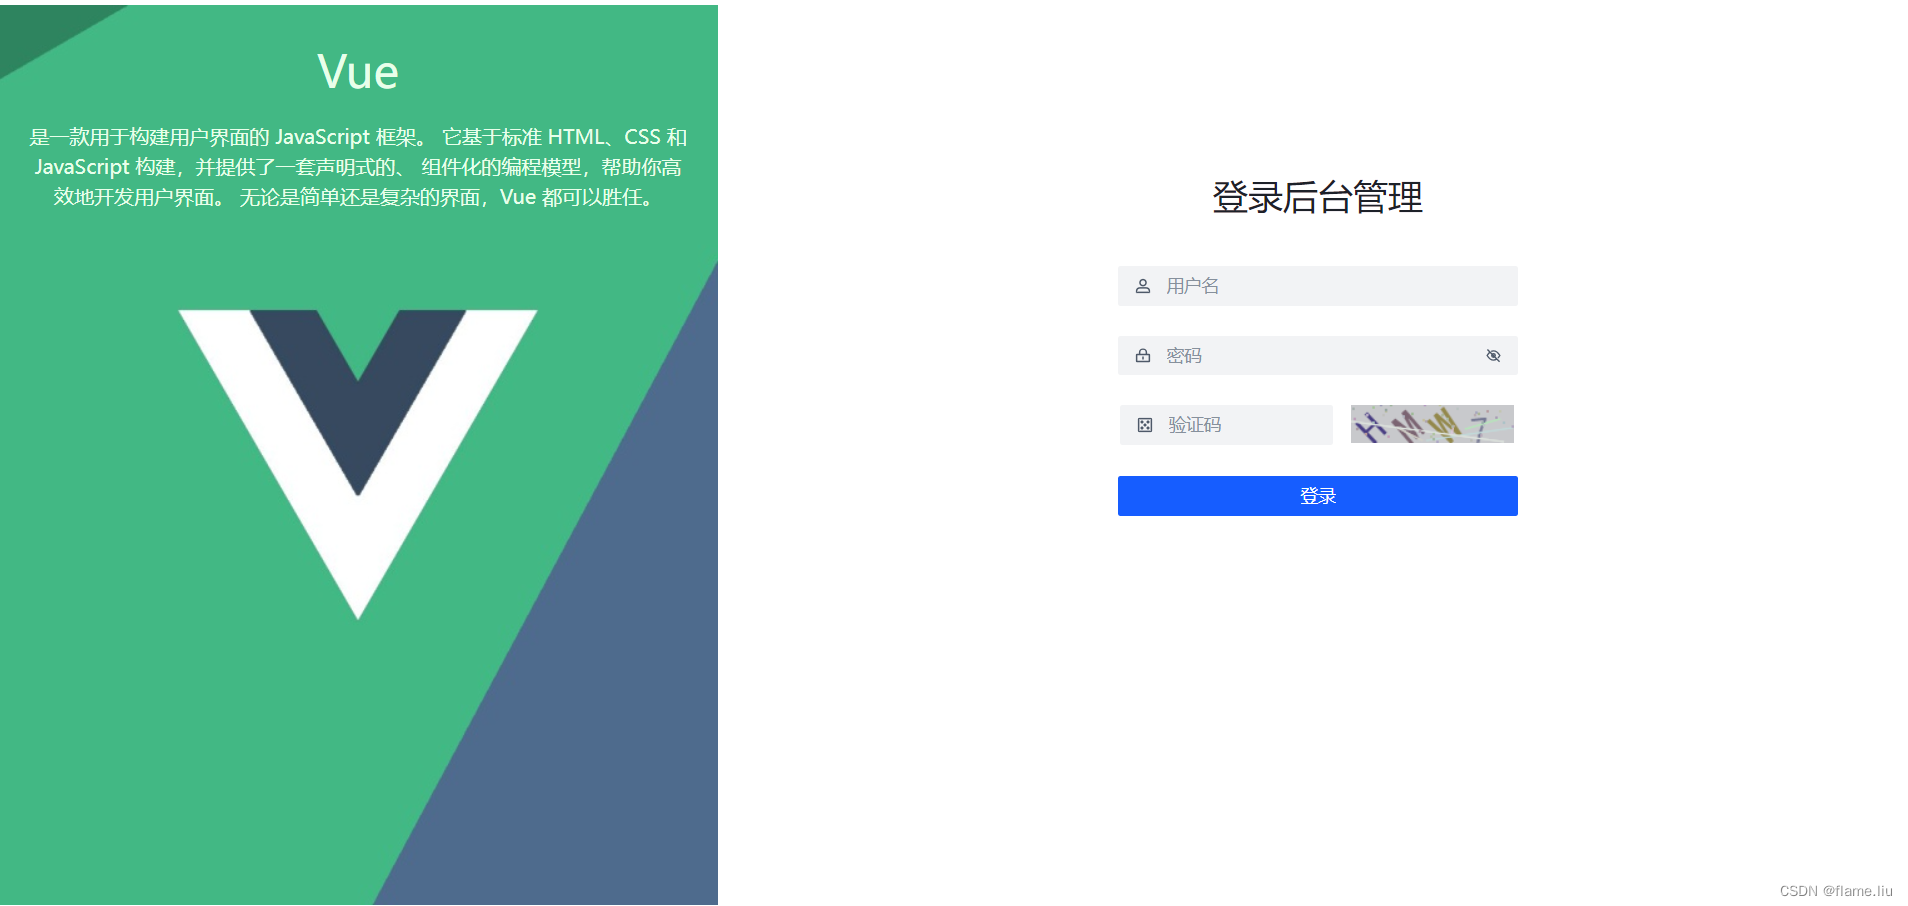
本篇文章主要介绍使用vue模板的方式制作登录组件,包含验证码的制作,其控件使用的是Arco toolbox.
效果图如下:
三.准备工作
1.安装arco toolbox figma:
Arco Toolbox是由「抖音体验设计中心-UED 火山引擎」和 「架构前端团队」联合推出的Figma插件,帮助设计师和研发同学工提效的设计工具,包含Components、Tokens、Iconbox、和Palette四个主打功能:
组件:快速定义组件样式,组件用法全知道
Tokens:查看主题全局样式,设计token一目了然
Iconbox:一键拖拽使用图标,支持在线调整,灵活配置,游刃有余
Palette:强大色彩算法,快速生成属于你的调色板
下面我们就开始,首先安装插件,在终端运行:
npm install --save-dev @arco-design/web-vue2.按需加载运行下面两个插件
npm install unplugin-vue-components

npm install unplugin-auto-import
3.修改根目录下的vite.config.js文件
内容如下:
import { defineConfig } from 'vite'
import vue from '@vitejs/plugin-vue'
import AutoImport from 'unplugin-auto-import/vite'
import Components from 'unplugin-vue-components/vite';
import { ArcoResolver } from 'unplugin-vue-components/resolvers';

// https://vitejs.dev/config/
export default defineConfig({
  plugins: [
    vue(),
    AutoImport({
      resolvers: [ArcoResolver()],
    }),
    Components({
      resolvers: [
        ArcoResolver({
          sideEffect: true
        })
      ]
    })
  ]
});
四. 编写验证码组件
在components文件夹中创建utils文件夹,并创建VerifyImg.vue文件,具体代码如下:(里面的关键代码注释比较清晰)
<script setup>
    import {reactive,onMounted,ref} from 'vue';
    //定义属性,在父组件中可以传递验证码的宽度和高度
    const props = defineProps({
        width:String,
        height:String,
    });
    //获得模板中画布的引用
    const verify = ref(null);
    const state = reactive({
        pool:"ABCDEFGHIJKLMNOPQRSTUVWXYZ1234567890",//字符串库
        width:props.width,
        height:props.height,
        imgCode:''//最终生成的验证码内容
    });

    //获得随机颜色
    const randomColor = (min,max) =>{
        const r = randomNum(min,max);
        const g = randomNum(min,max);
        const b = randomNum(min,max);
        // console.log("rgb="+r+":"+g+":"+b);
        return 'rgb('+r+','+g+','+b+')';
    }
    //绘制验证码的方法
    const draw=()=>{
        const ctx = verify.value.getContext('2d');
        ctx.fillStyle = randomColor(180,230);
        console.log(ctx.fillStyle)
        ctx.fillRect(0,0,state.width,state.height);
        let imgCode = '';//存储产生的随机字符
        for(let i=0;i<4;i++){
            const text = state.pool[randomNum(0,state.pool.length)];
            imgCode +=text;
            //设置字体大小的范围
            const fontSize = randomNum(25,40);
            //设置字体大小
            ctx.font=fontSize + 'px Simhei';
            ctx.textBaseLine = 'top';
            //设置字体颜色范围
            ctx.fillStyle = randomColor(50,150);
            //保存上面画布的设置
            ctx.save();
            //移动画布坐标的原点,以15为开始值,每次先后移动30个像素,绘制下一个字符
            ctx.translate(30*i+15,15);
            //旋转画布的原点,使文字产生旋转的效果
            const deg = randomNum(-45,45);
            ctx.rotate((deg*Math.PI)/180);
            //在画布上写上文字
            ctx.fillText(text,-10,15);
            //还原画布的设置,以便重新设置画布.
            ctx.restore();
        }
        // console.log(imgCode);
        //绘制干扰线
        for(let i=0;i<5;i++){
            ctx.beginPath();
            ctx.moveTo(randomNum(0,state.width),randomNum(0,state.height));
            ctx.lineTo(randomNum(0,state.width),randomNum(0,state.height));
            ctx.strokeStyle = randomColor(180,230);
            ctx.closePath();
            ctx.stroke();
        }
        //绘制干扰点
        for(let i=0;i<40;i++){
            ctx.beginPath();
            ctx.arc(randomNum(0,state.width),randomNum(0,state.height),1,0,2*Math.PI);
            ctx.closePath();
            ctx.fillStyle=randomColor(150,200);
            ctx.fill();
        }
        return imgCode;
    }
    //挂起的时候,绘图并获得验证码
    onMounted(()=>{
        state.imgCode = draw();
    });

    //点击事件响应的方法
    const handleDraw = ()=>{
        state.imgCode = draw();
    }
    //获得一个在规定范围内的随机函数
    const randomNum = (min,max) =>{
        return parseInt(Math.random()*(max-min)+min);
    }
</script>

<template>
    <div class="img-verify"></div>
    <canvas ref="verify" :width="width" :height="height" @click="handleDraw"></canvas>
</template>
<style type="text/css">
.img-verify canvas{
    cursor:pointer;
}
</style>
五. 完成登录组件
在components文件夹中创建login.vue组件,因为使用了arco插件,所以样式和布局都简单了.具体代码如下.
<script setup>
import VerifyImg from './utils/VerifyImg.vue';
</script>

<template>
    <a-row align="center" justify="center" style="height: 100%;">
      <a-col :xs="{span: 2}" :lg="{span: 9}" align="center" class="banner-inner">
        <a-row justify="center">
            <a-col :xs="{span: 0}" :lg="{span: 22}" >
                <a-typography>
                    <a-typography-title style="color:rgb(var(--green-1))">
                        Vue
                    </a-typography-title>
                    <a-typography-title :heading="6" style="color:rgb(var(--green-1))">
                        是一款用于构建用户界面的 JavaScript 框架。
                    它基于标准 HTML、CSS 和 JavaScript 构建,并提供了一套声明式的、
                    组件化的编程模型,帮助你高效地开发用户界面。
                    无论是简单还是复杂的界面,Vue 都可以胜任。
                    </a-typography-title>
                </a-typography>
            </a-col>
        </a-row>
      </a-col>

      <a-col :xs="{span: 22}" :lg="{span: 15}" align="center">
        <a-space direction="vertical" size="large" style="margin-top: -20px;">
            <a-typography-title :heading="3">登录后台管理</a-typography-title>

            <a-input :style="{width:'320px'}" placeholder="用户名" allow-clear>
            <template #prefix><icon-user /></template>
            </a-input>

            <a-input-password :style="{width:'320px'}" placeholder="密码" allow-clear>
                <template #prefix><icon-lock /></template>
            </a-input-password>

            <a-space direction="vertical" style="display: block;">
                <a-row>
                <a-col :span="13">
                    <a-input :style="{width:'170px'}" placeholder="验证码" allow-clear>
                    <template #prefix><icon-dice /></template>
                    </a-input>
                </a-col>
                <a-col :span="1"></a-col>
                <a-col :span="5">
                    <verify-img :width="130" :height="30"></verify-img>
                </a-col>
                </a-row>
            </a-space>

            <a-button type="primary" long>登录</a-button>
            <div style="height: 160px;"></div>
        </a-space>
      </a-col>
    </a-row>
</template>
六.引用登录组件
在src文件夹中创建login.html文件,完成登录页面,具体代码如下:
<!DOCTYPE html>
<html lang="en">
<head>
    <meta charset="UTF-8">
    <meta http-equiv="X-UA-Compatible" content="IE=edge">
    <meta name="viewport" content="width=device-width, initial-scale=1.0">
    <title>Document</title>
    <style>
        html,body,#login{height: 100%;}
    </style>
</head>
<body>
    <div id="login"></div>
</body>
<script type="module">
    import {createApp} from 'vue';
    import login from './components/login.vue';
    import ArcoVue from '@arco-design/web-vue';
    import ArcoVueIcon from '@arco-design/web-vue/es/icon';
    import '@arco-design/web-vue/dist/arco.css';
    import './assets/style/login.css'

    const loginApp = createApp(login);
    loginApp.use(ArcoVue);
    loginApp.use(ArcoVueIcon);
    loginApp.mount("#login");
</script>
</html>


 1187
1187


 被折叠的 条评论
为什么被折叠?
被折叠的 条评论
为什么被折叠?
 到【灌水乐园】发言


