


 这篇博客介绍了Angular 8的基础知识,包括组件的创建和声明、数据绑定的四种方式、指令的使用,特别是结构指令如*ngIf和*ngFor。还详细讨论了组件间数据交互、视图封装、生命周期钩子,以及服务和依赖注入的概念,强调了依赖注入在保持代码清晰和减少组件间数据传输复杂性方面的优势。
Basics
-
Angular的Component可以反复使用也可以使用在其他Component中, Angular有一个根Component叫做
<app-root></app-root>,其他我们生成的Component都需要在该Component内部 -
可以手动生成Component,但不要忘记在app.modules.ts的declarations中声明(类似于spring中对Component的scan);也可以用ng generate component
<name>自动生成,则不再需要手动添加声明(确保ng serve在运行)。 -
@Component指明了该组件的配置情况,其中templateUrl指定了该组件的内容(可以不用templateUrl而是使用template,那么此时是在typescript文件中直接写html),styleUrls和styles起着相同的作用,唯一的区别是style可以有多个css文件。selector很像css的selector,不止可以做为选中元素,也可以做为选中属性( [
<attribute>] )或者选中class ( [.<class>] )import { Component, OnInit } from '@angular/core'; @Component({ selector: 'app-servers', templateUrl: './servers.component.html', styleUrls: ['./servers.component.css'] }) export class ServersComponent implements OnInit { constructor() { } ngOnInit() { } } -
Angular databinding的四种方式

- String Interpolation:{{ }}写在html文件中,{{ }}中间可以是typescript中声明的变量或函数,只要{{ }}中间最后是一个String类型即可。
- Property Binding:改变某个元素的原生属性的值,比如将某个元素的disabled属性绑定到某个布尔变量上。
<button class="btn btn-primary" [disabled]="!allowNewServer"></button> - Event Binding:当触发绑定的event(比如click event)后,会执行expression。一个很重要的预留关键词是
$event,这个关键词代表的是触发该event产生的数据。比如我们可以监听input元素的input event,每当我们改变input元素的内容的时候,我们都可以拿到这个值。
<input class="form-control" (input)="onUpdataServerName($event)"> - Two Way Binding:typescript中变量的改变会改变template上的显示,template上的显示被手动改变也会改变typescript中变量的值。需要加入FormModule这个库。
-
Directives:组件是一个带模板的指令;@Component装饰器实际上就是一个@Directive装饰器,只是扩展了一些面向模板的特性。
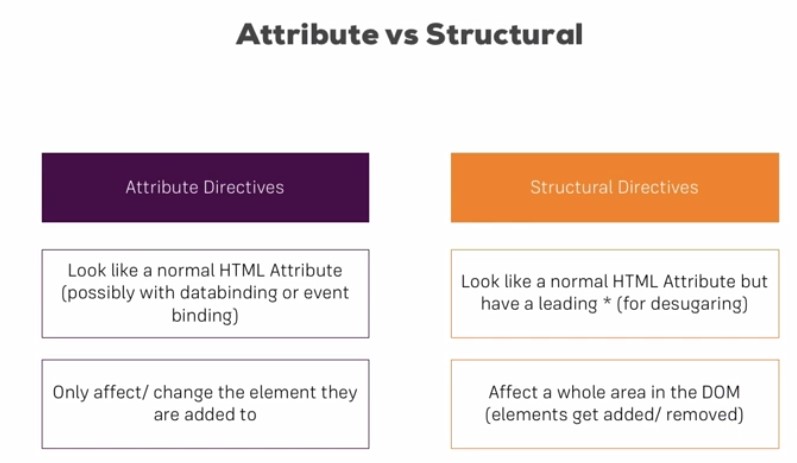
一些angular内置的directives:带*号的是structural directives,structural directives会导致元素的增加或删除,普通的attribute directives不会造成元素的增加或删除,只会改变元素。
*ngIf:如果判断为真,那么元素存在,如果判断为假,那么该元素不存在(注意与disabled属性的区别,disabled是指元素存在但不可见)。<p *ngIf="getServerStatus()"></p>
[ngStyle]:attribute directive,他本身是一个directive,我们使用的时候用Property Binding来动态的改变某个元素的style。<p [ngStyle]="{ backgroundColor: getColor() }"></p>
语法格式是:冒号前面是style名字,冒号后面是一个String,代表该style的属性。
[ngClass]:动态增加css class。<p [ngClass]="{ Online: getServerStatus==='online' } "></p>
语法格式是:冒号前面是我们css文件中的某个class,冒号后面是boolean值,可以是表达式或函数,如果boolean为真,那么在该元素上增加该class。
*ngFor:<p *ngFor="let server of servers; let i = index">{{ server }}</p>
servers是我们定义的一个javascript array。index是ngFor预留的关键词,可以获取ngFor循环的index。i可以在这个元素中当做变量使用。 -
一个很重要的问题:两个Component之间如何进行数据的交互。
Custom Properties & Events:

Native Properties & Events指的是对已有元素的property进行绑定,比如disabled属性。
Custom Properties & Events for Directives指的是类似*ngFor。
Custom Properties & Event for Components 用于Component间的数据交互。-
父Component传入子Component
export class ServerElementComponent implements OnInit {
  @Input('srvElement')
  element : {
    type: string,
    name: string,
    content: string
  }
  constructor() { }
  ngOnInit() {
  }
}
使用了input注解之后,我们再使用ServerElementComponent的时候就像之前我们使用disabled属性一样使用element属性了,所以也可以为其绑定数据。
<app-server-element *ngFor="let serverElement of serverElements" [srvElement]='serverElement'></app-server-element>
@Input(alias),如果我们想为property起一个别名,乐意在里面加一个alias,这时候使用的时候就必须要用这个alias。如果不加alias,那么使用的时候就是用他本来的名字(element)。 -
子Component发射event,父Component接受event(子Component向父Component传数据)
app.html.<app-cockpit (serverCreated)="onServerAdded($event)" (blueprintCreated)="onBlueprintAdded($event)"></app-cockpit>app.ts
export class AppComponent {
  serverElements = [{type:'server', name:'test', content:'test'}];

  onServerAdded(serverData:{serverName: string, serverContent:string}) {
    this.serverElements.push({
      type: 'server',
      name: serverData.serverName,
      content: serverData.serverContent
    });
  }

  onBlueprintAdded(serverData:{serverName: string, serverContent:string}) {
    this.serverElements.push({
      type: 'blueprint',
      name: serverData.serverName,
      content: serverData.newServerContent
    });
  }
}
cockpit.html
<div class="row">
  <div class="col-xs-12">
    <p>Add new Servers or blueprints!</p>
    <label>Server Name</label>
    <input type="text" class="form-control" [(ngModel)]="newServerName">
    <label>Server Content</label>
    <input type="text" class="form-control" [(ngModel)]="newServerContent">
    <br>
    <button
      class="btn btn-primary"
      (click)="onAddServer()">Add Server</button>
    <button
      class="btn btn-primary"
      (click)="onAddBlueprint()">Add Server Blueprint</button>
  </div>
</div>
cockpit.ts
export class CockpitComponent implements OnInit {
  @Output() serverCreated = new EventEmitter<{serverName:string, serverContent:string}>();
  @Output() blueprintCreated = new EventEmitter<{serverName:string, serverContent:string}>();
  newServerName = '';
  newServerContent = '';
  constructor() { }

  ngOnInit() {
  }

  onAddServer() {
    //当我们接受到click信号的时候,触发这个函数,在这个函数中将serverCreated信号发射,这样我们的app-component会接受到serverCreated信号并把新加入的server加入数组。
    this.serverCreated.emit({
      serverName:this.newServerName,
      serverContent:this.newServerContent
    });
  }

  onAddBlueprint() {
    this.blueprintCreated.emit({
      serverName:this.newServerName,
      serverContent:this.newServerContent
    });
  }
-
-
View Encapsulation
默认是emulated,可选的有none和native。emulated意思是css文件只对该Component起作用。 -
传数据的其他方式
Local Reference
我们现在使用双向绑定获取input的值,我们也可以在html元素中加入#reference_name,然后我们可以在html的其他位置引用该元素。
@ViewChild
在html使用#号标识引用,然后再ts文件中使用viewchild声明一个变量。
@ViewChild('nameInput', {static: false}) nameInputRef:ElementRef
后面我们就可以使用这个变量,并且它的值与html关联。
this.nameInputRef.nativeElement.value
ng-content -
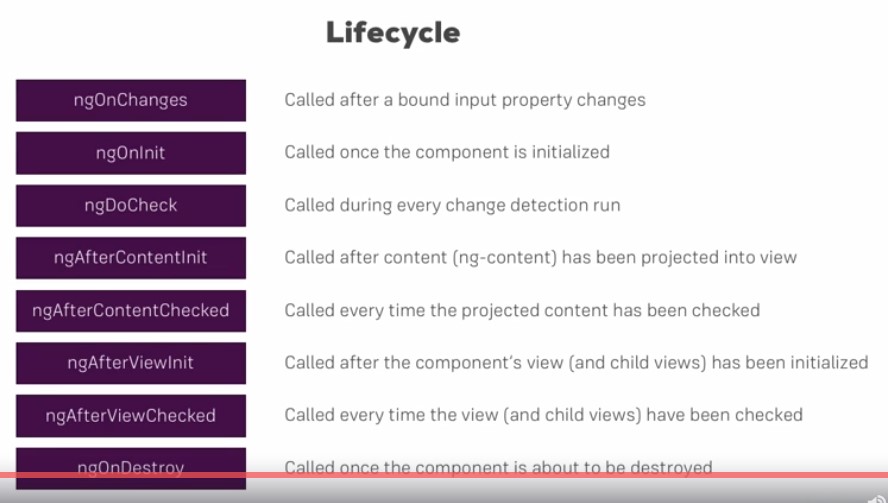
Lifecycle
-
More of directive
-
basic attribute directive :
import { Directive, ElementRef, OnInit } from '@angular/core'; @Directive({ selector:'[appBasicHightlight]' }) export class BasicHighlightDirective implements OnInit { constructor(private elementRef:ElementRef){} ngOnInit(): void { this.elementRef.nativeElement.style.backgroundColor = 'green'; } } -
better attribute directive:
因为有的时候不能直接操作DOM,所以这是一个更好的方法。import { Directive, Renderer2, OnInit, ElementRef } from '@angular/core'; @Directive({ selector: '[appBetterHighlight]' }) export class BetterHighlightDirective implements OnInit{ constructor(private elRef:ElementRef, private renderer:Renderer2) { } ngOnInit(){ this.renderer.setStyle(this.elRef.nativeElement, 'background-color', 'blue') } } responsive attribute directive:使用HostListener注解可以像jQuery一样接收到event。 @HostListener('mouseenter') mouseover(eventData:Event){ this.renderer.setStyle(this.elRef.nativeElement, 'back-ground-color', 'blue'); } @HostListener('mouseleave') mouseleave(eventData:Event){ this.renderer.setStyle(this.elRef.nativeElement, 'back-ground-color', 'transparent'); }以上这种responsive attribute directive还是有些麻烦,我们可以不使用renderer2而是使用@HostBinding
export class BetterHighlightDirective implements OnInit{ @HostBinding('style.backgroundColor') backgroundColor:string = 'transparent'; constructor(private elRef:ElementRef, private renderer:Renderer2) { } ngOnInit(){ } @HostListener('mouseenter') mouseover(eventData:Event){ // this.renderer.setStyle(this.elRef.nativeElement, 'back-ground-color', 'blue'); this.backgroundColor = 'blue'; } @HostListener('mouseleave') mouseleave(eventData:Event){ // this.renderer.setStyle(this.elRef.nativeElement, 'back-ground-color', 'transparent'); this.backgroundColor = 'green'; } } -
directive也像component一样可以进行custom binding,语法格式完全一样(在directive中新建@input成员变量),然后就可以在使用directive的时候绑定值。
@Directive({ selector: '[appBetterHighlight]' }) export class BetterHighlightDirective implements OnInit{ @Input() defaultColor:string = 'transparent'; @Input() changedColor:string = 'blue'; @HostBinding('style.backgroundColor') backgroundColor:string; constructor(private elRef:ElementRef, private renderer:Renderer2) { } ngOnInit(){ this.backgroundColor = this.defaultColor; } @HostListener('mouseenter') mouseover(eventData:Event){ // this.renderer.setStyle(this.elRef.nativeElement, 'back-ground-color', 'blue'); this.backgroundColor = this.changedColor; } @HostListener('mouseleave') mouseleave(eventData:Event){ // this.renderer.setStyle(this.elRef.nativeElement, 'back-ground-color', 'transparent'); this.backgroundColor = this.defaultColor; } }<ul class="list-group"> <li class="list-group-item" appBetterHighlight [changedColor]="'red'" [defaultColor]="'pink'"> content </li> </ul> -
structural directive:
Angular本身没有*符号,符号其实是告诉Angular将ngIf变成<ng-template [ngIf]></ng-template>
-
Service and Dependency Injection
-
与spring boot的dependency injection相同,angular也采用了相同的思想,所以对于我们的服务类,我们不需要去实例化他们,而是应该在需要使用该依赖的时候使用依赖注入。
import { Component, EventEmitter, Output } from '@angular/core'; import { LoggingService } from '../logging.service'; @Component({ selector: 'app-new-account', templateUrl: './new-account.component.html', styleUrls: ['./new-account.component.css'], providers: [LoggingService] }) export class NewAccountComponent { @Output() accountAdded = new EventEmitter<{name: string, status: string}>(); constructor(private loggingService:LoggingService){} onCreateAccount(accountName: string, accountStatus: string) { this.accountAdded.emit({ name: accountName, status: accountStatus }); this.loggingService.logStatusChange(accountStatus); } } -
Hierarchical Injector
如果在一个component中使用了依赖注入,那么这个component及它的子component都会共享同一个相同的实例。所以如果在父component和它的子component中都对同一个service进行依赖注入,那么会产生两个实例。
所以,如果想要在子component使用父component的实例,那么不要在providers中填写service类! -
如果想在一个一个依赖中注入另一个依赖,需要标注
@Injectable,同时在appModule的provider中注明。 -
Injection Dependency的好处:①代码结构更清晰,分离操作与接口 ② 不再需要component之间繁琐的数据传输,数据传输都可以通过service层


 被折叠的 条评论
为什么被折叠?
被折叠的 条评论
为什么被折叠?
 到【灌水乐园】发言


