实战指南:Spring Boot 3.x 与JJWT 0.9.x到0.12.5版本升级,使用HS256算法生成JWT

1.前言

随着微服务架构和前后端分离开发模式的流行,JWT(JSON Web Token)成为了身份认证和授权的标准方式之一。JWT 的使用允许我们在客户端和服务器之间安全地传递信息,特别是在无状态的 HTTP 协议中。本文将详细介绍如何在 Spring Boot 3.x 项目中使用 HS256 算法生成 JWT,并将 jjwt 依赖从版本 0.9.x 升级到 0.12.5。

2.简介

什么是 JWT?

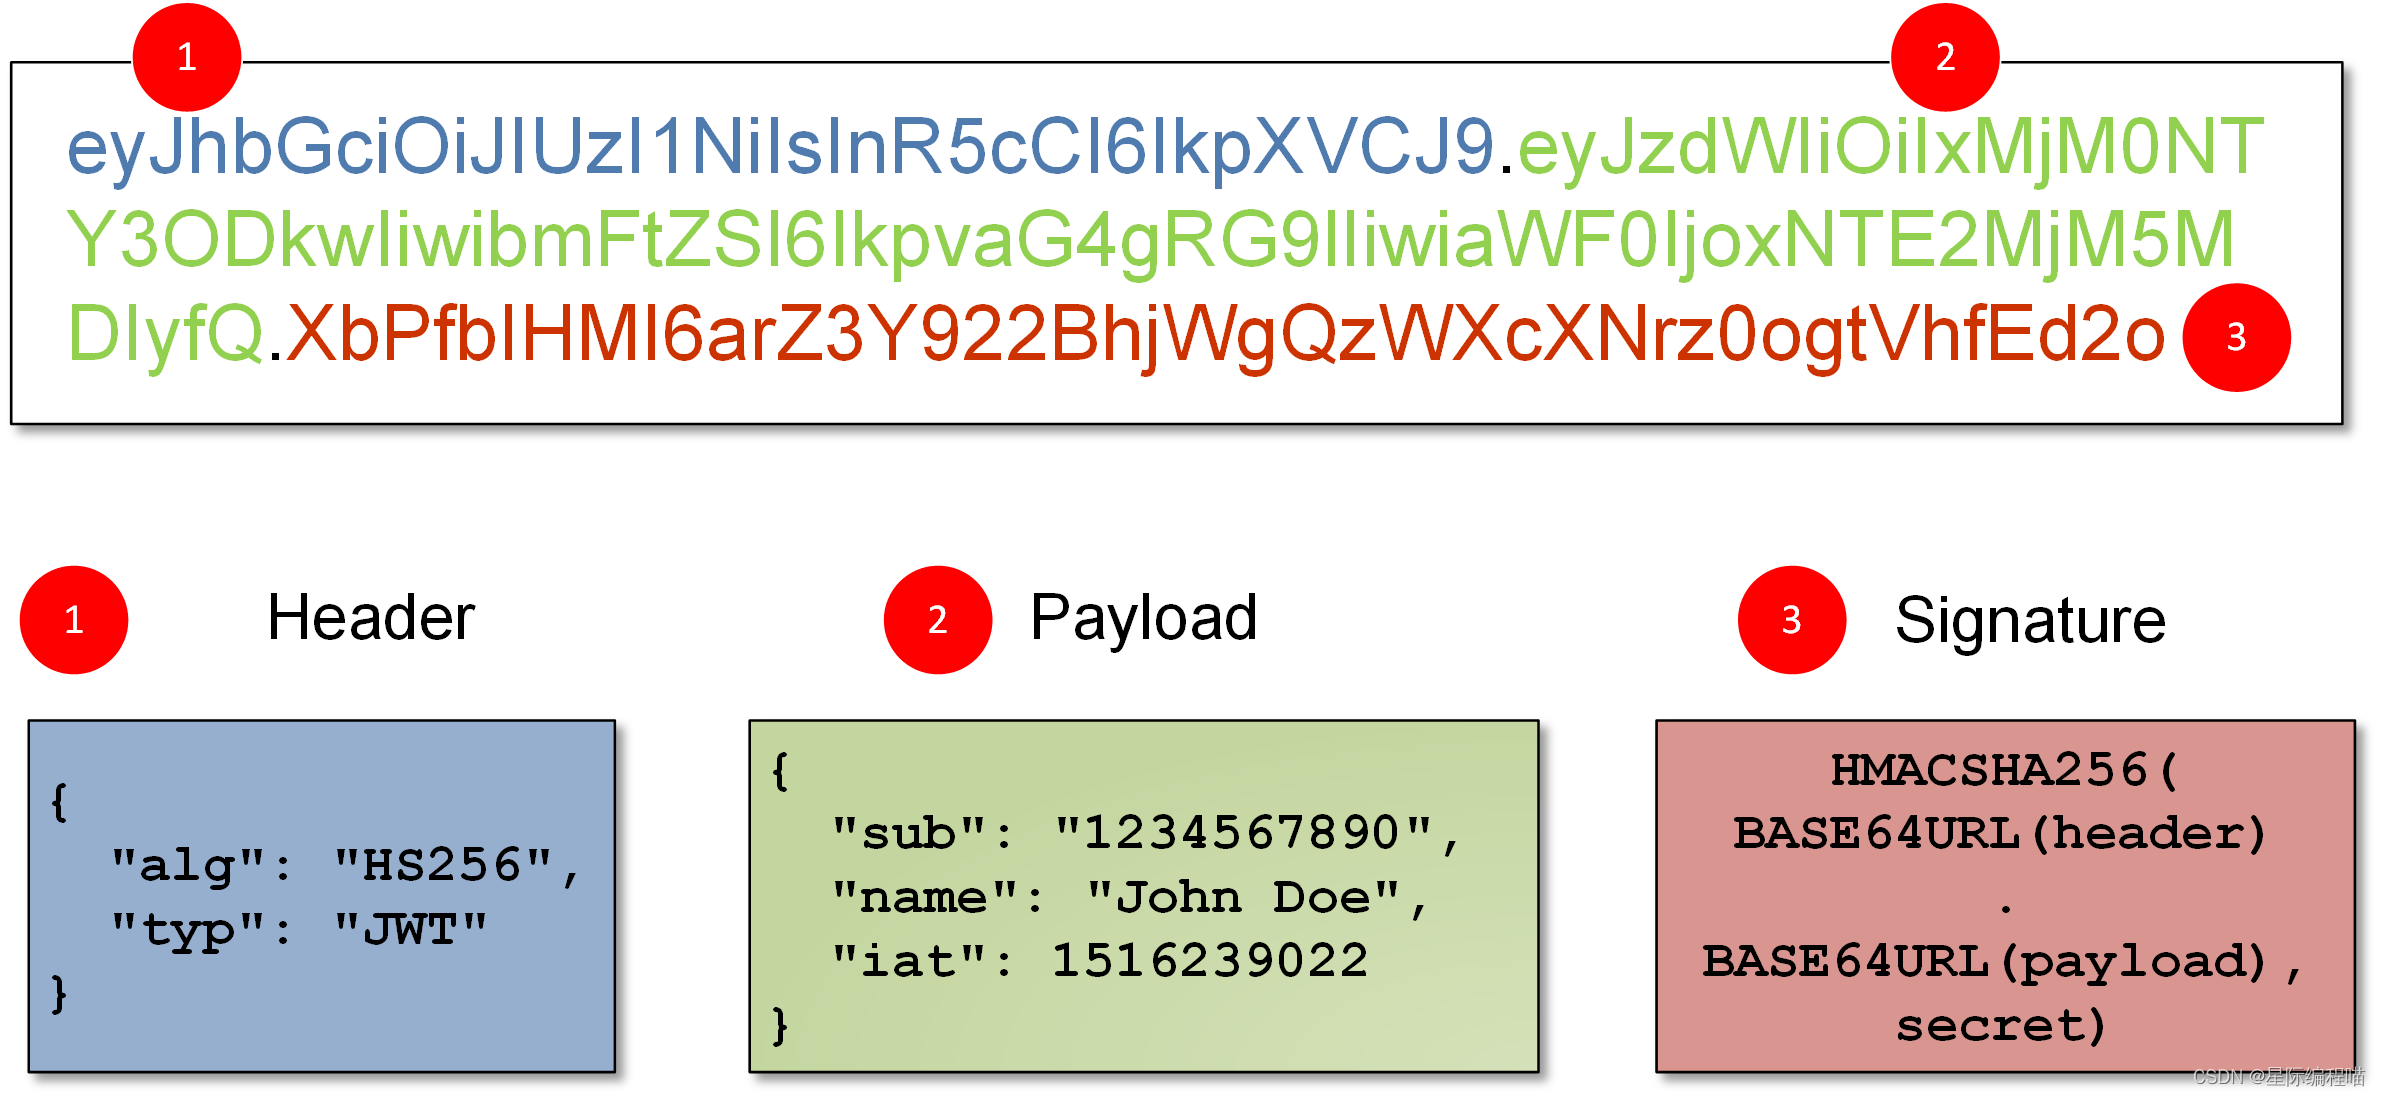
JWT(JSON Web Token)是一种基于 JSON 的开放标准 (RFC 7519),用于在各方之间安全地传输信息。JWT 由三部分组成:Header(头部)、Payload(载荷)和 Signature(签名)。这些部分通过点(.)分隔组成一个字符串。

  • Header:通常包含令牌类型(即 JWT)和所使用的签名算法。
  • Payload:包含声明或断言,如用户 ID、用户名和其他元数据。
  • Signature:用于验证消息在传输过程中是否被篡改。

HS256 算法

HS256(HMAC with SHA-256)是 JWT 支持的一种对称加密算法,使用同一个密钥进行加密和解密,这使得密钥管理变得至关重要。其主要优点在于速度快,适合对性能要求较高的场景。

JJWT 库

  • 5
    点赞
  • 0
    收藏
    觉得还不错? 一键收藏
  • 打赏
    打赏
  • 0
    评论
使用Spring BootJwt进行身份验证可以保护您的应用程序免受未经授权的访问。下面是使用Spring BootJwt进行身份验证的步骤: 1. 添加相关依赖 在 `pom.xml` 文件中添加以下依赖: ```xml <dependency> <groupId>org.springframework.boot</groupId> <artifactId>spring-boot-starter-security</artifactId> </dependency> <dependency> <groupId>io.jsonwebtoken</groupId> <artifactId>jjwt</artifactId> <version>0.9.1</version> </dependency> ``` 2. 创建JwtUtils类 创建一个 `JwtUtils` 类,用于生成和解析Jwt令牌。以下是一个示例实现: ```java import io.jsonwebtoken.Claims; import io.jsonwebtoken.Jwts; import io.jsonwebtoken.SignatureAlgorithm; import org.springframework.beans.factory.annotation.Value; import org.springframework.security.core.userdetails.UserDetails; import org.springframework.stereotype.Component; import java.util.Date; import java.util.HashMap; import java.util.Map; import java.util.function.Function; @Component public class JwtUtils { @Value("${jwt.secret}") private String secret; @Value("${jwt.expiration}") private Long expiration; public String generateToken(UserDetails userDetails) { Map<String, Object> claims = new HashMap<>(); return createToken(claims, userDetails.getUsername()); } private String createToken(Map<String, Object> claims, String subject) { Date now = new Date(); Date expirationDate = new Date(now.getTime() + expiration); return Jwts.builder() .setClaims(claims) .setSubject(subject) .setIssuedAt(now) .setExpiration(expirationDate) .signWith(SignatureAlgorithm.HS256, secret) .compact(); } public boolean validateToken(String token, UserDetails userDetails) { final String username = extractUsername(token); return (username.equals(userDetails.getUsername()) && !isTokenExpired(token)); } public boolean isTokenExpired(String token) { final Date expirationDate = extractExpiration(token); return expirationDate.before(new Date()); } public String extractUsername(String token) { return extractClaim(token, Claims::getSubject); } public Date extractExpiration(String token) { return extractClaim(token, Claims::getExpiration); } public <T> T extractClaim(String token, Function<Claims, T> claimsResolver) { final Claims claims = extractAllClaims(token); return claimsResolver.apply(claims); } private Claims extractAllClaims(String token) { return Jwts.parser().setSigningKey(secret).parseClaimsJws(token).getBody(); } } ``` 3. 创建JwtRequestFilter 创建一个 `JwtRequestFilter` 类,用于拦截所有安全请求并验证Jwt令牌。以下是一个示例实现: ```java import org.springframework.beans.factory.annotation.Autowired; import org.springframework.security.authentication.UsernamePasswordAuthenticationToken; import org.springframework.security.core.context.SecurityContextHolder; import org.springframework.security.core.userdetails.User; import org.springframework.security.core.userdetails.UserDetails; import org.springframework.security.core.userdetails.UserDetailsService; import org.springframework.security.web.authentication.WebAuthenticationDetailsSource; import org.springframework.stereotype.Component; import org.springframework.web.filter.OncePerRequestFilter; import javax.servlet.FilterChain; import javax.servlet.ServletException; import javax.servlet.http.HttpServletRequest; import javax.servlet.http.HttpServletResponse; import java.io.IOException; @Component public class JwtRequestFilter extends OncePerRequestFilter { @Autowired private UserDetailsService userDetailsService; @Autowired private JwtUtils jwtUtils; @Override protected void doFilterInternal(HttpServletRequest request, HttpServletResponse response, FilterChain filterChain) throws ServletException, IOException { final String authorizationHeader = request.getHeader("Authorization"); String username = null; String jwt = null; if (authorizationHeader != null && authorizationHeader.startsWith("Bearer ")) { jwt = authorizationHeader.substring(7); username = jwtUtils.extractUsername(jwt); } if (username != null && SecurityContextHolder.getContext().getAuthentication() == null) { UserDetails userDetails = this.userDetailsService.loadUserByUsername(username); if (jwtUtils.validateToken(jwt, userDetails)) { UsernamePasswordAuthenticationToken usernamePasswordAuthenticationToken = new UsernamePasswordAuthenticationToken( userDetails, null, userDetails.getAuthorities()); usernamePasswordAuthenticationToken.setDetails(new WebAuthenticationDetailsSource().buildDetails(request)); SecurityContextHolder.getContext().setAuthentication(usernamePasswordAuthenticationToken); } } filterChain.doFilter(request, response); } } ``` 4. 创建JwtAuthenticationController 创建一个 `JwtAuthenticationController` 类,用于处理用户身份验证请求并返回Jwt令牌。以下是一个示例实现: ```java import org.springframework.beans.factory.annotation.Autowired; import org.springframework.http.ResponseEntity; import org.springframework.security.authentication.AuthenticationManager; import org.springframework.security.authentication.UsernamePasswordAuthenticationToken; import org.springframework.security.core.userdetails.UserDetails; import org.springframework.security.core.userdetails.UserDetailsService; import org.springframework.security.crypto.password.PasswordEncoder; import org.springframework.web.bind.annotation.*; @RestController public class JwtAuthenticationController { @Autowired private AuthenticationManager authenticationManager; @Autowired private UserDetailsService userDetailsService; @Autowired private JwtUtils jwtUtils; @Autowired private PasswordEncoder passwordEncoder; @PostMapping("/authenticate") public ResponseEntity<?> createAuthenticationToken(@RequestBody JwtRequest jwtRequest) throws Exception { try { authenticationManager.authenticate( new UsernamePasswordAuthenticationToken(jwtRequest.getUsername(), jwtRequest.getPassword())); } catch (Exception e) { throw new Exception("Incorrect username or password", e); } final UserDetails userDetails = userDetailsService.loadUserByUsername(jwtRequest.getUsername()); final String token = jwtUtils.generateToken(userDetails); return ResponseEntity.ok(new JwtResponse(token)); } @PostMapping("/register") public ResponseEntity<?> saveUser(@RequestBody UserDto userDto) { User user = new User(userDto.getUsername(), passwordEncoder.encode(userDto.getPassword())); userDetailsService.save(user); return ResponseEntity.ok(user); } } ``` 5. 配置WebSecurityConfigurerAdapter 最后,我们需要配置WebSecurityConfigurerAdapter以启用基于Jwt的身份验证。以下是一个示例实现: ```java import org.springframework.beans.factory.annotation.Autowired; import org.springframework.context.annotation.Bean; import org.springframework.context.annotation.Configuration; import org.springframework.security.authentication.AuthenticationManager; import org.springframework.security.config.annotation.authentication.builders.AuthenticationManagerBuilder; import org.springframework.security.config.annotation.web.builders.HttpSecurity; import org.springframework.security.config.annotation.web.configuration.EnableWebSecurity; import org.springframework.security.config.annotation.web.configuration.WebSecurityConfigurerAdapter; import org.springframework.security.config.http.SessionCreationPolicy; import org.springframework.security.core.userdetails.UserDetailsService; import org.springframework.security.crypto.password.PasswordEncoder; import org.springframework.security.web.authentication.UsernamePasswordAuthenticationFilter; @Configuration @EnableWebSecurity public class WebSecurityConfig extends WebSecurityConfigurerAdapter { @Autowired private JwtRequestFilter jwtRequestFilter; @Autowired private UserDetailsService userDetailsService; @Autowired private PasswordEncoder passwordEncoder; @Override protected void configure(AuthenticationManagerBuilder auth) throws Exception { auth.userDetailsService(userDetailsService).passwordEncoder(passwordEncoder); } @Override protected void configure(HttpSecurity http) throws Exception { http.csrf().disable() .authorizeRequests().antMatchers("/authenticate", "/register").permitAll() .anyRequest().authenticated() .and().sessionManagement() .sessionCreationPolicy(SessionCreationPolicy.STATELESS); http.addFilterBefore(jwtRequestFilter, UsernamePasswordAuthenticationFilter.class); } @Bean @Override public AuthenticationManager authenticationManagerBean() throws Exception { return super.authenticationManagerBean(); } } ``` 现在,您的Spring Boot应用程序已经配置使用Jwt进行身份验证。
评论
添加红包

请填写红包祝福语或标题

红包个数最小为10个

红包金额最低5元

当前余额3.43前往充值 >
需支付:10.00
成就一亿技术人!
领取后你会自动成为博主和红包主的粉丝 规则
hope_wisdom
发出的红包

打赏作者

星际编程喵

你的鼓励将是我创作的最大动力

¥1 ¥2 ¥4 ¥6 ¥10 ¥20
扫码支付:¥1
获取中
扫码支付

您的余额不足,请更换扫码支付或充值

打赏作者

实付
使用余额支付
点击重新获取
扫码支付
钱包余额 0

抵扣说明:

1.余额是钱包充值的虚拟货币,按照1:1的比例进行支付金额的抵扣。
2.余额无法直接购买下载,可以购买VIP、付费专栏及课程。

余额充值