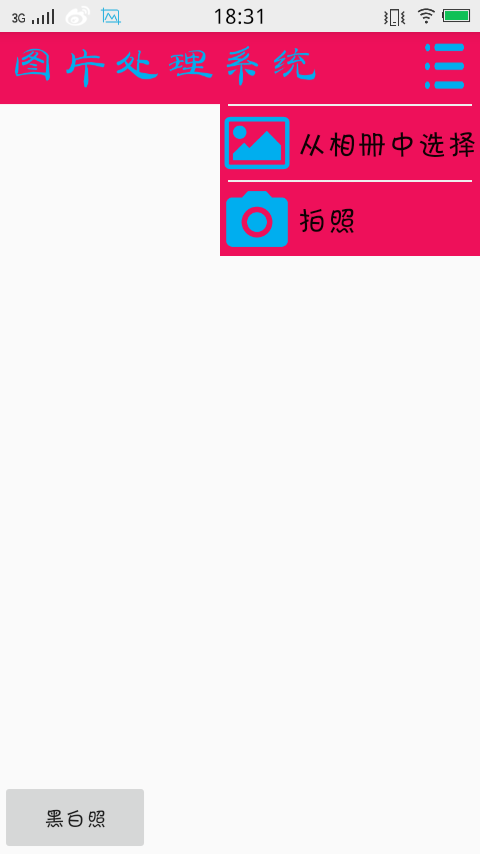
Android调用系统相册和相机选择图片并显示在imageview中,在系统调用相机拍摄中,直接返回的是经过压缩处理后的图像,当你直接把返还后的图片放在imageview中时 图片就会非常的模糊,所以要经过先存放在sd中,然后在处理并显示。当调用系统相册时,因为Android系统从4.4版本以后系统不再返回真实的uri路径,而是封装过后的uri路径,所以当你写代码时必须注意,4.4是一个分水岭,4.4以上的版本必须就通过解析和相应的处理才能获取到真实的uri路径。
先上程序运行的结果。
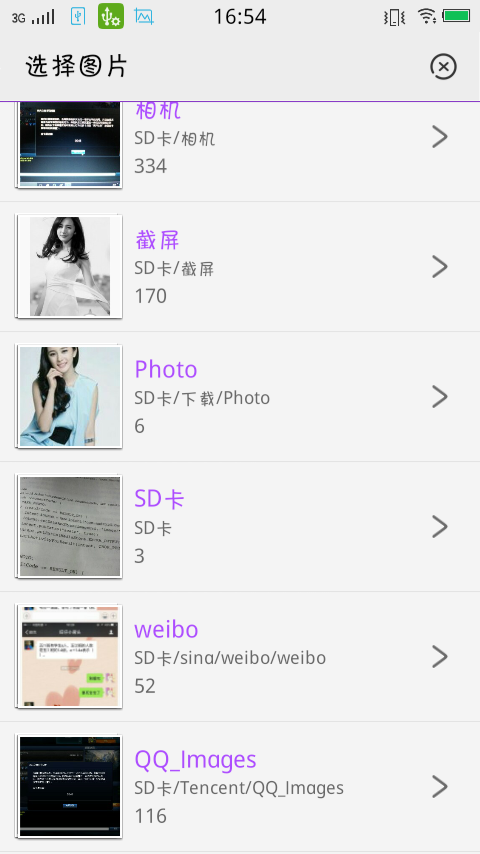
这个是调用系统相册后的运行截图。


调用手机相机运行的截图就不发了 ,你自己运行一下代码就出了,
在程序中牵扯到对sd卡的操作,所以要在文件中注册sd卡的权限
<uses-permission android:name="android.permission.WRITE_EXTERNAL_STORAGE"/>首先建立xml文件:
<?xml version="1.0" encoding="utf-8"?>
<LinearLayout
    xmlns:android="http://schemas.android.com/apk/res/android"
    android:layout_width="match_parent"
    android:layout_height="match_parent"
    android:orientation="vertical">

    <LinearLayout
        android:layout_width="match_parent"
        android:layout_height="49dp"
        android:background="#ee105a"
        android:orientation="horizontal">
        <ImageView
            android:layout_width="220dp"
            android:layout_height="match_parent"
            android:background="@mipmap/mainactionbar"/>
        <TextView
            android:layout_width="0dp"
            android:layout_height="match_parent"
            android:layout_weight="1"/>
        <ImageButton
            android:id="@+id/main_imagebutton_menu"
            android:layout_width="27dp"
            android:layout_height="match_parent"
            android:layout_marginRight="10dp"
            android:layout_marginTop="3dp"
            android:layout_marginBottom="3dp"
            android:background="@mipmap/maincaidan"/>

    </LinearLayout>
    <LinearLayout
        android:layout_width="match_parent"
        android:layout_height="match_parent"
        android:orientation="vertical">
        <ImageView
            android:layout_marginTop="10dp"
            android:id="@+id/main_imageview_tupian"
            android:layout_width="match_parent"
            android:layout_height="400dp"
            />

        <TextView
            android:layout_width="match_parent"
            android:layout_height="0dp"
            android:layout_weight="1"/>
        <LinearLayout
            android:layout_width="match_parent"
            android:layout_height="49dp"
            android:orientation="horizontal">
            <Button
                android:layout_width="100dp"
                android:layout_height="50dp"
                android:text="黑白照"
                android:id="@+id/bitton"/>
        </LinearLayout>

    </LinearLayout>
</LinearLayout>
在activity活动中我用到了PopWindow对其是相册还是相机进行了选择。
PopWindow的xml文件如下:
<?xml version="1.0" encoding="utf-8"?>
<LinearLayout xmlns:android="http://schemas.android.com/apk/res/android"
    android:orientation="vertical"
    android:layout_width="wrap_content"
    android:layout_height="wrap_content"
    android:gravity="center_horizontal"
    android:background="#ee105a">
    <ImageView
        android:layout_width="match_parent"
        android:layout_height="1dp"
        android:layout_marginLeft="5dp"
        android:layout_marginRight="5dp"
        android:background="#eeeeee"/>
    <LinearLayout
        android:id="@+id/linearlayout_mainmenu_xiangce"
        android:layout_width="match_parent"
        android:layout_height="49dp"
        android:orientation="horizontal">
        <ImageView
            android:layout_width="49dp"
            android:layout_height="match_parent"
            android:background="@mipmap/xiangce"/>
        <ImageView
            android:layout_width="2dp"
            android:layout_height="match_parent"
            android:background="#ee105a"/>
        <TextView
            android:layout_width="wrap_content"
            android:layout_height="match_parent"
            android:gravity="center"
            android:text="从相册中选择"
            android:textColor="#0e0103"
            android:textSize="20dp"/>

    </LinearLayout>
    <ImageView
        android:layout_width="match_parent"
        android:layout_height="1dp"
        android:layout_marginLeft="5dp"
        android:layout_marginRight="5dp"
        android:background="#eeeeee"/>
    <LinearLayout
        android:id="@+id/linearlayout_mainmenu_paizhao"
        android:layout_width="match_parent"
        android:layout_height="49dp"
        android:orientation="horizontal">
        <ImageView
            android:layout_width="49dp"
            android:layout_height="match_parent"
            android:background="@mipmap/paizhao"/>
        <ImageView
            android:layout_width="2dp"
            android:layout_height="match_parent"
            android:background="#ee105a"/>
        <TextView
            android:layout_width="wrap_content"
            android:layout_height="match_parent"
            android:gravity="center"
            android:text="拍照"
            android:textColor="#0e0103"
            android:textSize="20dp"/>

    </LinearLayout>


</LinearLayout>
在activity中所有的代码如下 一部分重要核心的代码附带有详细的注释:
public class MainActivity extends Activity {

    private Button button;
    private ImageButton imageButton_menu;
    private ImageView imageView_main;
    private FileInputStream is = null;
    public static Context activity;
    public static Uri uriImageview;
    private Bitmap bitmap_guiduhua;
    @Override
    protected void onCreate(Bundle savedInstanceState) {
        super.onCreate(savedInstanceState);
        requestWindowFeature(Window.FEATURE_NO_TITLE);
        setContentView(R.layout.activity_main);
        activity = this.getApplicationContext();
        //id绑定
        idBinding();
        //控件的点击事件的设置
        onClick();
    }

    /**
     * activity布局文件中id的绑定
     */
    private void idBinding() {
        button = (Button) findViewById(R.id.bitton);
        imageButton_menu = (ImageButton)findViewById(R.id.main_imagebutton_menu);
        imageView_main = (ImageView)findViewById(R.id.main_imageview_tupian);
    }

    /**
     * 控件的点击事件设置
     * 利用匿名类来注册监听事件
     */
    private void onClick() {
        button.setOnClickListener(new View.OnClickListener() {
            @Override
            public void onClick(View v) {
                imageView_main.setImageBitmap(bitmap_guiduhua);
            }
        });

        imageButton_menu.setOnClickListener(new View.OnClickListener() {
            @Override
            public void onClick(View v) {
                Log.e("menu点击----->","menu");
                MainMenuPopWindow mainMenuPopWindow = new MainMenuPopWindow(MainActivity.this);
                mainMenuPopWindow.showPopupWindow(imageButton_menu);
            }
        });
    }

    @Override
    protected void onActivityResult(int requestCode, int resultCode, Intent data) {
        Log.e("requestCode---->", ""+requestCode);
        switch (requestCode){
            case 1:
                if (resultCode == RESULT_OK){
                    /**
                     * 判断手机版本,因为在4.4版本都手机处理图片返回的方法就不一样了
                     * 4.4以后返回的不是真实的uti而是一个封装过后的uri 所以要对封装过后的uri进行解析
                     */

                    if (Build.VERSION.SDK_INT >=19){
                        //4.4系统一上用该方法解析返回图片
                        handleImageOnKitKat(data);
                    }else{
                        //4.4一下用该方法解析图片的获取
                        handleImageBeforeKitKat(data);
                    }
                }
                break;
            case 2:
                Log.e("case2---->", "22222222222222222222");
                if (resultCode == RESULT_OK){
                    Intent intent = new Intent("com.android.camera.action.CROP");
                    intent.setDataAndType(uriImageview,"image/*");
                    intent.putExtra("scale",true);
                    intent.putExtra(MediaStore.EXTRA_OUTPUT,uriImageview);
                    startActivityForResult(intent,3);//启动裁剪程序
                }
                break;
            case 3:
                if (resultCode == RESULT_OK){
                    try{
                        Log.e("case3---->", "3333333333333");
                        Bitmap bitmap = BitmapFactory.decodeStream(getContentResolver()
                        .openInputStream(uriImageview));
                        //将裁剪后的图片显示出来
                        imageView_main.setImageBitmap(bitmap);
                        bitmap_guiduhua = huiDuHua(bitmap);
                    }catch (FileNotFoundException e){
                        e.printStackTrace();
                    }
                }
        }


    }

    /**
     * api 19以后
     *  4.4版本后 调用系统相机返回的不在是真实的uri 而是经过封装过后的uri,
     * 所以要对其记性数据解析,然后在调用displayImage方法尽心显示
     * @param data
     */

    private void handleImageOnKitKat(Intent data){
        String imagePath = null;
        Uri uri = data.getData();
        if (DocumentsContract.isDocumentUri(this,uri)){
            //如果是document类型的uri 则通过id进行解析处理
            String docId = DocumentsContract.getDocumentId(uri);
            if ("com.android.providers.media.documents".equals(uri.getAuthority())){
                //解析出数字格式id
                String id = docId.split(":")[1];
                String selection = MediaStore.Images.Media._ID + "=" +id;
                imagePath = getImagePath(MediaStore.Images.Media.EXTERNAL_CONTENT_URI,selection);
            }else if ("com.android.providers.downloads.documents".equals(uri.getAuthority())){
                Uri contentUri = ContentUris.withAppendedId(Uri.parse("" +
                        "content://downloads/public_downloads"),Long.valueOf(docId));
                imagePath = getImagePath(contentUri,null);
            }
        }else if ("content".equals(uri.getScheme())){
            //如果不是document类型的uri,则使用普通的方式处理
            imagePath = getImagePath(uri,null);
        }
        displayImage(imagePath);
    }

    /**
     * 4.4版本一下 直接获取uri进行图片处理
     * @param data
     */
    private void handleImageBeforeKitKat(Intent data){
        Uri uri = data.getData();
        String imagePath = getImagePath(uri,null);
        displayImage(imagePath);
    }

    /**
     * 通过 uri seletion选择来获取图片的真实uri
     * @param uri
     * @param seletion
     * @return
     */
    private String getImagePath(Uri uri, String seletion){
        String path = null;
        Cursor cursor = getContentResolver().query(uri,null,seletion,null,null);
        if (cursor != null){
            if (cursor.moveToFirst()) {
                path = cursor.getString(cursor.getColumnIndex(MediaStore.Images.Media.DATA));
            }
            cursor.close();
        }
        return path;
    }

    /**
     * 通过imagepath来绘制immageview图像
     * @param imagPath
     */
    private void displayImage(String imagPath){
        if (imagPath != null){
            Bitmap bitmap = BitmapFactory.decodeFile(imagPath);
            imageView_main.setImageBitmap(bitmap);
            bitmap_guiduhua = huiDuHua(bitmap);
        }else{
            Toast.makeText(this,"图片获取失败",Toast.LENGTH_SHORT).show();
        }
    }

}
PopupWindow的作用就是从mainactivity中跳转到相应系统的相册或者相机界面:
public class MainMenuPopWindow extends PopupWindow{

    private View popView;
    private Uri uriImageview;


    public MainMenuPopWindow(final Activity context){

        LayoutInflater layoutInflater = (LayoutInflater)context.
                getSystemService(Context.LAYOUT_INFLATER_SERVICE);
        popView = layoutInflater.inflate(R.layout.main_menu,null);
        //获取宽高
        int h = context.getWindowManager().getDefaultDisplay().getHeight();
        int w = context.getWindowManager().getDefaultDisplay().getWidth();
        //设置弹出的popview视图
        this.setContentView(popView);
        //设置弹出窗口的宽
        this.setWidth(w/2+20);
        //设置高度  为layout的自适应高度
        this.setHeight(LinearLayout.LayoutParams.WRAP_CONTENT);
        //设置  pop可点击可见
        this.setFocusable(true);
        this.setOutsideTouchable(true);
        this.update();
        // 实例化一个ColorDrawable颜色为半透明
        ColorDrawable colorDrawable = new ColorDrawable(0000000000);
        // 点back键和其他地方使其消失,设置了这个才能触发OnDismisslistener
        this.setBackgroundDrawable(colorDrawable);
        // 设置pop弹出窗体动画效果
        this.setAnimationStyle(R.style.PopWindowAnimation);
        // 获取SD卡路径


        LinearLayout linearLayout_xiangce = (LinearLayout)popView.
                findViewById(R.id.linearlayout_mainmenu_xiangce);
        linearLayout_xiangce.setOnClickListener(new View.OnClickListener() {
            @Override
            public void onClick(View v) {

                Log.e("xiangce---->","相冊");
                Intent intent = new Intent();
                intent.setType("image/*");
                intent.setAction(Intent.ACTION_GET_CONTENT);
                context.startActivityForResult(intent, 1);
            }
        });

        LinearLayout linearLayout_paizhao = (LinearLayout)popView.
                findViewById(R.id.linearlayout_mainmenu_paizhao);
        linearLayout_paizhao.setOnClickListener(new View.OnClickListener() {
            @Override
            public void onClick(View v) {
                //以系统时间作为该文件 民命
                SimpleDateFormat formatter  =   new    SimpleDateFormat("yyyy年MM月dd日HH-mm-ss");
                Date curDate = new Date(System.currentTimeMillis());//获取当前时间
                String    str    =    formatter.format(curDate);
                Log.e("拍照---->",str);
                //建立file文件用于保存来拍照后的图片
                File outputFile = new File(Environment.getExternalStorageDirectory(),str+".jpg");
                /**
                 * 使用隐式intent进行跳转
                 */
                try {
                    if (outputFile.exists()){
                        outputFile.delete();
                    }
                    outputFile.createNewFile();

                }catch (Exception e){
                    e.printStackTrace();
                }
                uriImageview = Uri.fromFile(outputFile);
                //另mainactivity的uri等于本.java 文件中的  uri
                MainActivity.uriImageview = uriImageview;
                Intent intent = new Intent("android.media.action.IMAGE_CAPTURE");
                intent.putExtra(MediaStore.EXTRA_OUTPUT,uriImageview);
                //启动相机程序
                context.startActivityForResult(intent,2);

            }
        });


    }

    /**
     * 设置  pop 的弹出位置
     * @param parent
     */
    public void showPopupWindow(View parent) {
        if (!this.isShowing()) {
            this.showAsDropDown(parent, parent.getLayoutParams().width / 2, 5);
        } else {
            this.dismiss();
        }
    }

}


 1175
1175

 被折叠的 条评论
为什么被折叠?


