


我们在开发中,很多地方可能都会 imageView 的身影,尤其是应用管理类的 app,包括一些社交类的用户头像. 如果简单的把这些头像或者应用图标设置为正方形,总感觉不是那么的美观,那么今天,我们一起看下该如何快速设置 imageView 形状
为了方便以后使用,我把这些功能都封装到一起了,以后可以直接拿来用
针对圆形形状,我个人是先创建了一个继承字UIImage 的Category,头文件声明了两个方法,一个类方法,一个对象方法
#import <UIKit/UIKit.h>

@interface UIImage (XFExtension)

/**
 *  返回圆形图片
 */
- (instancetype)xf_circleImage;

+ (instancetype)xf_circleImage:(NSString *)name;

@end
在.m 文件里,先实现能返回圆形的对象方法
#import "UIImage+XFExtension.h"

@implementation UIImage (XFExtension)

- (instancetype)xf_circleImage {
    // 开启图形上下文
    UIGraphicsBeginImageContext(self.size);

    // 上下文
    CGContextRef context = UIGraphicsGetCurrentContext();

    // 添加一个圆
    CGRect rect = CGRectMake(0, 0, self.size.width, self.size.height);
    CGContextAddEllipseInRect(context, rect);

    // 裁剪
    CGContextClip(context);

    // 绘制图片
    [self drawInRect:rect];

    // 获得图片
    UIImage *image = UIGraphicsGetImageFromCurrentImageContext();

    // 关闭图形上下文
    UIGraphicsEndImageContext();

    return image;
}

+ (instancetype)xf_circleImage:(NSString *)name {
    return [[self imageNamed:name] xf_circleImage];
}

@end
类方法的实现通过外界传入的 image,返回一个圆形的
+ (instancetype)xf_circleImage:(NSString *)name { return [[self imageNamed:name] xf_circleImage];}然后,我创建了一个继承字UIImageView的Category,这里的方法是真正开放给外界使用的,所以在头文件中,我声明了三个对象方法
#import <UIKit/UIKit.h>

@interface UIImageView (XFExtension)

/**
 *  圆形
 */
- (void)xf_setCircleHeaderWithUrl:(NSString *)url placeholder:(NSString *)placeholderName;

/**
 *  方形或者圆角型
 */
- (void)xf_setRectHeaderWithUrl:(NSString *)url placeholder:(NSString *)placeholderName;

/**
 *  六边形
 */
- (void)xf_setSixSideHeaderWithUrl:(NSString *)url placeholder:(NSString *)placeholderName;

@end
接着在.m 文件里,一一实现这些方法
首先是圆形
/**
 *  圆形
 */
- (void)xf_setCircleHeaderWithUrl:(NSString *)url placeholder:(NSString *)placeholderName {
    // 让占位图片也是圆的
    UIImage *placeholderImage = [UIImage xf_circleImage:placeholderName];
    [self sd_setImageWithURL:[NSURL URLWithString:url] placeholderImage:placeholderImage completed:^(UIImage *image, NSError *error, SDImageCacheType cacheType, NSURL *imageURL) {

        if (image == nil) return;

        self.image = [image xf_circleImage];
    }];
}
接着是方形或者圆角型
/**
 *  方形,也可以设置圆角
 */
- (void)xf_setRectHeaderWithUrl:(NSString *)url placeholder:(NSString *)placeholderName {
    [self sd_setImageWithURL:[NSURL URLWithString:url] placeholderImage:[UIImage imageNamed:placeholderName] completed:^(UIImage *image, NSError *error, SDImageCacheType cacheType, NSURL *imageURL) {

        if (image == nil) return;

        self.layer.cornerRadius = 8.0;
        self.clipsToBounds = YES;
    }];
}
最后是六边形
/**
 *  六边形
 */
- (void)xf_setSixSideHeaderWithUrl:(NSString *)url placeholder:(NSString *)placeholderName {

    [self sd_setImageWithURL:[NSURL URLWithString:url] placeholderImage:[UIImage imageNamed:placeholderName] completed:^(UIImage *image, NSError *error, SDImageCacheType cacheType, NSURL *imageURL) {

        if (image == nil) return;

        // 这个宽高要跟外面你要设置的 imageview 的宽高一样
        CGFloat imageViewWH = 57;

        UIBezierPath * path = [UIBezierPath bezierPath];
        path.lineWidth = 2;
        [path moveToPoint:CGPointMake((sin(M_1_PI / 180 * 60)) * (imageViewWH / 2), (imageViewWH / 4))];
        [path addLineToPoint:CGPointMake((imageViewWH / 2), 0)];
        [path addLineToPoint:CGPointMake(imageViewWH - ((sin(M_1_PI / 180 * 60)) * (imageViewWH / 2)), (imageViewWH / 4))];
        [path addLineToPoint:CGPointMake(imageViewWH - ((sin(M_1_PI / 180 * 60)) * (imageViewWH / 2)), (imageViewWH / 2) + (imageViewWH / 4))];
        [path addLineToPoint:CGPointMake((imageViewWH / 2), imageViewWH)];
        [path addLineToPoint:CGPointMake((sin(M_1_PI / 180 * 60)) * (imageViewWH / 2), (imageViewWH / 2) + (imageViewWH / 4))];
        [path closePath];
        CAShapeLayer * shapLayer = [CAShapeLayer layer];
        shapLayer.lineWidth = 2;
        shapLayer.path = path.CGPath;
        self.layer.mask = shapLayer;
    }];
}
至此,方法声明和实现已经完成,接下来就是在相应的位置,先导入头文件,使用的时候就一句代码就 OK 了
- (void)viewDidLoad {
[super viewDidLoad];
self.view.backgroundColor = [UIColor grayColor];
// 测试图片 url
NSString *testUrl = @"http://bos.pgzs.com/itunesimg/31/351091731/c2dcc1bc41fa08a3a7ab3877e878b7a1_512x512bb.114x114-75.jpg";
float viewWidth = 57;
/*** 要设置圆形的 imageview */
UIImageView *imageView = [[UIImageView alloc] init];
imageView.frame = CGRectMake(70, 100, viewWidth, viewWidth);
[imageView xf_setCircleHeaderWithUrl:testUrl placeholder:@"icon"];
[self.view addSubview:imageView];
/*** 要设置圆角型的 imageview */
UIImageView *imageViewTwo = [[UIImageView alloc] init];
imageViewTwo.frame = CGRectMake(150, 100, viewWidth, viewWidth);
[imageViewTwo xf_setRectHeaderWithUrl:testUrl placeholder:@"icon"];
[self.view addSubview:imageViewTwo];
/*** 要设置六边形的 imageview */
UIImageView *imageViewThree = [[UIImageView alloc] init];
imageViewThree.frame = CGRectMake(230, 100, viewWidth, viewWidth);
[imageViewThree xf_setSixSideHeaderWithUrl:testUrl placeholder:@"icon"];
[self.view addSubview:imageViewThree];
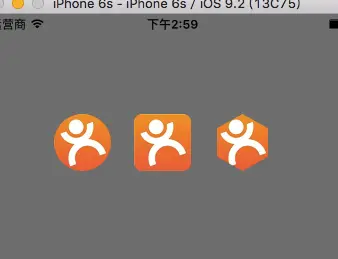
}直接把所有代码贴出来了,有了代码,几乎不用我废话了
运行效果如下
我也不是什么大牛,很多东西也是 stackoverflow / Google,以及各种iOS大牛群里学来的,自认为,学到就是赚到.哈哈
- 最后奉上我的这些
Category链接,如果你觉得有用,可以 down 下来. - 穿越至 github ---> XFCategory(里面还有我总结的一些其他 Category)
文/张张张小烦(简书作者)
原文链接:http://www.jianshu.com/p/397073abcf43
著作权归作者所有,转载请联系作者获得授权,并标注“简书作者”。
原文链接:http://www.jianshu.com/p/397073abcf43
著作权归作者所有,转载请联系作者获得授权,并标注“简书作者”。


 618
618

 被折叠的 条评论
为什么被折叠?
被折叠的 条评论
为什么被折叠?
 到【灌水乐园】发言


