


文章目录
{ { } }插值表达式
{ { } } 插值 表达式 只能作用在内容节点,适合 拼接内容,不能作用在 属性节点
v-bind 只能 作用在属性节点
<div id="app">
    <input type="button" v-bind:placeholder="tips">
</div>
<!-- 这样无法解析!!!  -->
<div  placeholder="{{tips}}"></div>

<!-- 这样可以 ! ! !  -->
<div>{{tips}}</div>
‘box’ 是 字符串box,index 是变量名,两者 进行字符串拼接
<div :title="'box'+index"> This a div </div>
{ { } } 还可以 进行 运算以及函数、三元运算~
{{number+1}}
{{number++}}
{{show=!show}}
{{ok?'ok':'no'}}
{{message.split('').reverse().join('')}}
$event
<!--  $event,原生DOM的事件对象e-->
<button @click="add(1,$event)">+N</button>
methods: {
   add(n, e) {
       console.log(n, e.target)
   }
}
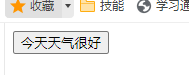
e.target 就是 触发事件的DOM对象

methods: {
    add(n, e) {
        e.target.innerHTML='今天天气很好'
    }
}
点击之后:
<!--   只有 在按下Enter时执行submit函数-->
<input @keyup.enter="submit">
<!--   只有 在按下ESC时执行clearInput函数-->
<input @keyup.esc="clearInput">
注意:在标签中 使用this代表的是 window浏览器实例~~
<input @keyup.enter="submit(this)">
v-for
<!--   官方建议:只要用到 v-for指令,一定 要绑定 :key 属性-->
<!--   而且,尽量 把id 作为key的值-->
<!--   官方 对key的值类型,要求:数字或 字符串-->
<!--   key的值 不能重复!!!否则报错:Duplicate keys detected-->
<tr v-for="(item,index) in list" :key="item.id">
    <td>{{index}}</td>
    <td>{{item.id}}</td>
    <td>{{item.name}}</td>
</tr>
删除、新增
tr 使用 必须要加
<table>标签!!!
<div id="app">
    <table>
        <tr v-for="item in list" :key="item.id">
            <td>{{item.id}}</td>
            <td>{{item.name}}</td>
            <td>{{item.status}}</td>
            <td>{{item.time}}</td>
            <td><a href="javascript:;" @click="remove(item.id)">删除</a></td>
        <tr/>
    </table>


</div>
<script type="application/javascript">
    var app = new Vue({
        el: '#app',
        data() {
            return {
                // 品牌的列表数据
                list: [
                    {id: 1, name: '宝马', status: true, time: new Date()},
                    {id: 2, name: '奔驰', status: true, time: new Date()},
                    {id: 3, name: '奥迪', status: true, time: new Date()}
                ]
            }
        },
        methods: {
            remove(id) {
                this.list = this.list.filter(item => item.id != id)
            }
        }
    })
</script>
新增
add() {
   this.list.push({id: 4, name: '奥迪', status: true, time: new Date()})
}
axios方法优化
<div id="app">
    <table>
        <tr v-for="item in books" :key="item.id">
            <td>{{item.id}}</td>
            <td>{{item.bookname}}</td>
            <td>{{item.author}}</td>
            <td>{{item.publisher}}</td>
        <tr/>
    </table>
    <input type="button" @click="getBooks" value="获取数据">


</div>
<script type="application/javascript">
    var app = new Vue({
        el: '#app',
        data() {
            return {
                // 书籍
                books: []
            }
        },
        methods: {
            async getBooks() {
                let {data: res} = await axios.get('http://www.liulongbin.top:3006/api/getbooks')
                this.books = res.data
            }
        }
    })
</script>

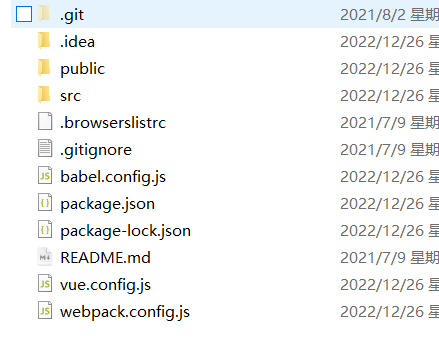
启动 Vue项目
npm install -g @vue/cli
链接:https://pan.baidu.com/s/10zhofYzlIY9buSxqiVRILQ
提取码:yyds
下载 demo 文件夹
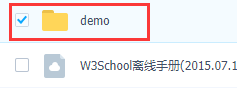
进入 文件夹
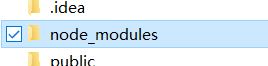
npm cache clear --force    # npm 缓存清除--强制
cnpm install 			   # 安装 依赖
#  如果 没有 cnpm,先安装 cnpm
#  npm install -g cnpm --registry=https://registry.npm.taobao.org
安装 完成 多了node_modules 文件夹
npm run dev # 启动项目
Vue项目的运行流程
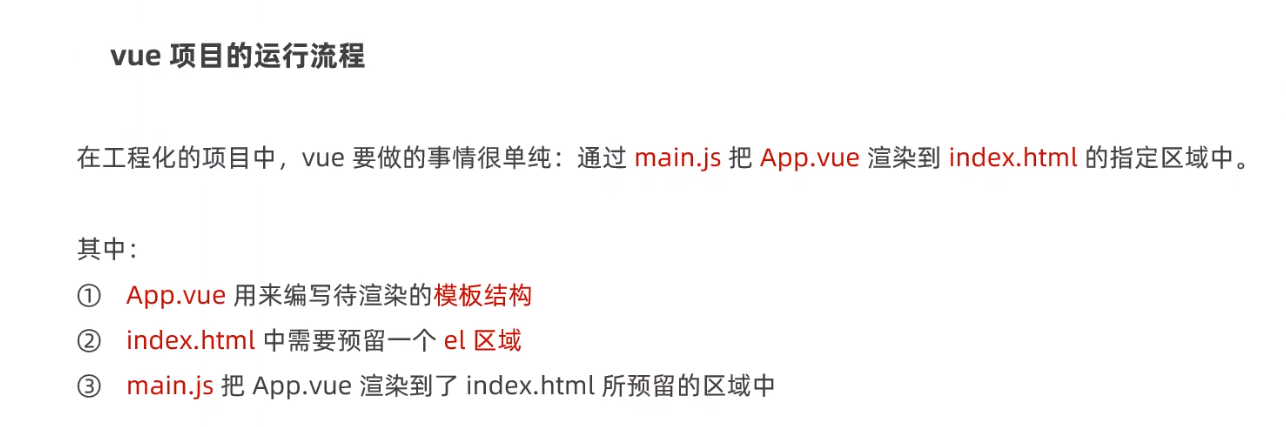
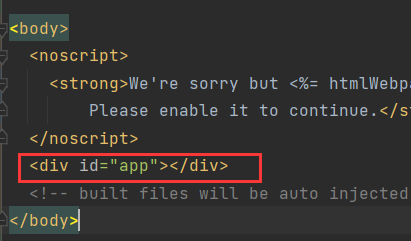
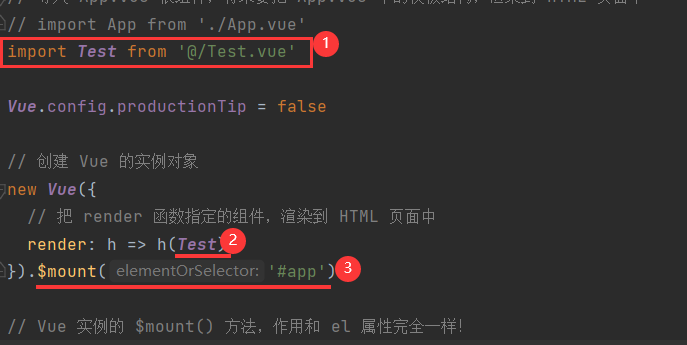
相当于 使用 App.vue 组件 替换这个 <div id="app"></div>
组件的三个结构
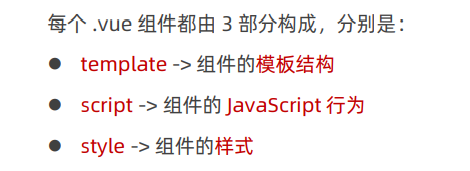
<template>
  <!--有且仅有 一个根标签!且必须存在!-->
  <!-- 命名规范:
       {filename}-container
  -->
  <div class="test-container">
    {{ username }}
  </div>
</template>

<script>
//  默认导出,这是 固定写法!!!
export default {
  // data 数据源
  // 组件中的数据源 必须是 data(){} 函数
  data() {
    return {
      username: 'xiaoidng'
    }
  },
  methods: {
    changeName() {
      // this 是组件的实例
      this.username = 'xiaohong'
    }

  }
}
</script>

<style lang="less" scoped>

</style>

组件的使用
<script>
// 1.导入组件,在 默认导出外 进行!!
import app from '@/App.vue'

export default {
// 2.注册组件
  components: {
    app
  }
}
</script>
以标签的形式使用组件,必须 在哪注册就 在哪使用!!!
<app></app>
在 main.js 全局注册
// 导入需要被 全局注册的组件
import app from  '@/App.vue'
// 注册后,在任意组件都可以使用!!!
Vue.component('MyApp',app)
props 是 只读的
<template>
  <div class="App-container">
    {{ init }}
  </div>
</template>

<script>

export default {
  props: ['init']
}
</script>
注册 并且使用组件
<template>
  <div>
    <!-- 将 该组件的count 与app组件的 init属性绑定在一起~~ -->
    <app :init="count"></app>
  </div>
</template>

<script>
import app from '@/App.vue'

export default {
  data() {
    return {
      count: 10
    }
  },
  components: {
    app
  }
}
</script>
组件之间的通信
父子 组件通信
子组件
<template>
  <div class="App-container">
    <span>子组件的值:{{ count }}</span>
    <button type="button" @click="numChange">点我变化</button>
  </div>
</template>
<script>

export default {
  data() {
    return {
      count: 0
    }
  },
  methods: {
    numChange() {
      this.count = 10
      // 通知 父组件发生变化,带上 发生变化的值
      this.$emit('numChange', this.count)
    }
  }
}
</script>
父组件
此时 $event,也是 子组件传过来的值
<template>
  <div>
    <span>父组件的值:{{ count }}</span>
    <!-- 父组件 监听到,就 调用自己的 numChange方法-->
    <app @numChange="numChange"></app>
  </div>
</template>

<script>

import app from '@/App.vue'

export default {

  data() {
    return {
      count: 0
    }
  },
  components: {
    app
  },
  methods: {
    // 参数值是从 子组件传过来的
    numChange(val) {
      this.count = val
    }
  }
}
</script>
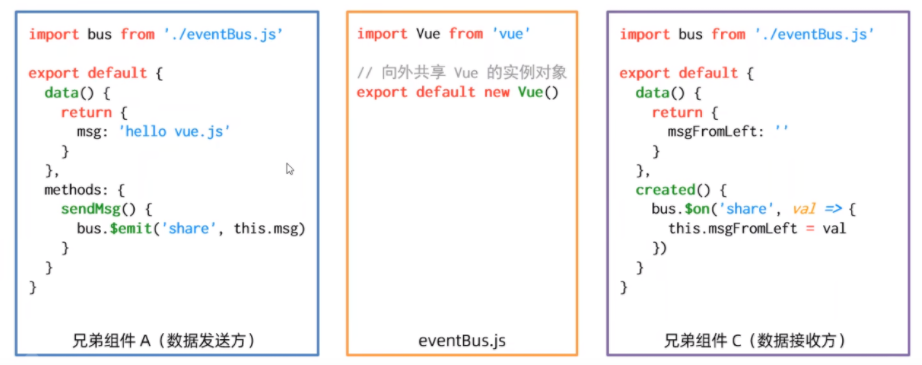
兄弟组件通信
操作DOM
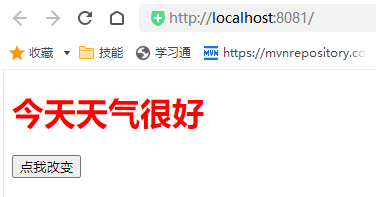
<template>
  <div>
    <h1 ref="myref">今天天气很好 </h1>
    <button @click="change">点我改变</button>
  </div>
</template>
<script>

export default {
  data() {
    return {}
  },
  methods: {
    change() {
      // this.$refs.myref 代表 myref 这个DOM对象
      this.$refs.myref.style.color = 'red'
    }
  }
}
</script>
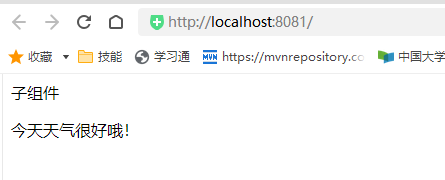
插槽 slot
作用 范围:

<template>
  <div class="App-container">
    <span>子组件</span>
    <!-- slot的name 默认为 default,这部分的内容 由使用插槽的人添加!!!-->
    <slot name="page"></slot>
  </div>
</template>

<script>

export default {
  data() {
    return {}
  }
}
</script>
调用方
<template>
  <div>
    <app>
      <!-- 在 组件内部 为插槽添加内容!-->
      <!-- 必须要 指定名字,v-slot 可以简写为 #-->
      <template #page>
        <p>今天天气很好哦!</p>
      </template>
    </app>
  </div>
</template>

<script>

import app from '@/App.vue'

export default {

  data() {
    return {
      count: 0
    }
  },
  components: {
    app
  },
  methods: {}
}
</script>
移除node_modules
cnpm i -g rimraf
# 进行 移除
rimraf node_modules
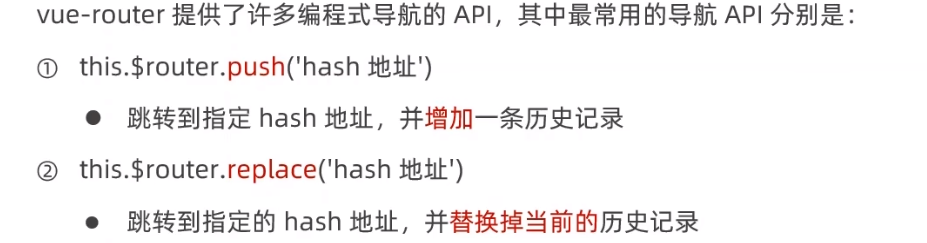
路由
安装、入门
在 src目录下 新建 router文件夹,在 router文件夹下 新建 index.js 文件
// 1. 导入Vue 和VueRouter的包
import Vue from "vue";
import VueRouter from "vue-router"
// 2. 调用Vue.use()函数,把VueRouter 安装为 Vue的插件
Vue.use(VueRouter)
// 3. 创建 路由的实例对象
const vueRouter = new VueRouter()

// 4. 向外共享路由的 实例对象
export default vueRouter
<template>
  <div class="App-container">
    <h1>今天天气很好!</h1>
    <!--  跳转连接  -->
    <router-link to="/movie">电影</router-link>
    <br>
    <router-link to="/about">关于</router-link>

    <router-view></router-view>
  </div>
</template>
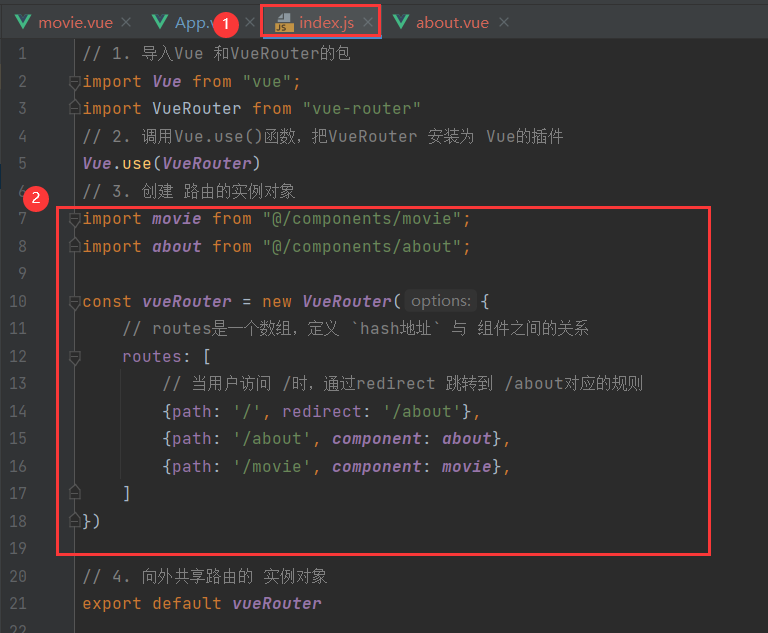
import movie from "@/components/movie";
import about from "@/components/about";

const vueRouter = new VueRouter({
    // routes是一个数组,定义 `hash地址` 与 组件之间的关系
    routes: [
        // 当用户访问 /时,通过redirect 跳转到 /about对应的规则
        {path: '/', redirect: '/about'},
        {path: '/about', component: about},
        {path: '/movie', component: movie},
    ]
})
嵌套路由
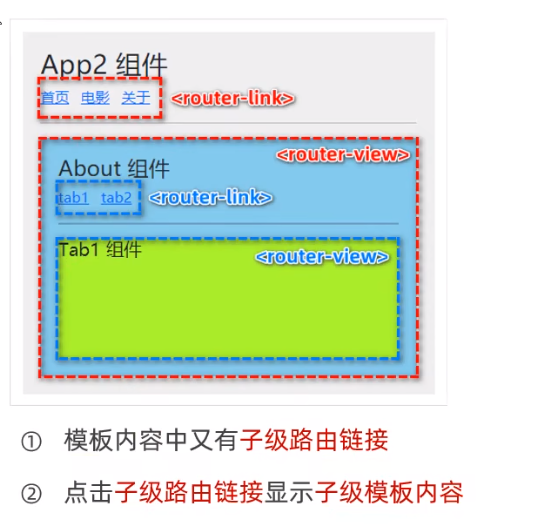
<template>
  <div>
    <h1>钢铁侠</h1>
    <router-link to="/movie/say">点我</router-link>
    <router-view></router-view>
  </div>
</template>
路由 规则:
import movie from "@/components/movie";
import about from "@/components/about";
import tab from "@/components/tab";

const vueRouter = new VueRouter({
    // routes是一个数组,定义 `hash地址` 与 组件之间的关系
    routes: [
        // 当用户访问 /时,通过redirect 跳转到 /about对应的规则
        {path: '/', redirect: '/about'},
        {path: '/about', component: about},
        {
            path: '/movie',
            component: movie,
            children: [
                // 子路由规则,不加 / 线
                {path: 'say', component: tab}
            ]
        },
    ]
})
获取路由参数
在组件中 获取 路由参数的值
// 根据id 的值,获取对应电影的信息
{path: '/movie/:mid', component: movie, props: true}
开启 props传参
在 movie 组件 添加一个 mid属性
<script>
export default {
  props: ['mid']
}
</script>
在 movie 组件 获取参数值
{{ this.$route.params.mid }}

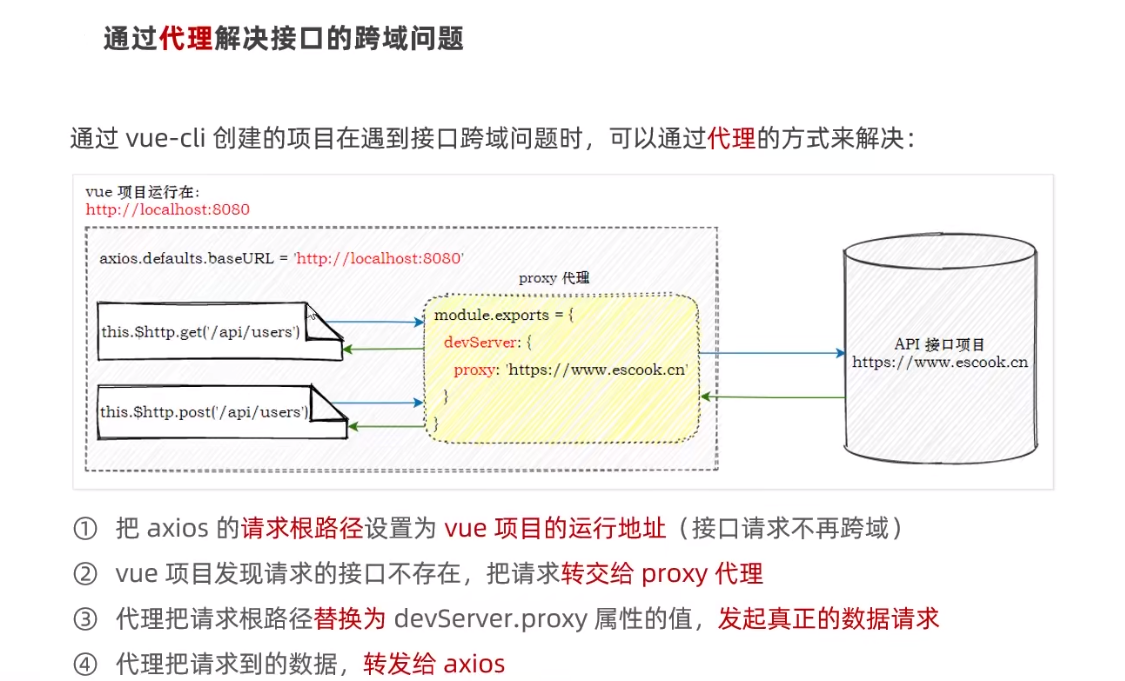
跨域代理
线上 需要 开启 API接口服务器的 CORS 跨域允许
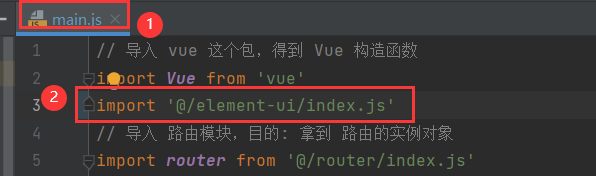
element-ui
访问地址:点击
// 导入Vue 构造
import Vue from 'vue'
// 按需导入 element-ui组件
import {Button, Input} from 'element-ui'

// 注册需要的组件
Vue.use(Button)
Vue.use(Input)
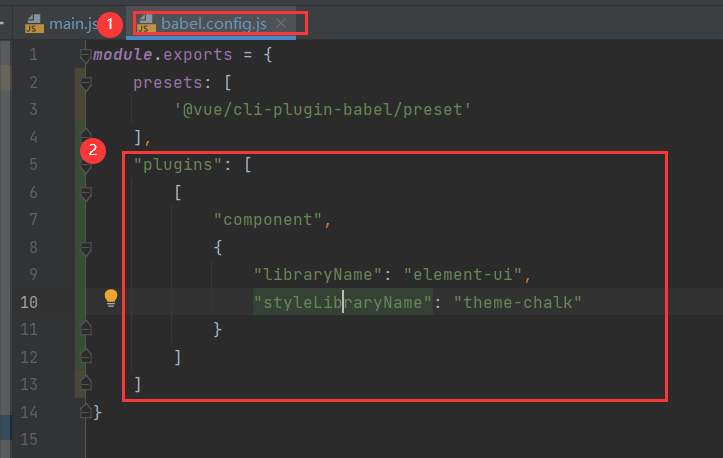
 "plugins": [
        [
            "component",
            {
                "libraryName": "element-ui",
                "styleLibraryName": "theme-chalk"
            }
        ]
    ]
scope.row 代表这一行的数据
<el-table :data="tableData" style="width: 100%">
  <el-table-column prop="date" label="日期" width="180"></el-table-column>
  <el-table-column prop="name" label="姓名" width="180"></el-table-column>
  <el-table-column prop="address" abel="地址"></el-table-column>
  <el-table-column prop="创建时间" label="创建时间">
	    <template v-slot:default="scope">
	      {{ scope.row.date }}
	    </template>
  </el-table-column>
</el-table>
表单验证
<template>
  <div>
    <el-form :model="form" status-icon :rules="formRules" ref="form" label-width="80px" >
      <!-- prop 必须和 下面data中 form的内容一致-->
      <el-form-item label="用户姓名" prop="name">
        <el-input v-model="form.name" autocomplete="off"></el-input>
      </el-form-item>
      <!--  v-model.number:自动转为数字 保存到 form.age   -->
      <el-form-item label="用户年龄" prop="age">
        <el-input v-model.number="form.age" autocomplete="off"></el-input>
      </el-form-item>

      <el-form-item label="用户头衔" prop="position">
        <el-input v-model="form.position"></el-input>
      </el-form-item>

      <el-form-item>
        <el-button type="primary" @click="submitForm('form')">提交</el-button>
        <el-button @click="resetForm('form')">重置</el-button>
      </el-form-item>
    </el-form>
  </div>

</template>

<script>
export default {
  data() {
    // 声明 校验年龄的函数
    // value 填写的值
    // cb回调函数  cb(new new Error()) 代表出错
    // cb() 代表验证通过
    let checkAge = (rule, value, cb) => {
      if (!Number.isInteger(value)) {
        return cb(new Error('请填写整数'))
      }
      if (value > 100 || value < 1) {
        return cb(new Error('年龄必须在1到100岁之间!'))
      }
      cb()
    }
    return {

      // 要采集的用户的 信息对象
      form: {
        name: '',
        age: '',
        position: ''
      },
      // 表单的验证规则~
      formRules: {
        name: [
          {required: true, message: '姓名是必填项', trigger: 'blur'},
          {min: 1, max: 15, message: '长度在1到15个字符', trigger: 'blur'}
        ],
        age: [
          {required: true, message: '年龄是必填项', trigger: 'blur'},
          //validator 校验规则,trigger 触发时机
          {validator: checkAge, trigger: 'blur'}
        ],
        position: [
          {required: true, message: '头衔是必填项', trigger: 'blur'},
          {min: 1, max: 10, message: '长度在1到10个字符', trigger: 'blur'}
        ],
      }
    }
  },
  methods: {
    submitForm(formName) {
      this.$refs[formName].validate((valid) => {
        if (valid) {
          alert('submit!');
        } else {
          console.log('error submit!!');
          return false;
        }
      });
    },
    resetForm(formName) {
      this.$refs[formName].resetFields();
    }
  }
}
</script>
Message 消息提示
通过 main.js ,给原型加个 $message对象
import {Message} from "element-ui";

Vue.prototype.$message = Message
submitForm(formName) {
  this.$refs[formName].validate(async valid => {
    // 验证 没通过 直接返回,不发送请求
    if (!valid) return;
    // 需要 执行 添加的业务处理
    const {data: res} = await this.$http.post('/api/users', this.form)
    // this.$message 优化提示效果: Message消息提示
    if (res.status != 0) return this.$message.error("操作失败")
    this.$message.success("操作成功!")

  });
},
resetForm(formName) {
  this.$refs[formName].resetFields();
  this.$message.success("重置成功!")
}
提示组件MessageBox弹框
通过 main.js ,给原型加个 $confirm 对象
import {Message, MessageBox} from "element-ui";

Vue.prototype.$message = Message
Vue.prototype.$confirm = MessageBox
async resetForm(formName) {
  const confirmResult = await this.$confirm('此操作将重置表单, 是否继续?', '提示', {
    confirmButtonText: '确定',
    cancelButtonText: '取消',
    type: 'warning'
  }).catch(err => err)
  if (confirmResult != 'confirm') return this.$message.info('取消重置')
  this.$refs[formName].resetFields();
  this.$message.success('重置成功')
}


 286
286


 被折叠的 条评论
为什么被折叠?
被折叠的 条评论
为什么被折叠?
 到【灌水乐园】发言


