系统版本:CentOS Linux release 7.3.1611 (Core)
一、 安装 Elasticsearch
只允许普通用户操作,不允许root用户
注意:因为elasticsearch有远程执行脚本的功能所以容易中木马病毒,所以不允许用root用户启动,root用户是起不来的,赋权限,用一般的用户启动
要配置network.host才能别的机器或者网卡访问,否则只能是127.0.0.1或者localhost访问,这里配置成自己的局域网ip
注意配置yml结尾的配置文件都需要冒号后面加空格才行
1、下载elasticsearch-7.6.0-linux-x86_64.tar.gz版本,上传到/opt路径下。
下载地址:https://elasticsearch.cn/download/
上传路径:/opt/elasticsearch-7.6.0-linux-x86_64.tar.gz
不要用root解压,需要切换用户。Centos中查看有哪些用户:cut -d : -f 1 /etc/passwd
创建一个新用户:adduser elasticsearch
为新用户创建初始化密码:passwd elasticsearch
root用户解压文件:tar -zxvf elasticsearch-7.6.0-linux-x86_64.tar.gz
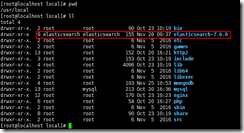
复制到指定目录下:cp -R elasticsearch-7.6.0 /usr/local/
设置授权范围:chown -R elasticsearch:elasticsearch /usr/local/elasticsearch-7.6.0/
2、启动方法:切换elasticsearch用户,进入目录/usr/local/elasticsearch-7.6.0/bin,执行:./elasticsearch
root用户启动报错:
[root@localhost elasticsearch-7.6.0]# cd bin/
[root@localhost bin]# ./elasticsearch
OpenJDK 64-Bit Server VM warning: Option UseConcMarkSweepGC was deprecated in version 9.0 and will likely be removed in a future release.
[2020-11-28T10:38:45,259][ERROR][o.e.b.ElasticsearchUncaughtExceptionHandler] [localhost.localdomain] uncaught exception in thread [main]
org.elasticsearch.bootstrap.StartupException: java.lang.RuntimeException: can not run elasticsearch as root
    at org.elasticsearch.bootstrap.Elasticsearch.init(Elasticsearch.java:174) ~[elasticsearch-7.6.0.jar:7.6.0]
    at org.elasticsearch.bootstrap.Elasticsearch.execute(Elasticsearch.java:161) ~[elasticsearch-7.6.0.jar:7.6.0]
    at org.elasticsearch.cli.EnvironmentAwareCommand.execute(EnvironmentAwareCommand.java:86) ~[elasticsearch-7.6.0.jar:7.6.0]
    at org.elasticsearch.cli.Command.mainWithoutErrorHandling(Command.java:125) ~[elasticsearch-cli-7.6.0.jar:7.6.0]
    at org.elasticsearch.cli.Command.main(Command.java:90) ~[elasticsearch-cli-7.6.0.jar:7.6.0]
    at org.elasticsearch.bootstrap.Elasticsearch.main(Elasticsearch.java:126) ~[elasticsearch-7.6.0.jar:7.6.0]
    at org.elasticsearch.bootstrap.Elasticsearch.main(Elasticsearch.java:92) ~[elasticsearch-7.6.0.jar:7.6.0]
Caused by: java.lang.RuntimeException: can not run elasticsearch as root
    at org.elasticsearch.bootstrap.Bootstrap.initializeNatives(Bootstrap.java:105) ~[elasticsearch-7.6.0.jar:7.6.0]

    at org.elasticsearch.bootstrap.Bootstrap.setup(Bootstrap.java:172) ~[elasticsearch-7.6.0.jar:7.6.0]
    at org.elasticsearch.bootstrap.Bootstrap.init(Bootstrap.java:349) ~[elasticsearch-7.6.0.jar:7.6.0]
    at org.elasticsearch.bootstrap.Elasticsearch.init(Elasticsearch.java:170) ~[elasticsearch-7.6.0.jar:7.6.0]
    ... 6 more
uncaught exception in thread [main]
java.lang.RuntimeException: can not run elasticsearch as root
    at org.elasticsearch.bootstrap.Bootstrap.initializeNatives(Bootstrap.java:105)
    at org.elasticsearch.bootstrap.Bootstrap.setup(Bootstrap.java:172)
    at org.elasticsearch.bootstrap.Bootstrap.init(Bootstrap.java:349)
    at org.elasticsearch.bootstrap.Elasticsearch.init(Elasticsearch.java:170)
    at org.elasticsearch.bootstrap.Elasticsearch.execute(Elasticsearch.java:161)
    at org.elasticsearch.cli.EnvironmentAwareCommand.execute(EnvironmentAwareCommand.java:86)
    at org.elasticsearch.cli.Command.mainWithoutErrorHandling(Command.java:125)
    at org.elasticsearch.cli.Command.main(Command.java:90)
    at org.elasticsearch.bootstrap.Elasticsearch.main(Elasticsearch.java:126)
    at org.elasticsearch.bootstrap.Elasticsearch.main(Elasticsearch.java:92)
For complete error details, refer to the log at /usr/local/elasticsearch-7.6.0/logs/elasticsearch.log3、切换成elasticsearch用户后第一次启动成功,但访问:http://localhost:9200失败,第二次启失败,报以下错误日志。
[2020-11-28T11:04:41,474][INFO ][o.e.n.Node               ] [localhost.localdomain] initialized
[2020-11-28T11:04:41,475][INFO ][o.e.n.Node               ] [localhost.localdomain] starting ...
[2020-11-28T11:04:41,659][INFO ][o.e.t.TransportService   ] [localhost.localdomain] publish_address {192.168.8.190:9300}, bound_addresses {192.168.8.190:9300}
[2020-11-28T11:04:42,074][INFO ][o.e.b.BootstrapChecks    ] [localhost.localdomain] bound or publishing to a non-loopback address, enforcing bootstrap checks
ERROR: [3] bootstrap checks failed
[1]: max file descriptors [4096] for elasticsearch process is too low, increase to at least [65535]
[2]: max virtual memory areas vm.max_map_count [65530] is too low, increase to at least [262144]
[3]: the default discovery settings are unsuitable for production use; at least one of [discovery.seed_hosts, discovery.seed_providers, cluster.initial_master_nodes] must be configured
ERROR: Elasticsearch did not exit normally - check the logs at /usr/local/elasticsearch-7.6.0/logs/elasticsearch.log
[2020-11-28T11:04:42,125][INFO ][o.e.n.Node               ] [localhost.localdomain] stopping ...
[2020-11-28T11:04:42,152][INFO ][o.e.n.Node               ] [localhost.localdomain] stopped
[2020-11-28T11:04:42,152][INFO ][o.e.n.Node               ] [localhost.localdomain] closing ...
[2020-11-28T11:04:42,168][INFO ][o.e.n.Node               ] [localhost.localdomain] closed
[2020-11-28T11:04:42,171][INFO ][o.e.x.m.p.NativeController] [localhost.localdomain] Native controller process has stopped - no new native processes can be started
解决方法:
新装es启动时,会遇到以下错误情况:

ERROR: [3] bootstrap checks failed
[1]: max file descriptors [4096] for elasticsearch process is too low, increase to at least [65536]
解决办法:
编辑 /etc/security/limits.conf,追加以下内容;
* soft nofile 65536
* hard nofile 65536
此文件修改后需要重新登录用户,才会生效
[2]: max virtual memory areas vm.max_map_count [65530] is too low, increase to at least [262144]
解决办法:
编辑 /etc/sysctl.conf,追加以下内容:
vm.max_map_count=655360
保存后,执行:

sysctl -p

[3]: max number of threads [2048] for user [tongtech] is too low, increase to at least [4096]
错误原因:启动检查未通过
    elasticsearch用户的最大线程数太低
解决办法:
vim /etc/security/limits.d/90-nproc.conf
将2048改为4096或更大4、修改后重启依然报错:[1]: the default discovery settings are unsuitable for production use; at least one of [discovery.seed_hosts, discovery.seed_providers, cluster.initial_master_nodes] must be configured
[2020-11-28T11:12:15,598][INFO ][o.e.p.PluginsService     ] [localhost.localdomain] no plugins loaded
[2020-11-28T11:12:20,659][INFO ][o.e.x.s.a.s.FileRolesStore] [localhost.localdomain] parsed [0] roles from file [/usr/local/elasticsearch-7.6.0/config/roles.yml]
[2020-11-28T11:12:21,426][INFO ][o.e.x.m.p.l.CppLogMessageHandler] [localhost.localdomain] [controller/29820] [Main.cc@110] controller (64 bit): Version 7.6.0 (Build 1c8cca13fa9631) Copyright (c) 2020 Elasticsearch BV
[2020-11-28T11:12:22,161][DEBUG][o.e.a.ActionModule       ] [localhost.localdomain] Using REST wrapper from plugin org.elasticsearch.xpack.security.Security
[2020-11-28T11:12:22,342][INFO ][o.e.d.DiscoveryModule    ] [localhost.localdomain] using discovery type [zen] and seed hosts providers [settings]
[2020-11-28T11:12:23,503][INFO ][o.e.n.Node               ] [localhost.localdomain] initialized
[2020-11-28T11:12:23,503][INFO ][o.e.n.Node               ] [localhost.localdomain] starting ...
[2020-11-28T11:12:23,679][INFO ][o.e.t.TransportService   ] [localhost.localdomain] publish_address {192.168.8.190:9300}, bound_addresses {192.168.8.190:9300}
[2020-11-28T11:12:24,119][INFO ][o.e.b.BootstrapChecks    ] [localhost.localdomain] bound or publishing to a non-loopback address, enforcing bootstrap checks
ERROR: [1] bootstrap checks failed
[1]: the default discovery settings are unsuitable for production use; at least one of [discovery.seed_hosts, discovery.seed_providers, cluster.initial_master_nodes] must be configured
ERROR: Elasticsearch did not exit normally - check the logs at /usr/local/elasticsearch-7.6.0/logs/elasticsearch.log
[2020-11-28T11:12:24,169][INFO ][o.e.n.Node               ] [localhost.localdomain] stopping ...
[2020-11-28T11:12:24,204][INFO ][o.e.n.Node               ] [localhost.localdomain] stopped
[2020-11-28T11:12:24,204][INFO ][o.e.n.Node               ] [localhost.localdomain] closing ...
[2020-11-28T11:12:24,219][INFO ][o.e.n.Node               ] [localhost.localdomain] closed
[2020-11-28T11:12:24,222][INFO ][o.e.x.m.p.NativeController] [localhost.localdomain] Native controller process has stopped - no new native processes can be started
因为没有修改配置文件,修配置文件如下:
#集群名称
cluster.name: my-application
#节点名称
node.name: node-1
#当前节点所绑定的本机IP
network.host: 192.168.8.190
#初始化集群主节点
cluster.initial_master_nodes: ["node-1"]
注意:如果要配置集群需要两个节点上的elasticsearch配置的cluster.name相同,都启动可以自动组成集群,这里如果不改cluster.name则默认是cluster.name=elasticsearch,nodename随意取但是集群内的各节点不能相同。
#
# Use a descriptive name for the node:
#
node.name: node-1
#
# Add custom attributes to the node:
#
#node.attr.rack: r1
#
# ----------------------------------- Paths ------------------------------------
#
# Path to directory where to store the data (separate multiple locations by comma):
#
#path.data: /path/to/data
#
# Path to log files:
#
#path.logs: /path/to/logs
#
# ----------------------------------- Memory -----------------------------------
#
# Lock the memory on startup:
#
#bootstrap.memory_lock: true
#
# Make sure that the heap size is set to about half the memory available
# on the system and that the owner of the process is allowed to use this
# limit.
#
# Elasticsearch performs poorly when the system is swapping the memory.
#
# ---------------------------------- Network -----------------------------------
#
# Set the bind address to a specific IP (IPv4 or IPv6):
#
network.host: 192.168.8.190
#
# Set a custom port for HTTP:
#
#http.port: 9200
#
# For more information, consult the network module documentation.
#
# --------------------------------- Discovery ----------------------------------
#
# Pass an initial list of hosts to perform discovery when this node is started:
# The default list of hosts is ["127.0.0.1", "[::1]"]
#
#discovery.seed_hosts: ["host1", "host2"]
#
# Bootstrap the cluster using an initial set of master-eligible nodes:
#
cluster.initial_master_nodes: ["node-1"]
#
# For more information, consult the discovery and cluster formation module documentation.
#
# ---------------------------------- Gateway -----------------------------------
#
# Block initial recovery after a full cluster restart until N nodes are started:
#
#gateway.recover_after_nodes: 3
#
# For more information, consult the gateway module documentation.
#
# ---------------------------------- Various -----------------------------------
#
# Require explicit names when deleting indices:
#
#action.destructive_requires_name: true
5、目录说明

bin : 可执行文件
config : 配置文件
log4j2.properties:日志文件
jvm.options : JVM启动参数
elasticsearch.yml : 自身参数设置 默认端口9200;
roles.yml : 角色参数设置
role_mapping.yml : 角色映射文件
users : 用户文件
users_roles : 用户对应角色关系文件
jdk : 不用说
lib : jar包
logs : 日志
modules : 功能模块
plugins : 插件
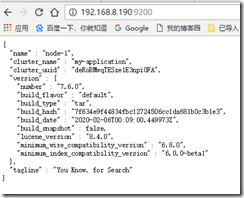
6、成功访问:http://192.168.8.190:9200/
访问接口:9200
通信接口:9300
二、CentOS 7.x Elasticsearch-x设置开机启动
1.建立服务文件
vi /lib/systemd/system/elasticsearch.service[Unit]
Description=elasticsearch
[Service]
LimitNOFILE=100000
LimitNPROC=100000
ExecStart=/usr/local/elasticsearch-7.6.0/bin/elasticsearch
User=elasticsearch
Group=elasticsearch
[Install]
WantedBy=multi-user.target2.给脚本赋权限:
chmod +x /lib/systemd/system/elasticsearch.service3.设置开机自启动
重新加载systemd的守护线程:systemctl daemon-reload

systemctl enable elasticsearch
4.其他
启动elasticsearch.service:
systemctl start elasticsearch.service

查看elasticsearch.serivce状态:
systemctl status elasticsearch.service
ps aux|grep java
如果出现错误可以使用如下命令查看日志:journalctl -u elaticsearch.service


 567
567


 被折叠的 条评论
为什么被折叠?


