


认证快速开始
快速入门
- 添加依赖
<dependency>
    <groupId>org.springframework.boot</groupId>
    <artifactId>spring-boot-starter-security</artifactId>
</dependency>
<dependency>
    <groupId>org.springframework.boot</groupId>
    <artifactId>spring-boot-starter-web</artifactId>
</dependency>
- 创建controller
@RestController
@Slf4j
public class HelloController {

    @GetMapping("hello")
    public String hello() {
    	return "hello spring security";
    }

}
接下来访问 /hello 等 任意 url 都会跳转到 /login , 对包括 /login, 他会重定向一次, 可以考虑将 login 也给加入到白名单
而由于密码没有配置, 默认 是 user 密码默认为 UUID , 输出在启动控制台中, 需要你去查找
源码流程简要分析

客户端向服务端发送了两次请求, 第一次访问 /hello , 被 spring security 的过滤器 FilterSecurityIntercepotor 拦截, 抛出异常给 ExceptionTranslationFilter 重定向客户端url为 /login(get请求)
客户端写入账号和密码之后, 发出 /login(post请求) 进行账号密码认证
这里不要搞乱了:
get形式的/login地址是登录页面
post形式的/login地址为登陆页面的form表单请求地址, 是真正的认证账户密码地址
背后做了什么?
虽然上面做了最简单的配置, 但是 SpringSecurity 在背后做了很多的事情
- 开启
SpringSecurity自动配置, 然后创建一个springSecurityFilterChain的过滤器, 并注入Spring容器中, 这个过滤器负责几乎所有的安全管理, 包括 认证, 授权等(springSecurityFilterChain代理了SpringSecurity的过滤器链) - 创建一个
UserDetailsService实例,UserDetailsService负责提供用户数据,默认的用户数据是基于内存的用户,用户名为user,密码则是随机生成的UUID字符串。 - 给用户生成一个默认的登录页面。
- 开启
CSRF攻击防御。 - 开启会话固定攻击防御。集成
X-XSS-Protection。 - 集成
X-Frame-Options以防止单击劫持。
默认用户账号密码的生成
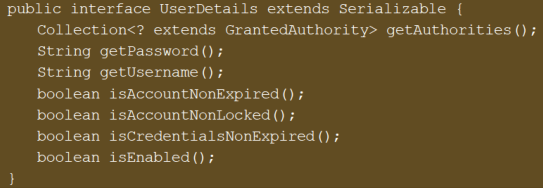
Spring Security中定义了UserDetails 接口来规范开发者自定义的用户对象,这样方便一些旧系统、用户表已经固定的系统集成到Spring Security 认证体系中。
UserDetails接口定义如下:

这是用户对象的定义,而负责提供用户数据源的接口是UserDetailsService ,UserDetailsService中只有一个查询用户的方法,代码如下:
public interface UserDetailsService {
	UserDetails loadUserByUsername(String username) throws UsernameNotFoundException;
}
loadUserByUsername有一个参数是username,这是用户在认证时传入的用户名,最常见的就是用户在登录表单中输入的用户名(实际开发时还可能存在其他情况,例如使用CAS单点登录时, username并非表单输入的用户名,而是CAS Server认证成功后回调的用户名参数),开发者在这里拿到用户名之后,再去数据库中查询用户,最终返回一个UserDetails实例。
在实际项目中,一般需要开发者自定义UserDetailsService 的实现。如果开发者没有自定义UserDetailsService 的实现,Spring Security也为 UserDetailsService 提供了很多默认实现
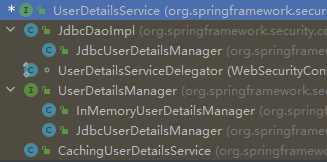
UserDetailsManager在UserDetailsService的基础上,继续定义了添加用户、更新用户、删除用户、修改密码以及判断用户是否存在共5种方法。JdbcDaolmpl在UserDetailsService的基础上,通过spring-jdbc实现了从数据库中查询用户的方法。InMemoryUserDetailsManager实现了UserDetailsManager中关于用户的增删改查方法,不过都是基于内存的操作,数据并没有持久化。JdbcUserDetailsManager继承自JdbcDaolmpl同时又实现了UserDetailsManager接口,因此可以通过JdbcUserDetailsManager实现对用户的增删改查操作,这些操作都会持久化到数据库中。不过JdbcUserDetailsManager有一个局限性,就是操作数据库中用户的SQL都是提前写好的,不够灵活,因此在实际开发中JdbcUserDetailsManager使用并不多。CachingUserDetailsService的特点是会将UserDetailsService缓存起来。UserDetailsServiceDelegator则是提供了UserDetailsService的懒加载功能。ReactiveUserDetailsServiceAdapter是webflux-web-security模块定义的UserDetailsService实现。
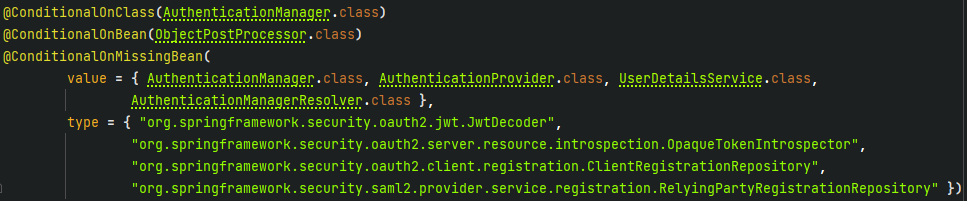
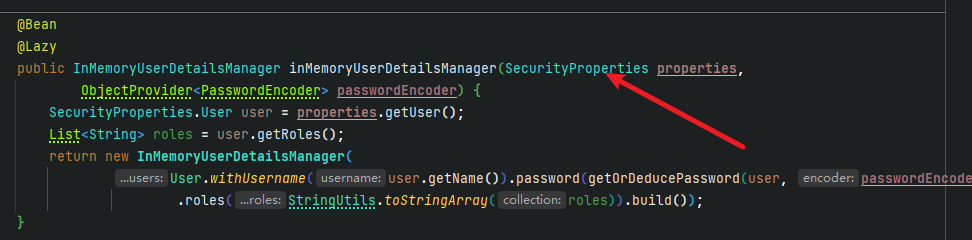
在上面快速入门的情况下, SpringSecurity 默认使用的是 InMemoryUserDetailsManager, 将账号密码保存在内存中, 在这里可以看到
@AutoConfiguration
@ConditionalOnClass(AuthenticationManager.class)
@ConditionalOnBean(ObjectPostProcessor.class)
@ConditionalOnMissingBean(
value = { AuthenticationManager.class, AuthenticationProvider.class, UserDetailsService.class,
AuthenticationManagerResolver.class },
type = { "org.springframework.security.oauth2.jwt.JwtDecoder",
"org.springframework.security.oauth2.server.resource.introspection.OpaqueTokenIntrospector",
"org.springframework.security.oauth2.client.registration.ClientRegistrationRepository",
"org.springframework.security.saml2.provider.service.registration.RelyingPartyRegistrationRepository" })
public class UserDetailsServiceAutoConfiguration {
private static final String NOOP_PASSWORD_PREFIX = "{noop}";
private static final Pattern PASSWORD_ALGORITHM_PATTERN = Pattern.compile("^\\{.+}.*$");
private static final Log logger = LogFactory.getLog(UserDetailsServiceAutoConfiguration.class);
@Bean
@Lazy
public InMemoryUserDetailsManager inMemoryUserDetailsManager(SecurityProperties properties,
ObjectProvider<PasswordEncoder> passwordEncoder) {
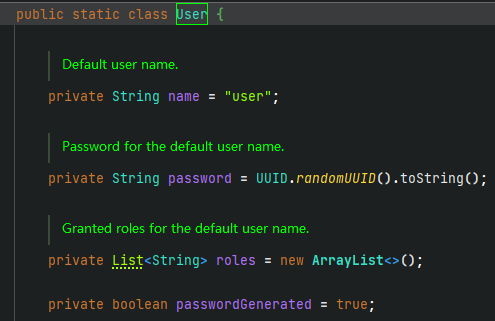
// private String name = "user";
// private String password = UUID.randomUUID().toString();
SecurityProperties.User user = properties.getUser();
// 获得角色列表
List<String> roles = user.getRoles();
// 创建内存中保存的 用户名和密码
return new InMemoryUserDetailsManager(
User.withUsername(user.getName()).password(getOrDeducePassword(user, passwordEncoder.getIfAvailable()))
.roles(StringUtils.toStringArray(roles)).build());
}
// 在密码前面加上 {noop}
private String getOrDeducePassword(SecurityProperties.User user, PasswordEncoder encoder) {
String password = user.getPassword();
// 看看有没有在密码前面添加了密码类型字符串前缀 {xxxx}
if (encoder != null || PASSWORD_ALGORITHM_PATTERN.matcher(password).matches()) {
return password;
}
// 为密码添加 {noop} 密文前缀
return NOOP_PASSWORD_PREFIX + password;
}
}
可以看出这些条件下才会启动该自动配置类, 配置用户名和密码
-
需要在
classpath中有AuthenticationManager.class, 还需要org.springframework.security.config.annotation.ObjectPostProcessor在SpringBean容器中 -
在Spring容器中没有配置
AuthenticationManager.class, AuthenticationProvider.class, UserDetailsService.class, AuthenticationManagerResolver.class和一些其他类的情况下, 则加载
UserDetailsServiceAutoConfiguration
看上面的源码可以发现
password就是UUID, 用户名为 user
在这里可以发现
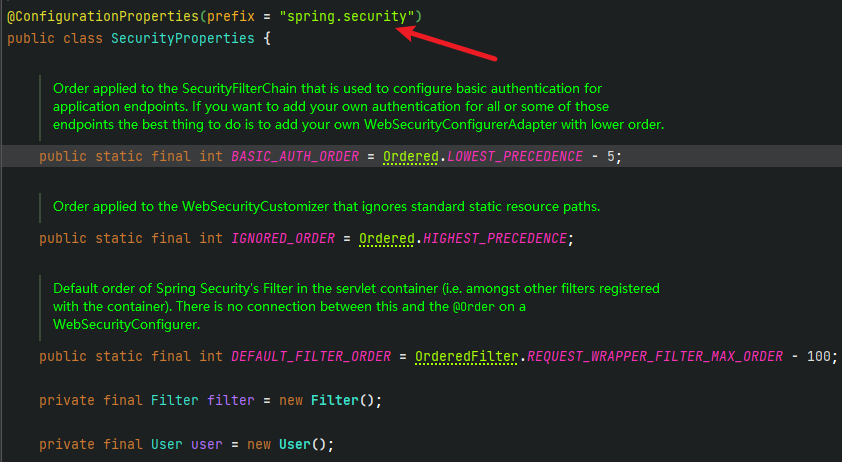
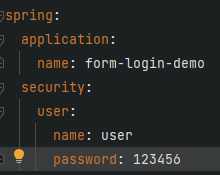
在 application.yml 中可以配置 用户名和密码
默认页面生成
登录
在上面的案例中,一共存在两个默认页面,一个就是/login的登录页面,另外一个则是注销登录页面。当用户登录成功之后,在浏览器中输入http://localhost:8080/logout就可以看到注销登录页面,如图所示。

现在的目的就是找找, 这两个网页在哪生成的
在前面的过滤器链可以发现这两个过滤器

通过过滤器的名字就可以分辨出DefaultLoginPageGeneratingFilter过滤器用来生成默认的登录页面,DefaultLogoutPageGeneratingFilter过滤器则用来生成默认的注销页面。
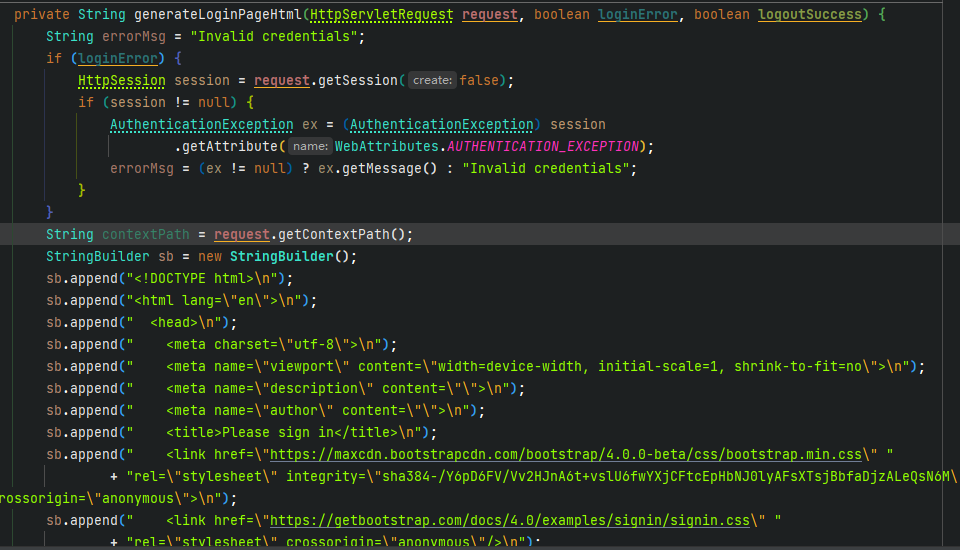
先来看DefaultLoginPageGeneratingFilter。作为Spring Security过滤器链中的一员,在第一次请求hello接口的时候,就会经过DefaultLoginPageGeneratingFilter过滤器,但是由于/hello接口和登录无关,因此 DefaultLoginPageGeneratingFilter过滤器并未干涉hello接口。等到第二次重定向到/login页面的时候,这个时候就和 DefaultLoginPageGeneratingFilter有关系了,此时请求就会在DefaultLoginPageGeneratingFilter 中进行处理,生成登录页面返回给客户端。
我们来看一下DefaultLoginPageGeneratingFilter 的源码,源码比较长,这里仅列出核心部分:
@Override
public void doFilter(ServletRequest request, ServletResponse response, FilterChain chain)
    throws IOException, ServletException {
    // 过滤器将会被 chain 自动调用
    doFilter((HttpServletRequest) request, (HttpServletResponse) response, chain);
}

private void doFilter(HttpServletRequest request, HttpServletResponse response, FilterChain chain)
    throws IOException, ServletException {
    boolean loginError = isErrorPage(request);
    boolean logoutSuccess = isLogoutSuccess(request);
    if (isLoginUrlRequest(request) || loginError || logoutSuccess) {
        // 核心代码, 这里生成了SpringSecurity的默认 /login 网页
        String loginPageHtml = generateLoginPageHtml(request, loginError, logoutSuccess);
        response.setContentType("text/html;charset=UTF-8");
        response.setContentLength(loginPageHtml.getBytes(StandardCharsets.UTF_8).length);
        // 将网页源码写入
        response.getWriter().write(loginPageHtml);
        return;
    }
    // 下一个 Filter
    chain.doFilter(request, response);
}
对了 _csrf 在这里被设置了

private String renderHiddenInputs(HttpServletRequest request) {
    StringBuilder sb = new StringBuilder();
    for (Map.Entry<String, String> input : this.resolveHiddenInputs.apply(request).entrySet()) {
        sb.append("<input name=\"");
        sb.append(input.getKey());
        sb.append("\" type=\"hidden\" value=\"");
        sb.append(input.getValue());
        sb.append("\" />\n");
    }
    return sb.toString();
}
这里需要分析这段代码, 才能发现 csrf 被设置了
public final class DefaultLoginPageConfigurer<H extends HttpSecurityBuilder<H>>
		extends AbstractHttpConfigurer<DefaultLoginPageConfigurer<H>, H> {

    // 这里将 csrf 的值设置, 或者说提供了一个Function接口, 提供了 csrf
	private DefaultLoginPageGeneratingFilter loginPageGeneratingFilter = new DefaultLoginPageGeneratingFilter();

	@Override
	public void init(H http) {
		this.loginPageGeneratingFilter.setResolveHiddenInputs(DefaultLoginPageConfigurer.this::hiddenInputs);
	}

	private Map<String, String> hiddenInputs(HttpServletRequest request) {
        // 这里就是获取 csrf 的 value
		CsrfToken token = (CsrfToken) request.getAttribute(CsrfToken.class.getName());
		return (token != null) ? Collections.singletonMap(token.getParameterName(), token.getToken())
				: Collections.emptyMap();
	}

	@Override
	@SuppressWarnings("unchecked")
	public void configure(H http) {
		AuthenticationEntryPoint authenticationEntryPoint = null;
		ExceptionHandlingConfigurer<?> exceptionConf = http.getConfigurer(ExceptionHandlingConfigurer.class);
		if (exceptionConf != null) {
			authenticationEntryPoint = exceptionConf.getAuthenticationEntryPoint();
		}
		if (this.loginPageGeneratingFilter.isEnabled() && authenticationEntryPoint == null) {
			this.loginPageGeneratingFilter = postProcess(this.loginPageGeneratingFilter);
			http.addFilter(this.loginPageGeneratingFilter);
		}
	}

}
这个类省略了很多代码
在上面设置好的 Function 函数之后, 然后在
DefaultLoginPageGeneratingFilter#renderHiddenInputs这个函数中使用
private String renderHiddenInputs(HttpServletRequest request) {
   StringBuilder sb = new StringBuilder();
   for (Map.Entry<String, String> input : this.resolveHiddenInputs.apply(request).entrySet()) {
      sb.append("<input name=\"");
      sb.append(input.getKey());
      sb.append("\" type=\"hidden\" value=\"");
      sb.append(input.getValue());
      sb.append("\" />\n");
   }
   return sb.toString();
}
最后促成了前端页面的

另外这里配置了登录地址和登出地址

private void init(UsernamePasswordAuthenticationFilter authFilter,
      AbstractAuthenticationProcessingFilter openIDFilter) {
   // 这里初始化了 /login 地址
   this.loginPageUrl = DEFAULT_LOGIN_PAGE_URL;
    // 这里设置了 登出 的地址
   this.logoutSuccessUrl = DEFAULT_LOGIN_PAGE_URL + "?logout";
   // 这里设置了登录错误的地址
   this.failureUrl = DEFAULT_LOGIN_PAGE_URL + "?" + ERROR_PARAMETER_NAME;
   if (authFilter != null) {
      initAuthFilter(authFilter);
   }
   if (openIDFilter != null) {
      initOpenIdFilter(openIDFilter);
   }
}
登出
如果你仔细看DefaultLoginPageConfigurer类的代码
public final class DefaultLoginPageConfigurer<H extends HttpSecurityBuilder<H>>
		extends AbstractHttpConfigurer<DefaultLoginPageConfigurer<H>, H> {

	private DefaultLoginPageGeneratingFilter loginPageGeneratingFilter = new DefaultLoginPageGeneratingFilter();

	private DefaultLogoutPageGeneratingFilter logoutPageGeneratingFilter = new DefaultLogoutPageGeneratingFilter();

	@Override
	public void init(H http) {
		this.loginPageGeneratingFilter.setResolveHiddenInputs(DefaultLoginPageConfigurer.this::hiddenInputs);
		this.logoutPageGeneratingFilter.setResolveHiddenInputs(DefaultLoginPageConfigurer.this::hiddenInputs);
		http.setSharedObject(DefaultLoginPageGeneratingFilter.class, this.loginPageGeneratingFilter);
	}

	private Map<String, String> hiddenInputs(HttpServletRequest request) {
		CsrfToken token = (CsrfToken) request.getAttribute(CsrfToken.class.getName());
		return (token != null) ? Collections.singletonMap(token.getParameterName(), token.getToken())
				: Collections.emptyMap();
	}

	@Override
	@SuppressWarnings("unchecked")
	public void configure(H http) {
		AuthenticationEntryPoint authenticationEntryPoint = null;
		ExceptionHandlingConfigurer<?> exceptionConf = http.getConfigurer(ExceptionHandlingConfigurer.class);
		if (exceptionConf != null) {
			authenticationEntryPoint = exceptionConf.getAuthenticationEntryPoint();
		}
		if (this.loginPageGeneratingFilter.isEnabled() && authenticationEntryPoint == null) {
			this.loginPageGeneratingFilter = postProcess(this.loginPageGeneratingFilter);
			http.addFilter(this.loginPageGeneratingFilter);
			LogoutConfigurer<H> logoutConfigurer = http.getConfigurer(LogoutConfigurer.class);
			if (logoutConfigurer != null) {
				http.addFilter(this.logoutPageGeneratingFilter);
			}
		}
	}

}
将会看到 登出 过滤器源码
public class DefaultLogoutPageGeneratingFilter extends OncePerRequestFilter {

	private RequestMatcher matcher = new AntPathRequestMatcher("/logout", "GET");

	private Function<HttpServletRequest, Map<String, String>> resolveHiddenInputs = (request) -> Collections.emptyMap();

	@Override
	protected void doFilterInternal(HttpServletRequest request, HttpServletResponse response, FilterChain filterChain)
			throws ServletException, IOException {
		if (this.matcher.matches(request)) {
			renderLogout(request, response);
		}
		else {
			filterChain.doFilter(request, response);
		}
	}

	private void renderLogout(HttpServletRequest request, HttpServletResponse response) throws IOException {
		StringBuilder sb = new StringBuilder();
		sb.append("<!DOCTYPE html>\n");
		sb.append("<html lang=\"en\">\n");
		sb.append("  <head>\n");
		sb.append("    <meta charset=\"utf-8\">\n");
		sb.append("    <meta name=\"viewport\" content=\"width=device-width, initial-scale=1, shrink-to-fit=no\">\n");
		sb.append("    <meta name=\"description\" content=\"\">\n");
		sb.append("    <meta name=\"author\" content=\"\">\n");
		sb.append("    <title>Confirm Log Out?</title>\n");
		sb.append("    <link href=\"https://maxcdn.bootstrapcdn.com/bootstrap/4.0.0-beta/css/bootstrap.min.css\" "
				+ "rel=\"stylesheet\" integrity=\"sha384-/Y6pD6FV/Vv2HJnA6t+vslU6fwYXjCFtcEpHbNJ0lyAFsXTsjBbfaDjzALeQsN6M\" "
				+ "crossorigin=\"anonymous\">\n");
		sb.append("    <link href=\"https://getbootstrap.com/docs/4.0/examples/signin/signin.css\" "
				+ "rel=\"stylesheet\" crossorigin=\"anonymous\"/>\n");
		sb.append("  </head>\n");
		sb.append("  <body>\n");
		sb.append("     <div class=\"container\">\n");
		sb.append("      <form class=\"form-signin\" method=\"post\" action=\"" + request.getContextPath()
				+ "/logout\">\n");
		sb.append("        <h2 class=\"form-signin-heading\">Are you sure you want to log out?</h2>\n");
		sb.append(renderHiddenInputs(request)
				+ "        <button class=\"btn btn-lg btn-primary btn-block\" type=\"submit\">Log Out</button>\n");
		sb.append("      </form>\n");
		sb.append("    </div>\n");
		sb.append("  </body>\n");
		sb.append("</html>");
		response.setContentType("text/html;charset=UTF-8");
		response.getWriter().write(sb.toString());
	}

	public void setResolveHiddenInputs(Function<HttpServletRequest, Map<String, String>> resolveHiddenInputs) {
		Assert.notNull(resolveHiddenInputs, "resolveHiddenInputs cannot be null");
		this.resolveHiddenInputs = resolveHiddenInputs;
	}

	private String renderHiddenInputs(HttpServletRequest request) {
		StringBuilder sb = new StringBuilder();
		for (Map.Entry<String, String> input : this.resolveHiddenInputs.apply(request).entrySet()) {
			sb.append("<input name=\"");
			sb.append(input.getKey());
			sb.append("\" type=\"hidden\" value=\"");
			sb.append(input.getValue());
			sb.append("\" />\n");
		}
		return sb.toString();
	}

}
从上述源码中可以看出,请求到来之后,会先判断是否是注销请求/logout,如果是/logout请求,则渲染一个注销请求的页面返回给客户端,渲染过程和前面登录页面的渲染过程类似,也是字符串拼接(这里省略了字符串拼接,读者可以参考DefaultLogoutPageGeneratingFilter的源码)﹔否则请求继续往下走,执行下一个过滤器。
自定义登录表单
快速入门
在resources/templates创建login.html页面, 自定义我们自己的网页
由于我们在
templates创建html, 所以需要在controller下创建mapping@Controller @Slf4j public class LoginController { @GetMapping("/login") public String login() { return "login"; } }
<!DOCTYPE html>
<html lang="zh-CN">
<head>
    <meta charset="UTF-8">
    <title>form-login</title>

    <link rel="stylesheet" href="css/font-awesome-4.7.0/css/font-awesome.min.css">
    <link rel="stylesheet" href="css/style.css">

</head>
<body>


<div class="materialContainer">
    <div class="box">
        <div class="title">form-登录</div>
        <form th:action="@{/doLogin}" method="post">
            <div class="input">
                <label for="name">用户名</label>
<!--	            <input type="text" name="username" id="name">-->
	            <input type="text" name="name" id="name">
                <span class="spin"></span>
            </div>
            <div class="input">
                <label for="pass">密码</label>
<!--	            <input type="password" name="password" id="pass">-->
	            <input type="password" name="pwd" id="pass">
                <span class="spin"></span>
            </div>
            <div class="button login">
                <button type="submit">
                    <span>登录</span>
                    <i class="fa fa-check"></i>
                </button>
            </div>
	        <div th:text="${session.SPRING_SECURITY_LAST_EXCEPTION}"></div>
        </form>
        <a href="javascript:" class="pass-forgot">忘记密码?</a>
    </div>

    <div class="overbox">
        <div class="material-button alt-2">
            <span class="shape"></span>
        </div>
        <div class="title">form-注册</div>
        <div class="input">
            <label for="regname">用户名</label>
            <input type="text" name="regname" id="regname">
            <span class="spin"></span>
        </div>
        <div class="input">
            <label for="regpass">密码</label>
            <input type="password" name="regpass" id="regpass">
            <span class="spin"></span>
        </div>
        <div class="input">
            <label for="reregpass">确认密码</label>
            <input type="password" name="reregpass" id="reregpass">
            <span class="spin"></span>
        </div>
        <div class="button">
            <button>
                <span>注册</span>
            </button>
        </div>
    </div>

</div>

<script src="js/jquery.min.js"></script>
<script src="js/index.js"></script>

</body>
</html>
值得注意的是, 我们将表单登录的
action地址修改为doLogin, 将原先的username和password修改为name和pwd
我们对 login.html 的修改, 需要告知 spring security
配置SpringSecurity配置类
@Bean
public SecurityFilterChain securityWebFilterChain(HttpSecurity httpSecurity) throws Exception {
    return httpSecurity.authorizeHttpRequests()
        .anyRequest()
        .authenticated()
        .and()
        .formLogin()
        .loginPage("/login")
        .loginProcessingUrl("/doLogin")
        .defaultSuccessUrl("/index")
        .failureUrl("/login")
        .usernameParameter("name")
        .passwordParameter("pwd")
        .permitAll()
        .and()
        .csrf()
        .disable()
        .build();
}
authorizeRequests()方法表示开启权限配置(该方法的含义其实比较复杂,我们在后面还会再次介绍该方法),.anyRequest().authenticated()表示所有的请求都要认证之后才能访问。- 有的读者会对
and()方法表示疑惑,and()方法会返回HttpSecurityBuilder对象的一个子类(实际上就是HttpSecurity),所以and()方法相当于又回到HttpSecurity实例,重新开启新一轮的配置。如果觉得and(方法很难理解,也可以不用and()方法,在.anyRequest().authenticated()配置完成后直接用分号(;)结束,然后通过http.formLogin()继续配置表单登录。 formLogin()表示开启表单登录配置,loginPage用来配置登录页面地址loginProcessingUrl用来配置登录接口地址;defaultSuccessUrl表示登录成功后的跳转地址;failureUrl表示登录失败后的跳转地址;usernameParameter表示登录用户名的参数名称;passwordParameter表示登录密码的参数名称;permitAll表示跟登录相关的页面和接口不做拦截,直接通过。需要注意的是,loginProcessingUrl、usernameParameter、passwordParameter需要和login.html中登录表单的配置一致。- 最后的
csrf().disable()表示禁用CSRF防御功能,Spring Security自带了CSRF防御机制,但是我们这里为了测试方便,先将CSRF防御机制关闭,后续将会详细介绍CSRF攻击与防御问题。
配置细节
当然,前面的配置比较粗糙,这里还有一些配置的细节需要和读者分享一下。
在前面的配置中,我们用defaultSuccessUrl表示用户登录成功后的跳转地址,用failureUrl表示用户登录失败后的跳转地址。关于登录成功和登录失败,除了这两个方法可以配置之外,还有另外两个方法也可以配置。
登陆成功
当用户登录成功之后,除了defaultSuccessUnl 方法可以实现登录成功后的跳转之外,successForwardUrl也可以实现登录成功后的跳转
// .successForwardUrl("/")
.defaultSuccessUrl("/", false)
defaultSuccessUrl 和 successForwardUrl的区别
defaultSuccessUrl表示当用户登录成功之后,会自动重定向到登录之前的地址上,如果用户本身就是直接访问的登录页面,则登录成功后就会重定向到defaultSuccessUrl指定的页面中。例如,用户在未认证的情况下,访问了hello页面,此时会自动重定向到登录页面,当用户登录成功后,就会自动重定向到/hello页面; 而用户如果一开始就访问登录页面,则登录成功后就会自动重定向到defaulItSuccessUrl所指定的页面中。successForwardUrl则不会考虑用户之前的访问地址,只要用户登录成功,就会通过服务器端跳转到successForwardUrl所指定的页面。defaultSuccessUrl有一个重载方法,如果重载方法的第二个参数传入true,则defaultSuccessUrl的效果与successForwardUrl类似,即不考虑用户之前的访问地址,只要登录成功,就重定向到defaultSuccessUrl所指定的页面。不同之处在于,defaultSuccessUrl是通过重定向实现的跳转(客户端跳转),而successForwardUrl则是通过服务器端跳转实现的。
相关源码简单分析
无论是defaultSuccessUrl还是successForwardUrl,最终所配置的都是AuthenticationSuccessHandler接口的实例。
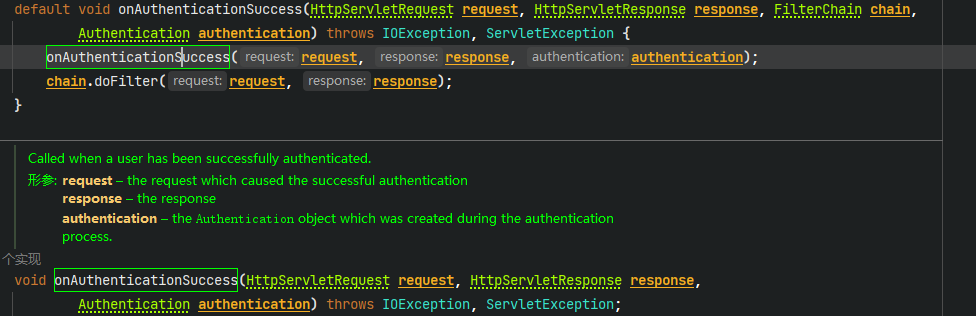
Spring Security中专门提供了AuthenticationSuccessHandler接口用来处理登录成功事项:
public interface AuthenticationSuccessHandler {
	default void onAuthenticationSuccess(HttpServletRequest request, HttpServletResponse response, FilterChain chain,
			Authentication authentication) throws IOException, ServletException {
		onAuthenticationSuccess(request, response, authentication);
		chain.doFilter(request, response);
	}

	void onAuthenticationSuccess(HttpServletRequest request, HttpServletResponse response,
			Authentication authentication) throws IOException, ServletException;
}
由上述代码可以看到,AuthenticationSuccessHandler接口中一共定义了两个方法,其中一个是 default方法,此方法是Spring Security 5.2开始加入进来的,在处理特定的认证请求Authentication Filter中会用到; 另外一个非 default方法,则用来处理登录成功的具体事项,其中request和response参数好理解,authentication参数保存了登录成功的用户信息。我们将在后面的章节中详细介绍 authentication参数。

这个接口的函数超级简单
你在用户认证成功之后, 就会调用上面的那个函数, 紧接着上面的默认函数会调用下面的函数, 该函数是个接口, 将会有实现类
AuthenticationSuccessHandler接口共有三个实现类, 如图所示
[外链图片转存失败,源站可能有防盗链机制,建议将图片保存下来直接上传(img-YgBgoeob-1675433382963)(null)]
ForwardAuthenticationSuccessHandler

成功就转发
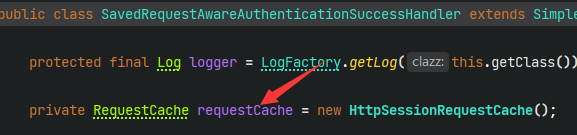
SavedRequestAwareAuthenticationSuccessHandler

SavedRequestAwareAuthenticationSuccessHandler 在 SimpleUrlAuthenticationSuccessHandler 的基础上增加了请求缓存的功能,可以记录之前请求的地址,进而在登录成功后重定向到一开始访问的地址。
SimpleUrlAuthenticationSuccessHandler

这个是默认的, 如果你没有配置任何相关配置时, 将会使用它
我们来重点分析SavedRequestAwareAuthenticationSuccessHandler和 ForwardAuthenticationSuccessHandler的实现。
当通过defaultSuccessUrl来设置登录成功后重定向的地址时,实际上对应的实现类就是SavedRequestAwareAuthenticationSuccessHandler,由于该类的源码比较长,这里列出来一部分核心代码:
public class SavedRequestAwareAuthenticationSuccessHandler extends SimpleUrlAuthenticationSuccessHandler {

	protected final Log logger = LogFactory.getLog(this.getClass());

	private RequestCache requestCache = new HttpSessionRequestCache();

	@Override
	public void onAuthenticationSuccess(HttpServletRequest request, HttpServletResponse response,
			Authentication authentication) throws ServletException, IOException {
        // 从缓存中拿请求, 但是没有, 说明用户在登录之前没有访问的地址
		SavedRequest savedRequest = this.requestCache.getRequest(request, response);
		if (savedRequest == null) {
            // 走SimpleUrlAuthenticationSuccessHandler默认重定向地址
			super.onAuthenticationSuccess(request, response, authentication);
			return;
		}
        // 拿到请求 ?target=/hello 参数的 /hello
		String targetUrlParameter = getTargetUrlParameter();
        // 如果使用默认的targetUrl, 则targetUrlParameter设置无意义
        // 还是和前面一样, 直接走SimpleUrlAuthenticationSuccessHandler默认重定向地址
		if (isAlwaysUseDefaultTargetUrl()
				|| (targetUrlParameter != null && StringUtils.hasText(request.getParameter(targetUrlParameter)))) {
			this.requestCache.removeRequest(request, response);
			super.onAuthenticationSuccess(request, response, authentication);
			return;
		}
		clearAuthenticationAttributes(request);
		// Use the DefaultSavedRequest URL
		String targetUrl = savedRequest.getRedirectUrl();
		getRedirectStrategy().sendRedirect(request, response, targetUrl);
	}

	public void setRequestCache(RequestCache requestCache) {
		this.requestCache = requestCache;
	}

}
String targetUrlParameter = getTargetUrlParameter();- 接下来会获取一个
targetUrlParameter,这个是用户显式指定的、希望登录成功后重定向的地址,例如用户发送的登录请求是http:/localhost:8080/doLogin?target=/hello,这就表示当用户登录成功之后,希望自动重定向到/hello这个接口。getTargetUrlParameter就是要获取重定向地址参数的key,也就是上面的target,拿到target之后,就可以获取到重定向地址了。完整逻辑看下图 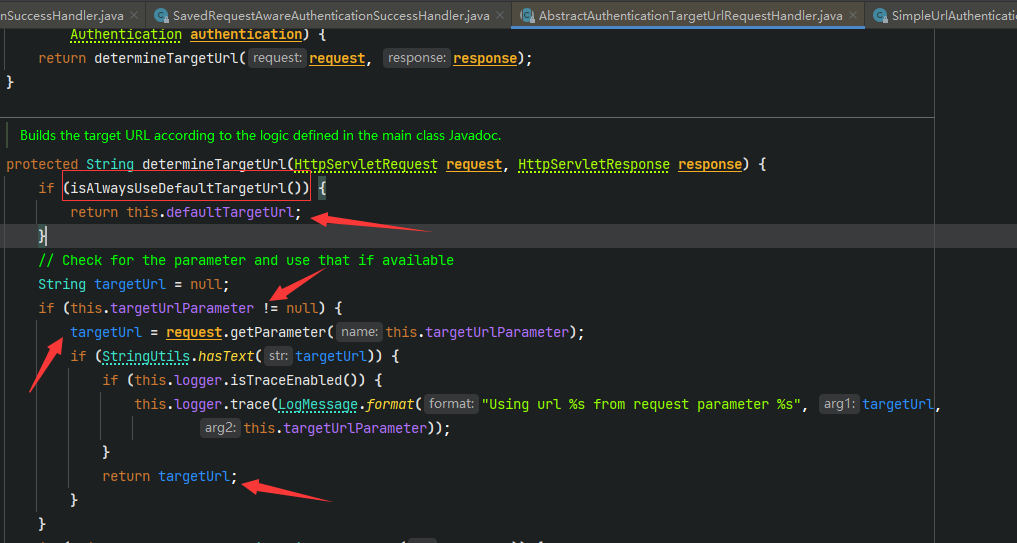
- 接下来会获取一个
如果前面的条件都不满足,那么最终会从缓存请求savedRequest 中获取重定向地址,然后进行重定向操作。如下图:

整体逻辑非常简单
看这段代码我们可以自定义一个
public final T defaultSuccessUrl(String defaultSuccessUrl, boolean alwaysUse) {
   SavedRequestAwareAuthenticationSuccessHandler handler = new SavedRequestAwareAuthenticationSuccessHandler();
   handler.setDefaultTargetUrl(defaultSuccessUrl);
   handler.setAlwaysUseDefaultTargetUrl(alwaysUse);
   this.defaultSuccessHandler = handler;
   return successHandler(handler);
}
/**
 * 当然实际开发中不会这么用
 * @return
 */
SavedRequestAwareAuthenticationSuccessHandler successHandler() {
   SavedRequestAwareAuthenticationSuccessHandler savedRequestAwareAuthenticationSuccessHandler = new SavedRequestAwareAuthenticationSuccessHandler();
   savedRequestAwareAuthenticationSuccessHandler.setDefaultTargetUrl("/index");
   savedRequestAwareAuthenticationSuccessHandler.setTargetUrlParameter("target");
   return savedRequestAwareAuthenticationSuccessHandler;
}
或者效仿这个
public void onAuthenticationSuccess(HttpServletRequest request, HttpServletResponse response, Authentication authentication) throws ServletException, IOException {
    SavedRequest savedRequest = this.requestCache.getRequest(request, response);
    if (savedRequest == null) {
        super.onAuthenticationSuccess(request, response, authentication);
    } else {
        String targetUrlParameter = this.getTargetUrlParameter();
        if (!this.isAlwaysUseDefaultTargetUrl() && (targetUrlParameter == null || !StringUtils.hasText(request.getParameter(targetUrlParameter)))) {
            this.clearAuthenticationAttributes(request);
            String targetUrl = savedRequest.getRedirectUrl();
            this.getRedirectStrategy().sendRedirect(request, response, targetUrl);
        } else {
            this.requestCache.removeRequest(request, response);
            super.onAuthenticationSuccess(request, response, authentication);
        }
    }
}
实现一个自定义的前后端分离的项目
.successHandler((request, response, authentication) -> {
   HashMap<String, Object> retHashMap = new HashMap<>();
   retHashMap.put("msg", "登录成功");
   retHashMap.put("status", HttpStatus.OK.value());
   retHashMap.put("authentication", authentication);
   response.setContentType(MediaType.APPLICATION_JSON_UTF8_VALUE);
   String s = objectMapper.writeValueAsString(retHashMap);
   response.getWriter().write(s);
})
登录失败
@Bean
public SecurityFilterChain securityWebFilterChain(HttpSecurity httpSecurity, ObjectMapper objectMapper) throws Exception {
    return httpSecurity.authorizeHttpRequests()
        .anyRequest()
        .authenticated()
        .and()
        .formLogin()
        .loginPage("/login")
        .省略 ...
        .failureUrl("/login") // 登录失败
        .permitAll()
        .and()
        .build();
}
.failureUrl("/login") 这种是重定向, 无法携带错误信息
可以改成转发
.failureForwardUrl("/login") // 转发, 可以携带错误信息
源码简单分析
public class ForwardAuthenticationFailureHandler implements AuthenticationFailureHandler {

	private final String forwardUrl;


	public ForwardAuthenticationFailureHandler(String forwardUrl) {
		Assert.isTrue(UrlUtils.isValidRedirectUrl(forwardUrl), () -> "'" + forwardUrl + "' is not a valid forward URL");
        // 设置转发地址
		this.forwardUrl = forwardUrl;
	}

	@Override
	public void onAuthenticationFailure(HttpServletRequest request, HttpServletResponse response,
			AuthenticationException exception) throws IOException, ServletException {
        // 设置错误信息 key = "SPRING_SECURITY_LAST_EXCEPTION" value = 异常
		request.setAttribute(WebAttributes.AUTHENTICATION_EXCEPTION, exception);
        // 转发地址
		request.getRequestDispatcher(this.forwardUrl).forward(request, response);
	}

}
注意看, 他的接口AuthenticationFailureHandler
[外链图片转存失败,源站可能有防盗链机制,建议将图片保存下来直接上传(img-MsEzUOqy-1675433382661)(null)]
SimpleUrlAuthenticationFailureHandler默认的处理逻辑就是通过重定向跳转到登录页面,当然也可以通过配置forwardToDestination属性将重定向改为服务器端跳转,failureUrl方法的底层实现逻辑就是SimpleUrlAuthenticationFailureHandler。ExceptionMappingAuthenticationFailureHandler可以实现根据不同的异常类型,映射到不同的路径。ForwardAuthenticationFailureHandler表示通过服务器端跳转来重新回到登录页面,failureForwardUrl方法的底层实现逻辑就是ForwardAuthenticationFailureHandler。AuthenticationEntryPointFailureHandler是Spring Security 5.2新引进的处理类,可以通过AuthenticationEntryPoint来处理登录异常。DelegatingAuthenticationFailureHandler可以实现为不同的异常类型配置不同的登录失败处理回调。
源码就不分析了, 记得转发也可以设置前后端分析, 基本代码和重定向那边一致
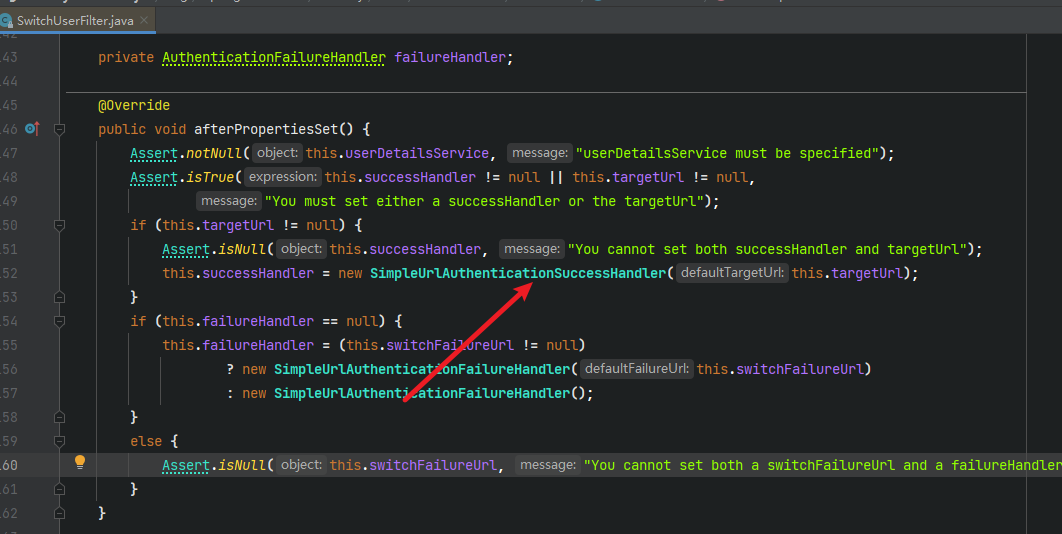
注销登录
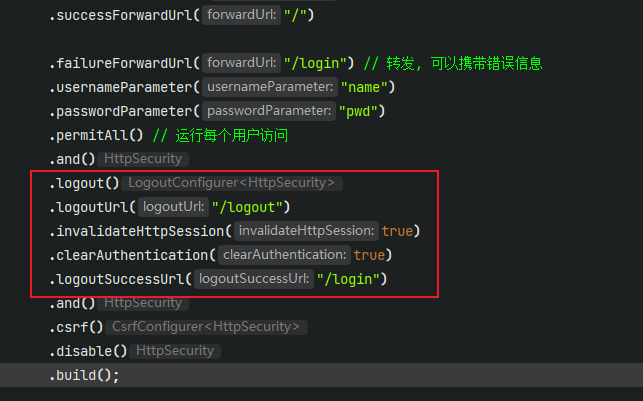
- 通过
.logout()方法开启注销登录配置。 logoutUrl指定了注销登录请求地址,默认是GET请求,路径为/logout。invalidateHttpSession表示是否使session失效,默认为true。clearAuthentication表示是否清除认证信息,默认为true。logoutSuccessUrl表示注销登录后的跳转地址。
设置多个注销登录地址
.logoutRequestMatcher(new OrRequestMatcher(new AntPathRequestMatcher("/logout1", "GET"), new AntPathRequestMatcher("logout2", "GET"))) // 设置多个推出登录地址
登录用户数据获取
登录成功之后,在后续的业务逻辑中,开发者可能还需要获取登录成功的用户对象,如果不使用任何安全管理框架,那么可以将用户信息保存在HtpSession 中,以后需要的时候直接从 HttpSession中获取数据。在 Spring Security中,用户登录信息本质上还是保存在HttpSession中,但是为了方便使用,Spring Security对HtpSession中的用户信息进行了封装,封装之后,开发者若再想获取用户登录数据就会有两种不同的思路:
(1)从 SecurityContextHolder中获取。
(2)从当前请求对象中获取。
这里列出来的两种方式是主流的做法,开发者也可以使用一些非主流的方式获取登录成功后的用户信息,例如直接从HttpSession 中获取用户登录数据。
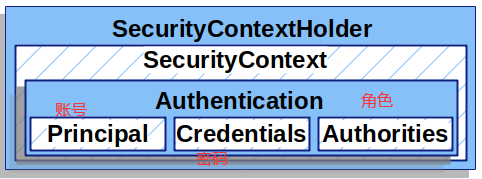
无论是哪种获取方式,都离不开一个重要的对象: Authentication。在Spring Security 中,Authentication对象主要有两方面的功能:
(1)作为AuthenticationManager 的输入参数,提供用户身份认证的凭证,当它作为一个输入参数时,它的isAuthenticated方法返回false,表示用户还未认证。
(2)代表已经经过身份认证的用户,此时的Authentication可以从SecurityContext中获取。
一个Authentication对象主要包含三个方面的信息:
(1) principal:定义认证的用户。如果用户使用用户名/密码的方式登录,principal 通常就是一个UserDetails对象。
(2) credentials:登录凭证,一般就是指密码。当用户登录成功之后,登录凭证会被自动擦除,以防止泄漏。
(3)authorities:用户被授予的权限信息。
Java中本身提供了Principal 接口用来描述认证主体,Principal可以代表一个公司、个人或者登录ID。Spring Security中定义了Authentication接口用来规范登录用户信息,Authentication继承自Principal:
public interface Authentication extends Principal, Serializable {

	Collection<? extends GrantedAuthority> getAuthorities();

	Object getCredentials();

	Object getDetails();

	Object getPrincipal();

	boolean isAuthenticated();

	void setAuthenticated(boolean isAuthenticated) throws IllegalArgumentException;

}
getAuthorities方法:用来获取用户权限。getCredentials方法:用来获取用户凭证,一般来说就是密码。getDetails方法:用来获取用户的详细信息,可能是当前的请求之类。getPrincipal方法:用来获取当前用户信息,可能是一个用户名,也可能是一个用户对象。isAuthenticated方法:当前用户是否认证成功。
不同的认证方式有不同的Authentication对象
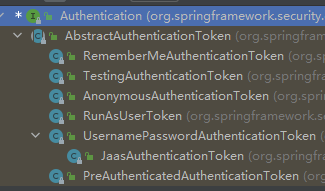
AbstractAuthenticationToken:该类实现了Authentication和CredentialsContainer两个接口,在AbstractAuthenticationToken中对Authentication接口定义的各个数据获取方法进行了实现,CredentialsContainer则提供了登录凭证擦除方法。一般在登录成功后,为了防止用户信息泄漏,可以将登录凭证(例如密码)擦除。RememberMeAuthenticationToken:如果用户使用RememberMe的方式登录,登录信息将封装在RememberMeAuthenticationToken中。TestingAuthenticationToken:单元测试时封装的用户对象。AnonymousAuthenticationToken:匿名登录时封装的用户对象。RunAsUserToken:替换验证身份时封装的用户对象。UsernamePasswordAuthenticationToken:表单登录时封装的用户对象。JaasAuthenticationToken:JAAS认证时封装的用户对象。PreAuthenticatedAuthenticationToken:Pre-Authentication场景下封装的用户对象。
在这些Authentication的实例中,最常用的有两个:UsernamePasswordAuthenticationToken和RememberMeAuthenticationToken。在前面中的案例对应的用户认证对象就是UsernamePasswordAuthenticationToken。
了解了Authentication对象之后,接下来我们来看一下如何在登录成功后获取用户登录信息,即 Authentication对象。
修改SecurityContextHolder存储的位置
@RestController
@Slf4j
public class UserController {

	@GetMapping("user")
	public void userInfo() {
		// 这个对象绑定在 ThreadLocal
		Authentication authentication = SecurityContextHolder.getContext().getAuthentication();
		String name = authentication.getName();
		Collection<? extends GrantedAuthority> authorities = authentication.getAuthorities();
		System.err.println("username: " + name);
		System.err.println("authorities: " + authorities);
	}

}
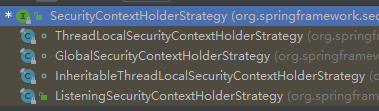
首先在 SecurityContextHolder中存放的是SecurityContext,SecurityContextHolder 中定义了三种不同的数据存储策略,这实际上是一种典型的策略模式:
(1)MODE_THREADLOCAL:这种存放策略是将SecurityContext存放在ThreadLocal中,大家知道ThreadLocal的特点是在哪个线程中存储就要在哪个线程中读取,这其实非常适合Web 应用,因为在默认情况下,一个请求无论经过多少Filter到达 Servlet,都是由一个线程来处理的。这也是SecurityContextHolder 的默认存储策略,这种存储策略意味着如果在具体的业务处理代码中,开启了子线程,在子线程中去获取登录用户数据,就会获取不到。
(2)MODE_INHERITABLETHREADLOCAL:这种存储模式适用于多线程环境,如果希望在子线程中也能够获取到登录用户数据,那么可以使用这种存储模式。
(3)MODE_GLOBAL:这种存储模式实际上是将数据保存在一个静态变量中,在 JavaWeb开发中,这种模式很少使用到。
Spring Security 中定义了SecurityContextHolderStrategy接口用来规范存储策略中的方法,我们来看一下:
public interface SecurityContextHolderStrategy {

	// 删除当前上下文
	void clearContext();

	// 获取当前上下文
	SecurityContext getContext();

	// 设置当前上下文
	void setContext(SecurityContext context);

    // 创建一个新的, 空的上下文实现, 供SecurityContextRepository实现在首次创建新上下文时使用。
	SecurityContext createEmptyContext();

}
有4个实现类
final class ThreadLocalSecurityContextHolderStrategy implements SecurityContextHolderStrategy {
	// 存储状态, 更线程绑定
	private static final ThreadLocal<SecurityContext> contextHolder = new ThreadLocal<>();

	@Override
	public void clearContext() {
		contextHolder.remove();
	}

	@Override
	public SecurityContext getContext() {
		SecurityContext ctx = contextHolder.get();
		if (ctx == null) {
			ctx = createEmptyContext();
			contextHolder.set(ctx);
		}
		return ctx;
	}

	@Override
	public void setContext(SecurityContext context) {
		Assert.notNull(context, "Only non-null SecurityContext instances are permitted");
		contextHolder.set(context);
	}

	@Override
	public SecurityContext createEmptyContext() {
		return new SecurityContextImpl();
	}

}
这些都是非常简单的代码, 就不介绍了
final class InheritableThreadLocalSecurityContextHolderStrategy implements SecurityContextHolderStrategy {

	private static final ThreadLocal<SecurityContext> contextHolder = new InheritableThreadLocal<>();
}
跟上面唯一的区别在于 ThreadLocal和InheritableThreadLocal
InheritableThreadLocal非常简单
该对象扩展了 ThreadLocal, 提供了从父线程到子线程的值继承
当子线程被创建, 此时子线程将会获得所有并初始化继承的父线程有的ThreadLocal变量的值
通常, 子线程的值将会和父线程相同, 然而, 子线程的值可以通过重写在类中的childValue函数变成父类的任意方法
当变量中维护的每线程属性(例如,用户ID,事务ID)必须自动传输到创建的任何子线程时,可继承的线程局部变量优先于普通线程局部变量。
注意:在创建新线程期间,可以选择不接收可继承线程局部变量的初始值。
最后

就更简单了, 直接使用一个静态变量让多线程共享使用
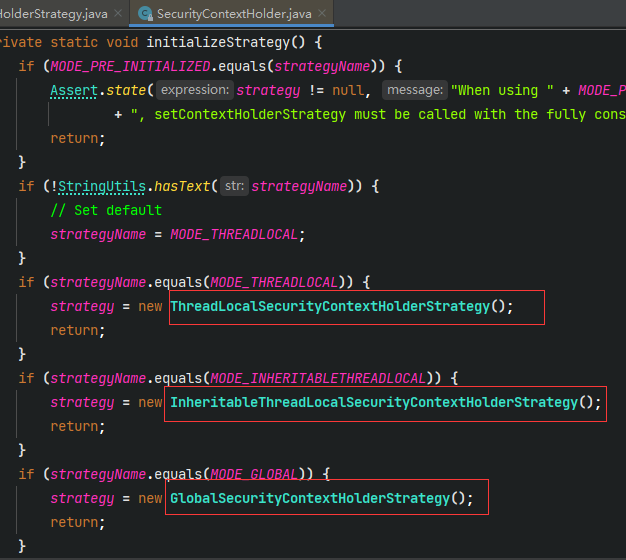
public class SecurityContextHolder {

	public static final String MODE_THREADLOCAL = "MODE_THREADLOCAL";

	public static final String MODE_INHERITABLETHREADLOCAL = "MODE_INHERITABLETHREADLOCAL";

	public static final String MODE_GLOBAL = "MODE_GLOBAL";

	private static final String MODE_PRE_INITIALIZED = "MODE_PRE_INITIALIZED";

	public static final String SYSTEM_PROPERTY = "spring.security.strategy";

	private static String strategyName = System.getProperty(SYSTEM_PROPERTY);

	private static SecurityContextHolderStrategy strategy;

	private static int initializeCount = 0;

	static {
		initialize();
	}

	private static void initialize() {
		initializeStrategy();
		initializeCount++;
	}

	private static void initializeStrategy() {
		if (MODE_PRE_INITIALIZED.equals(strategyName)) {
			Assert.state(strategy != null, "When using " + MODE_PRE_INITIALIZED
					+ ", setContextHolderStrategy must be called with the fully constructed strategy");
			return;
		}
		if (!StringUtils.hasText(strategyName)) {
			// Set default
			strategyName = MODE_THREADLOCAL;
		}
		if (strategyName.equals(MODE_THREADLOCAL)) {
			strategy = new ThreadLocalSecurityContextHolderStrategy();
			return;
		}
		if (strategyName.equals(MODE_INHERITABLETHREADLOCAL)) {
			strategy = new InheritableThreadLocalSecurityContextHolderStrategy();
			return;
		}
		if (strategyName.equals(MODE_GLOBAL)) {
			strategy = new GlobalSecurityContextHolderStrategy();
			return;
		}
		// Try to load a custom strategy
		try {
			Class<?> clazz = Class.forName(strategyName);
			Constructor<?> customStrategy = clazz.getConstructor();
			strategy = (SecurityContextHolderStrategy) customStrategy.newInstance();
		}
		catch (Exception ex) {
			ReflectionUtils.handleReflectionException(ex);
		}
	}


	public static void clearContext() {
		strategy.clearContext();
	}


	public static SecurityContext getContext() {
		return strategy.getContext();
	}


	public static int getInitializeCount() {
		return initializeCount;
	}


	public static void setContext(SecurityContext context) {
		strategy.setContext(context);
	}


	public static void setStrategyName(String strategyName) {
		SecurityContextHolder.strategyName = strategyName;
		initialize();
	}


	public static void setContextHolderStrategy(SecurityContextHolderStrategy strategy) {
		Assert.notNull(strategy, "securityContextHolderStrategy cannot be null");
		SecurityContextHolder.strategyName = MODE_PRE_INITIALIZED;
		SecurityContextHolder.strategy = strategy;
		initialize();
	}


	public static SecurityContextHolderStrategy getContextHolderStrategy() {
		return strategy;
	}


	public static SecurityContext createEmptyContext() {
		return strategy.createEmptyContext();
	}

	@Override
	public String toString() {
		return "SecurityContextHolder[strategy='" + strategy.getClass().getSimpleName() + "'; initializeCount="
				+ initializeCount + "]";
	}

}
从这段源码中可以看到,SecurityContextHolder定义了三个静态常量用来描述三种不同的存储策略;存储策略strategy 会在静态代码块中进行初始化,根据不同的strategyName初始化不同的存储策略; strategyName变量表示目前正在使用的存储策略,开发者可以通过配置系统变量或者调用setStrategyName来修改SecurityContextHolder 中的存储策略,调用setStrategyName后会重新初始化 strategy。
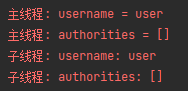
默认情况下,如果开发者试图从子线程中获取当前登录用户数据,就会获取失败,代码如下:
@RestController
@Slf4j
public class UserController {

	@GetMapping("user")
	public void userInfo() {
		// 这个对象绑定在 ThreadLocal
		Authentication authentication = SecurityContextHolder.getContext().getAuthentication();
		String name = authentication.getName();
		Collection<? extends GrantedAuthority> authorities = authentication.getAuthorities();
		System.err.println("主线程: username = " + name);
		System.err.println("主线程: authorities = " + authorities);
		new Thread(() -> {
			Authentication authentication1 = SecurityContextHolder.getContext().getAuthentication();
			if (authentication1 == null) {
				System.out.println(Thread.currentThread().getName() + ": 获得用户信息失败");
				return;
			}
			String name1 = authentication1.getName();
			Collection<? extends GrantedAuthority> authorities1 = authentication.getAuthorities();
			System.err.println(Thread.currentThread().getName() + ": username: " + name1);
			System.err.println(Thread.currentThread().getName() + ": authorities: " + authorities1);
		}, "子线程").start();
	}

}
主线程: username = user
主线程: authorities = []
子线程: 获得用户信息失败
设置多线程ThreadLocal继承策略
@SpringBootApplication
public class FormLoginApplication {

   public static void main(String[] args) throws Exception {
      System.setProperty(SecurityContextHolder.SYSTEM_PROPERTY, SecurityContextHolder.MODE_INHERITABLETHREADLOCAL); // 设置 SecurityContextHolder 模式
      SpringApplication.run(FormLoginApplication.class, args);
   }

}
SecurityContextPersistenceFilter(已弃用)
使用在请求之前所配置的SecurityContextRepository获取的信息去填充SecurityContextHolder

public interface SecurityContextRepository {

    // 已被弃用, 使用下面的那个default Supplier<SecurityContext> loadContext(HttpServletRequest request)
   @Deprecated
   SecurityContext loadContext(HttpRequestResponseHolder requestResponseHolder);

   default Supplier<SecurityContext> loadContext(HttpServletRequest request) {
      return SingletonSupplier.of(() -> loadContext(new HttpRequestResponseHolder(request, null)));
   }

   void saveContext(SecurityContext context, HttpServletRequest request, HttpServletResponse response);

   boolean containsContext(HttpServletRequest request);
}
默认它使用HttpSessionSecurityContextRepository , 有关 HttpSession 相关配置选项的信息,请参阅此类。

该过滤器只会在每一个request请求执行一次, 以解析servlet容器(特别是 Weblogic)的兼容问题
过滤器必须在任何认证处理机制前执行
认证处理机制(例如: Basic, cas 处理过滤器等)期望SecurityContextHolder在他们执行时包含有效的SecurityContext
这本质上是就HttpSessionContextIntegrationFilter 的重构过程, 以委托存储问题给单独的策略, 从而允许在请求之间维护安全上下文方式进行更多的自定义
forceEagerSessionCreation 属性将被用于确保session总是在过滤器链执行之前可用(默认是false, 他是不推荐 且密集的资源)
该类已弃用, 现在使用SecurityContextHolderFilter
整体上来说,SecurityContextPersistenceFilter主要做两件事情:
-
当一个请求到来时,从
HttpSession中获取SecurityContext并存入SecurityContextHolder中,这样在同一个请求的后续处理过程中,开发者始终可以通过SecurityContextHolder获取到当前登录用户信息。 -
当一个请求处理完毕时,从
SecurityContextHolder中获取SecurityContext并存入HttpSession中(主要针对异步Servlet),方便下一个请求到来时,再从HttpSession中拿出来使用,同时擦除SecurityContextHolder中的登录用户信息。在
SecurityContextPersistenceFilter过滤器中,当一个请求处理完毕时,从SecurityContextHolder中获取SecurityContext存入HtpSession中,这一步的操作主要是针对异步Servlet。如果不是异步Servlet,在响应提交时,就会将SecurityContext保存到HtpSession中了,而不会等到在SecurityContextPersistenceFilter过滤器中再去存储。
@Deprecated
public class SecurityContextPersistenceFilter extends GenericFilterBean {

	static final String FILTER_APPLIED = "__spring_security_scpf_applied";

	private SecurityContextRepository repo;

	private boolean forceEagerSessionCreation = false;

	public SecurityContextPersistenceFilter() {
		this(new HttpSessionSecurityContextRepository());
	}

	public SecurityContextPersistenceFilter(SecurityContextRepository repo) {
		this.repo = repo;
	}

	@Override
	public void doFilter(ServletRequest request, ServletResponse response, FilterChain chain)
			throws IOException, ServletException {
		doFilter((HttpServletRequest) request, (HttpServletResponse) response, chain);
	}

	private void doFilter(HttpServletRequest request, HttpServletResponse response, FilterChain chain)
			throws IOException, ServletException {
		// ensure that filter is only applied once per request
		if (request.getAttribute(FILTER_APPLIED) != null) {
			chain.doFilter(request, response);
			return;
		}
		request.setAttribute(FILTER_APPLIED, Boolean.TRUE);
		if (this.forceEagerSessionCreation) {
			HttpSession session = request.getSession();
			if (this.logger.isDebugEnabled() && session.isNew()) {
				this.logger.debug(LogMessage.format("Created session %s eagerly", session.getId()));
			}
		}
		HttpRequestResponseHolder holder = new HttpRequestResponseHolder(request, response);
		SecurityContext contextBeforeChainExecution = this.repo.loadContext(holder);
		try {
			SecurityContextHolder.setContext(contextBeforeChainExecution);
			if (contextBeforeChainExecution.getAuthentication() == null) {
				logger.debug("Set SecurityContextHolder to empty SecurityContext");
			}
			else {
				if (this.logger.isDebugEnabled()) {
					this.logger
							.debug(LogMessage.format("Set SecurityContextHolder to %s", contextBeforeChainExecution));
				}
			}
			chain.doFilter(holder.getRequest(), holder.getResponse());
		}
		finally {
			SecurityContext contextAfterChainExecution = SecurityContextHolder.getContext();
			// Crucial removal of SecurityContextHolder contents before anything else.
			SecurityContextHolder.clearContext();
			this.repo.saveContext(contextAfterChainExecution, holder.getRequest(), holder.getResponse());
			request.removeAttribute(FILTER_APPLIED);
			this.logger.debug("Cleared SecurityContextHolder to complete request");
		}
	}

	public void setForceEagerSessionCreation(boolean forceEagerSessionCreation) {
		this.forceEagerSessionCreation = forceEagerSessionCreation;
	}

}
但该类已被弃用, 现在使用
public class SecurityContextHolderFilter extends OncePerRequestFilter {

	private final SecurityContextRepository securityContextRepository;

	private boolean shouldNotFilterErrorDispatch;

	/**
	 * Creates a new instance.
	 * @param securityContextRepository the repository to use. Cannot be null.
	 */
	public SecurityContextHolderFilter(SecurityContextRepository securityContextRepository) {
		Assert.notNull(securityContextRepository, "securityContextRepository cannot be null");
		this.securityContextRepository = securityContextRepository;
	}

	@Override
	protected void doFilterInternal(HttpServletRequest request, HttpServletResponse response, FilterChain filterChain)
			throws ServletException, IOException {
        // 读取SecurityContext
		SecurityContext securityContext = this.securityContextRepository.loadContext(request).get();
		try {
            // 存储到 SecurityContextHolder
			SecurityContextHolder.setContext(securityContext);
			filterChain.doFilter(request, response);
		}
		finally {
			SecurityContextHolder.clearContext();
		}
	}

	@Override
	protected boolean shouldNotFilterErrorDispatch() {
		return this.shouldNotFilterErrorDispatch;
	}

	public void setShouldNotFilterErrorDispatch(boolean shouldNotFilterErrorDispatch) {
		this.shouldNotFilterErrorDispatch = shouldNotFilterErrorDispatch;
	}

}
他们有个通用的属性: SecurityContextRepository
该属性前面也看过了, 主要使用 HttpSessionSecurityContextRepository 作为实现类实体用于增删改查SecurityContext
@Override
public void saveContext(SecurityContext context, HttpServletRequest request, HttpServletResponse response) {
    SaveContextOnUpdateOrErrorResponseWrapper responseWrapper = WebUtils.getNativeResponse(response,
                                                                                           SaveContextOnUpdateOrErrorResponseWrapper.class);
    if (responseWrapper == null) {
        // 获得session
        boolean httpSessionExists = request.getSession(false) != null;
        // 创建SecurityContext
        SecurityContext initialContext = SecurityContextHolder.createEmptyContext();
        // 创建存储容器 其本质是一个HttpServletResponse
        responseWrapper = new SaveToSessionResponseWrapper(response, request, httpSessionExists, initialContext);
    }
    // 存储 SecurityContext 下面有代码截图
    responseWrapper.saveContext(context);
}
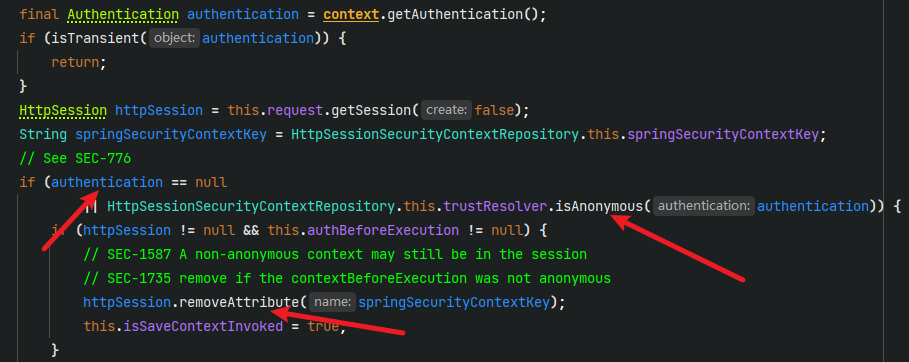
如果拿不到authentication 则删除掉httpSession中的authentication
[外链图片转存失败,源站可能有防盗链机制,建议将图片保存下来直接上传(img-koE3cVw8-1675433383230)(null)]
如果authentication和httpSession都不是空的, 就保存
httpSession.setAttribute(springSecurityContextKey, context);
保存到 key = 
的session中
其他源码就不看了, 基本上都是对
httpSession的操作
从当前请求对象中获取
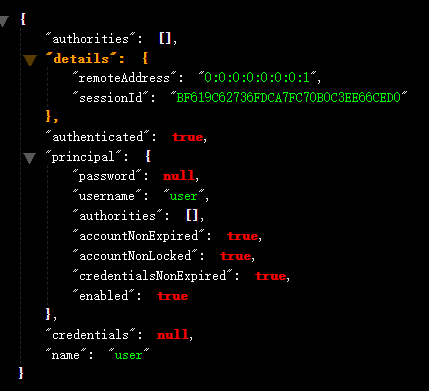
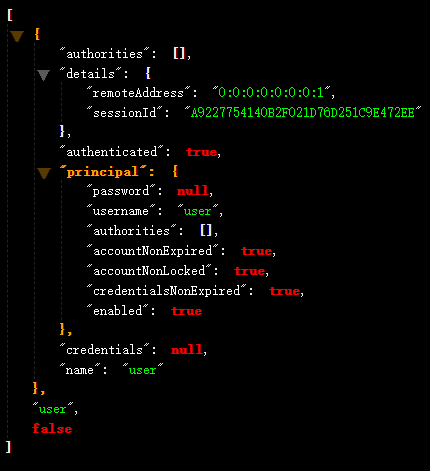
@GetMapping("authentication")
@ResponseBody
public Authentication authentication(Authentication authentication) {
    return authentication;
}

@GetMapping("principal")
@ResponseBody
public Principal principal(Principal principal) {
    return principal;
}
这两都是一个的JSON:
学过springMVC都应该知道, Controller方法的参数都是由HttpServletRequest请求拿出来的
那他是什么时候存储到HttpServletRequest的?
看上面这三个函数 找到这三个函数的 spring security实现:

再看这三个函数:
找 SpringSecurity的实现类HttpServlet3RequestFactory的内部类Servlet3SecurityContextHolderAwareRequestWrapper:
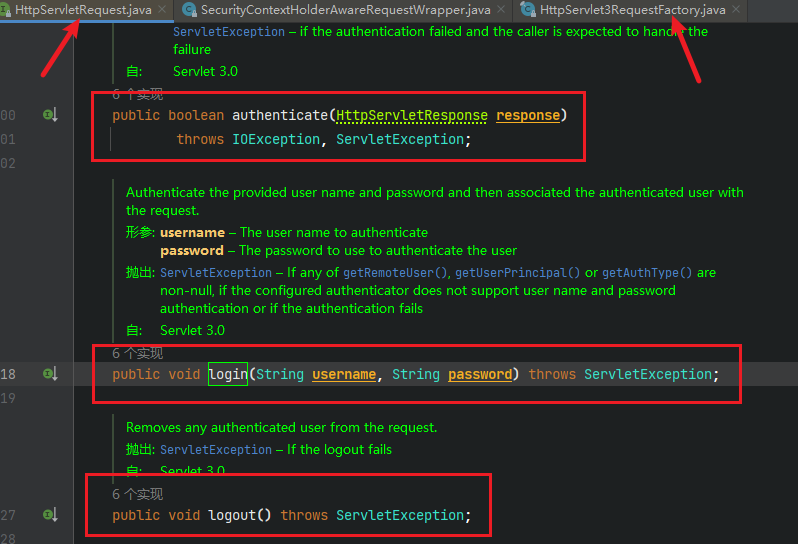
@Override
public void login(String username, String password) throws ServletException {
   if (isAuthenticated()) {
      throw new ServletException("Cannot perform login for '" + username + "' already authenticated as '"
            + getRemoteUser() + "'");
   }
   AuthenticationManager authManager = HttpServlet3RequestFactory.this.authenticationManager;
   if (authManager == null) {
      HttpServlet3RequestFactory.this.logger.debug(
            "authenticationManager is null, so allowing original HttpServletRequest to handle login");
      super.login(username, password);
      return;
   }
   Authentication authentication = getAuthentication(authManager, username, password);
   SecurityContext context = SecurityContextHolder.createEmptyContext();
   context.setAuthentication(authentication);
   SecurityContextHolder.setContext(context);
}

private Authentication getAuthentication(AuthenticationManager authManager, String username, String password)
      throws ServletException {
   try {
      UsernamePasswordAuthenticationToken authentication = UsernamePasswordAuthenticationToken
            .unauthenticated(username, password);
      Object details = HttpServlet3RequestFactory.this.authenticationDetailsSource.buildDetails(this);
      authentication.setDetails(details);
      return authManager.authenticate(authentication);
   }
   catch (AuthenticationException ex) {
      SecurityContextHolder.clearContext();
      throw new ServletException(ex.getMessage(), ex);
   }
}
看到这里我们就知道怎么使用 HttpServletRequest 了
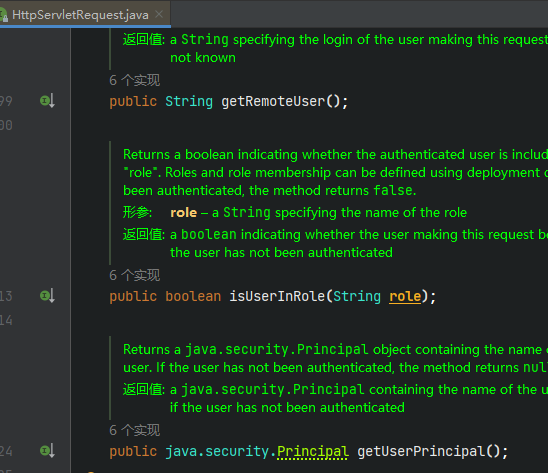
@GetMapping("information")
public String information(HttpServletRequest request) throws JsonProcessingException {
   Principal userPrincipal = request.getUserPrincipal();
   String remoteUser = request.getRemoteUser();
   boolean admin = request.isUserInRole("admin");
   List<Object> objectList = new ArrayList<>();
   objectList.add(userPrincipal);
   objectList.add(remoteUser);
   objectList.add(admin);
   return objectMapper.writeValueAsString(objectList);
}
前面我们直接将Authentication或者Principal 写到Controller参数中,实际上就是SpringMVC框架从Servlet3SecurityContextHolderAwareRequestWrapper 中提取的用户信息。
那么Spring Security是如何将默认的请求对象转化为Servlet3SecurityContextHolderAwareRequestWrapper 的呢?这就涉及Spring Security过滤器链中另外一个重要的过滤器——SecurityContextHolderAwareRequestFilter。
前面我们提到Spring Security过滤器中,有一个SecurityContextHolderAwareRequestFilter过滤器,该过滤器的主要作用就是对HttpServletRequest请求进行再包装,重写HtpServletRequest 中和安全管理相关的方法。HtpServletRequest 在整个请求过程中会被包装多次,每一次的包装都会给它增添新的功能,例如在经过 SecurityContextPersistenceFilter请求时就会对它进行包装。
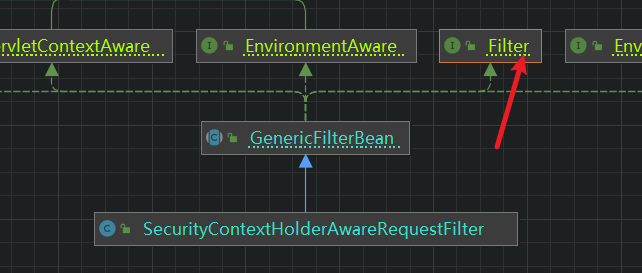
本质上还是一个过滤器
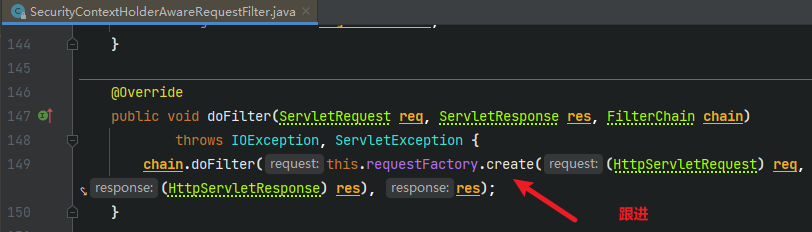
requestFactory这个对象在这里被被创建

跟进HttpServlet3RequestFactory类
@Override
public HttpServletRequest create(HttpServletRequest request, HttpServletResponse response) {
   return new Servlet3SecurityContextHolderAwareRequestWrapper(request, this.rolePrefix, response);
}
这个Servlet3SecurityContextHolderAwareRequestWrapper类再次见到了
ionException ex) {
SecurityContextHolder.clearContext();
throw new ServletException(ex.getMessage(), ex);
}
}
看到这里我们就知道怎么使用 `HttpServletRequest` 了


```java
@GetMapping("information")
public String information(HttpServletRequest request) throws JsonProcessingException {
   Principal userPrincipal = request.getUserPrincipal();
   String remoteUser = request.getRemoteUser();
   boolean admin = request.isUserInRole("admin");
   List<Object> objectList = new ArrayList<>();
   objectList.add(userPrincipal);
   objectList.add(remoteUser);
   objectList.add(admin);
   return objectMapper.writeValueAsString(objectList);
}
[外链图片转存中…(img-REbfXxoO-1675433377889)]
前面我们直接将Authentication或者Principal 写到Controller参数中,实际上就是SpringMVC框架从Servlet3SecurityContextHolderAwareRequestWrapper 中提取的用户信息。
那么Spring Security是如何将默认的请求对象转化为Servlet3SecurityContextHolderAwareRequestWrapper 的呢?这就涉及Spring Security过滤器链中另外一个重要的过滤器——SecurityContextHolderAwareRequestFilter。
前面我们提到Spring Security过滤器中,有一个SecurityContextHolderAwareRequestFilter过滤器,该过滤器的主要作用就是对HttpServletRequest请求进行再包装,重写HtpServletRequest 中和安全管理相关的方法。HtpServletRequest 在整个请求过程中会被包装多次,每一次的包装都会给它增添新的功能,例如在经过 SecurityContextPersistenceFilter请求时就会对它进行包装。
[外链图片转存中…(img-Hk62JsGP-1675433377890)]
本质上还是一个过滤器
[外链图片转存中…(img-YQM4bDky-1675433377891)]
requestFactory这个对象在这里被被创建
[外链图片转存中…(img-Ah4Lbsb6-1675433377892)]
跟进HttpServlet3RequestFactory类
@Override
public HttpServletRequest create(HttpServletRequest request, HttpServletResponse response) {
   return new Servlet3SecurityContextHolderAwareRequestWrapper(request, this.rolePrefix, response);
}
这个Servlet3SecurityContextHolderAwareRequestWrapper类再次见到了
最终在Spring MVC 的ServletRequestMethodArgumentResolver#resolveArgument(Class<?>,HttpServletRequest)方法中进行默认参数解析,自动解析出 Principal对象。开发者在Controller中既可以通过 Principal来接收参数,也可以通过Authentication对象来接收。


 324
324


 被折叠的 条评论
为什么被折叠?
被折叠的 条评论
为什么被折叠?
 到【灌水乐园】发言


