


访问官网 ReactDOM 了解更多DOM 的特定方法
1、旧生命周期
当前版本虽然依然全部可用,但是自16.x版本就开始说要删除其中的
componentWillMount、componentWillReceiveProps、componentWillUpdate;而且这三个钩子也基本万年不用一次,建议不要使用
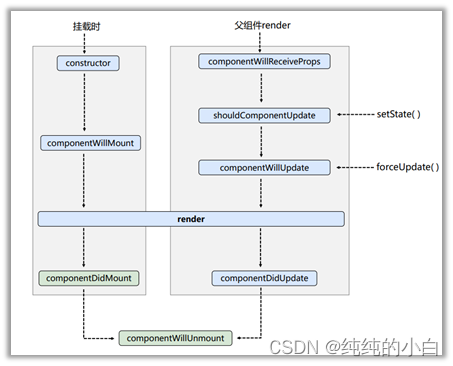
1.1、单组件生命周期
1.1.1、生命周期
1.1.1.1、初始化阶段:由 ReactDOM.render() 触发—初次渲染
-
constructor()
-
componentWillMount():组件挂载前置;组件将被挂载
-
render() 必用
-
componentDidMount():组件挂载完毕 常用
- 可以接收2个参数
(prevProps, prevState),既挂载前收到的props和初始化时创建的state - 一般在这个钩子中做一些初始化的事,例如:开启定时器、发送网络请求、订阅消息
- 可以接收2个参数
1.1.1.2、更新阶段:由组件内部 this.setSate() 或父组件重新render触发
-
shouldComponentUpdate():组件更新阀门,判断是否进行更新
- 可以接收2个参数
(nextProps, nextState) - 可直接调
forceUpdate()绕过阀门进行强制更新
- 可以接收2个参数
-
componentWillUpdate():组件更新前置;组件将要更新
- 可以接收3个参数
(prevProps, prevState, snapshot)
- 可以接收3个参数
-
render() 必用
-
componentDidUpdate():组件更新完毕
1.1.1.3、卸载组件:由 ReactDOM.unmountComponentAtNode() 触发
- componentWillUnmount():组件卸载前置;组件将要被卸载,这里可以交代后事 常用
- 一般在这个钩子中做一些收尾的事,例如:关闭定时器、取消订阅消息
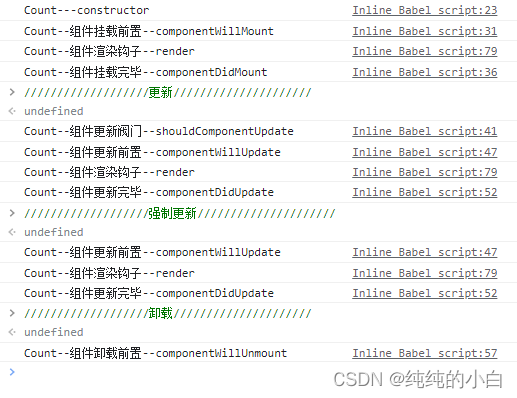
1.1.2、CODE
<!DOCTYPE html>
<html lang="en">
<head>
	<meta charset="UTF-8">
	<title>2_react生命周期(旧)</title>
</head>
<body>
	<!-- 准备好一个“容器” -->
	<div id="test"></div>

	<!-- 引入react核心库 -->
	<script type="text/javascript" src="../js/react.development.js"></script>
	<!-- 引入react-dom,用于支持react操作DOM -->
	<script type="text/javascript" src="../js/react-dom.development.js"></script>
	<!-- 引入babel,用于将jsx转为js -->
	<script type="text/javascript" src="../js/babel.min.js"></script>

	<script type="text/babel">
		//创建组件
		class Count extends React.Component {

			//构造器
			constructor(props) {
				console.log('Count---constructor');
				super(props)
				//初始化状态
				this.state = { count: 0 }
			}

			//组件将要挂载的钩子
			componentWillMount() {
				console.log('Count--组件挂载前置--componentWillMount');
			}

			//组件挂载完毕的钩子
			componentDidMount() {
				console.log('Count--组件挂载完毕--componentDidMount');
			}

			//控制组件更新的“阀门”
			shouldComponentUpdate() {
				console.log('Count--组件更新阀门--shouldComponentUpdate');
				return true // 必须返回boolean且只有返回true才会继续执行更新流程
			}

			//组件将要更新的钩子
			componentWillUpdate() {
				console.log('Count--组件更新前置--componentWillUpdate');
			}

			//组件更新完毕的钩子
			componentDidUpdate() {
				console.log('Count--组件更新完毕--componentDidUpdate');
			}

			//组件将要卸载的钩子
			componentWillUnmount() {
				console.log('Count--组件卸载前置--componentWillUnmount');
			}

			//加1按钮的回调
			add = () => {
				//获取原状态
				const { count } = this.state
				//更新状态
				this.setState({ count: count + 1 })
			}

			//卸载组件按钮的回调
			death = () => {
				ReactDOM.unmountComponentAtNode(document.getElementById('test'))
			}

			//强制更新按钮的回调
			force = () => {
				this.forceUpdate() // 绕过更新阀门直接强制更新
			}

			render() {
				console.log('Count--组件渲染钩子--render');
				const { count } = this.state
				return (
					<div>
						<h2>当前求和为:{count}</h2>
						<button onClick={this.add}>点我+1</button>
						<button onClick={this.death}>卸载组件</button>
						<button onClick={this.force}>不更改任何状态中的数据,强制更新一下</button>
					</div>
				)
			}
		}

		//渲染组件
		ReactDOM.render(<Count />, document.getElementById('test'))
	</script>
</body>
</html>
1.1.3、Result
1.2、嵌套组件生命周期
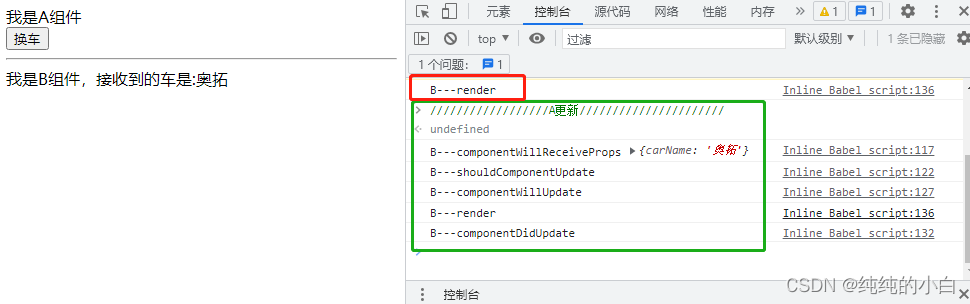
1.2.1、组件将要接收 props
- componentWillReceiveProps(props):组件接收 props 前置
- 注意点:第一次传的不算(首次渲染不会调此钩子),如果更名为 componentWillReceiveNewProps 更好理解
1.2.2、CODE
//父组件A
class A extends React.Component {
    //初始化状态
    state = { carName: '奔驰' }

    changeCar = () => {
        this.setState({ carName: '奥拓' })
    }

    render() {
        return (
            <div>
                <div>我是A组件</div>
                <button onClick={this.changeCar}>换车</button>
        		<hr />
            	<B carName={this.state.carName} />
			</div>
        )
    }
}

//子组件B
class B extends React.Component {
    //组件将要接收新的props的钩子
    componentWillReceiveProps(props) {
        console.log('B---componentWillReceiveProps', props);
    }

    //控制组件更新的“阀门”
    shouldComponentUpdate() {
        console.log('B---shouldComponentUpdate');
        return true
    }
    //组件将要更新的钩子
    componentWillUpdate() {
        console.log('B---componentWillUpdate');
    }

    //组件更新完毕的钩子
    componentDidUpdate() {
        console.log('B---componentDidUpdate');
    }

    render() {
        console.log('B---render');
        return (
            <div>我是B组件,接收到的车是:{this.props.carName}</div>
    	)
    }
}

//渲染组件
ReactDOM.render(<A/>, document.getElementById('test'))
1.2.3、Result
2、新生命周期
2.1、变化
2.1.1、即将废弃的 3 个老钩子
componentWillMountcomponentWillReceivePropscomponentWillUpdate
如果在新版本想继续使用这三个废弃的钩子,则必须在前面加上 “UNSAFE_” 前缀,这里的 “unsafe” 不是指安全性,而是表示使用这些生命周期的代码在 React 的未来版本中更有可能出现 bug,尤其是在启用异步渲染之后。具体可参考官博 异步渲染之更新(为未来规划计)。
2.1.2、新增 2 个钩子(万年不用)
- getDerivedStateFromProps:从Props获取派生状态。此方法适用于==罕见==的用例,即 state 的值在任何时候都取决于 props。派生状态会导致代码冗余,并使组件难以维护
- 可以接收2个参数,没错就是
(props, state) - 必须声明为
static静态方法 - 必须返回一个
state对象或者null
- 可以接收2个参数,没错就是
- getSnapshotBeforeUpdate:在最近一次渲染输出(提交到 DOM 节点)之前调用。它使得组件能在发生更改之前从 DOM 中捕获一些信息(例如,滚动位置)。此生命周期方法的任何返回值将作为参数传递给
componentDidUpdate()。此用法并不常见,但它可能出现在 UI 处理中,如需要以特殊方式处理滚动位置的聊天线程等。- 可以接收2个参数
(prevProps, prevState) - 必须返回 snapshot 的值或
null
- 可以接收2个参数
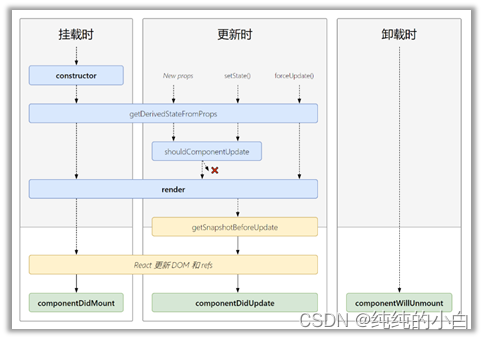
2.2、新生命周期
新钩子已经红色标出,由于根本不用,所以未加粗突出,甚至完全可以忽略这俩小透明
2.2.1、初始化阶段:由 ReactDOM.render() 触发—初次渲染
-
constructor()
-
static getDerivedStateFromProps() -
render() 必用
-
componentDidMount() 常用
2.2.2、更新阶段:由组件内部 this.setSate() 或父组件重新render触发
-
static getDerivedStateFromProps() -
shouldComponentUpdate()
-
render() 必用
-
getSnapshotBeforeUpdate -
componentDidUpdate()
2.2.3、卸载组件:由 ReactDOM.unmountComponentAtNode() 触发
- componentWillUnmount() 常用
2.3、CODE for getSnapshotBeforeUpdate
<!DOCTYPE html>
<html lang="en">
<head>
	<meta charset="UTF-8">
	<title>4_getSnapShotBeforeUpdate的使用场景</title>
	<style>
		.list{
			width: 200px;
			height: 150px;
			background-color: skyblue;
			overflow: auto;
		}
		.news{
			height: 30px;
		}
	</style>
</head>
<body>
	<!-- 准备好一个“容器” -->
	<div id="test"></div>

	<!-- 引入react核心库 -->
	<script type="text/javascript" src="../js/17.0.1/react.development.js"></script>
	<!-- 引入react-dom,用于支持react操作DOM -->
	<script type="text/javascript" src="../js/17.0.1/react-dom.development.js"></script>
	<!-- 引入babel,用于将jsx转为js -->
	<script type="text/javascript" src="../js/17.0.1/babel.min.js"></script>

	<script type="text/babel">
		class NewsList extends React.Component{

			state = {newsArr:[]}

			componentDidMount(){
				setInterval(() => {
					//获取原状态
					const {newsArr} = this.state
					//模拟一条新闻
					const news = '新闻'+ (newsArr.length+1)
					//更新状态
					this.setState({newsArr:[news,...newsArr]})
				}, 1000);
			}

			getSnapshotBeforeUpdate(){
				return this.refs.list.scrollHeight
			}

			componentDidUpdate(preProps,preState,height){
				this.refs.list.scrollTop += this.refs.list.scrollHeight - height
			}

			render(){
				return(
					<div className="list" ref="list">
						{
							this.state.newsArr.map((n,index)=>{
								return <div key={index} className="news">{n}</div>
							})
						}
					</div>
				)
			}
		}
		ReactDOM.render(<NewsList/>,document.getElementById('test'))
	</script>
</body>
</html>
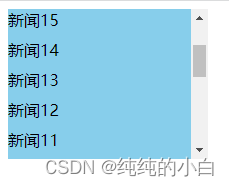
2.4、Result
滑动到哪就可以让内容停在哪,不会随着数据增加而被压到底下
小白学习参考视频:尚硅谷React教程
中文官网:State & 生命周期


 429
429


 被折叠的 条评论
为什么被折叠?
被折叠的 条评论
为什么被折叠?
 到【灌水乐园】发言


