


前言
紧接前文nacos配置中心,本文继续讲目前比较火热的动态配置中心apollo,从源码层面分析一下它的实现
以apollo-client-1.9.2源码进行分析,关于如何使用apollo本文不再赘述,笔者是下载官方1.9.2的源码到本地启动项目的
pom.xml文件
<?xml version="1.0" encoding="UTF-8"?>
<project xmlns="http://maven.apache.org/POM/4.0.0" xmlns:xsi="http://www.w3.org/2001/XMLSchema-instance"
         xsi:schemaLocation="http://maven.apache.org/POM/4.0.0 https://maven.apache.org/xsd/maven-4.0.0.xsd">

    <modelVersion>4.0.0</modelVersion>
    <groupId>com.example.demowhq</groupId>
    <artifactId>demowhq</artifactId>
    <version>1.9.2</version>
    <name>demowhq</name>
    <description>demowhq</description>
    <packaging>jar</packaging>
    <properties>
        <java.version>1.8</java.version>
        <project.build.sourceEncoding>UTF-8</project.build.sourceEncoding>
        <project.reporting.outputEncoding>UTF-8</project.reporting.outputEncoding>
        <spring-boot.version>2.4.2</spring-boot.version>
        <github.path>${project.artifactId}</github.path>
    </properties>
    <dependencies>
        <dependency>
            <groupId>org.springframework.boot</groupId>
            <artifactId>spring-boot-starter-web</artifactId>
        </dependency>
        <dependency>
            <groupId>com.ctrip.framework.apollo</groupId>
            <artifactId>apollo-client</artifactId>
            <version>1.9.2</version>
        </dependency>
        <!-- for spring demo -->
        <dependency>
            <groupId>org.springframework</groupId>
            <artifactId>spring-context</artifactId>
        </dependency>
        <!-- for spring boot demo -->
        <dependency>
            <groupId>org.springframework.boot</groupId>
            <artifactId>spring-boot-starter</artifactId>
            <exclusions>
                <exclusion>
                    <groupId>org.springframework.boot</groupId>
                    <artifactId>spring-boot-starter-logging</artifactId>
                </exclusion>
            </exclusions>
        </dependency>
        <dependency>
            <groupId>org.springframework.boot</groupId>
            <artifactId>spring-boot-starter-log4j2</artifactId>
        </dependency>
        <!-- for refresh scope demo -->
        <dependency>
            <groupId>org.springframework.cloud</groupId>
            <artifactId>spring-cloud-context</artifactId>
        </dependency>

    </dependencies>

    <dependencyManagement>
        <dependencies>
            <dependency>
                <groupId>org.springframework.boot</groupId>
                <artifactId>spring-boot-dependencies</artifactId>
                <version>${spring-boot.version}</version>
                <type>pom</type>
                <scope>import</scope>
            </dependency>

            <dependency>
                <groupId>org.springframework.cloud</groupId>
                <artifactId>spring-cloud-dependencies</artifactId>
                <version>2020.0.1</version>
                <type>pom</type>
                <scope>import</scope>
            </dependency>
        </dependencies>
    </dependencyManagement>

    <build>
        <plugins>
            <plugin>
                <groupId>org.apache.maven.plugins</groupId>
                <artifactId>maven-compiler-plugin</artifactId>
                <version>3.8.1</version>
                <configuration>
                    <source>1.8</source>
                    <target>1.8</target>
                    <encoding>UTF-8</encoding>
                </configuration>
            </plugin>
            <plugin>
                <groupId>org.springframework.boot</groupId>
                <artifactId>spring-boot-maven-plugin</artifactId>
                <version>2.3.7.RELEASE</version>
                <configuration>
                    <mainClass>com.example.demowhq.DemowhqApplication</mainClass>
                </configuration>
                <executions>
                    <execution>
                        <id>repackage</id>
                        <goals>
                            <goal>repackage</goal>
                        </goals>
                    </execution>
                </executions>
            </plugin>
        </plugins>
    </build>

</project>
启动类
@SpringBootApplication
@EnableApolloConfig
public class DemowhqApplication {

    public static void main(String[] args) {
        SpringApplication.run(DemowhqApplication.class, args);
    }

}
application.properties文件
# 应用名称
spring.application.name=demowhq
server.port=7777

apollo.bootstrap.enabled=true
apollo.bootstrap.eagerLoad.enabled=true
apollo.bootstrap.namespaces=application

# 应用id
app.id=whq1
# 环境
env=DEV
# 集群
apollo.cluster=default
# 服务地址
apollo.meta=http://localhost:8080
上述配置会加载两个配置文件
第一个:使用的是apollo.bootstrap.namespaces,这是配置加载的属性优先级较高
第二个:启动类的@EnableApolloConfig默认名称为application,这个优先级低于apollo.bootstrap.namespaces
但是我这里实际上两个配置文件内容是一样的,这里仅做演示,可以不使用apollo.bootstrap.namespaces配置
源码解析
与springboot集成
首先看apollo-client包下的springboot spi
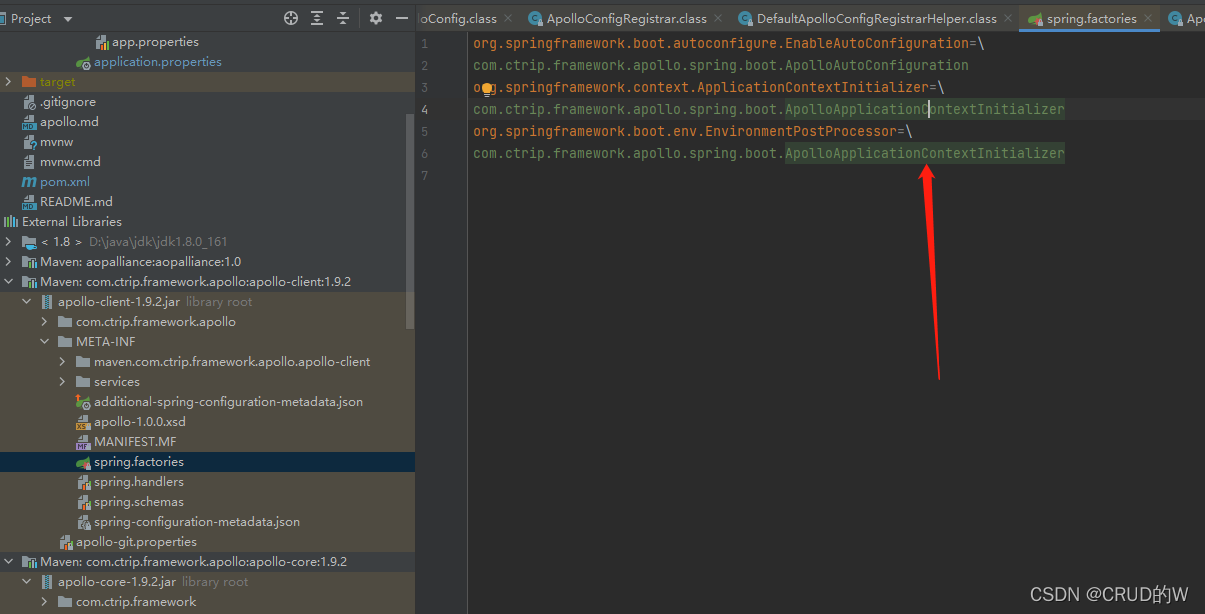
这个EnvironmentPostProcessor是在spring环境变量Environment加载时会被调用的,会调用到它的postProcessEnvironment方法
public void postProcessEnvironment(ConfigurableEnvironment configurableEnvironment, SpringApplication springApplication) {
        this.initializeSystemProperty(configurableEnvironment);
        Boolean eagerLoadEnabled = (Boolean)configurableEnvironment.getProperty("apollo.bootstrap.eagerLoad.enabled", Boolean.class, false);
        if (eagerLoadEnabled) {
            Boolean bootstrapEnabled = (Boolean)configurableEnvironment.getProperty("apollo.bootstrap.enabled", Boolean.class, false);
            if (bootstrapEnabled) {
                DeferredLogger.enable();
                // 核心1
                this.initialize(configurableEnvironment);
            }

        }
    }
远程配置的加载
这里就是优先级较高的apollo.bootstrap的配置,判断是非懒加载模式,并且开启了配置,那么直接进行加载
protected void initialize(ConfigurableEnvironment environment) {
    // 从环境变量获取apollo.bootstrap.namespaces的值,可以获取到填写的application
    if (environment.getPropertySources().contains(PropertySourcesConstants.APOLLO_BOOTSTRAP_PROPERTY_SOURCE_NAME)) {
      //already initialized, replay the logs that were printed before the logging system was initialized
      DeferredLogger.replayTo();
      return;
    }

    String namespaces = environment.getProperty(PropertySourcesConstants.APOLLO_BOOTSTRAP_NAMESPACES, ConfigConsts.NAMESPACE_APPLICATION);
    logger.debug("Apollo bootstrap namespaces: {}", namespaces);
     // 因为namespaces可以配置多个,这里根据逗号转为集合列表
    List<String> namespaceList = NAMESPACE_SPLITTER.splitToList(namespaces);

    CompositePropertySource composite;
    final ConfigUtil configUtil = ApolloInjector.getInstance(ConfigUtil.class);
    if (configUtil.isPropertyNamesCacheEnabled()) {
      composite = new CachedCompositePropertySource(PropertySourcesConstants.APOLLO_BOOTSTRAP_PROPERTY_SOURCE_NAME);
    } else {
      composite = new CompositePropertySource(PropertySourcesConstants.APOLLO_BOOTSTRAP_PROPERTY_SOURCE_NAME);
    }
    for (String namespace : namespaceList) {
      // 获取config,这个config很关键,里面就包含了namespace文件的内容,下面要分析这个方法
      Config config = ConfigService.getConfig(namespace);
	  // 根据config转换为spring environment需要的propertySource
      composite.addPropertySource(configPropertySourceFactory.getConfigPropertySource(namespace, config));
    }
    // 加到所有PropertySources最前面,这里可以看到优先级就是最高的了
    environment.getPropertySources().addFirst(composite);
  }
接下来就看最关键的ConfigService.getConfig(namespace)
public static Config getConfig(String namespace) {
    return s_instance.getManager().getConfig(namespace);
  }
这里是各种懒加载机制,先看getManager
private ConfigManager getManager() {
    if (m_configManager == null) {
      synchronized (this) {
        if (m_configManager == null) {
          m_configManager = ApolloInjector.getInstance(ConfigManager.class);
        }
      }
    }

    return m_configManager;
  }
懒加载的机制创建了一个ConfigManager,是一个DefaultConfigManager实现类,内部比较复杂,不做分析
然后看getConfig
public Config getConfig(String namespace) {
    Config config = m_configs.get(namespace);

    if (config == null) {
      synchronized (this) {
        config = m_configs.get(namespace);

        if (config == null) {
          ConfigFactory factory = m_factoryManager.getFactory(namespace);
		  // 核心1
          config = factory.create(namespace);
          m_configs.put(namespace, config);
        }
      }
    }

    return config;
  }
核心1处获取到一个DefaultConfigFactory,调用create
@Override
  public Config create(String namespace) {
    ConfigFileFormat format = determineFileFormat(namespace);
    if (ConfigFileFormat.isPropertiesCompatible(format)) {
      return this.createRepositoryConfig(namespace, createPropertiesCompatibleFileConfigRepository(namespace, format));
    }
    // 核心1
    return this.createRepositoryConfig(namespace, createLocalConfigRepository(namespace));
  }
核心1这里很关键,大部分核心代码都在里面了,这里要从内往外看,先看createLocalConfigRepository,后面再看createRepositoryConfig
LocalFileConfigRepository createLocalConfigRepository(String namespace) {
	// 核心1
    if (m_configUtil.isInLocalMode()) {
      logger.warn(
          "==== Apollo is in local mode! Won't pull configs from remote server for namespace {} ! ====",
          namespace);
      return new LocalFileConfigRepository(namespace);
    }
    // 核心2
    return new LocalFileConfigRepository(namespace, createRemoteConfigRepository(namespace));
  }
核心1判断配置文件的属性:env是不是等于local,如果是,那么只走本地缓存文件的方式,因为apollo支持只从本地获取,比如说你之前启动过项目,现在你没网了连不上远程服务器,那么你可以设置env=local来让本地直接从本地缓存文件获取
核心2是一种装饰器模式了,创建了一个LocalFileConfigRepository,里面又包装了一个RemoteConfigRepository,还是从内往外看,先看createRemoteConfigRepository
RemoteConfigRepository createRemoteConfigRepository(String namespace) {
    return new RemoteConfigRepository(namespace);
  }
继续
public RemoteConfigRepository(String namespace) {
    m_namespace = namespace;
    m_configCache = new AtomicReference<>();
    // 核心1
    m_configUtil = ApolloInjector.getInstance(ConfigUtil.class);
    m_httpClient = ApolloInjector.getInstance(HttpClient.class);
    m_serviceLocator = ApolloInjector.getInstance(ConfigServiceLocator.class);
    remoteConfigLongPollService = ApolloInjector.getInstance(RemoteConfigLongPollService.class);
    m_longPollServiceDto = new AtomicReference<>();
    m_remoteMessages = new AtomicReference<>();
    m_loadConfigRateLimiter = RateLimiter.create(m_configUtil.getLoadConfigQPS());
    m_configNeedForceRefresh = new AtomicBoolean(true);
    m_loadConfigFailSchedulePolicy = new ExponentialSchedulePolicy(m_configUtil.getOnErrorRetryInterval(),
        m_configUtil.getOnErrorRetryInterval() * 8);
    // 核心2
    this.trySync();
    // 核心3
    this.schedulePeriodicRefresh();
    // 核心4
    this.scheduleLongPollingRefresh();
  }
核心1非常关键,应该是获取ConfigUtil,这个方法如果ConfigUtil已经存在则会缓存起来,也就是只会初始化一个,这里打断点看了一下第一次初始化是在SpringValueDefinitionProcessor类
  public SpringValueDefinitionProcessor() {
    configUtil = ApolloInjector.getInstance(ConfigUtil.class);
    placeholderHelper = SpringInjector.getInstance(PlaceholderHelper.class);
  }
这个类是通过@EnableApolloConfig注解注册到spring的,这里等会看,先看ConfigUtil的初始化
ConfigUtil的构造方法
public ConfigUtil() {
    warnLogRateLimiter = RateLimiter.create(0.017); // 1 warning log output per minute
    // 初始化属性间隔
    initRefreshInterval();
    // 初始化连接超时时间
    initConnectTimeout();
    // 初始化读取配置超时时间
    initReadTimeout();
    // 初始化cluster,apollo.cluster配置
    initCluster();
    initQPS();
    initMaxConfigCacheSize();
    initLongPollingInitialDelayInMills();
    initAutoUpdateInjectedSpringProperties();
    initPropertiesOrdered();
    initPropertyNamesCacheEnabled();
  }
这里就是初始化一些项目要用到的公共配置,可以看到这里居然没有app.id的初始化,后面看如何获取的
接下来看上面的核心2
protected boolean trySync() {
    try {
      sync();
      return true;
    } catch (Throwable ex) {
      Tracer.logEvent("ApolloConfigException", ExceptionUtil.getDetailMessage(ex));
      logger
          .warn("Sync config failed, will retry. Repository {}, reason: {}", this.getClass(), ExceptionUtil
              .getDetailMessage(ex));
    }
    return false;
  }
看sync()
这里会分本地配置还是远程配置走不同的实现,因为这里是远程配置,所有进入RemoteConfigRepository的sync
@Override
  protected synchronized void sync() {
    Transaction transaction = Tracer.newTransaction("Apollo.ConfigService", "syncRemoteConfig");

    try {
      // 获取当前的ApolloConfig
      ApolloConfig previous = m_configCache.get();
      // 核心1,获取远程的ApolloConfig
      ApolloConfig current = loadApolloConfig();

      //reference equals means HTTP 304
      if (previous != current) {
        logger.debug("Remote Config refreshed!");
        // 如果本地和远程不一样,则更新
        m_configCache.set(current);
        // 核心2
        this.fireRepositoryChange(m_namespace, this.getConfig());
      }

      if (current != null) {
        Tracer.logEvent(String.format("Apollo.Client.Configs.%s", current.getNamespaceName()),
            current.getReleaseKey());
      }

      transaction.setStatus(Transaction.SUCCESS);
    } catch (Throwable ex) {
      transaction.setStatus(ex);
      throw ex;
    } finally {
      transaction.complete();
    }
  }
先看loadApolloConfig
private ApolloConfig loadApolloConfig() {
    if (!m_loadConfigRateLimiter.tryAcquire(5, TimeUnit.SECONDS)) {
      //wait at most 5 seconds
      try {
        TimeUnit.SECONDS.sleep(5);
      } catch (InterruptedException e) {
      }
    }
    // 核心1,获取到各种需要的参数
    String appId = m_configUtil.getAppId();
    String cluster = m_configUtil.getCluster();
    String dataCenter = m_configUtil.getDataCenter();
    String secret = m_configUtil.getAccessKeySecret();
    Tracer.logEvent("Apollo.Client.ConfigMeta", STRING_JOINER.join(appId, cluster, m_namespace));
    int maxRetries = m_configNeedForceRefresh.get() ? 2 : 1;
    long onErrorSleepTime = 0; // 0 means no sleep
    Throwable exception = null;

    List<ServiceDTO> configServices = getConfigServices();
    String url = null;
    retryLoopLabel:
    // 有一个重试次数的机制
    for (int i = 0; i < maxRetries; i++) {
      List<ServiceDTO> randomConfigServices = Lists.newLinkedList(configServices);
      Collections.shuffle(randomConfigServices);
      。。。。。。
        HttpRequest request = new HttpRequest(url);
        if (!StringUtils.isBlank(secret)) {
          Map<String, String> headers = Signature.buildHttpHeaders(url, appId, secret);
          request.setHeaders(headers);
        }

        Transaction transaction = Tracer.newTransaction("Apollo.ConfigService", "queryConfig");
        transaction.addData("Url", url);
        try {
		  // 核心2
          HttpResponse<ApolloConfig> response = m_httpClient.doGet(request, ApolloConfig.class);
          m_configNeedForceRefresh.set(false);
          m_loadConfigFailSchedulePolicy.success();

          transaction.addData("StatusCode", response.getStatusCode());
          transaction.setStatus(Transaction.SUCCESS);

          if (response.getStatusCode() == 304) {
            logger.debug("Config server responds with 304 HTTP status code.");
            return m_configCache.get();
          }

          ApolloConfig result = response.getBody();

          logger.debug("Loaded config for {}: {}", m_namespace, result);

          return result;
        } catch (ApolloConfigStatusCodeException ex) {
          .。。。。。
  }
核心1的m_configUtil.getAppId()先看一下
这里的app.id的初始化,打断点看了一下,是在DefaultApplicationProvider类的initAppId,也是支持从多种场景获取app.id,也支持读取/META-INF/app.properties文件中的值
private void initAppId() {
        this.m_appId = System.getProperty("app.id");
        if (!Utils.isBlank(this.m_appId)) {
            this.m_appId = this.m_appId.trim();
            logger.info("App ID is set to {} by app.id property from System Property", this.m_appId);
        } else {
            this.m_appId = System.getenv("APP_ID");
            if (!Utils.isBlank(this.m_appId)) {
                this.m_appId = this.m_appId.trim();
                logger.info("App ID is set to {} by APP_ID property from OS environment variable", this.m_appId);
            } else {
                this.m_appId = this.m_appProperties.getProperty("app.id");
                if (!Utils.isBlank(this.m_appId)) {
                    this.m_appId = this.m_appId.trim();
                    logger.info("App ID is set to {} by app.id property from {}", this.m_appId, "/META-INF/app.properties");
                } else {
                    this.m_appId = null;
                    logger.warn("app.id is not available from System Property and {}. It is set to null", "/META-INF/app.properties");
                }
            }
        }
    }
然后看核心2,这里发起一个http,我把url拿下来是这样的
http://192.168.0.105:8080/configs/whq1/default/application?ip=192.168.0.105
直接浏览器调用一下,发现结果
{"appId":"whq1","cluster":"default","namespaceName":"application",
"configurations":{"local.env":"test21","name":"333"},
"releaseKey":"20220425214809-bfbf053bc0685404"}
configurations就是我在apollo配置的两个属性了,也就是这里只是调用一个http请求来到服务端获取配置,还是比较简单的,最终返回出去
然后看核心2的this.fireRepositoryChange(m_namespace, this.getConfig())
this.getConfig()是根据ApolloConfig获取一个Properties
public Properties getConfig() {
    if (m_configCache.get() == null) {
      this.sync();
    }
    return transformApolloConfigToProperties(m_configCache.get());
  }
fireRepositoryChange方法
protected void fireRepositoryChange(String namespace, Properties newProperties) {
    for (RepositoryChangeListener listener : m_listeners) {
      try {
        listener.onRepositoryChange(namespace, newProperties);
      } catch (Throwable ex) {
        Tracer.logError(ex);
        logger.error("Failed to invoke repository change listener {}", listener.getClass(), ex);
      }
    }
  }
这里的m_listeners目前没有值,后面会用到,先继续往下看
然后要看RemoteConfigRepository核心3的this.schedulePeriodicRefresh();
private void schedulePeriodicRefresh() {
    logger.debug("Schedule periodic refresh with interval: {} {}",
        m_configUtil.getRefreshInterval(), m_configUtil.getRefreshIntervalTimeUnit());
    m_executorService.scheduleAtFixedRate(
        new Runnable() {
          @Override
          public void run() {
            Tracer.logEvent("Apollo.ConfigService", String.format("periodicRefresh: %s", m_namespace));
            logger.debug("refresh config for namespace: {}", m_namespace);
            trySync();
            Tracer.logEvent("Apollo.Client.Version", Apollo.VERSION);
          }
        }, m_configUtil.getRefreshInterval(), m_configUtil.getRefreshInterval(),
        m_configUtil.getRefreshIntervalTimeUnit());
  }
这里的m_configUtil.getRefreshInterval()默认等于5,m_configUtil.getRefreshIntervalTimeUnit()是分钟,trySync();刚看过,也就是每隔5分钟,进行检查一次服务端是否变更,这是一次容错策略,避免某些情况下客户端无法直接感知,那么过5分钟之内也可以得到更新
长轮询监听配置更改
然后看RemoteConfigRepository核心4的this.scheduleLongPollingRefresh(),这个方法很关键了
private void scheduleLongPollingRefresh() {
    remoteConfigLongPollService.submit(m_namespace, this);
  }
public boolean submit(String namespace, RemoteConfigRepository remoteConfigRepository) {
    boolean added = m_longPollNamespaces.put(namespace, remoteConfigRepository);
    m_notifications.putIfAbsent(namespace, INIT_NOTIFICATION_ID);
    if (!m_longPollStarted.get()) {
      // 核心1
      startLongPolling();
    }
    return added;
  }
startLongPolling
private void startLongPolling() {
    if (!m_longPollStarted.compareAndSet(false, true)) {
      //already started
      return;
    }
    try {
      final String appId = m_configUtil.getAppId();
      final String cluster = m_configUtil.getCluster();
      final String dataCenter = m_configUtil.getDataCenter();
      final String secret = m_configUtil.getAccessKeySecret();
      // 默认是longPollingInitialDelayInMills
      final long longPollingInitialDelayInMills = m_configUtil.getLongPollingInitialDelayInMills();
      // 核心1
      m_longPollingService.submit(new Runnable() {
        @Override
        public void run() {
          if (longPollingInitialDelayInMills > 0) {
            try {
              logger.debug("Long polling will start in {} ms.", longPollingInitialDelayInMills);
              TimeUnit.MILLISECONDS.sleep(longPollingInitialDelayInMills);
            } catch (InterruptedException e) {
              //ignore
            }
          }
          // 核心2
          doLongPollingRefresh(appId, cluster, dataCenter, secret);
        }
      });
    } catch (Throwable ex) {
      m_longPollStarted.set(false);
      ApolloConfigException exception =
          new ApolloConfigException("Schedule long polling refresh failed", ex);
      Tracer.logError(exception);
      logger.warn(ExceptionUtil.getDetailMessage(exception));
    }
  }
核心1的m_longPollingService是一个线程池,这里的意思是每次睡眠2秒后,调用一次doLongPollingRefresh
private void doLongPollingRefresh(String appId, String cluster, String dataCenter, String secret) {
    final Random random = new Random();
    ServiceDTO lastServiceDto = null;
    while (!m_longPollingStopped.get() && !Thread.currentThread().isInterrupted()) {
      if (!m_longPollRateLimiter.tryAcquire(5, TimeUnit.SECONDS)) {
        //wait at most 5 seconds
        try {
          TimeUnit.SECONDS.sleep(5);
        } catch (InterruptedException e) {
        }
      }
      Transaction transaction = Tracer.newTransaction("Apollo.ConfigService", "pollNotification");
      String url = null;
      try {
        if (lastServiceDto == null) {
          List<ServiceDTO> configServices = getConfigServices();
          lastServiceDto = configServices.get(random.nextInt(configServices.size()));
        }

        url =
            assembleLongPollRefreshUrl(lastServiceDto.getHomepageUrl(), appId, cluster, dataCenter,
                m_notifications);

        logger.debug("Long polling from {}", url);

		// 核心1
        HttpRequest request = new HttpRequest(url);
        // 核心2
        request.setReadTimeout(LONG_POLLING_READ_TIMEOUT);
        if (!StringUtils.isBlank(secret)) {
          Map<String, String> headers = Signature.buildHttpHeaders(url, appId, secret);
          request.setHeaders(headers);
        }

        transaction.addData("Url", url);
		// 核心3
        final HttpResponse<List<ApolloConfigNotification>> response =
            m_httpClient.doGet(request, m_responseType);

        logger.debug("Long polling response: {}, url: {}", response.getStatusCode(), url);
        if (response.getStatusCode() == 200 && response.getBody() != null) {
          updateNotifications(response.getBody());
          updateRemoteNotifications(response.getBody());
          transaction.addData("Result", response.getBody().toString());
          // 核心4
          notify(lastServiceDto, response.getBody());
        }

        //try to load balance
        if (response.getStatusCode() == 304 && random.nextBoolean()) {
          lastServiceDto = null;
        }

        m_longPollFailSchedulePolicyInSecond.success();
        transaction.addData("StatusCode", response.getStatusCode());
        transaction.setStatus(Transaction.SUCCESS);
      } catch (Throwable ex) {
        lastServiceDto = null;
        Tracer.logEvent("ApolloConfigException", ExceptionUtil.getDetailMessage(ex));
        transaction.setStatus(ex);
        long sleepTimeInSecond = m_longPollFailSchedulePolicyInSecond.fail();
        logger.warn(
            "Long polling failed, will retry in {} seconds. appId: {}, cluster: {}, namespaces: {}, long polling url: {}, reason: {}",
            sleepTimeInSecond, appId, cluster, assembleNamespaces(), url, ExceptionUtil.getDetailMessage(ex));
        try {
          TimeUnit.SECONDS.sleep(sleepTimeInSecond);
        } catch (InterruptedException ie) {
          //ignore
        }
      } finally {
        transaction.complete();
      }
    }
  }
核心1处创建了一个请求,这个url是这样的:
http://192.168.0.105:8080/notifications/v2?cluster=default&appId=whq1&ip=192.168.0.105¬ifications=[{“namespaceName”:“application”,“notificationId”:-1}]
核心2的参数是90000
核心3发起请求,这里很关键,这里是一个长轮询的机制,服务端如果发现当前要监听的配置没有修改,那么是不会立刻返回的,会挂起当前请求,直到客户端超时或者服务端发现配置变更会返回,那么代码才能往下走,实现了服务端配置更改,通知到客户端的功能
当请求返回时,调用到核心4的notify
private void notify(ServiceDTO lastServiceDto, List<ApolloConfigNotification> notifications) {
    if (notifications == null || notifications.isEmpty()) {
      return;
    }
    for (ApolloConfigNotification notification : notifications) {
      String namespaceName = notification.getNamespaceName();
      //create a new list to avoid ConcurrentModificationException
      List<RemoteConfigRepository> toBeNotified =
          Lists.newArrayList(m_longPollNamespaces.get(namespaceName));
      ApolloNotificationMessages originalMessages = m_remoteNotificationMessages.get(namespaceName);
      ApolloNotificationMessages remoteMessages = originalMessages == null ? null : originalMessages.clone();
      //since .properties are filtered out by default, so we need to check if there is any listener for it
      toBeNotified.addAll(m_longPollNamespaces
          .get(String.format("%s.%s", namespaceName, ConfigFileFormat.Properties.getValue())));
      for (RemoteConfigRepository remoteConfigRepository : toBeNotified) {
        try {
          // 获取之前创建的RemoteConfigRepository,调用它的onLongPollNotified方法
          remoteConfigRepository.onLongPollNotified(lastServiceDto, remoteMessages);
        } catch (Throwable ex) {
          Tracer.logError(ex);
        }
      }
    }
  }
onLongPollNotified
public void onLongPollNotified(ServiceDTO longPollNotifiedServiceDto, ApolloNotificationMessages remoteMessages) {
    m_longPollServiceDto.set(longPollNotifiedServiceDto);
    m_remoteMessages.set(remoteMessages);
    m_executorService.submit(new Runnable() {
      @Override
      public void run() {
        m_configNeedForceRefresh.set(true);
        trySync();
      }
    });
  }
这里使用线程池又扔进去一个任务,执行了trySync,从远程获取配置,并且有一个很重要的机制是会触发一个fireRepositoryChange方法,调用所有RepositoryChangeListener的onRepositoryChange,只不过目前还没有值
protected void fireRepositoryChange(String namespace, Properties newProperties) {
    for (RepositoryChangeListener listener : m_listeners) {
      try {
        listener.onRepositoryChange(namespace, newProperties);
      } catch (Throwable ex) {
        Tracer.logError(ex);
        logger.error("Failed to invoke repository change listener {}", listener.getClass(), ex);
      }
    }
  }
然后createRemoteConfigRepository方法结束了,回到之前
new LocalFileConfigRepository(namespace, createRemoteConfigRepository(namespace));
接着看LocalFileConfigRepository
 public LocalFileConfigRepository(String namespace, ConfigRepository upstream) {
    m_namespace = namespace;
    m_configUtil = ApolloInjector.getInstance(ConfigUtil.class);
    // 核心1
    this.setLocalCacheDir(findLocalCacheDir(), false);
    // 核心2
    this.setUpstreamRepository(upstream);
    // 核心3
    this.trySync();
  }
核心1,LocalFileConfigRepository这个类就是和本地缓存相关的,这里会先创建缓存文件路径
核心2
public void setUpstreamRepository(ConfigRepository upstreamConfigRepository) {
    if (upstreamConfigRepository == null) {
      return;
    }
    //clear previous listener
    if (m_upstream != null) {
      m_upstream.removeChangeListener(this);
    }
    m_upstream = upstreamConfigRepository;
    upstreamConfigRepository.addChangeListener(this);
  }
upstreamConfigRepository就是之前的RemoteConfigRepository,这里对RemoteConfigRepository调用了addChangeListener,传递的是自己,也就是给之前的m_listeners加了一个监听器,是自己,LocalFileConfigRepository,当远程配置被修改时,LocalFileConfigRepository的onRepositoryChange就会被调用到了
public void addChangeListener(RepositoryChangeListener listener) {
    if (!m_listeners.contains(listener)) {
      m_listeners.add(listener);
    }
  }
看一下LocalFileConfigRepository的onRepositoryChange
public void onRepositoryChange(String namespace, Properties newProperties) {
    if (newProperties.equals(m_fileProperties)) {
      return;
    }
    Properties newFileProperties = propertiesFactory.getPropertiesInstance();
    newFileProperties.putAll(newProperties);
    // 核心1
    updateFileProperties(newFileProperties, m_upstream.getSourceType());
    // 核心2
    this.fireRepositoryChange(namespace, newProperties);
  }
核心1,更新自己本地的缓存文件
核心2,还是这个fireRepositoryChange,目前LocalFileConfigRepository中的m_listeners是空的,也就是监听触发后会进行传递
protected void fireRepositoryChange(String namespace, Properties newProperties) {
    for (RepositoryChangeListener listener : m_listeners) {
      try {
        listener.onRepositoryChange(namespace, newProperties);
      } catch (Throwable ex) {
        Tracer.logError(ex);
        logger.error("Failed to invoke repository change listener {}", listener.getClass(), ex);
      }
    }
  }
然后这里再看下LocalFileConfigRepository的核心3的this.trySync()
protected boolean trySync() {
    try {
      sync();
      return true;
    } catch (Throwable ex) {
      Tracer.logEvent("ApolloConfigException", ExceptionUtil.getDetailMessage(ex));
      logger
          .warn("Sync config failed, will retry. Repository {}, reason: {}", this.getClass(), ExceptionUtil
              .getDetailMessage(ex));
    }
    return false;
  }
@Override
  protected void sync() {
    //sync with upstream immediately
    boolean syncFromUpstreamResultSuccess = trySyncFromUpstream();

    if (syncFromUpstreamResultSuccess) {
      return;
    }

    Transaction transaction = Tracer.newTransaction("Apollo.ConfigService", "syncLocalConfig");
    Throwable exception = null;
    try {
      transaction.addData("Basedir", m_baseDir.getAbsolutePath());
      // 核心1,把磁盘文件内容加载到内存缓存
      m_fileProperties = this.loadFromLocalCacheFile(m_baseDir, m_namespace);
      m_sourceType = ConfigSourceType.LOCAL;
      transaction.setStatus(Transaction.SUCCESS);
    } catch (Throwable ex) {
      Tracer.logEvent("ApolloConfigException", ExceptionUtil.getDetailMessage(ex));
      transaction.setStatus(ex);
      exception = ex;
      //ignore
    } finally {
      transaction.complete();
    }

    if (m_fileProperties == null) {
      m_sourceType = ConfigSourceType.NONE;
      throw new ApolloConfigException(
          "Load config from local config failed!", exception);
    }
  }
因为之前只是缓存了本地配置文件,但是配置文件的加载还是比较消耗性能的,所以需要内存缓存,这里就是把磁盘缓存文件的配置加载到内存的m_fileProperties 中
接下来就看LocalFileConfigRepository再外层的包装了
回到DefaultConfigFactory的create,再外层是createRepositoryConfig方法
@Override
  public Config create(String namespace) {
    ConfigFileFormat format = determineFileFormat(namespace);
    if (ConfigFileFormat.isPropertiesCompatible(format)) {
      return this.createRepositoryConfig(namespace, createPropertiesCompatibleFileConfigRepository(namespace, format));
    }
    return this.createRepositoryConfig(namespace, createLocalConfigRepository(namespace));
  }
createRepositoryConfig
protected Config createRepositoryConfig(String namespace, ConfigRepository configRepository) {
    return new DefaultConfig(namespace, configRepository);
  }
public DefaultConfig(String namespace, ConfigRepository configRepository) {
    m_namespace = namespace;
    m_resourceProperties = loadFromResource(m_namespace);
    m_configRepository = configRepository;
    m_configProperties = new AtomicReference<>();
    m_warnLogRateLimiter = RateLimiter.create(0.017); // 1 warning log output per minute
    // 核心1
    initialize();
  }
initialize
private void initialize() {
    try {
      updateConfig(m_configRepository.getConfig(), m_configRepository.getSourceType());
    } catch (Throwable ex) {
      Tracer.logError(ex);
      logger.warn("Init Apollo Local Config failed - namespace: {}, reason: {}.",
          m_namespace, ExceptionUtil.getDetailMessage(ex));
    } finally {
      //register the change listener no matter config repository is working or not
      //so that whenever config repository is recovered, config could get changed
      // 核心1
      m_configRepository.addChangeListener(this);
    }
  }
这里发现对传进来的LocalFileConfigRepository调用了addChangeListener,同样的方式,让当前类来监听LocalFileConfigRepository,所以监听可以传递到当前类DefaultConfig的onRepositoryChange方法了
onRepositoryChange方法
public synchronized void onRepositoryChange(String namespace, Properties newProperties) {
    if (newProperties.equals(m_configProperties.get())) {
      return;
    }

    ConfigSourceType sourceType = m_configRepository.getSourceType();
    Properties newConfigProperties = propertiesFactory.getPropertiesInstance();
    newConfigProperties.putAll(newProperties);

    // 核心1
    Map<String, ConfigChange> actualChanges = updateAndCalcConfigChanges(newConfigProperties,
        sourceType);

    //check double checked result
    if (actualChanges.isEmpty()) {
      return;
    }
    // 核心2
    this.fireConfigChange(m_namespace, actualChanges);

    Tracer.logEvent("Apollo.Client.ConfigChanges", m_namespace);
  }
核心1,updateAndCalcConfigChanges,这个方法比较长,简单说就是根据之前的配置和现在的配置做对比,比较哪些是新增的、删除的、修改的,然后封装为ConfigChange返回
private Map<String, ConfigChange> updateAndCalcConfigChanges(Properties newConfigProperties,
      ConfigSourceType sourceType) {
    List<ConfigChange> configChanges =
        calcPropertyChanges(m_namespace, m_configProperties.get(), newConfigProperties);

    ImmutableMap.Builder<String, ConfigChange> actualChanges =
        new ImmutableMap.Builder<>();

    /** === Double check since DefaultConfig has multiple config sources ==== **/

    //1. use getProperty to update configChanges's old value
    for (ConfigChange change : configChanges) {
      change.setOldValue(this.getProperty(change.getPropertyName(), change.getOldValue()));
    }

    //2. update m_configProperties
    updateConfig(newConfigProperties, sourceType);
    clearConfigCache();

    //3. use getProperty to update configChange's new value and calc the final changes
    for (ConfigChange change : configChanges) {
      change.setNewValue(this.getProperty(change.getPropertyName(), change.getNewValue()));
      switch (change.getChangeType()) {
        case ADDED:
          if (Objects.equals(change.getOldValue(), change.getNewValue())) {
            break;
          }
          if (change.getOldValue() != null) {
            change.setChangeType(PropertyChangeType.MODIFIED);
          }
          actualChanges.put(change.getPropertyName(), change);
          break;
        case MODIFIED:
          if (!Objects.equals(change.getOldValue(), change.getNewValue())) {
            actualChanges.put(change.getPropertyName(), change);
          }
          break;
        case DELETED:
          if (Objects.equals(change.getOldValue(), change.getNewValue())) {
            break;
          }
          if (change.getNewValue() != null) {
            change.setChangeType(PropertyChangeType.MODIFIED);
          }
          actualChanges.put(change.getPropertyName(), change);
          break;
        default:
          //do nothing
          break;
      }
    }
    return actualChanges.build();
  }
核心2,fireConfigChange
protected void fireConfigChange(String namespace, Map<String, ConfigChange> changes) {
    final Set<String> changedKeys = changes.keySet();
    // 核心1
    final List<ConfigChangeListener> listeners = this.findMatchedConfigChangeListeners(changedKeys);

    // notify those listeners
    for (ConfigChangeListener listener : listeners) {
      Set<String> interestedChangedKeys = resolveInterestedChangedKeys(listener, changedKeys);
      InterestedConfigChangeEvent interestedConfigChangeEvent = new InterestedConfigChangeEvent(
          namespace, changes, interestedChangedKeys);
      // 核心2
      this.notifyAsync(listener, interestedConfigChangeEvent);
    }
  }
核心1
private List<ConfigChangeListener> findMatchedConfigChangeListeners(Set<String> changedKeys) {
    final List<ConfigChangeListener> configChangeListeners = new ArrayList<>();
    // 核心1
    for (ConfigChangeListener configChangeListener : this.m_listeners) {
      // check whether the listener is interested in this change event
      if (this.isConfigChangeListenerInterested(configChangeListener, changedKeys)) {
        configChangeListeners.add(configChangeListener);
      }
    }
    return configChangeListeners;
  }
这里的m_listeners打断点看了一下,是什么时候设置的,发现是在PropertySourcesProcessor的initializeAutoUpdatePropertiesFeature方法设置的,这里等会再看细节
private void initializeAutoUpdatePropertiesFeature(ConfigurableListableBeanFactory beanFactory) {
    if (!configUtil.isAutoUpdateInjectedSpringPropertiesEnabled() ||
        !AUTO_UPDATE_INITIALIZED_BEAN_FACTORIES.add(beanFactory)) {
      return;
    }
    // 核心1
    AutoUpdateConfigChangeListener autoUpdateConfigChangeListener = new AutoUpdateConfigChangeListener(
        environment, beanFactory);

    List<ConfigPropertySource> configPropertySources = configPropertySourceFactory.getAllConfigPropertySources();
    for (ConfigPropertySource configPropertySource : configPropertySources) {
      // 核心2
      configPropertySource.addChangeListener(autoUpdateConfigChangeListener);
    }
  }
核心1创建了AutoUpdateConfigChangeListener,核心2添加了listener,ConfigPropertySource里面就包装了DefaultConfig
然后接着看之前的逻辑,核心2的notifyAsync
private void notifyAsync(final ConfigChangeListener listener, final ConfigChangeEvent changeEvent) {
    m_executorService.submit(new Runnable() {
      @Override
      public void run() {
        String listenerName = listener.getClass().getName();
        Transaction transaction = Tracer.newTransaction("Apollo.ConfigChangeListener", listenerName);
        try {
          // 核心1
          listener.onChange(changeEvent);
          transaction.setStatus(Transaction.SUCCESS);
        } catch (Throwable ex) {
          transaction.setStatus(ex);
          Tracer.logError(ex);
          logger.error("Failed to invoke config change listener {}", listenerName, ex);
        } finally {
          transaction.complete();
        }
      }
    });
  }
调用AutoUpdateConfigChangeListener的onChange,传递了更改的changeEvent
public void onChange(ConfigChangeEvent changeEvent) {
    Set<String> keys = changeEvent.changedKeys();
    if (CollectionUtils.isEmpty(keys)) {
      return;
    }
    for (String key : keys) {
      // 1. check whether the changed key is relevant
      // 核心1
      Collection<SpringValue> targetValues = springValueRegistry.get(beanFactory, key);
      if (targetValues == null || targetValues.isEmpty()) {
        continue;
      }

      // 2. update the value
      for (SpringValue val : targetValues) {
        // 核心2
        updateSpringValue(val);
      }
    }
  }
这里打断点看了一下,循环所有修改的key,核心1的springValueRegistry.get
public Collection<SpringValue> get(BeanFactory beanFactory, String key) {
    // 核心1
    Multimap<String, SpringValue> beanFactorySpringValues = registry.get(beanFactory);
    if (beanFactorySpringValues == null) {
      return null;
    }
    return beanFactorySpringValues.get(key);
  }
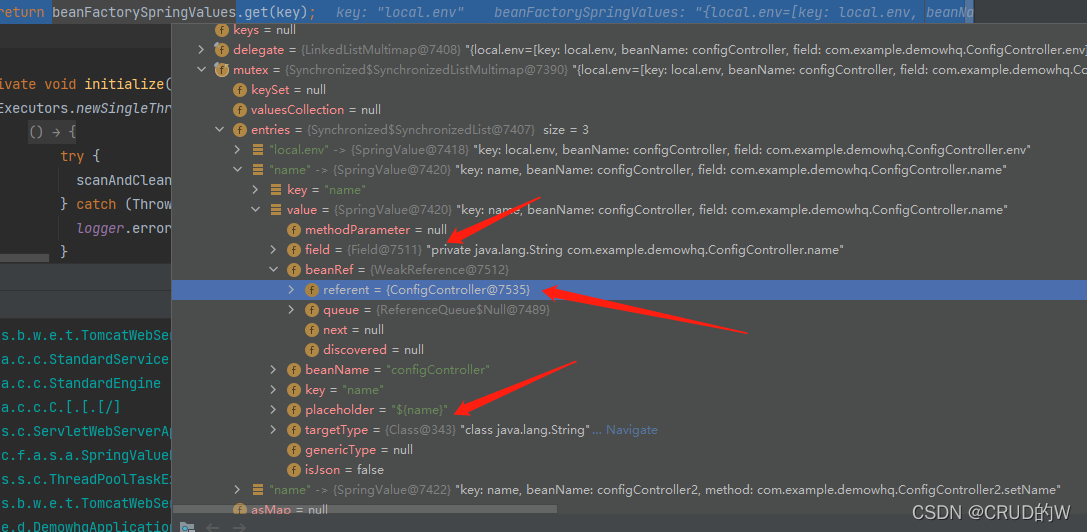
Multimap是一个可以保存多个相同key的map,是guava第三包提供的,这里打断点看下
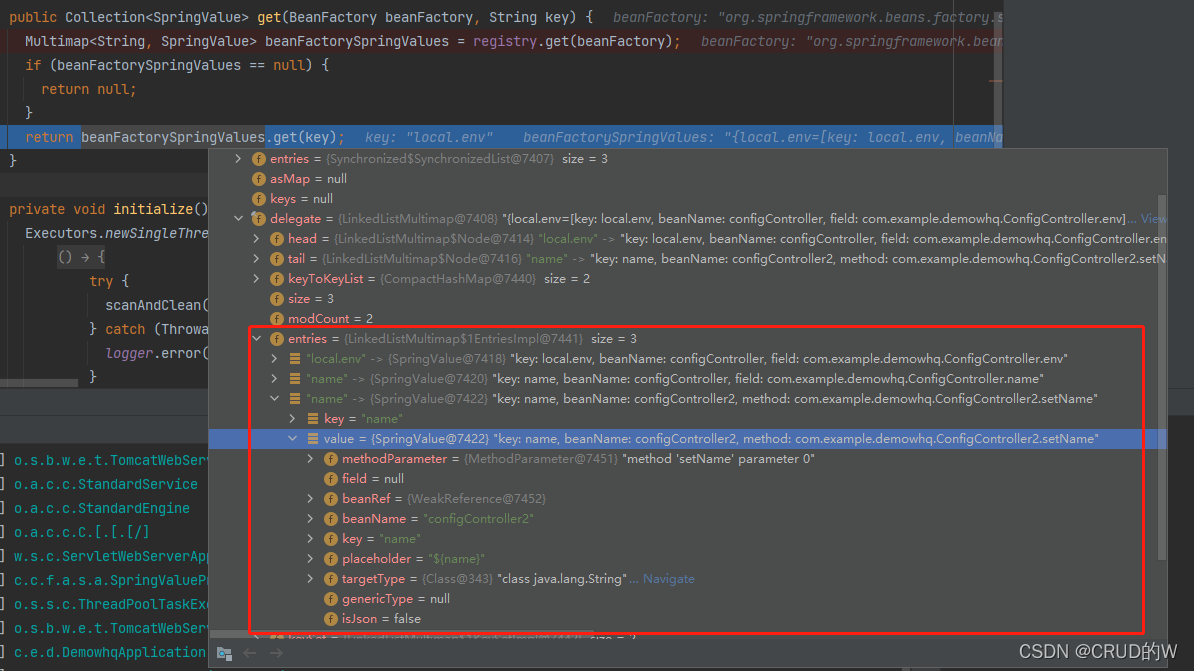
这里就可以发现,这个SpringValueRegistry里面存储了所有用到@Value注解的字段或方法,并且包装为了SpringValue对象,里面包含了是字段注入还是方法注入,需要注入的对象、解析的占位符,那么根据这些信息,直接通过反射就能做到修改对应的值了
核心2,拿到所有的SpringValue,依次调用updateSpringValue
private void updateSpringValue(SpringValue springValue) {
    try {
      // 核心1,重新获取该字段最新的值
      Object value = resolvePropertyValue(springValue);
      // 核心2
      springValue.update(value);

      logger.info("Auto update apollo changed value successfully, new value: {}, {}", value,
          springValue);
    } catch (Throwable ex) {
      logger.error("Auto update apollo changed value failed, {}", springValue.toString(), ex);
    }
  }
核心2,springValue.update(value)
public void update(Object newVal) throws IllegalAccessException, InvocationTargetException {
    if (isField()) {
      injectField(newVal);
    } else {
      injectMethod(newVal);
    }
  }
injectField
private void injectField(Object newVal) throws IllegalAccessException {
    // 需要注入的对象
    Object bean = beanRef.get();
    if (bean == null) {
      return;
    }
    boolean accessible = field.isAccessible();
    field.setAccessible(true);
    // 反射设置值
    field.set(bean, newVal);
    field.setAccessible(accessible);
  }
injectMethod和injectField类似,不看了
到这里apollo就完成了服务端配置修改,同步到客户端@Value值的动态修改了,核心功能已经实现了
服务端长轮询机制
首先发起长轮询的url经过我解码是这样的:
http://10.50.15.217:8080/notifications/v2?cluster=default&appId=whq1&ip=10.50.15.217¬ifications=[{“namespaceName”:“application”,“notificationId”:23}]
携带了要监听的cluster、appid、还有namespaceName,namespaceName可以是多个,每个namespaceName还有一个notificationId
这个notificationId可以理解的是比如一个配置文件在服务端有一个版本号,客户端和服务端都维护这个版本号,服务端就是根据这种版本号来判断客户端和服务端的配置是否相同的
看服务端接受这个url的方法,NotificationControllerV2 类的pollNotification
@RestController
@RequestMapping("/notifications/v2")
public class NotificationControllerV2 implements ReleaseMessageListener
pollNotification
@GetMapping
  public DeferredResult<ResponseEntity<List<ApolloConfigNotification>>> pollNotification(
      @RequestParam(value = "appId") String appId,
      @RequestParam(value = "cluster") String cluster,
      @RequestParam(value = "notifications") String notificationsAsString,
      @RequestParam(value = "dataCenter", required = false) String dataCenter,
      @RequestParam(value = "ip", required = false) String clientIp) {
    List<ApolloConfigNotification> notifications = null;

    try {
      notifications =
          gson.fromJson(notificationsAsString, notificationsTypeReference);
    } catch (Throwable ex) {
      Tracer.logError(ex);
    }

    if (CollectionUtils.isEmpty(notifications)) {
      throw new BadRequestException("Invalid format of notifications: " + notificationsAsString);
    }

    Map<String, ApolloConfigNotification> filteredNotifications = filterNotifications(appId, notifications);

    if (CollectionUtils.isEmpty(filteredNotifications)) {
      throw new BadRequestException("Invalid format of notifications: " + notificationsAsString);
    }
    // 核心1
    DeferredResultWrapper deferredResultWrapper = new DeferredResultWrapper(bizConfig.longPollingTimeoutInMilli());
    Set<String> namespaces = Sets.newHashSetWithExpectedSize(filteredNotifications.size());
    Map<String, Long> clientSideNotifications = Maps.newHashMapWithExpectedSize(filteredNotifications.size());

    for (Map.Entry<String, ApolloConfigNotification> notificationEntry : filteredNotifications.entrySet()) {
      String normalizedNamespace = notificationEntry.getKey();
      ApolloConfigNotification notification = notificationEntry.getValue();
      namespaces.add(normalizedNamespace);
      clientSideNotifications.put(normalizedNamespace, notification.getNotificationId());
      if (!Objects.equals(notification.getNamespaceName(), normalizedNamespace)) {
        deferredResultWrapper.recordNamespaceNameNormalizedResult(notification.getNamespaceName(), normalizedNamespace);
      }
    }

    Multimap<String, String> watchedKeysMap =
        watchKeysUtil.assembleAllWatchKeys(appId, cluster, namespaces, dataCenter);

    Set<String> watchedKeys = Sets.newHashSet(watchedKeysMap.values());

    /**
     * 1、set deferredResult before the check, for avoid more waiting
     * If the check before setting deferredResult,it may receive a notification the next time
     * when method handleMessage is executed between check and set deferredResult.
     */
    deferredResultWrapper
          .onTimeout(() -> logWatchedKeys(watchedKeys, "Apollo.LongPoll.TimeOutKeys"));

    // 核心2
    deferredResultWrapper.onCompletion(() -> {
      //unregister all keys
      for (String key : watchedKeys) {
        deferredResults.remove(key, deferredResultWrapper);
      }
      logWatchedKeys(watchedKeys, "Apollo.LongPoll.CompletedKeys");
    });

    //register all keys
    for (String key : watchedKeys) {
      // 核心3
      this.deferredResults.put(key, deferredResultWrapper);
    }

    logWatchedKeys(watchedKeys, "Apollo.LongPoll.RegisteredKeys");
    logger.debug("Listening {} from appId: {}, cluster: {}, namespace: {}, datacenter: {}",
        watchedKeys, appId, cluster, namespaces, dataCenter);

    /**
     * 2、check new release
     */
    List<ReleaseMessage> latestReleaseMessages =
        releaseMessageService.findLatestReleaseMessagesGroupByMessages(watchedKeys);

    /**
     * Manually close the entity manager.
     * Since for async request, Spring won't do so until the request is finished,
     * which is unacceptable since we are doing long polling - means the db connection would be hold
     * for a very long time
     */
    entityManagerUtil.closeEntityManager();

    // 核心4
    List<ApolloConfigNotification> newNotifications =
        getApolloConfigNotifications(namespaces, clientSideNotifications, watchedKeysMap,
            latestReleaseMessages);

    if (!CollectionUtils.isEmpty(newNotifications)) {
      deferredResultWrapper.setResult(newNotifications);
    }

    return deferredResultWrapper.getResult();
  }
这里使用了一个DeferredResultWrapper,它是Spring的DeferredResult的包装类,DeferredResult的意思是当返回DeferredResult时,服务端不会马上返回,会hold住请求,此时servlet会释放该线程,让服务端可以接受更多的请求,直到服务端调用了setResult或者是超时的时候,才会返回
核心1就是设置了超时时间是60秒
核心2,当完成时从deferredResults里面删除对应的监听key
核心3,把监听key都放到deferredResults中,这个可以就是判断配置唯一的三要素,appid、cluster、namespace,比如whq1+default+application
核心4,去对比一下key的notificationId是否和服务端一致,不一致则说明服务端key有变更,只有这种情况这个方法才会立即返回
然后按照正常思路,当你在页面上更改配置时,肯定会在deferredResults里面找对应的key,如果有,那么找到对应的DeferredResultWrapper,调用setResult,设置结果,那么hold住的请求就可以返回了,客户端就能收到结果处理了,然后客户端就这样一直循环发起这个请求实现长轮询
通过客户端发布配置
我在浏览器修改配置后发布,监听到url是:
http://localhost:8070/apps/whq1/envs/DEV/clusters/default/namespaces/application/releases
对应ReleaseController的方法publish
@Transactional
  @PostMapping("/apps/{appId}/clusters/{clusterName}/namespaces/{namespaceName}/releases")
  public ReleaseDTO publish(@PathVariable("appId") String appId,
                            @PathVariable("clusterName") String clusterName,
                            @PathVariable("namespaceName") String namespaceName,
                            @RequestParam("name") String releaseName,
                            @RequestParam(name = "comment", required = false) String releaseComment,
                            @RequestParam("operator") String operator,
                            @RequestParam(name = "isEmergencyPublish", defaultValue = "false") boolean isEmergencyPublish) {
    Namespace namespace = namespaceService.findOne(appId, clusterName, namespaceName);
    if (namespace == null) {
      throw new NotFoundException(String.format("Could not find namespace for %s %s %s", appId,
                                                clusterName, namespaceName));
    }
    Release release = releaseService.publish(namespace, releaseName, releaseComment, operator, isEmergencyPublish);

    //send release message
    Namespace parentNamespace = namespaceService.findParentNamespace(namespace);
    String messageCluster;
    if (parentNamespace != null) {
      messageCluster = parentNamespace.getClusterName();
    } else {
      messageCluster = clusterName;
    }
    // 核心1
    messageSender.sendMessage(ReleaseMessageKeyGenerator.generate(appId, messageCluster, namespaceName),
                              Topics.APOLLO_RELEASE_TOPIC);
    return BeanUtils.transform(ReleaseDTO.class, release);
  }
上面是发布Release数据等,看核心1
@Override
  @Transactional
  public void sendMessage(String message, String channel) {
    logger.info("Sending message {} to channel {}", message, channel);
    if (!Objects.equals(channel, Topics.APOLLO_RELEASE_TOPIC)) {
      logger.warn("Channel {} not supported by DatabaseMessageSender!", channel);
      return;
    }

    Tracer.logEvent("Apollo.AdminService.ReleaseMessage", message);
    Transaction transaction = Tracer.newTransaction("Apollo.AdminService", "sendMessage");
    try {
      // 核心1
      ReleaseMessage newMessage = releaseMessageRepository.save(new ReleaseMessage(message));
      toClean.offer(newMessage.getId());
      transaction.setStatus(Transaction.SUCCESS);
    } catch (Throwable ex) {
      logger.error("Sending message to database failed", ex);
      transaction.setStatus(ex);
      throw ex;
    } finally {
      transaction.complete();
    }
  }
看到核心1,就是保存了一条ReleaseMessage消息,然后这里就结束了,没有看到想要看到的逻辑
然后这里有这么一个类,ReleaseMessageScanner,他实现了spring的InitializingBean,所以初始化时会调用afterPropertiesSet方法
@Override
  public void afterPropertiesSet() throws Exception {
    databaseScanInterval = bizConfig.releaseMessageScanIntervalInMilli();
    maxIdScanned = loadLargestMessageId();
    executorService.scheduleWithFixedDelay(() -> {
      Transaction transaction = Tracer.newTransaction("Apollo.ReleaseMessageScanner", "scanMessage");
      try {
        scanMissingMessages();
        // 核心1
        scanMessages();
        transaction.setStatus(Transaction.SUCCESS);
      } catch (Throwable ex) {
        transaction.setStatus(ex);
        logger.error("Scan and send message failed", ex);
      } finally {
        transaction.complete();
      }
    }, databaseScanInterval, databaseScanInterval, TimeUnit.MILLISECONDS);

  }
这里的参数看了下,是每隔1秒执行一次,会调用scanMessage()
private void scanMessages() {
    boolean hasMoreMessages = true;
    while (hasMoreMessages && !Thread.currentThread().isInterrupted()) {
      hasMoreMessages = scanAndSendMessages();
    }
  }
scanAndSendMessages
private boolean scanAndSendMessages() {
    //current batch is 500
    // 核心1
    List<ReleaseMessage> releaseMessages =
        releaseMessageRepository.findFirst500ByIdGreaterThanOrderByIdAsc(maxIdScanned);
    if (CollectionUtils.isEmpty(releaseMessages)) {
      return false;
    }
    // 核心2
    fireMessageScanned(releaseMessages);
    int messageScanned = releaseMessages.size();
    long newMaxIdScanned = releaseMessages.get(messageScanned - 1).getId();
    // check id gaps, possible reasons are release message not committed yet or already rolled back
    if (newMaxIdScanned - maxIdScanned > messageScanned) {
      recordMissingReleaseMessageIds(releaseMessages, maxIdScanned);
    }
    maxIdScanned = newMaxIdScanned;
    return messageScanned == 500;
  }
这里维护了一个maxIdScanned,看上去是指扫描的最大id,根据这个id应该可以找到还没扫描到的数据,也就是我们之前新增的数据,然后调用fireMessageScanned
private void fireMessageScanned(Iterable<ReleaseMessage> messages) {
    for (ReleaseMessage message : messages) {
      for (ReleaseMessageListener listener : listeners) {
        try {
          listener.handleMessage(message, Topics.APOLLO_RELEASE_TOPIC);
        } catch (Throwable ex) {
          Tracer.logError(ex);
          logger.error("Failed to invoke message listener {}", listener.getClass(), ex);
        }
      }
    }
  }
这里调用所有的ReleaseMessage,然后listeners里面有一个NotificationControllerV2类,也就是监听长轮询的controller,里面有一个deferredResults,就是维护了长连接信息的
调用handleMessage
@Override
  public void handleMessage(ReleaseMessage message, String channel) {
    logger.info("message received - channel: {}, message: {}", channel, message);

    String content = message.getMessage();
    Tracer.logEvent("Apollo.LongPoll.Messages", content);
    if (!Topics.APOLLO_RELEASE_TOPIC.equals(channel) || Strings.isNullOrEmpty(content)) {
      return;
    }

    String changedNamespace = retrieveNamespaceFromReleaseMessage.apply(content);

    if (Strings.isNullOrEmpty(changedNamespace)) {
      logger.error("message format invalid - {}", content);
      return;
    }

    if (!deferredResults.containsKey(content)) {
      return;
    }

    //create a new list to avoid ConcurrentModificationException
    // 核心1
    List<DeferredResultWrapper> results = Lists.newArrayList(deferredResults.get(content));

    ApolloConfigNotification configNotification = new ApolloConfigNotification(changedNamespace, message.getId());
    configNotification.addMessage(content, message.getId());

    //do async notification if too many clients
    if (results.size() > bizConfig.releaseMessageNotificationBatch()) {
      largeNotificationBatchExecutorService.submit(() -> {
        logger.debug("Async notify {} clients for key {} with batch {}", results.size(), content,
            bizConfig.releaseMessageNotificationBatch());
        for (int i = 0; i < results.size(); i++) {
          if (i > 0 && i % bizConfig.releaseMessageNotificationBatch() == 0) {
            try {
              TimeUnit.MILLISECONDS.sleep(bizConfig.releaseMessageNotificationBatchIntervalInMilli());
            } catch (InterruptedException e) {
              //ignore
            }
          }
          logger.debug("Async notify {}", results.get(i));
          results.get(i).setResult(configNotification);
        }
      });
      return;
    }

    logger.debug("Notify {} clients for key {}", results.size(), content);

    for (DeferredResultWrapper result : results) {
      // 核心2
      result.setResult(configNotification);
    }
    logger.debug("Notification completed");
  }
核心1根据content,这里的值是:whq1+default+application
然后找到对应的DeferredResultWrapper,在核心2的地址设置值,实现了长轮询的请求连接返回
apollo就是通过这种方式实现长轮询的
总结
整体流程看下来,相对还是比较容易看懂核心逻辑的,可以看到apollo实现了对@Value注解字段的动态更改,相比于Nacos,nacos居然都没实现这么核心的功能
通过比较,如果是需要在公司内部大规模使用动态配置中心的话,个人还是推荐使用apollo,apollo的界面更友好,支持单个key的修改,让人看起来更整洁,并且完美支持@Value值的动态更新,缺点是部署较为困难,需要占用较多的服务器


 3406
3406


 被折叠的 条评论
为什么被折叠?
被折叠的 条评论
为什么被折叠?
 到【灌水乐园】发言


