


本文主要总结一些互联网的安全算法和摘要、签名认证,内容来自《大型分布式网站架构设计与实践》。
一、常用的安全算法
常用的安全算法主要包括摘要算法、对称加密算法、非对称加密算法、信息编码等。
1、数字摘要
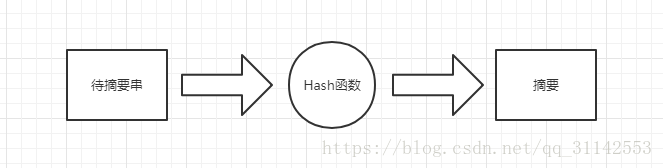
数字摘要也称为消息摘要,它是一个唯一对应一个消息或文本的固定长度的值,它由一个单向Hash函数对消息进行计算而产生。
(1)MD5
即Message Digest Algorithm 5(消息摘要算法5),用于确保信息传输完整性和一致性,摘要长度为128位。
public static byte[] testMD5(String content) throws Exception {
	MessageDigest md = MessageDigest.getInstance("MD5");
	byte[] bytes = md.digest(content.getBytes("utf8"));
	return bytes;
}
(2)SHA
SHA的全称是Secure Hash Algorithm,即安全散列算法。生成的摘要信息的长度为160位,相同的硬件下运行速度比MD5更慢,但也更安全。
public static byte[] testSHA1(String content) throws Exception {
	MessageDigest md = MessageDigest.getInstance("SHA-1");
	byte[] bytes = md.digest(content.getBytes("utf8"));
	return bytes;
}
一般需要对生成的摘要字符串进行编码,常用的编码方式有十六进制编码和Base64编码。
(3)16进制编码
十六进制由0~9和A~F来进行表示,与十进制的对应关系是:0~9对应0~9,A~F对应10~15。
    // 十六进制编码
	public static String bytes2hex(byte[] bytes) {
		StringBuilder hex = new StringBuilder();
		for (int i = 0; i < bytes.length; i++) {
			byte b = bytes[i];
			boolean negative = false;// 是否为负数
			if (b < 0) negative = true;
			int inte = Math.abs(b);
			if (negative) inte = inte | 0x80;// 负数会转成证书(最高位的负号变成数值计算,再转十六进制
			String temp = Integer.toHexString(inte & 0xFF);
			if (temp.length() == 1) {
				hex.append("0");
			}
			hex.append(temp.toLowerCase());
		}
		return hex.toString();
	}

	// 十六进制解码
	public static byte[] hex2bytes(String hex) {
		byte[] bytes = new byte[hex.length()/2];
		for (int i = 0; i < bytes.length; i++) {
			String subStr = hex.substring(i, i + 2);
			boolean negative = false;// 是否为负数
			int inte = Integer.parseInt(subStr, 16);
			if (inte > 127) negative = true;
			if (inte == 128) {
				inte = -128;
			} else if (negative) {
				inte = 0 - (inte & 0x7F);
			}
			byte b = (byte) inte;
			bytes[i/2] = b;
		}
		return bytes;
	}
每一个byte包含8位二进制数据,由于Java中没有无符号整型,因此8位中有一位为符号位,需要将符号位转换为对应的数值,然后再转换为对应的十六进制。8位二进制可以转换为2位十六进制,不足2位的进行补0,而解码时,需要先将符号位进行还原,再对数值进行转换,使用了Integer.parseInt(subStr, 16)这个方法来对十六进制进行解析,将其转换为整型的数值,然后判断正负,计算出符号位,并将剩余的位还原为byte的数值。
(4)Base64编码
只要得到Base64编码的内容,便可通过固定的方法,逆向得出编码之前的信息,Base64算法仅仅只是一种编码算法而已。
// 编码
public static String byte2base64(byte[] bytes) {
return Base64.getEncoder().encodeToString(bytes);
}
// 解码
public static byte[] base642byte (String base64) {
return Base64.getDecoder().decode(base64);
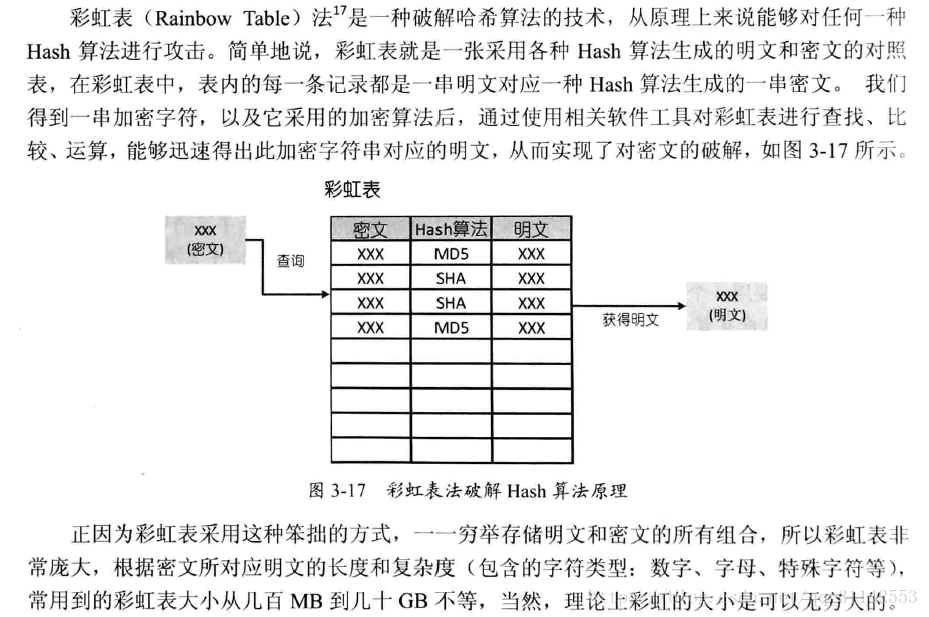
}(5)彩虹表破解Hash算法
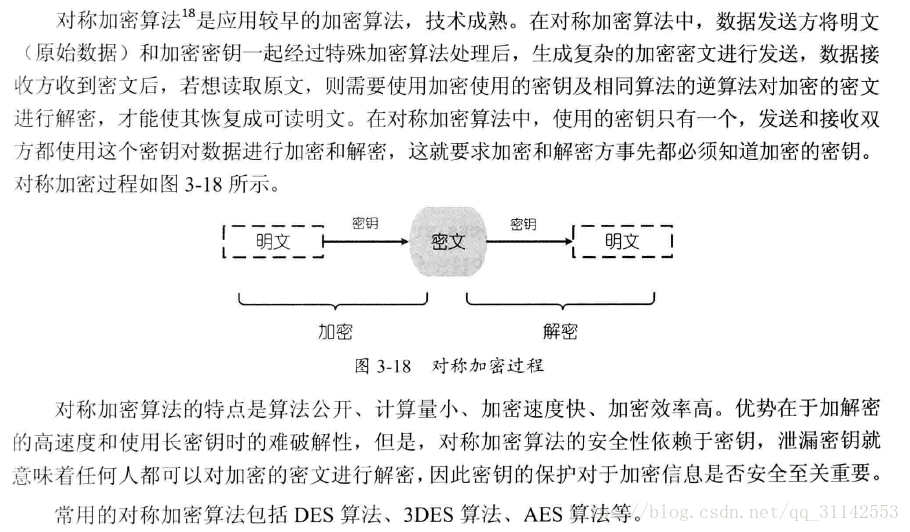
2、对称加密算法
(1)DES算法

    // 生成DES密钥
	public static String getKeyDES() throws Exception {
		KeyGenerator keyGen = KeyGenerator.getInstance("DES");
		keyGen.init(56);
		SecretKey key = keyGen.generateKey();
		String base64 = byte2base64(key.getEncoded());
		return base64;
	}
	public static SecretKey loadKeyDES(String base64Key) {
		byte[] bytes = base642byte(base64Key);
		SecretKey key = new SecretKeySpec(bytes, "DES");
		return key;
	}
    // 加密与解密
	public static byte[] encryptDES(byte[] source, SecretKey key) throws Exception {
		Cipher cipher = Cipher.getInstance("DES");
		cipher.init(Cipher.ENCRYPT_MODE, key);
		byte[] bytes = cipher.doFinal(source);
		return bytes;
	}
	public static byte[] decryptDES(byte[] source, SecretKey key) throws Exception {
		Cipher cipher = Cipher.getInstance("DES");
		cipher.init(Cipher.DECRYPT_MODE, key);
		byte[] bytes = cipher.doFinal(source);
		return bytes;
	}
加密与解密均需要实例化Cipher对象,加密时,Cipher初始化需要传入加密模式Cipher.ENCRYPT_MODE和对应的密钥SecretKey的实例,而解密时,传入的参数为Cipher.DECRYPT_MODE和对应的密钥SecretKey。
(2)AES算法

    // 生成AES密钥
	public static String getKeyAES() throws Exception {
		KeyGenerator keyGen = KeyGenerator.getInstance("AES");
		keyGen.init(56);// 支持128、192、256三种(使用192位和256位的密钥,需要另外下载无政策和司法限制的文件)
		SecretKey key = keyGen.generateKey();
		String base64Str = byte2base64(key.getEncoded());
		return base64Str;
	}
	public static SecretKey loadKeyAES(String base64Key) {
		byte[] bytes = base642byte(base64Key);
		SecretKey key = new SecretKeySpec(bytes, "AES");
		return key;
	}
// 加密与解密
public static byte[] encryptAES(byte[] source, SecretKey key) throws Exception {
Cipher cipher = Cipher.getInstance("AES");
cipher.init(Cipher.ENCRYPT_MODE, key);
byte[] bytes = cipher.doFinal(source);
return bytes;
}
public static byte[] decryptAES(byte[] source, SecretKey key) throws Exception {
Cipher cipher = Cipher.getInstance("AES");
cipher.init(Cipher.DECRYPT_MODE, key);
byte[] bytes = cipher.doFinal(source);
return bytes;
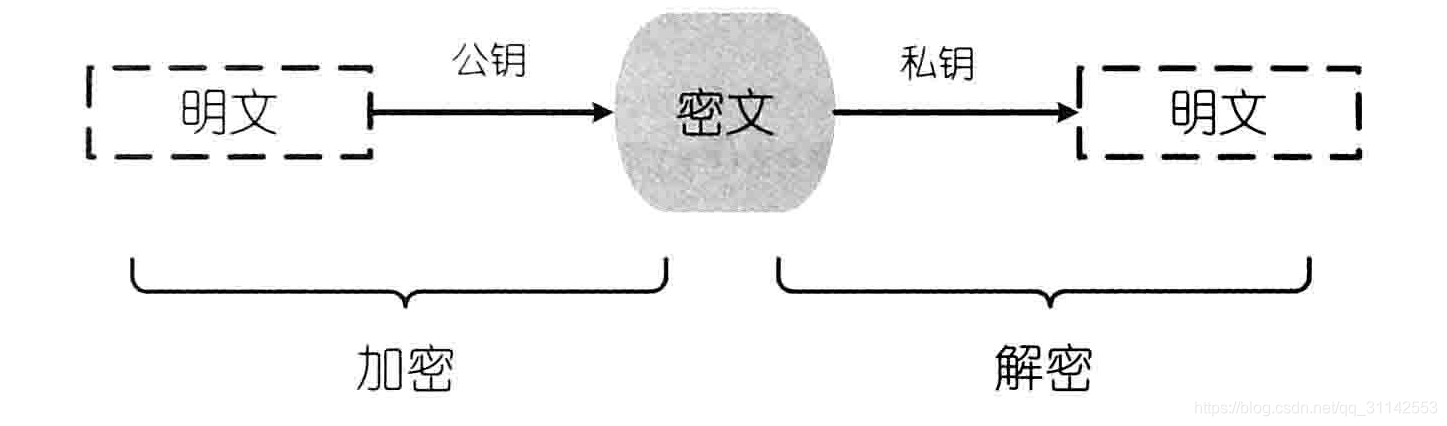
}3、非对称加密算法
基本过程:甲方先生成一对密钥并将其中的一把作为公钥向其他人公开,得到该公钥的乙方使用该密钥对机密信息进行加密后再发送给甲方,甲方再使用自己保存的另一把专用密钥(即私钥)对加密后的信息进行解密,如图
(1)RSA算法
是目前最有影响力的非对称加密算法,已被ISO推荐为公钥数据加密标准。RSA算法基于一个简单的数论事实:将两个大素数相乘十分容易,但反过来想要对其乘积进行因式分解却极其困难,因此可以将乘积公开作为加密密钥。
生成公钥与密钥
    // 生成密钥对
	public static KeyPair getKeyPair() throws Exception {
		KeyPairGenerator keyPairGenerator = KeyPairGenerator.getInstance("RSA");
		keyPairGenerator.initialize(512);
		KeyPair keyPair = keyPairGenerator.generateKeyPair();
		return keyPair;
	}

	// 获取公钥
	public static String getPublicKey(KeyPair keyPair) {
		PublicKey publicKey = keyPair.getPublic();
		byte[] bytes = publicKey.getEncoded();
		return byte2base64(bytes);
	}

	// 获取私钥
	public static String getPrivateKey(KeyPair keyPair) {
		PrivateKey privateKey = keyPair.getPrivate();
		byte[] bytes = privateKey.getEncoded();
		return byte2base64(bytes);
	}
将String类型的密钥转换为PublicKey和PrivateKey对象
    // 将String类型的密钥转换为PublicKey
	public static PublicKey string2PublicKey(String pubStr) throws Exception {
		byte[] keyBytes = base642byte(pubStr);
		X509EncodedKeySpec keySpec = new X509EncodedKeySpec(keyBytes);
		KeyFactory keyFactory = KeyFactory.getInstance("RSA");
		PublicKey publicKey = keyFactory.generatePublic(keySpec);
		return publicKey;
	}

	// 将String类型的密钥转换为PrivateKey
	public static PrivateKey string2PrivateKey(String priStr) throws Exception {
		byte[] keyBytes = base642byte(priStr);
		PKCS8EncodedKeySpec keySpec = new PKCS8EncodedKeySpec(keyBytes);
		KeyFactory keyFactory = KeyFactory.getInstance("RSA");
		PrivateKey privateKey = keyFactory.generatePrivate(keySpec);
		return privateKey;
	}
使用公钥加密,私钥解密
// 使用公钥加密
public static byte[] publicEncrypt(byte[] content, PublicKey publicKey) throws Exception {
Cipher cipher = Cipher.getInstance("RSA");
cipher.init(Cipher.ENCRYPT_MODE, publicKey);
byte[] bytes = cipher.doFinal(content);
return bytes;
}
// 使用私钥解密
public static byte[] privateDecrypt(byte[] content, PrivateKey privateKey) throws Exception {
Cipher cipher = Cipher.getInstance("RSA");
cipher.init(Cipher.DECRYPT_MODE, privateKey);
byte[] bytes = cipher.doFinal(content);
return bytes;
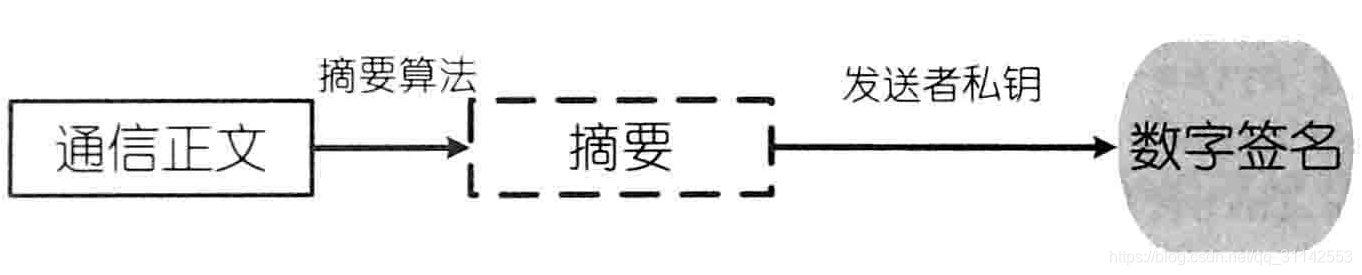
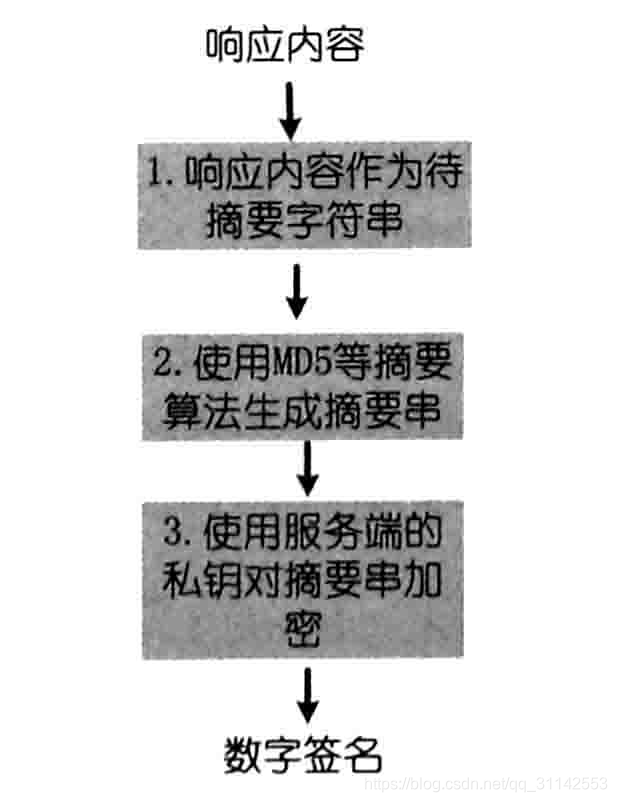
}4、数字签名

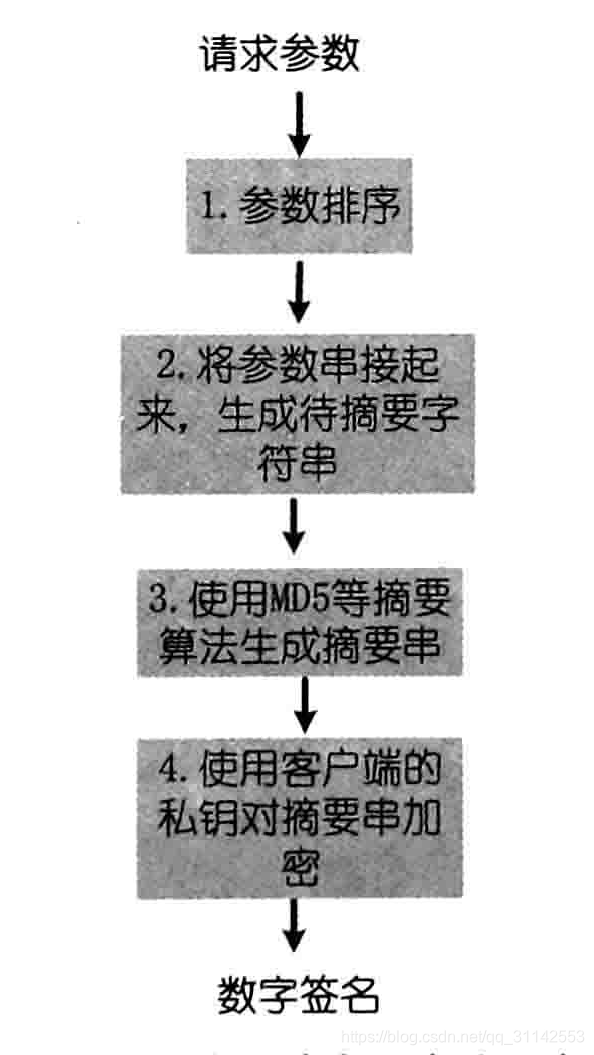
生成数字签名
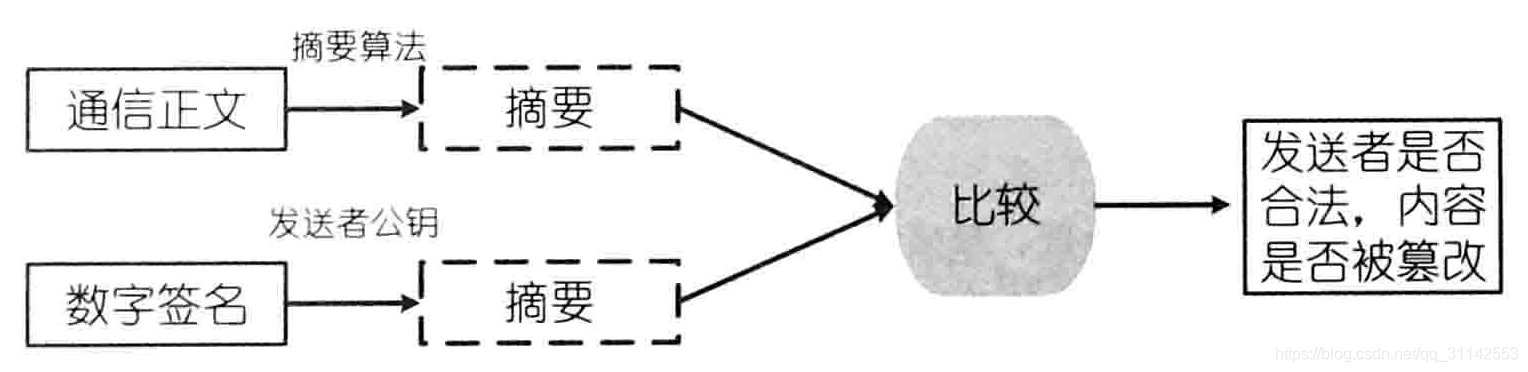
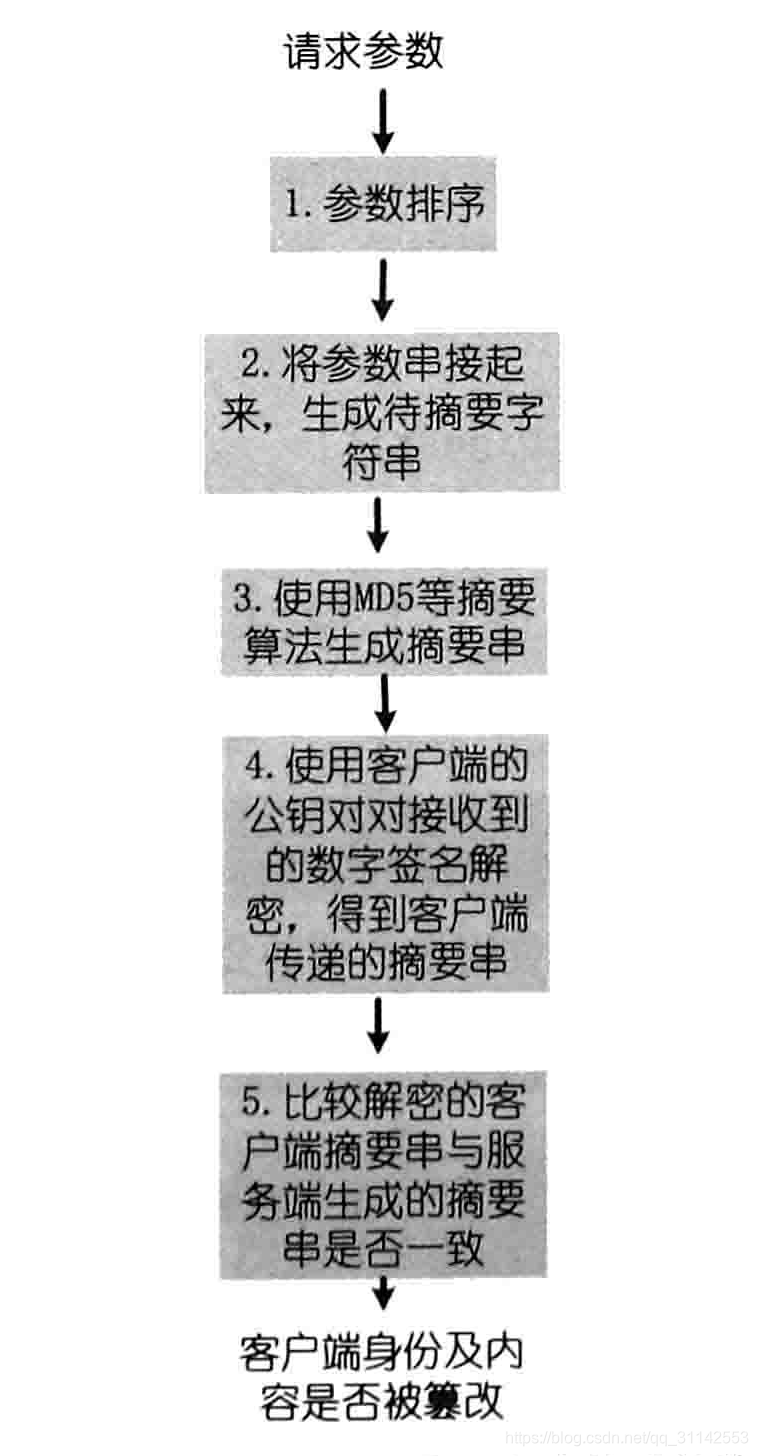
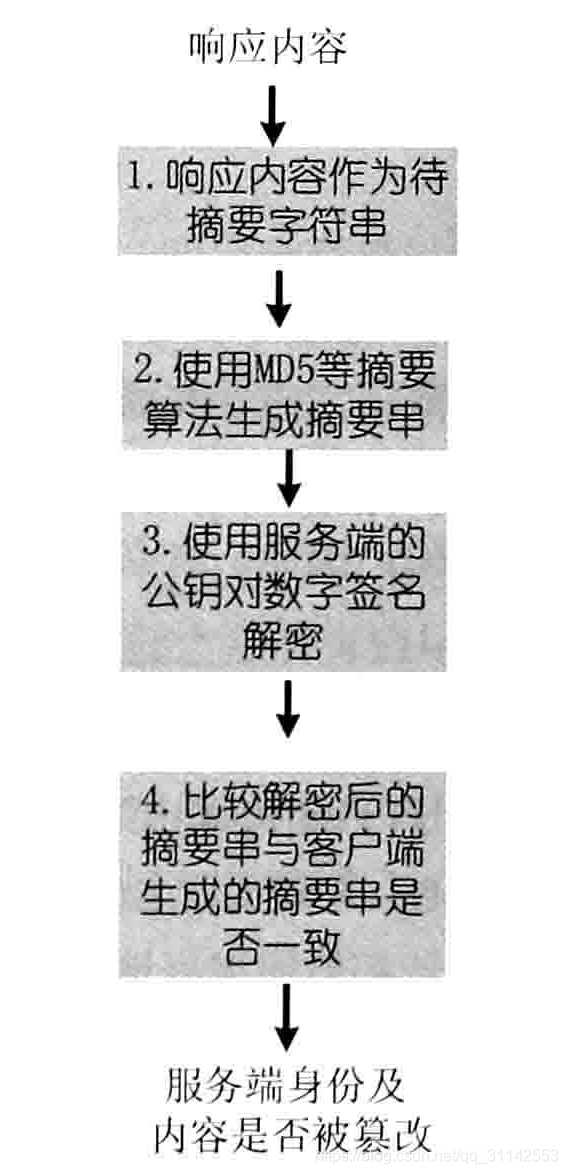
校验数字签名
(1)MD5withRSA
<1>自己实现
生成签名
    private static byte[] sign(byte[] content, PrivateKey privateKey) throws Exception {
		MessageDigest md = MessageDigest.getInstance("MD5");
		byte[] bytes = md.digest(content);
		Cipher cipher = Cipher.getInstance("RSA");
		cipher.init(Cipher.ENCRYPT_MODE, privateKey);
		byte[] encryptBytes = cipher.doFinal(bytes);
		return encryptBytes;
	}
校验签名
    private static boolean verify(byte[] content, byte[] sign, PublicKey publicKey) throws Exception {
		MessageDigest md = MessageDigest.getInstance("MD5");
		byte[] bytes = md.digest(content);
		Cipher cipher = Cipher.getInstance("RSA");
		cipher.init(Cipher.DECRYPT_MODE, publicKey);
		byte[] decryptBytes = cipher.doFinal(sign);
		if (byte2base64(decryptBytes).equals(byte2base64(bytes))) {
			return true;
		}
		return false;
	}
<2>基于Java的Signature API实现
生成签名
    private static byte[] sign(byte[] content, PrivateKey privateKey) throws Exception {
		Signature signature = Signature.getInstance("MD5withRSA");
		signature.initSign(privateKey);
		signature.update(content);
		return signature.sign();
	}
校验签名
    private static boolean verify(byte[] content, byte[] sign, PublicKey publicKey) throws Exception {
		Signature signature = Signature.getInstance(MD5withRSA);
		signature.initVerify(publicKey);
		signature.update(content);
		return signature.verify(sign);
	}
(2)SHA1withRSA
与MD5withRSA类似,只是使用SHA1取代MD5生成正文的数字摘要。Java API的调用也类似,只是签名算法换成了SHA1withRSA。
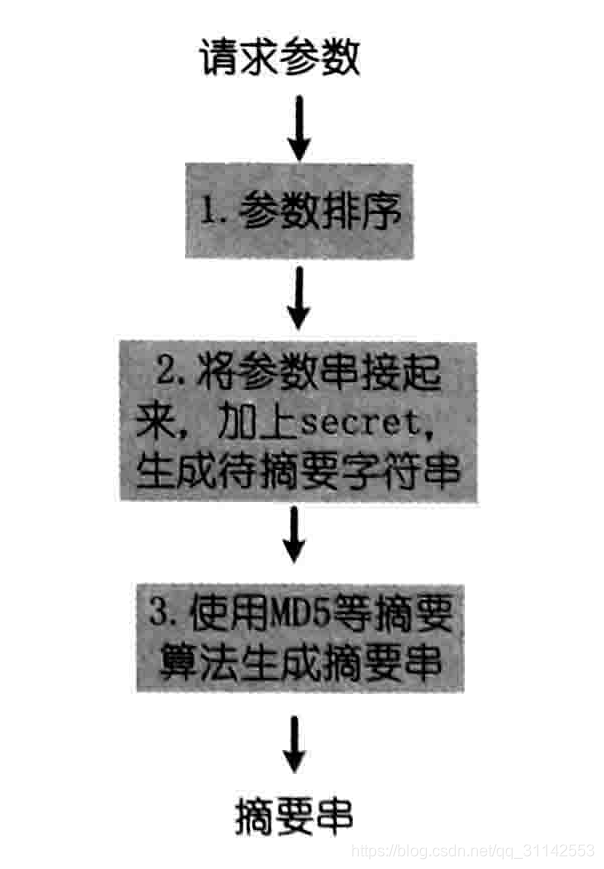
二、摘要认证的实现
1、客户端参数摘要生成
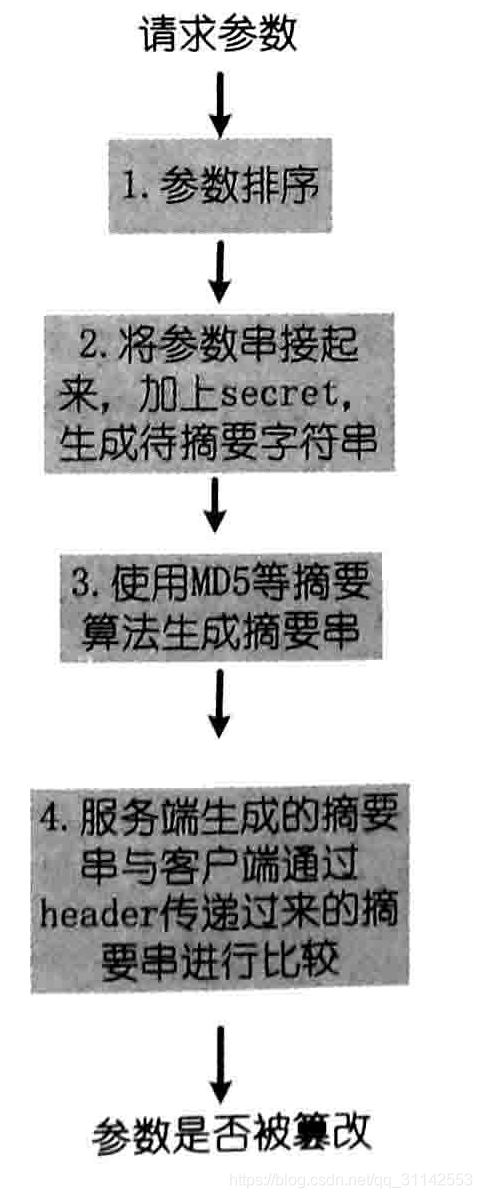
2、服务端参数摘要校验
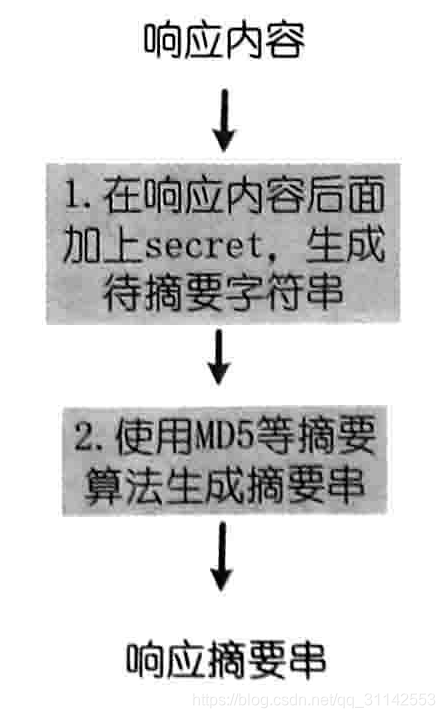
3、服务端响应摘要生成
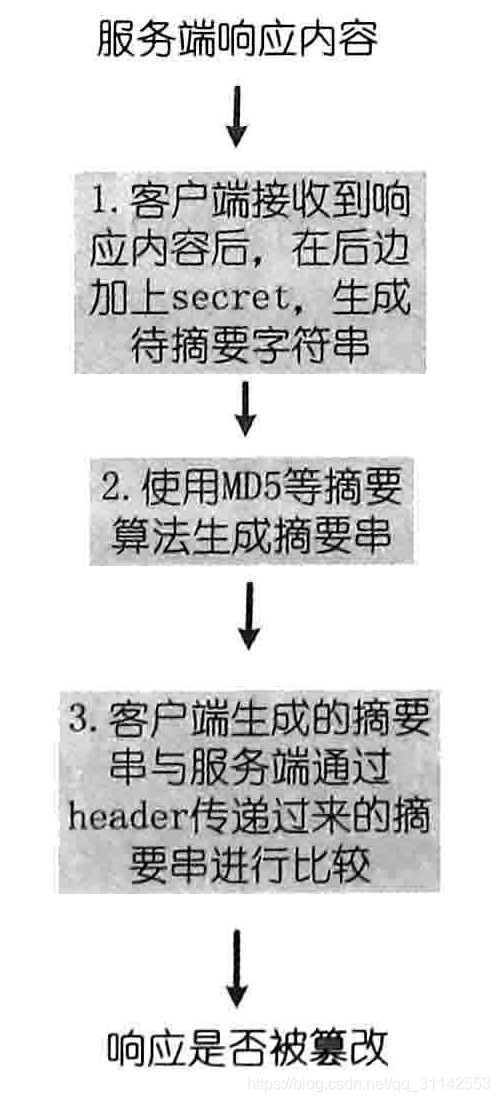
4、 客户端响应摘要校验
三、签名认证的实现
1、客户端参数签名生成
2、服务端参数签名校验
3、 服务端响应签名生成
4、 客户端响应签名校验


 778
778

 被折叠的 条评论
为什么被折叠?
被折叠的 条评论
为什么被折叠?
 到【灌水乐园】发言


