


当今企业级开发中,几乎都会用到orm框架,有全自动的orm框架hibernate,也有半自动的orm框架mybatis,还有springboot推荐使用的jpa,作者本人个偏向于mybatis框架(写原生sql真的很爽啊!!!),但是在高并发的场景下,不推荐在sql语句中使用关联查询,更倾向于单张表表冗余查询,在代码中使用stream操作,当然这是题外话。前几天逛论坛意外发现一篇标题为《抛弃mybatis,拥抱jooq》的文章,jooq是什么?随后撸了一遍官网:jooq官网链接
在learn模块中,我们可以看到介绍,入门学习只需要7步骤:
Getting started with the tutorial
Your simplest entry point is probably to get the tutorial running. It shows how to use jOOQ and its code generator with a simple MySQL database
Preparation: Download jOOQ and your SQL driver
Step 1: Create a SQL database and a table
Step 2: Generate classes
Step 3: Write a main class and establish a MySQL connection
Step 4: Write a query using jOOQ's DSL
Step 5: Iterate over results
Step 6: Explore!
好吧,一步步来实现吧!!!
step1:Download jOOQ and your SQL driver
准备所需要的jar包。这里使用的是免费的版本
<dependency>
  <groupId>org.jooq</groupId>
  <artifactId>jooq</artifactId>
  <version>3.12.3</version>
</dependency>
<dependency>
  <groupId>org.jooq</groupId>
  <artifactId>jooq-meta</artifactId>
  <version>3.12.3</version>
</dependency>
<dependency>
  <groupId>org.jooq</groupId>
  <artifactId>jooq-codegen</artifactId>
  <version>3.12.3</version>
</dependency>
jooq模块是jooq的核心jar包。
jooq-meta模块是jooq的元数据包,里面提供了不同类型数据库的元数据。
jooq-codegen模块是自动生成代码所需要的包,可以指定生成的目标代码的包名以及存放位置等信息。
既然要链接数据库,当然少不了sql的driver包
<dependency>
            <groupId>mysql</groupId>
            <artifactId>mysql-connector-java</artifactId>
            <version>5.1.26</version>
        </dependency>
step2:Create a SQL database and a table
创建数据库,以及新建一张表
CREATE DATABASE `library`;

USE `library`;

CREATE TABLE `author` (
  `id` int NOT NULL,
  `first_name` varchar(255) DEFAULT NULL,
  `last_name` varchar(255) DEFAULT NULL,
  PRIMARY KEY (`id`)
);
step3:Code generation
在resource文件中,我们创建library.xml文件
<?xml version="1.0" encoding="UTF-8" standalone="yes"?>
<configuration xmlns="http://www.jooq.org/xsd/jooq-codegen-3.12.0.xsd">
    <!-- 数据库连接配置 -->
    <jdbc>
        <driver>com.mysql.jdbc.Driver</driver>
        <url>jdbc:mysql://localhost:3306/library</url>
        <user>root</user>
        <password>19950617</password>
    </jdbc>

    <generator>
        <!--jooq是基于java的,这里代表自动生成代码de1ed风格,有
            -org.jooq.codegen.JavaGenerator
            -org.jooq.codegen.ScalaGenerator
            默认是java风格-->
        <name>org.jooq.codegen.JavaGenerator</name>

        <database>
            <!--指定数据库类型,有mysql,h2,postgres,sqlite...但是不支持oracle-->
            <name>org.jooq.meta.mysql.MySQLDatabase</name>

            <!--指定连接的数据库-->
            <inputSchema>library</inputSchema>
            <includes>.*</includes>
            <excludes></excludes>
        </database>

        <target>
            <!--  自动生成代码存放的目标包名-->
            <packageName>test.generated</packageName>

            <!--  自动生成代码存放的路径-->
            <directory>/Users/fengyue/IdeaProjects/jooq/src/main/java</directory>
        </target>
    </generator>
</configuration>
注:
com.mysql.jdbc.Driver 是 mysql-connector-java 5中的,
com.mysql.cj.jdbc.Driver 是 mysql-connector-java 6中的
官网使用的是com.mysql.cj.jdbc.Driver,这个根据driver包的版本确定。
官网说将jooq,jooq-meta,jooq-codegen,mysql-connector-java这4个jar包跟library.xml存放与同一目录下。执行命令:
windows:
java -classpath jooq-3.12.3.jar;^
jooq-meta-3.12.3.jar;^
jooq-codegen-3.12.3.jar;^
mysql-connector-java-5.1.18-bin.jar;. ^
org.jooq.codegen.GenerationTool library.xml
Mac/liunx
java -classpath jooq-3.12.3.jar:\
jooq-meta-3.12.3.jar:\
jooq-codegen-3.12.3.jar:\
mysql-connector-java-5.1.18-bin.jar:. \
org.jooq.codegen.GenerationTool library.xml
运行之后会发现,还缺少一个jar。
Exception in thread "main" java.lang.NoClassDefFoundError: org/reactivestreams/Publisher
        at java.lang.ClassLoader.defineClass1(Native Method)
        at java.lang.ClassLoader.defineClass(ClassLoader.java:763)
        at java.security.SecureClassLoader.defineClass(SecureClassLoader.java:142)
        at java.net.URLClassLoader.defineClass(URLClassLoader.java:467)
        at java.net.URLClassLoader.access$100(URLClassLoader.java:73)
        at java.net.URLClassLoader$1.run(URLClassLoader.java:368)
        at java.net.URLClassLoader$1.run(URLClassLoader.java:362)
        at java.security.AccessController.doPrivileged(Native Method)
        at java.net.URLClassLoader.findClass(URLClassLoader.java:361)
        at java.lang.ClassLoader.loadClass(ClassLoader.java:424)
        at sun.misc.Launcher$AppClassLoader.loadClass(Launcher.java:349)
        at java.lang.ClassLoader.loadClass(ClassLoader.java:357)
        at org.jooq.impl.DSL.using(DSL.java:601)
        at org.jooq.meta.mysql.MySQLDatabase.create0(MySQLDatabase.java:530)
        at org.jooq.meta.AbstractDatabase.create(AbstractDatabase.java:260)
        at org.jooq.meta.AbstractDatabase.create(AbstractDatabase.java:249)
        at org.jooq.meta.AbstractDatabase.setConnection(AbstractDatabase.java:239)
        at org.jooq.codegen.GenerationTool.run0(GenerationTool.java:501)
        at org.jooq.codegen.GenerationTool.run(GenerationTool.java:221)
        at org.jooq.codegen.GenerationTool.generate(GenerationTool.java:216)
        at org.jooq.codegen.GenerationTool.main(GenerationTool.java:188)
Caused by: java.lang.ClassNotFoundException: org.reactivestreams.Publisher
        at java.net.URLClassLoader.findClass(URLClassLoader.java:381)
        at java.lang.ClassLoader.loadClass(ClassLoader.java:424)
        at sun.misc.Launcher$AppClassLoader.loadClass(Launcher.java:349)
        at java.lang.ClassLoader.loadClass(ClassLoader.java:357)
        ... 21 more
好吧,我也不懂为什么,我也不敢问啊,缺什么补什么吧…
<dependency>
    <groupId>org.reactivestreams</groupId>
    <artifactId>reactive-streams</artifactId>
    <version>1.0.2</version>
</dependency>
下载reactive-streams包,放在同级目录中执行命令:
java -classpath reactive-streams-1.0.2.jar:jooq-3.12.3.jar:jooq-meta-3.12.3.jar:jooq-codegen-3.12.3.jar:mysql-connector-java-5.1.26.jar:. org.jooq.codegen.GenerationTool library.xml
会自动生成该目录结构:
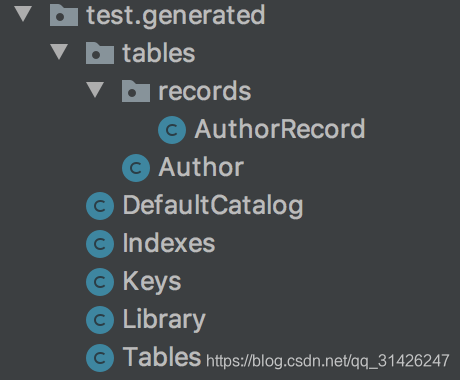
好吧,代码生成好了。进入下一步…
Step 4: Connect to your database
// For convenience, always static import your generated tables and jOOQ functions to decrease verbosity:
import static test.generated.Tables.*;
import static org.jooq.impl.DSL.*;

import java.sql.*;

public class Main {
    public static void main(String[] args) {
        String userName = "root";
        String password = "";
        String url = "jdbc:mysql://localhost:3306/library";

        // Connection is the only JDBC resource that we need
        // PreparedStatement and ResultSet are handled by jOOQ, internally
        try (Connection conn = DriverManager.getConnection(url, userName, password)) {
            // ...
        }

        // For the sake of this tutorial, let's keep exception handling simple
        catch (Exception e) {
            e.printStackTrace();
        }
    }
}
这里主要是获取数据库connection。
Step 5: Querying
简单介绍如何使用jooq查询数据,当然还有更多的api等待解锁:
DSLContext create = DSL.using(conn, SQLDialect.MYSQL);
Result<Record> result = create.select().from(AUTHOR).fetch();
Step 6: Iterating
for (Record r : result) {
    Integer id = r.getValue(AUTHOR.ID);
    String firstName = r.getValue(AUTHOR.FIRST_NAME);
    String lastName = r.getValue(AUTHOR.LAST_NAME);

    System.out.println("ID: " + id + " first name: " + firstName + " last name: " + lastName);
}
完整代码:
package test;

// For convenience, always static import your generated tables and
// jOOQ functions to decrease verbosity:
import static test.generated.Tables.*;
import static org.jooq.impl.DSL.*;

import java.sql.*;

import org.jooq.*;
import org.jooq.impl.*;

public class Main {

    /**
     * @param args
     */
    public static void main(String[] args) {
        String userName = "root";
        String password = "";
        String url = "jdbc:mysql://localhost:3306/library";

        // Connection is the only JDBC resource that we need
        // PreparedStatement and ResultSet are handled by jOOQ, internally
        try (Connection conn = DriverManager.getConnection(url, userName, password)) {
            DSLContext create = DSL.using(conn, SQLDialect.MYSQL);
            Result<Record> result = create.select().from(AUTHOR).fetch();

            for (Record r : result) {
                Integer id = r.getValue(AUTHOR.ID);
                String firstName = r.getValue(AUTHOR.FIRST_NAME);
                String lastName = r.getValue(AUTHOR.LAST_NAME);

                System.out.println("ID: " + id + " first name: " + firstName + " last name: " + lastName);
            }
        }

        // For the sake of this tutorial, let's keep exception handling simple
        catch (Exception e) {
            e.printStackTrace();
        }
    }
}
Step 7: Explore!
最后贴了一些参考文档,使用手册的地址:
http://www.jooq.org/learn
http://www.jooq.org/javadoc/latest/
https://groups.google.com/forum/#!forum/jooq-user
http://ikaisays.com/2011/11/01/getting-started-with-jooq-a-tutorial/
下次介绍springboot整合jooq…结束!


 356
356


 被折叠的 条评论
为什么被折叠?
被折叠的 条评论
为什么被折叠?
 到【灌水乐园】发言


