


上一篇文章我们介绍了Flutter的布局原理的概念知识,主要给大家解释了”向下传递约束,向上传递大小“、“松约束、紧约束”以及Container为什么时而大时而小的问题。还不知道的小伙伴请移步链接: Flutter布局原理 :为什么我的部件不听话
本篇文章我将通过CustomLayout自定义布局,给大家演示布局原理。OK,let`s go.
一、CustomMultiChildLayout基础介绍
CustomMultiChildLayout 允许你自定义多个子部件的布局。可以实现高度定制化的布局,其中每个子部件的位置和大小可以根据自定义算法来确定。
以下是使用 CustomMultiChildLayout 的基础介绍:
-
CustomMultiChildLayout构造函数:
CustomMultiChildLayout的构造函数如下:CustomMultiChildLayout({ Key? key, LayoutDelegate delegate, List<Widget> children = const <Widget>[], })delegate参数是一个必需的参数,它接受一个自定义的布局委托对象,该委托对象负责计算子部件的位置和大小。children参数是一个可选的子部件列表,你可以在其中放置需要进行自定义布局的子部件。
-
创建自定义布局委托:
要使用
CustomMultiChildLayout,你需要创建一个继承自MultiChildLayoutDelegate的自定义布局委托类。这个委托类必须实现以下方法:-
performLayout(BuildContext context, BoxConstraints constraints):在这个方法中,你可以计算和指定每个子部件的位置和大小,并将它们传递给layoutChild方法来进行布局。这个方法会在布局过程中被调用。 -
getSize(BoxConstraints constraints):在这个方法中,你需要指定CustomMultiChildLayout小部件的大小。通常,你可以根据传递给它的约束来确定大小。 -
shouldRelayout:可选的方法,用于确定是否需要重新布局。你可以根据需要实现此方法。
-
-
使用自定义布局委托:
在创建了自定义布局委托类后,将其实例化,并传递给
CustomMultiChildLayout小部件的delegate参数,如下所示:CustomMultiChildLayout( delegate: MyCustomLayoutDelegate(), // 使用自定义委托 children: [ // 放置子部件 // ... ], ) -
子部件的布局:
在自定义布局委托中,你可以使用
layoutChild方法来指定每个子部件的位置和大小,如下所示:layoutChild( 'childId', // 子部件的标识符 BoxConstraints.tight(Size(100.0, 100.0)), // 子部件的约束 ); positionChild( 'childId', // 子部件的标识符 Offset(50.0, 50.0), // 子部件的位置 );上述示例中,
layoutChild用于指定子部件的大小,positionChild用于指定子部件的位置。
使用 CustomMultiChildLayout 时,你有完全的灵活性来计算和布局子部件,这使得你可以创建各种自定义的布局效果。常见的用例包括创建自定义的流式布局、瀑布流布局和棋盘布局等。
请注意,CustomMultiChildLayout 需要一定的布局知识和编程技巧,因为你需要自己处理子部件的位置和大小计算。但它提供了一种非常灵活的方式来实现复杂的自定义布局需求。
二、举例说明
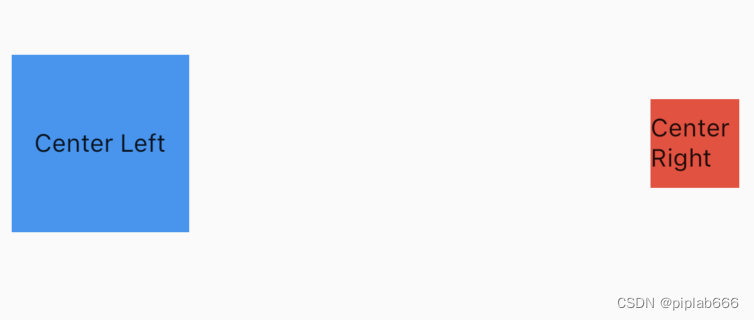
我们有蓝色和红色两个Widget,要将一个放在父容器中间左边距离10px的位置,另一个放在举例右侧10px的位置。两者中线对齐。
第一步:创建自定义部件
我们在定义部件的时候,要用LayoutId包裹一下,用作部件的唯一标识(下面会讲),不然Flutter不知道怎样区分是哪个部件。
class CustomLayoutExample extends StatelessWidget {
Widget build(BuildContext context) {
return CustomMultiChildLayout(
/// 这里创建代理
delegate: CustomLayoutDelegate(),
children: [
/// 部件的标识,用于识别是哪个部件
LayoutId(
id: 'centerLeft',
child: Container(
color: Colors.blue,
width: 100.0,
height: 100.0,
child: Center(child: Text('Center Left')),
),
),
LayoutId(
id: 'centerRight',
child: Container(
color: Colors.red,
width: 50.0,
height: 50.0,
child: Center(child: Text('Center Right')),
),
),
],
);
}
}
第二步:实现代理类
必须实现两个方法:void performLayout(Size size)布局的具体实现写在这个函数里;bool shouldRelayout(MultiChildLayoutDelegateoldDelegate) 用于决策是否要重新布局。代码中直接返回true。请阅读代码中的注释
class CustomLayoutDelegate extends MultiChildLayoutDelegate {
void performLayout(Size size) {
// 计算第一个子部件的位置和大小
///(1)向子部件传递了约束 20 <= width/height <= 100
// (2)子部件返回宽高
// 验证“向下传递约束,向上传递大小”
final leftSize = layoutChild('centerLeft', const BoxConstraints(
maxWidth: 100,
minWidth: 20,
maxHeight: 100,
minHeight: 20
));
var offsetY = size.height / 2.0 - leftSize.height / 2.0;
// (3)父部件摆放子部件的位置。
positionChild('centerLeft', Offset(10.0, offsetY));
// 计算第二个子部件的位置和大小
final rightSize = layoutChild('centerRight', const BoxConstraints(
maxWidth: 100,
minWidth: 20,
maxHeight: 100,
minHeight: 20
));
offsetY = size.height / 2.0 - rightSize.height / 2.0;
final offsetX = size.width - rightSize.width - 10;
positionChild('centerRight', Offset(offsetX, offsetY));
}
bool shouldRelayout(MultiChildLayoutDelegate oldDelegate) {
return true;
}
}
三、LayoutId
LayoutId 继承自 SingleChildRenderObjectWidget,这是因为 LayoutId 的主要作用是为子部件分配一个标识符(ID),以便在自定义布局委托中确定子部件的位置和大小。为了在布局过程中传递标识符,LayoutId 中包含了 parentData 属性,用于传递额外的布局信息。通常用于指定子部件在父部件中的布局约束、位置等信息。
如果你了解Stack & Posioned部件,Postioned部件也包含parentData属性,也是由于这个原因。
父部件的size有了,自己的size也有了,具体布局在哪里通过x,y就能确定了。这样还有什么部件不能通过自定义实现呢?


 2055
2055


 被折叠的 条评论
为什么被折叠?
被折叠的 条评论
为什么被折叠?
 到【灌水乐园】发言


