


 本文详细介绍了如何在SpringBoot应用中使用H2数据库,包括设置Maven依赖、配置数据源、启用H2Web控制台以及实现CRUD操作的示例代码。此外,还提供了连接H2数据库的URL和相关配置属性,以及运行应用程序的方法。
文章目录
在这一页,我们将使用H2数据库创建Spring Boot应用程序,并提供CRUD实例。H2数据库可作为嵌入式(embedded)、服务器(server)或内存(in-memory)数据库使用。Spring Boot可以在开发阶段自动配置H2控制台。H2数据库的驱动类名称是org.h2.Driver。在Spring Boot应用程序中,与数据源、JPA、连接池和H2网络控制台有关的所有配置都可以在application.properties文件中进行。
在这里,我们将创建一个Spring Boot应用程序,它将使用H2数据库执行创建、读取、更新和删除操作。在我们的演示应用程序中,我们使用CrudRepository来执行CRUD操作。
演示工具版本
- Java 11
- Spring 5.1.8.RELEASE
- Spring Boot 2.1.6.RELEASE
- H2 Database 1.4.197
- Maven 3.5.2
- Eclipse 2018-099
H2 Database
H2是开源的Java SQL数据库。它非常快,并使用JDBC API。H2数据库可以作为嵌入式模式、服务器模式和内存数据库使用。控制台可以使用浏览器访问。要安装和使用H2数据库,请查看以下步骤。
1. 进入官方网站链接。下载并安装在你的电脑上。
2. 打开H2 Console (Command Line),在浏览器中访问网址 http://localhost:8082。Spring Boot也可以在开发阶段为开发者自动配置H2控制台。现在选择服务器模式,在JDBC URL中,我们可以按照自己的意愿改变'test'数据库名称。在我们的例子中,我们将改变数据库名称为 'mydb'。如图所示。
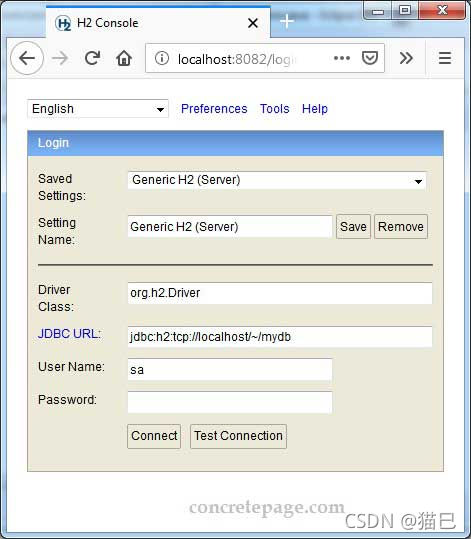
要创建表和检查数据,请点击Connect按钮。
3. 在我们的演示应用程序中,我们将使用H2数据库创建Spring Boot应用程序。找到创建H2表的SQL语句,在我们的演示中使用。
CREATE TABLE IF NOT EXISTS students (
  roll_num bigint(5) NOT NULL AUTO_INCREMENT,
  name varchar(100) NOT NULL,
  age int(3) NOT NULL,
  PRIMARY KEY (roll_num)
);

INSERT INTO students (roll_num, name, age) VALUES
	(1, 'Mahesh', 19),
	(2, 'Krishna', 18);
在H2数据库中创建上述表,以运行我们的演示应用程序。
4. 在服务器模式(server)下,JDBC URL将是jdbc:h2:tcp://localhost/~/mydb。
5. 如果我们选择嵌入式(embedded)模式,JDBC URL将是jdbc:h2:~/mydb
6. 在嵌入式(embedded)模式下,数据库在任何时候都只能在一个虚拟机(和类加载器)中打开,而在服务器(server)模式下,许多应用程序可以通过连接到这个服务器,在同一时间连接到同一个数据库。
7. 为了使用Spring应用程序连接到H2数据库,我们需要使用驱动类名称org.h2.Driver,并使用Maven依赖对其进行解析,如下所示。
<dependency>
  <groupId>com.h2database</groupId>
  <artifactId>h2</artifactId>
</dependency>
Maven 依赖项
找到Maven文件以解决依赖
pom.xml
<?xml version="1.0" encoding="UTF-8"?>
<project xmlns="http://maven.apache.org/POM/4.0.0"
	xmlns:xsi="http://www.w3.org/2001/XMLSchema-instance"
	xsi:schemaLocation="http://maven.apache.org/POM/4.0.0 http://maven.apache.org/xsd/maven-4.0.0.xsd">
	<modelVersion>4.0.0</modelVersion>
	<groupId>com.concretepage</groupId>
	<artifactId>spring-demo</artifactId>
	<version>0.0.1-SNAPSHOT</version>
	<packaging>jar</packaging>
	<name>Spring</name>
	<description>Spring Demo Project</description>
	<parent>
		<groupId>org.springframework.boot</groupId>
		<artifactId>spring-boot-starter-parent</artifactId>
		<version>2.1.6.RELEASE</version>
		<relativePath />
	</parent>
	<properties>
		<context.path>spring-app</context.path>
		<java.version>11</java.version>
	</properties>
	<dependencies>
		<dependency>
			<groupId>org.springframework.boot</groupId>
			<artifactId>spring-boot-starter-web</artifactId>
		</dependency>
		<dependency>
			<groupId>org.springframework.boot</groupId>
			<artifactId>spring-boot-starter-data-jpa</artifactId>
		</dependency>
		<dependency>
			<groupId>com.h2database</groupId>
			<artifactId>h2</artifactId>
		</dependency>
		<dependency>
			<groupId>org.springframework.boot</groupId>
			<artifactId>spring-boot-devtools</artifactId>
			<optional>true</optional>
		</dependency>
	</dependencies>
	<build>
		<plugins>
			<plugin>
				<groupId>org.springframework.boot</groupId>
				<artifactId>spring-boot-maven-plugin</artifactId>
			</plugin>
		</plugins>
	</build>
</project>
与 H2 数据库连接
H2数据库驱动类名称为org.h2.Driver。在application.properties文件中找到Spring数据源配置,以服务器模式连接H2数据库。
spring.datasource.driver-class-name=org.h2.Driver
spring.datasource.url=jdbc:h2:tcp://localhost/~/mydb
spring.datasource.username=sa
spring.datasource.password=cp
用 Spring Boot 配置 H2 Web 控制台
Spring Boot可以在以下情况下自动配置H2 Web控制台。
1. 我们正在开发基于Servlet的Web应用程序。
2. com.h2database:h2在类路径上。我们需要以下Maven依赖。
<dependency>
	<groupId>com.h2database</groupId>
	<artifactId>h2</artifactId>
</dependency>
3. 我们使用的是Spring Boot开发工具或spring.h2.console.enabled已在application.properties文件中被设置为true。
自动配置H2网络控制台的目的只是在开发阶段,而不是在生产阶段。如果我们的应用程序使用的是热部署,当我们为生产创建归档文件时,H2网络控制台将不会自动可用。
如果我们将spring.h2.console.enabled设为true,那么在为生产创建JAR/WAR之前,我们必须将其设为false。
为了在我们的应用程序中使用热部署,我们需要以下Maven依赖。
<dependency>
	<groupId>org.springframework.boot</groupId>
	<artifactId>spring-boot-devtools</artifactId>
        <optional>true</optional>
</dependency>
在application.properties文件中找到要配置的与H2网络控制台有关的属性。
spring.h2.console.path: 由Spring Boot自动配置的默认H2网络控制台路径是/h2-console,可以通过使用该属性来改变它。在我们的例子中,我们设置了spring.h2.console.path=/h2,可以使用网址http://localhost:8080/h2访问。
spring.h2.console.enabled: 是否启用控制台。默认为false。
spring.h2.console.settings.trace: 是否启用跟踪输出。默认为false。
spring.h2.console.settings.web-allow-others: 是否启用远程访问。默认为false。
Spring Boot + H2 CRUD 完整示例
项目结构
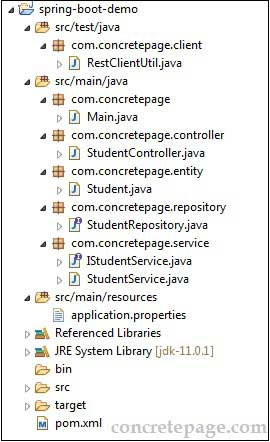
现在找到完整的代码。
application.properties
#Datasource Configuration
spring.datasource.driver-class-name=org.h2.Driver
spring.datasource.url=jdbc:h2:tcp://localhost/~/mydb
spring.datasource.username=sa
spring.datasource.password=

#JPA Configuration
spring.jpa.hibernate.ddl-auto=none
spring.jpa.show-sql=true

#Connection Pool Configuration
spring.datasource.hikari.connection-timeout=20000
spring.datasource.hikari.minimum-idle=5
spring.datasource.hikari.maximum-pool-size=12
spring.datasource.hikari.idle-timeout=300000
spring.datasource.hikari.max-lifetime=1200000

#H2 Web Console
#spring.h2.console.enabled=true
spring.h2.console.path=/h2
spring.h2.console.settings.trace=false
spring.h2.console.settings.web-allow-others=true
StudentRepository.java
package com.concretepage.repository;
import org.springframework.data.repository.CrudRepository;
import com.concretepage.entity.Student;
public interface StudentRepository extends CrudRepository<Student, Long>  {
}
IStudentService.java
package com.concretepage.service;
import java.util.List;
import com.concretepage.entity.Student;
public interface IStudentService {
     List<Student> getAllStudents();
     Student getStudentByRollNum(long rollNum);
     boolean addStudent(Student student);
     void updateStudent(Student student);
     void deleteStudent(long rollNum);
}
StudentService.java
package com.concretepage.service;
import java.util.ArrayList;
import java.util.List;
import org.springframework.beans.factory.annotation.Autowired;
import org.springframework.stereotype.Service;
import com.concretepage.entity.Student;
import com.concretepage.repository.StudentRepository;

@Service
public class StudentService implements IStudentService {
	@Autowired
	private StudentRepository studentRepository;

	@Override
	public Student getStudentByRollNum(long rollNum) {
		Student obj = studentRepository.findById(rollNum).get();
		return obj;
	}

	@Override
	public List<Student> getAllStudents() {
		List<Student> list = new ArrayList<>();
		studentRepository.findAll().forEach(e -> list.add(e));
		return list;
	}

	@Override
	public boolean addStudent(Student student) {
		studentRepository.save(student);
		return true;

	}

	@Override
	public void updateStudent(Student student) {
		studentRepository.save(student);
	}

	@Override
	public void deleteStudent(long rollNum) {
		studentRepository.delete(getStudentByRollNum(rollNum));
	}
}
Student.java
package com.concretepage.entity;
import java.io.Serializable;
import javax.persistence.Column;
import javax.persistence.Entity;
import javax.persistence.GeneratedValue;
import javax.persistence.GenerationType;
import javax.persistence.Id;
import javax.persistence.Table;
@Entity
@Table(name="students")
public class Student implements Serializable {
	private static final long serialVersionUID = 1L;
	@Id
	@GeneratedValue(strategy=GenerationType.AUTO)
	@Column(name="roll_num")
        private long rollNum;
	@Column(name="name")
        private String name;
	@Column(name="age")
	private int age;

       //setters and getters
}
StudentController.java
package com.concretepage.controller;
import java.util.List;
import org.springframework.beans.factory.annotation.Autowired;
import org.springframework.http.HttpHeaders;
import org.springframework.http.HttpStatus;
import org.springframework.http.ResponseEntity;
import org.springframework.stereotype.Controller;
import org.springframework.web.bind.annotation.DeleteMapping;
import org.springframework.web.bind.annotation.GetMapping;
import org.springframework.web.bind.annotation.PathVariable;
import org.springframework.web.bind.annotation.PostMapping;
import org.springframework.web.bind.annotation.PutMapping;
import org.springframework.web.bind.annotation.RequestBody;
import org.springframework.web.util.UriComponentsBuilder;
import com.concretepage.entity.Student;
import com.concretepage.service.IStudentService;
@Controller
public class StudentController {
	@Autowired
	private IStudentService studentService;

	@GetMapping("student/{rollNum}")
	public ResponseEntity<Student> getStudentByRollNum(@PathVariable("rollNum") long rollNum) {
		Student student = studentService.getStudentByRollNum(rollNum);
		return new ResponseEntity<Student>(student, HttpStatus.OK);
	}

	@GetMapping("students")
	public ResponseEntity<List<Student>> getAllStudents() {
		List<Student> list = studentService.getAllStudents();
		return new ResponseEntity<List<Student>>(list, HttpStatus.OK);
	}

	@PostMapping("student")
	public ResponseEntity<Void> addStudent(@RequestBody Student student, UriComponentsBuilder builder) {
		studentService.addStudent(student);
		HttpHeaders headers = new HttpHeaders();
		headers.setLocation(builder.path("/student/{rollNum}").buildAndExpand(student.getRollNum()).toUri());
		return new ResponseEntity<Void>(headers, HttpStatus.CREATED);
	}

	@PutMapping("student")
	public ResponseEntity<Student> updateStudent(@RequestBody Student student) {
		studentService.updateStudent(student);
		return new ResponseEntity<Student>(student, HttpStatus.OK);
	}

	@DeleteMapping("student/{rollNum}")
	public ResponseEntity<Void> deleteStudent(@PathVariable("rollNum") long rollNum) {
		studentService.deleteStudent(rollNum);
		return new ResponseEntity<Void>(HttpStatus.NO_CONTENT);
	}
}
Main.java
package com.concretepage;
import org.springframework.boot.SpringApplication;
import org.springframework.boot.autoconfigure.SpringBootApplication;
@SpringBootApplication
public class Main {
	public static void main(String[] args) {
		SpringApplication.run(Main.class, args);
        }
}
运行应用程序
我们可以直接以Java应用程序的形式运行主类,或者通过命令提示符的mvn spring-boot:run命令来运行。
1. 使用命令提示符进入项目的根目录,运行mvn clean package命令。
2. 在target目录下将创建一个JAR。
3. 要使用JAR运行应用程序,请运行以下命令。
java -jar target/spring-demo-0.0.1-SNAPSHOT.jar
确保H2 Console (Command Line)已在运行。
为了打开Spring Boot启用的H2网络控制台,我们需要在开发模式下启动我们的应用程序,将Main类作为Java应用程序运行,或者使用命令提示符的mvn spring-boot:run命令。
查找用于测试应用程序的客户端代码。
RestClientUtil.java
package com.concretepage.client;
import java.net.URI;
import org.springframework.http.HttpEntity;
import org.springframework.http.HttpHeaders;
import org.springframework.http.HttpMethod;
import org.springframework.http.MediaType;
import org.springframework.http.ResponseEntity;
import org.springframework.web.client.RestTemplate;
import com.concretepage.entity.Student;
public class RestClientUtil {
	HttpHeaders headers = new HttpHeaders();
	RestTemplate restTemplate = new RestTemplate();

	public void getStudentByRollNumDemo(long rollNum) {
		headers.setContentType(MediaType.APPLICATION_JSON);
		String url = "http://localhost:8080/student/{rollNum}";
		HttpEntity<String> requestEntity = new HttpEntity<String>(headers);
		ResponseEntity<Student> responseEntity = restTemplate.exchange(url, HttpMethod.GET, requestEntity,
				Student.class, rollNum);
		Student student = responseEntity.getBody();

		System.out.println("Roll Num:" + student.getRollNum() + ", Name:" + student.getName() + ", Age:" + student.getAge());
	}

	public void getAllStudentsDemo() {
		headers.setContentType(MediaType.APPLICATION_JSON);
		String url = "http://localhost:8080/students";
		HttpEntity<String> requestEntity = new HttpEntity<String>(headers);
		ResponseEntity<Student[]> responseEntity = restTemplate.exchange(url, HttpMethod.GET, requestEntity,
				Student[].class);
		Student[] students = responseEntity.getBody();
		for (Student student : students) {
			System.out.println("Roll Num:" + student.getRollNum() + ", Name:" + student.getName() + ", Age:" + student.getAge());
		}
	}

	public void addStudentDemo(Student student) {
		headers.setContentType(MediaType.APPLICATION_JSON);
		String url = "http://localhost:8080/student";
		HttpEntity<Student> requestEntity = new HttpEntity<Student>(student, headers);
		URI uri = restTemplate.postForLocation(url, requestEntity);
		System.out.println(uri.getPath());
	}

	public void updateStudentDemo(Student student) {
		HttpHeaders headers = new HttpHeaders();
		headers.setContentType(MediaType.APPLICATION_JSON);
		RestTemplate restTemplate = new RestTemplate();
		String url = "http://localhost:8080/student";
		HttpEntity<Student> requestEntity = new HttpEntity<Student>(student, headers);
		restTemplate.put(url, requestEntity);
	}

	public void deleteStudentDemo(long rollNum) {
		HttpHeaders headers = new HttpHeaders();
		headers.setContentType(MediaType.APPLICATION_JSON);
		RestTemplate restTemplate = new RestTemplate();
		String url = "http://localhost:8080/student/{rollNum}";
		HttpEntity<Student> requestEntity = new HttpEntity<Student>(headers);
		restTemplate.exchange(url, HttpMethod.DELETE, requestEntity, Void.class, rollNum);
	}

	public static void main(String args[]) {
		RestClientUtil util = new RestClientUtil();
		Student student = new Student();

		student.setName("Shiva");
		student.setAge(19);
		//util.addStudentDemo(student); //add

		student.setRollNum(2);
		student.setName("Gopal");
		student.setAge(22);
		//util.updateStudentDemo(student); //update

		//util.deleteStudentDemo(2); //delete

		//util.getStudentByRollNumDemo(1); //get by roll number

		System.out.println("---- All students ----");
		util.getAllStudentsDemo(); // get all students
	}
}
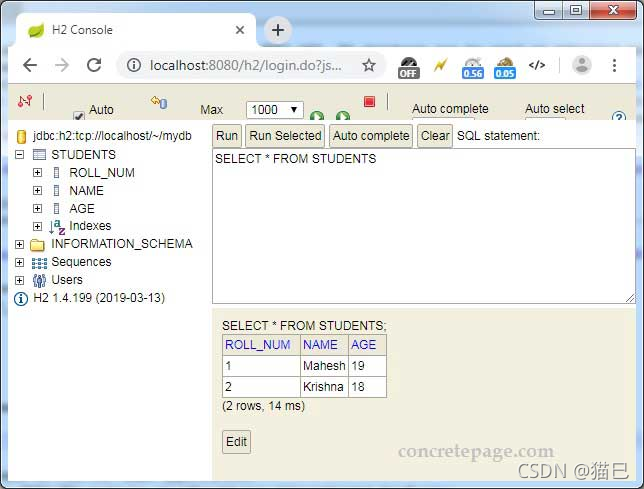
找到H2数据库中的数据。
参考文献
【1】Spring Boot Reference Guide
【2】H2 Database Engine
【3】Spring Boot + H2 Database
源码下载
提取码:mao4


 1万+
1万+

 被折叠的 条评论
为什么被折叠?
被折叠的 条评论
为什么被折叠?
 到【灌水乐园】发言


